Administrators Guide
Copyright © 2024 United Security Providers AG
This document is protected by copyright under the applicable laws and international treaties. No part of this document may be reproduced in any form and distributed to third parties by any means without prior written authorization of United Security Providers AG.
DOCUMENTATION IS PROVIDED "AS IS" AND ALL EXPRESSED OR IMPLIED REPRESENTATIONS AND WARRANTIES, INCLUDING BUT NOT LIMITED TO ANY IMPLIED WARRANTY OF MERCHANTABILITY, FITNESS FOR A PARTICULAR PURPOSE OR NON-INFRINGEMENT, ARE DISCLAIMED TO THE EXTENT PERMISSIBLE UNDER THE APPLICABLE LAWS.
Table of Contents
- I. SLS Core
- 1. Overview
- 2. Installation
- 3. Configuration
- 4. Recommended Settings
- 5. Deprecated And Removed Features
- 6. Commands ("cmd" parameter)
- 7. Model
- 8. Credential Providers
- 9. Challenge / Response
- 10. Session Handling
- 11. Redirecting
- 12. Parameter Checker / Aliases
- 13. Concurrency Issues with Browser Tabs
- 14. Localization
- 15. JSPs
- 16. User Filtering
- 17. Sending E-Mail
- 18. Multitenancy Support
- 19. Browser Blacklist
- 20. Login Slowdown
- 21. HTTP Basic Authentication
- 22. Browser ID Check ("BID")
- 23. SSO Integration
- 24. Cookies
- 25. Logging
- 25.1. Overview
- 25.2. Log4j 1 vs Log4j 2
- 25.3. Fixed Known Log4j 1.2 Vulnerabilities
- 25.4. Functionality
- 25.5. Log4J Configuration
- 25.6. Enabling / Disabling logging
- 25.7. Tenant-specific logging
- 25.8. Syslog support
- 25.9. Logstash and Elasticsearch support
- 25.10. Filtering Passwords
- 25.11. Disabling Multiline Stacktraces
- 25.12. SLS Logging Variables
- 25.13. Custom Log Messages
- 25.14. Performance Log
- 26. HSP Load Balancing
- 27. Load-Balancing / Failover
- 28. Backend Monitoring
- 29. HSP Parameter Passing / Gateway
- 30. SES Login Ticket
- 31. JSON Web Tokens
- 32. JEXL Expressions
- 33. Groovy Scripting
- 34. SES Session Attributes
- 35. Error Handling
- 36. Apache Geode Support
- 37. Storing / Reading Data
- 38. Headers
- 39. Support Tools
- 40. SLS Modules
- 41. TLS/SSL (JSSE)
- 42. HTTP Methods
- II. SOAP
- III. SAML
- IV. Adapters / Authentication Systems
- 46. File Adapter
- 47. Google Authenticator Adapter
- 48. HTTP Adapter
- 49. Web Service Adapter
- 50. LDAP Adapter
- 51. NTLM Adapter
- 52. RADIUS Adapter
- 53. PKI Adapter
- 54. RSA Adapter
- 55. SPNEGO Adapter
- 56. SAML IdP Adapter
- 57. SAML SP Adapter
- 58. OIDC OP Adapter
- 59. OIDC RP Adapter
- 60. WebAuthn Adapter
- 61. IDM (SES Identity) Adapter
- 62. Mobile ID Login
- V. Frontend
- VI. Usage Scenarios
- VII. Appendix
List of Tables
- 1.1. Delivery CD
- 5.1. Deprecated Settings
- 5.2. Deprecated Functions
- 7.1. State Attributes And Values
- 7.2. Alphabetical list of JSP states
- 7.3. Alphabetical list of action states
- 8.1. Sample credential provider configuration
- 14.1. Resource Properties Groups
- 19.1. Blacklist actions
- 23.1. Filter Mode Support
- 32.1. List of all variable types and their possible values.
- 32.2. Available semantic credential types
- 33.1. JEXL to Groovy migration table
- 55.1. Possible properties in spnegoLogin.conf
- 71.1. Additions
- 71.2. Glossary
This document describes how to set up, configure and deploy the SLS (Secure Login Service) web application.
The target audience for this document are systems administrators who install and maintain the SLS.
The Secure Login Service (called hereafter) is a sub-component of the Secure Entry Server (SES). In order to de-couple the session authorization from the authentication process, the SES delegates the authentication step to the SLS.
The SLS provides a centralized and customizable application-independent login mechanism. The following core functions are provided by the SLS:
- authentication (login)
- mapping of login ID to actual user ID
- gathering authorization information
- logout (invalidating the SES session)
- propagating authentication information to the back-end application
Technically, the SLS is a Java web application running in a standard servlet container such as Apache Tomcat. It handles login requests forwarded from the SES and signals back the result of an authentication process to the SES through custom HTTP response headers. Those headers never reach the browser client, they're processed only by the SES revers proxy.
Flexible and extensible
The SLS uses a custom dispatching framework which allows to add new actions or pages based on custom requirements, if new functionality must be added to the login service. The SLS can also be customized in many other ways (JSPs, text message resources, actions, extending the provided default implementations with custom Java code etc.).
Framework
All generic (aka not customer-specific), re-usable functionality of the SLS is part of the "SLS Framework". This framework represents, together all its 3rd party libraries, the base upon which the actual SLS implementation is built. The main functionality of the toolkit is:
- communication with HSP (SES) through custom HTTP request and response headers.
- custom, lean session handling coupled with HSP sessions
- generic parameter checking
- flexible error mapping
- login slowdown
- browser blacklist
- authentication back-end adapter interfaces
- challenge-response functionality
- configuration handling
- logging (performance, audit)
- multi-language-support
etc.
Dynamic Process Model
The SLS implements a small, efficient state machine which supports dynamically configurable models for performing different operations such as authentication, authorization etc. New, customer-specific processes or steps can easily be implemented and integrated.
No Container Sessions
The SLS does not use servlet container sessions for several reasons. The most important one is preventing Denial-of-Service attacks based on exceeding the container's session limit. Instead, the SLS uses a custom session implementation which is coupled to the SSL-sessions controlled by the HSP.
Authentication Types
The SLS implements an interface for any kind of adapters to back-end systems for the following actions:
- authentication
- mapping
- authorization
- re-authentication
- challenge-/response
- handling user attributes
- fail-over
- monitoring connectivity
It depends on the type of back-end system which of these actions are actually supported. Currently, adapter implementations exist for the following back-end system types:
- LDAP
- RADIUS
- RSA SecurID
- PKI (Certificates)
- NTLM (Windows Domain authentication)
- SPNEGO (Kerberos-based authentication)
- File (based on local XML file)
Different adapters may be used in combination. Furthermore, the SLS also supports
- SAML 1.1 Identity Provider for SSO (SAP certified)
- SAML 2 Service Provider
In order to increase the security level for the authentication process, the following features have been implemented in the :
SLS Seal (DataProtector replacement) support
SLS Seal is a utility from United Security Providers, which allows to encrypt passwords or other sensitive values stored in configuration files. Although it does not and cannot provide 100% security, it still raises the bar for someone who accidentally gets access to a configuration file with sensitive data.
X-Site-Scripting Prevention
The prevents potential attackers from having a user unknowingly executing malicious script code on his client system (known as "cross-site scripting attacks"). This is done by ensuring that all parameters sent from the client and included in a response HTML page are HTML-encoded, so that no executable JavaScript code can be secretly included in the response page.
Secure User Credentials
User credentials available to the application are provided by the secure identity header, which can contain just simple credentials or a Kerberos-like ticket with lists of attributes etc.
Input Parameter Checker
While the various back-end adapters, actions and JSPs may validate any given request parameter on their own, the SLS also includes a global request parameter check functionality, which serves as an additional layer of security. It performs checks similar to those performed by the HSP, so it is especially important in environments where the SLS is used without the HSP reverse proxy.
Re-Authentication
The application can enforce a re-authentication of an already authenticated user (for example when a user performs a critical transaction) to minimize the risks of session-stealing attacks.
Challenge-Response
The SLS provides an extensible challenge-response functionality which can also be combined with existing authentication schemes.
Login Slowdown
If several login attempts are performed with the same user ID but an invalid password within a short time, the SLS may optionally slow down further login attempts in various, configurable ways. This can help to make password guessing or denial-of-service-attacks harder.
User Whitelist
Through a username whitelist functionality, it is possible to restrict access to a running SLS instance immediately to a limited group of people without stopping and restarting the service.
This chapter contains instructions for getting an SLS instance up and running. All configuration files that are subject to manual change are described here. Files that have been left out by the descriptions do not need to be changed, at least not in relation to the .
The is a J2EE-compliant web application. It can be deployed into any J2EE container that supports the following API versions.
- Servlet API: 3.0
- JSP API: 1.2
Furthermore, the SLS has been tested and used with the following environment and component versions:
- Linux >= 2.4
- Sun Solaris version >= 7
- Sun Java 2 Platform, Standard Edition (J2SE) version 8 (JDK 1.8.x) and 11. The SLS has been tested and used in production environments with Java 8 and 11; see below for more information about Java version support.
- The "Unlimited Strength Jurisdiction Policy Files" for the "Java Cryptography Extension" (JCE) must be installed in the JVM as well.
- Apache Tomcat 8, 8.5 and 9. (TLSv1.3 for SLS front as server requires Tomcat 8.5 (and Java 8u261) or later, see "TLS/SSL (JSSE)" for more details.)
- App Server components require JDK 6 or later, with exception of the Tomcat 8 Authenticator which requires JDK 7 or later (because Tomcat 8 does).
Tomcat 8 will automatically insert a "JSessionID" value into every redirect URL created by the web application,
which can cause a number of issues in the SLS / HSP setup. This can be globally disabled in Tomcat in the file
"$CATALINA_BASE/conf/web.xml", with this tag:
<session-config>
    <tracking-mode>COOKIE</tracking-mode>
</session-config>All SLS components (except App Server components) have been built with Java 8 and with Java 8 set as the target (bytecode format). Special notes:
The SLS has been tested to run with Java 8 and Java 11. Any other runtime Java versions have not been tested and are not officially supported!
The following changes and additional entries have to be added to the SRManager configuration file (usually named "conf/httpd.conf").
Generally, cookies exchanged between the browser client and the login service are blocked by the SES for security reasons. However, this happens completely transparent to the protected application server. The HSP stores cookies created by a protected application server (and also the SLS) in its cookie-store instead of sending them through to the client, and inserts them in any subsequent request coming from the client. So, to an application server which sets a cookie, this process is transparent, and it cannot determine if the cookie comes from the actual client or the HSP cookie store.
Cookies in the HSP's cookie store are not stored persistently. They exist only as long as the SSL session between the HSP and the client browser.
If a cookie needs to be sent to the client in order to be stored there persistently (a typical example for this are GUI preferences), it must be enabled in the SRManager configuration. This process is called setting the cookie 'transparent\'. For more detailled information about the functionality of the HSP Cookie Store, please refer to [HTTPADMIN].
The SLS uses a such a 'transparent\' cookie to persistently store the language preference setting of the end-user on the client system. Therefore, that cookie must be defined as transparent in the SRManager configuration.
The following example shows how to do this for a cookie named "LSLanguage" globally:
###
# Definitions for cookie filter
###
<IfModule mod_l1_cd_store.c>
<IfModule mod_session_int_handler_cookie.c>
SE_IntCookie_PersistentCookies SLSLanguage
</IfModule>
</IfModule>
After the instruction SL_IntCookie_PersistentCookies there can be any number from 1 - n cookies that will then be made transparent. In the example above, SLSLanguage is the actual language cookie of the SLS.
In the configuration of the SRManager, appropriate locations must be specified for the protected application as well as for the SLS instance used to authenticate the users of that application.
A location similar to the one shown below must be configured in the SRManager. The URI may differ but should follow the same pattern:
<Location /sls/auth>
AC_StartPage                /sls/auth
AC_LoginPage                /sls/auth
AC_StartQueryString         ^.\*$
</Location>
(Optional) The second location is used for the static content used within the SLS (custom pictures, scripts, etc…).
<Location /staticfiles>
AC_AccessArea                                                           Public
</Location>
The location for an application secured by the could then look like this example:
<Location /demo/app>
SetHandler                  http_1_1_gw_handler
# The following setting points to the SLS Tomcat
HGW_Host                    slshost.acme.com:8080
HGW_RequestHeaders          %HTTP11_std %HSP_std %HSP_ssl %HLS_std
AC_AccessArea               Customer
AC_AuthorizedPath           /demo
AC_LoginPage                /demo/sls/auth
</Location>
The SLS is a standard J2EE Servlet / JSP web application (however, it is not an EJB application). Therefore, it can be deployed in a Tomcat instance just as any other web application.
See the Tomcat documentation for more detailed information about the installation and configuration at http://tomcat.apache.org. A sample server.xml is included on the SLS CD.
USP supplies a pre-configured Apache Tomcat installation with the according JDK to simplify your installation process. Currently there is a Solaris package available.
- First you have to manually create the required user and group. The username is sls and the group that should contain the user is webadm.
To create the required accounts log in as root on your desired system and execute the following commands:
# groupdadd webadm
# useradd -G webadm sls
- Change to the directory where the Solaris package usp-sls-base-solaris-x-x-x.pkg is located and execute the following command:
# pkgadd -d usp-sls-base-solaris-x-x-x.pkg
-
Thereafter, the actual package should be listed on the command prompt. Type
allto continue. -
Afterwards you might be asked to create a directory where the SLS will be
installed to. Confirm it with typing
y. - Finally, the SLS base is installed to the directory /opt/usp/sls. Make sure that the following message appears:
Installation of <usp-sls-base-solaris> was successful.
On the SLS CD in the /sls/ directory you're able to find the exploded web application. Just copy this directory into the
<tomcat_base>/webapps directory. See the configuration chapter for further information about the properties files and be aware that you have the ability to highly customize your SLS deployment. You may want to customize the JSP's to your CD (Corporate Design).
There are multiple backend authentication adapters available to use with the Secure Login Service. Usually, adapters are shiped seperately on different CD's. Basically, they consist of one JAR library and one example property file and the adapters manual for detailed informations about the configuration.
There are 3 easy steps to complete when installing an adapter into your SLS installation:
-
Open the SLS home folder. (this folder is mostly installed at
<tomcat_base>/webapps/sls) -
Copy the adapters JAR file into the
<sls_home>/WEB-INF/libfolder. (This JAR file is located on the CD in the /lib folder) -
Copy the example configuration File of the adapter to the
<sls_home>/WEB-INF/folder. In most cases you must adapt some configuration properties like IP addresses. (This property file is located most likely on the CD in the /conf folder)
This chapter contains basic instructions about how to configure an instance. All configuration files that are subject to manual change are mentioned and described. Files that have been left out by the descriptions do not need to be changed. This chapter serves as an index of all configuration properties which are explained more detailed in separate chapters.
The base configuration directory is the subdirectory "WEB-INF" of the web
application. All the property files mentioned further below are usually in that
directory and, optionally, in custom subdirectories.
At startup time, the SLS processes ALL files with the suffixes
-
"
.properties" -
"
.overrides"
Except for two special cases, the properties can really be stored in separate properties files as desired. The SLS will just read all these files and merge them into one configuration internally
The two exceptions are:
-
the contents of the file "
sls-errormap.properties" have to be in that file -
the property (or properties) for defining additional custom configuration
directories (
"custom.properties.path") MUST be in a".properties"file inside the SLS"WEB-INF"directory, due to the configuration bootstrap process. They CAN NOT be in an".overrides"file (see Section 3.2.2, “Overriding Properties”.
The files with the suffix ".overrides" can be used (as the suffix suggests) to override properties in the ".properties" files (see further below).
NOTE: In case of conflicting properties (a certain property appears multiple times in the configuration), the SLS will either log a WARN message about it, if the properties all have the same values, or fail startup with an ERROR log message, if the properties have conflicting values (since it cannot know which value would be the "correct" one).
It is possible to override properties defined in ".properties" files by setting
them with a different value in a file with the suffix ".overrides". This could
be used, for example, to have default values in the file "sls.properties",
but override some of them in test environments etc., just by adding a file
"test-environment-xy.overrides".
NOTE: The only property that MUST NOT be in an ".overrides" file is the property
that allows to define custom configuration directories, "custom.config.path".
This property MUST be in a file with the suffix ".properties".
NOTE: In case of conflicting overrides (a certain property appears multiple times in the override file(s)), the SLS will either log a WARN message about it, if the properties all have the same values, or fail startup with an ERROR log message, if the override properties have conflicting values (since it cannot know which value would be the "correct" one).
It is possible to define custom subdirectories within the SLS' "WEB-INF"
directory to contain configuration property and overrides files as well. This
allows, for example, to use such sub-directories for grouping certain property files
together, e.g. model configurations where each model is in a separate property file.
custom.properties.path[suffix]
This optional property can be stored just once without any "suffix" part, if
only one custom subdirectory shall be defined. It has to be in a properties file
in the "WEB-INF" directory, e.g. the default "sls.properties" file. Example:
custom.properties.path=customconfigs
In which case the SLS would look for a subdirectory "WEB-INF/customconfigs"
and scan it for property files as well. If multiple custom config directories
should be added, a suffix can be added to the property, e.g.
custom.properties.path.1=customconfigs
custom.properties.path.2=models
The configuration files explained in the following paragraphs are all located in
the subdirectory "WEB-INF" of the web application:
sls.properties
Core SLS configuration (static properties).
sls-dynamic.properties
Core SLS configuration (see chapter "Dynamic Properties").
log4j.xml
Logging configuration, see chapter "Log4J Configuration".
browser-blacklist.properties
Browser Blacklist properties, see chapter "Browser Blacklist".
…-adapter.properties
Adapter properties
sls-resources.properties*
Language resources, in the subdirectory "WEB-INF/classes". See chapter "Message Resource Files" for detailled explanations.
These are the files that may potentially be adapted to the current needs and environment. All other files such as "web.xml" are usually better left unchanged.
Note that changing the dispatching configuration file "struts-config.xml" may easily break the SLS functionality if not done correctly. As changes in that file require - to a certain degree - knowledge of the SLS's inner workings, it is strongly advised to leave that file unchanged or consult customer support before changing it.
Usually the SLS loads all property files found in the "WEB-INF"-directory and merges them internally to one configuration. It is also possible to define a finite list of files to be processed:
config.files
Defines a comma-separated list of file names. Each name must be defined relative to the "WEB-INF"-directory of the SLS.
Note that in many configuration properties variables can be used within the property value, as explained in chapter "JEXL Expressions".
Please read the variable documentation carefully in order to be sure that the variable used really is available at that time (as some variables are created only in the final steps of the login process).
The SLS includes SLS Seal which allows to encrypt and decrypt values using a symmetric key stored in a keystore file. The chapter "SLS Seal (DataProtector replacement)" describes how to create a keystore and encrypt or decrypt values using the commandline tool.
If a DataProtector/Seal keystore is enabled in the configuration, the SLS checks for each configuration value in the "sls.properties" or the "*-adapter.properties" files if it is encrypted. A typical use case is a technical password in the authentication adapter configuration.
If a property is encrypted, it is automatically being decrypted before it is processed. This way it is easy to have a critical value be plain text in an integration test environment and then use an encrypted value for that property in the production environment.
The properties in the file "sls-dynamic.properties" are dynamic in the sense that the file itself is checked for changes (based on the file's last change timestamp) at each request. If it has changed, all properties in it are refreshed. So, this allows to implement certain configuration changes "dynamically" at runtime, without having to restart the SLS. However, the login service defines exactly which properties can or must be in this file.
It is not possible to move just any property from the static "sls.properties" file into the "sls-dynamic.properties" file. If the moved property is not designated to be a "dynamic" property, the SLS will ignore it completely if it's in the wrong file!
The sample configuration file provided in the SLS web application contains all properties that can be used in this file. In this guide, each property that can or must be put in the dynamic properties file is documented accordingly.
If the name of a configuration property is defined as "deprecated", it means that the property has been renamed once, usually for reasons of better consistency with other, newly introduced configuration settings. In such cases, the old names are always still supported as there may be many productive, customized installations around which cannot be changed easily without a considerable effort.
If a configuration property has become obsolete completely, it will no longer be listed in the table below. Instead, there will be remarks in the provided release notes text file about which properties are to be removed from the configuration.
It is possible to set system properties by setting a property with the name prefix "system.property." in the file "sls.properties", followed by the name of the actual system property. Example:
system.property.logdir=/var/log
will set the system property "logdir" to the value "/var/log" at SLS startup time.
The file "sls.properties" is the main configuration file. This file is processed when the is starting up. Other, additional configuration files may be loaded as well, sometimes depending on the configuration values in this file.
The configuration properties are (in alphabetical order):
adapter.authentication
See "Usage Scenarios" for details.
adapter.authorization
adapter.challenge
adapter.changepassword
adapter.mapping
adapter.reauthentication
adapter.token
already.loggedin.page
Defaults to "false". If set to "true", a page which shows a message like
"you are already logged in" is displayed to the user, if she accesses the login
service and already has a valid HSP session.
NOTE: This page (the "Loggedin.jsp") is only displayed in the login model, NOT any other models. Obviously, an authenticated user still needs to be able to access password-change models etc. The SLS sees a model as a login model based on the fact that it contains one of the following states:
do.auth
do.auth2
...
do.auth6

do.cert.auth
do.cert.auth2
...
do.cert.auth6

do.auth.novalidate
do.auth.novalidate2
...
do.auth.novalidate6

do.ntlmauth
do.ntlmauth2
...
do.ntlmauth6
already.loggedin.redirect
Defaults to "false". If set to "true", a client which accesses the HSP and already has a valid session will just be redirected to the requested page (if available) or default redirect page. NOTE: This property will be ignored if "already.loggedin.page" is set.
app.header.*
See ""LoginUserData" Header" for details.
auth.type
See "Authentication Schemes" for details.
blacklist
See "Browser Blacklist" for details.
bid.check.enable
See "Browser ID Check ("BID")" for details.
basic.auth.enable
basic.auth.realm
basic.auth.match.*basic.auth.https.only
See "HTTP Basic Authentication" for details.
challenge.*
See "Challenge / Response" for details.
certificate.*
See "Certificate Handling" for details.
cookie.set.successful.name
See "Cookies" for details.
cookie.<name>.comment
cookie.<name>.domain
cookie.<name>.maxage
cookie.<name>.path
cookie.<name>.value
concurrent.*
See "Concurrency Issues with Browser Tabs" for details.
cred.*
See "Credential Providers" for details.
config.files
See "Configuration File Loading" for details.
custom.resources.path
See "Custom Message Resource Files" for details.
disable.requested. page.check
Optional: Allows to disable the check used to detect a change of the 'requested page\' during one login session. This should be disabled only if an existing installation / login model has a problem with it, and any potential security problems are properly addressed by the login model itself.
dataprotector.keystore
See "SLS Keystore Configuration" for details.
default.cookie.domain
See "Cookies" for details.
debug.info
See"Displaying Debug Information" for details.
email.*
See "Sending E-Mail" for details.
error.details
See "Displaying Internal Error Code" for details.
error.header
See "Internal Error Code HTTP Response Header" for details.
form.use.dynamic.actions
true or false (defaults to false). Enables dynamic correction of the
"action" URI generated by the "sls:form" JSP tag. In a case where the current
model was triggered by a different URI than the one configured in the tag's "action" attribute, the resulting "action" will
have the same URI as the original request. This kind of situation can occur in
cases where the same JSP is used in different models that are configured for
different request URIs.
fix.ssl.sid
See "SSL Session ID Fixation" for details.
frontend.soap.*
See "SOAP Frontend" for details.
gw-param.*
See "Modifying Parameters with "gw-param."" for details.
hsp.access.area
The SLS has to define an access area after each successful authentication. The possible values are either "Member" or "Customer". Please verify, that this property correlates to the SRM configuration.
hsp.header.*
See "Propagating Custom HTTP Headers" for details.
hsp.header.LoginData
See ""LoginUserData" Header" for details.
hsp.param.*
See "HSP Parameter Passing" for details.
http.parameter.check.enforce
See "Parameter Checker / Aliases" for details.
ignore.requested.page
See "Redirecting" for details.
jexl.class.<alias>
See "Custom JEXL Expressions" for details.
jexl.clear.request.vars
See "Clearing Variables at request entry" for details.
jexl.timestamp.format
See "Timestamp Creation" for details.
jexl2.lenient
See "JEXL Version Issues" for details.
jsonpath.*
See "Updating variables from JSON data with templates" for details.
lang.default
See "Localization" for details.
lang.default.<tenant>
lang.cookie.domain
lang.cookie.age
lang.cookie.path
jsp.globalerror.*
See "Multiple Errors / Showing First Or Last" for details.
log.filter.creds.secrets
See "Filtering Passwords" for details.
mail.*
See "Sending E-Mail" for details.
model.*
See "Model" for details.
modules.usage.file
See "SLS Modules" for details.
monitor.check.interval
See "Connection monitoring" for details.
multitenancy.*
See "Multitenancy Support" for details.
persist.*
See "Expressions / Persistent Variables" for details.
parameter.*
See "Parameter Checker / Aliases" for details.
prefs.*
See "Preferences Cookie" for details.
redirect.*
See "Redirecting" for details.
resources.encoding.legacy
Optional: Allows to disable UTF-8 handling when reading message resource bundles. If this property is set to "true" (default is "false"), the bundles will be read with the legacy default encoding ISO-8859-1.
session.*
See "Session Handling" for details.
slowdown.*
See "Login Slowdown" for details.
sls.response.buffer.size
Allows to override the size of the response buffer of the HTTP response. Increasing the buffer size from the container default can help in cases where a response from the SLS is incomplete (i.e. some response headers are missing) because the buffer is too small. This can be an issue with certain Tomcat 8 versions where the size of this buffer is not configurable. Also, adjusting the buffer size allows to adjust memory usage in such situation.
sls.title
Defines a title written to log files at startup. Can be left unchanged or, for example, changed to an instance-specific name.
static.files.path
Defines the URI path for static files. This serves as the base URI for all relative file references used with the "staticResource" JSP tag. Defaults to "/staticfiles" if not specified.
tenant.*
See "Multitenancy Support" for details.
tenant.*.regex
url.encoder.legacy
Allows to enable the legacy behaviour of the SLS URL encoder, where all URL-encoded contents will substitute a blank with a "+" character, instead of "%20" (the latter being the correct, standard-conform string). Defaults to "false".
wait.on.locking
See "Concurrency Issues with Browser Tabs" for details.
xpath.ignore.empty.nodes
See "Web Service Adapter" for details.
This chapter lists recommended configuration settings for various software components.
Note: It is very difficult to define reasonable default values for JVM memory settings, since the memory consumption of any given SLS instance depends heavily on how it is used, what features are enabled, the number of logins per minute etc.
A very bare-bone, minimal SLS setup can already run with less than 100MB ram. However, as soon as more sophisticated functionality (especially Groovy/JEXL scripting) is used, and the number of concurrent users rises, the required value can be much higher. The following settings seem reasonable for a standard setup which may have to serve up to a few thousand users within minutes in peak times:
-Xms128m -Xmx2048m -XX:MaxMetaspaceSize=512m
This configures the JVM to reserve 128MB RAM from the start, and use up to 2GB if necessary. Also, the "Metadata" space of the Java 8 VM can use up to 512MB, which should be enough even for high traffic environments.
Note:
- MaxMetaspaceSize is a Java 8 setting; it cannot be used with older JVMs!
- The example above is for running one single SLS webapp in one Tomcat instance. If multiple SLS webapps are used, it may be necessary to increase those settings, especially the Java 8 parameter "MaxMetaspaceSize".
For more information on this complex topic, please consult the JVM documentation of Oracle.
Other useful settings for dealing with situations where the SLS does run out of memory would be:
-XX:+HeapDumpOnOutOfMemoryError
This settings will trigger a complete dump of the memory (RAM) into a file at the moment of an OutOfMemoryError. This file can be useful for the USP 3rd level support to analyze the problem and find the cause, especially in a situation where there is reason to assume there might be some kind of memory leak.
Note: The following parameter should be used together with this one, otherwise the JVM will save the memory dump file in an undefined location in the filesystem.
-XX:HeapDumpPath=/.../logs/sls-dump.hprof
This defines the path where the JVM should write the memory dump file. It is important to make sure that the SLS process has the correct, required permissions to do so.
Also, the following parameter can be very helpful:
-XX:OnOutOfMemoryError=...restart-trigger-script...
This one allows to define a custom shell script which is executed the moment the OutOfMemoryError occurs. That script can then do anything - including restarting the SLS instance. Since an OutOfMemoryError usually means a complete breakdown of the SLS functionality, requiring a restart anyway, this feature can help to reduce downtime of the service.
Nowadays, it is almost always a good idea to use UTF-8 as the default encoding in the SLS and the application servers, so that in cases where headers with special non-ASCII characters should be propagated to the application, the values can be properly processed on the receiving end.
Since the Java VM usually relies on the default encoding of the underlying operating system as its own default encoding, it’s a good practice to enforce the use of a certain encoding with this JVM system property in the startup script:
-Dfile.encoding=UTF-8
Despite the confusing name, this property does not only affect file-related operations, but has a general impact on situations where strings are to be created from an array of raw byte data.
-Djava.security.egd=file:/dev/./urandom
NOTE: This settings is really mandatory on Linux platforms. It configures the JVM to use a technically (cryptographically) less secure random number generator, but one that will ALWAYS be able to provide entropy. Without this setting, the default random number generator can occasionally run out of entropy data (which is generated from things like I/O traffic, mouse movements etc.). When that happens, any crypto operation within the SLS can get stuck in a reading operation, waiting until new entropy data becomes available. This is usually far less acceptable than the slightly reduced level of security caused by the software-only random value generator.
Tomcat 7 introduced scanning of an application’s JAR files at startup time, in order to support certain types of dynamic feature registration. However, this feature is not used by the SLS webapp, and can slow down startup considerably. Therefore, it’s recommended to disable it completely by setting the following Java System property in the startup script:
-Dtomcat.util.scan.StandardJarScanFilter.jarsToSkip=*.jar
- NOTE: The SLS requires at least Tomcat 6.
- The "conf/server.xml" file should begin with this:
<?xml version="1.0" encoding="UTF-8" standalone="yes"?>
The important detail here is the "UTF-8" encoding, which should be enforced everywhere in the SLS setup.
- The following are all attributes of the "Connector" element in the "server.xml" file:
maxHttpHeaderSize=68192
Sets the maximum size limit for request headers to 66KB (default is only 8KB). The default value is often a problem with PKI-related login flows, where entire certificates (or chains) are sent back and forth between the HSP and SLS in request headers.
enableLookups="false"
Disables DNS lookups for resolving the actual hostname of the remote client. With this setting, the client IP is returned (by "request.getRemoteHost()") instead. Since the client in this case is always an HSP / SRM, DNS resolution makes no sense.
minSpareThreads="25"
The minimum number of threads always ready to process new requests.
URIEncoding="UTF-8"
This specifies the character encoding used to decode the URI bytes, after decoding the URL. If not specified, ISO-8859-1 will be used.
The following properties are usually set in the file "sls.properties".
# Automatically adapt POST action in JSPs based
# on URI which triggered the model
form.use.dynamic.actions=true


# Avoid having the same error show up multiple times in the global error message
jsp.globalerror.last=true

# Make sure JEXL 2 is not fault-tolerant by default.
jexl2.lenient=false

# JSP bean should show internal error ID. Should
# be used for testing purposes only.
error.details=false

# Send HTTP header "SLSError" with error information
# to client (useful for automated clients, but use
# with caution)
error.header=false


# Allows to restrict basic auth to HTTPS locations
basic.auth.https.only=true


# Make sure SLS session attribute values are URL-encoded by default
session-attribute.encodings=true

# Enable BID-check functionality by default
bid.check.enable=true

# Disable creating Log4j variables for headers and parameters
log.disable.log4j.vars=true

# Respond with a self-redirect to POST requests
# (instead of a 200 with a HTML page)
selfredirect.enable=true

# Allows to enable automatic setting of the "host" request
# header through the SLS HttpRequestWrapper implementation, based on
# the always-present HSP header "hsp_https_host". This eliminates the
# need for setting the SRM directive "HGW_ForceHost" for SAML logins.
auto.host.header.enable=true

# Optional: If set to "true", the SLS will fail at startup if strong cryptography
# is not available (which is usually caused by not having installed the unlimited
# jurisdiction strength policy files in the JVM). Defaults to "false" for reasons
# of backwards compatibility. It it is false, only a warning will be logged.
fail.on.limited.crypto=true


# Login slowdown mechanism
slowdown.active=true
slowdown.usepage=false
slowdown.time=10
slowdown.type=doubling
slowdown.threshold=3
ldap.enable.escaping=true
Performs LDAP escaping on configuration strings for LDAP URLs and filters.
com.sun.jndi.ldap.connect.timeout=60000
Timeout for opening a new LDAP connection during a bind operation.
com.sun.jndi.ldap.read.timeout=10000
Timeout for read operations on an existing connection.
com.sun.jndi.ldap.connect.pool=false
Enables or disables connection pooling (defaults to "true"). Although using connection pooling generally seems to be a good idea, long-lived connections can sometimes cause hard to track issues with firewall infrastructures that don’t allow for long-lived connections. So, as long as there are no performance issues that indicate that a connection pooling might be required, it is recommended to keep it disabled.
To avoid performance issues and unnecessary consumption of disk space, disable
logging of debug messages. This can be done by changing the debug level in the
Log4J configuration file "log4j.xml". The suggested level for a productive
environment is "WARN":
<category name="com.usp">
  <priority value="WARN" />
  <appender-ref ref="SLS_LOG" />
  <appender-ref ref="EXCEPTION_LOG" />
  <appender-ref ref="STDOUT" />
</category>
For more information about the SLS logging functionality see chapter "Logging".
If an error occurs during the login process the SLS will show a human readable info message and the internal error code if configured. In most cases displaying the internal error codes is not necessary in a productive environment and should therefore be disabled:
error.details=false
If not needed by a non-browser client, it is also recommended to disable the creation of an HTTP response header containing the internal error code:
error.header=false
Please note that both of these configuration options are disabled by default, if the properties are not set at all.
There are certain settings in the HSP HTTP(S) listeners that define how many requests can be processed concurrently:
MaxServer: Number of processes.
ThreadsPerChild: Number of threads per process
So in the following example, a total of 10x50 (=500) requests can be processed at once:
MaxServer        10
ThreadsPerChild  50
It is reasonable to configure the SLS in about the same way. To do this, the following Tomcat settings are relevant:
maxThreads
Defines the maximum number of requests processed concurrently by Tomcat. So the value of this setting should usually correlate with the calculated total of the HTS settings above:
maxThreads=500
Optionally, the following setting can be used to limit the number of connections accepted by Tomcat:
acceptCount
The value of this setting, which defaults to 10’000, should always be higher
than that of "maxThreads", and at least as high as or a little higher than
the HTS connection total:
acceptCount=5000
In a case where the SLS instance cannot handle as many requests at once as the HSP settings would allow, it may make sense to reduce the thread pool of Tomcat and thereby reduce the number of requests the SLS will process concurrently, e.g.
maxThreads=100
As a result, as soon as all 100 threads are busy processing a request, any newly incoming requests will still be accepted (until the value of "acceptCount" is exceeded), but are kept waiting until one of the busy threads is freed up.
The SLS Seal tool allows to encrypt sensitive configuration values such as technical passwords in any property file. Please see chapter "SLS Seal (DataProtector replacement)" for details on how to create and configure a keystore, and how to encrypt values.
There are two Jar-files in the "WEB-INF/lib" directory of the SLS web application which contain actual SLS functionality:
-
sls-core-<version>.jar -
sls-core-<version>-tests.jar
The first file contains the core of the login service framework. The second library is optional and contains functionality useful in testing and development environments, namely
- Various mock-up-implementation of all adapter interfaces, for functions such as authentication, authorization etc. This allows to use these classes to perform local authentications without any actual back-end callouts.
- HSP parameter passing (see chapter "HSP Parameter Passing" for details).
In order to make sure that these features cannot be used in a production
environment even if someone by mistake enables them in the configuration,
remove the jar-file "sls-core-<version>-tests.jar" from the SLS
"WEB-INF/lib" directory.
This chapter lists functionality and features that have either been declared as deprecated, to be removed at an unspecified point in the future, or that have already been removed.
"Deprecated" means that these features are still available in the SLS, but will be subject to removal or change in a future release. So, wherever one of the deprecated configuration settings or JEXL functions is used, it is recommended to change it with its designated replacement to ensure a smooth update in the future.
Table 5.1. Deprecated Settings
Property | Component | Description |
| Tomcat Authenticator | replaced with the new property |
| SLS | replaced with the new property |
| SLS | replaced with the new property |
Table 5.2. Deprecated Functions
Old Function | New Function |
|
|
|
|
|
|
|
|
|
|
|
|
|
|
|
|
|
|
|
|
|
|
|
|
|
|
- Support for Java versions older than 8. Since version 5.x, the SLS requires a Java 8 runtime (Oracle or OpenJDK). Older Java versions are no longer supported.
-
The obsolete configuration property prefix
character.illegal.was removed, because this whole "illegal character" check mechanism has become obsolete by the introduction of the "parameter checker" some time ago. The hard-coded internal checks for evil characters such as<and/>have been removed as well. In order to prevent the use of such characters, the parameter checker must now be configured accordingly, or the HSP / SRM. -
Challenge adapter of type
smschallengehas been removed. Use the HTTP adapter to send the challenge to the SMS provider, and thebasechallengeadapter to create the challenge and verify the response. See the corresponding chapter in the "SLS Administration Guide", "Challenge / Response" for details. -
The setting
groovy.script.timeout.secshas been removed, because it fundamentally cannot be made to work as desired, due to the nature of the Groovy JDK and the Java VM. - The "Struts" framework has been removed and replaced with a custom dispatching functionality that still supports the same configuration file, "struts-config.xml", for backwards-compatibility. NOTE: Because of this removal, the "Struts" JSP tag libaries are no longer included, so if you have JSPs that used them, they must be adapted (use SLS JSP tag library instead).
- The Axsionics adapter has been discontinued and removed.
- The SiteMinder adapter has been discontinued and removed.
-
The obsolete and rarely used feature called "Triggers" has been entirely
removed. NOTE: This has nothing to do with model triggers. It was an old
mechanism that allowed to trigger certain actions during a flow based on
the user ID, using either the model state
do.triggeror the JEXL functionfunction.checkTriggers(). The same kind of functionaliy can nowadays be implemented in many, and more flexible ways using conditional model actions or states, JEXL and Groovy scripts etc. The "Triggers" feature had to be enabled with the configuration propertytriggers.enabled=true(which is not supported as well anymore). So you may need to search your configuration for this property to check if that functionality was used. If so, the configuration will have to be adapted using the regular conditiona actions and scripting mechanisms. - The obsolete "Info Portal" functionaliy was removed from the SLS, since it provides no useful functionality beyond the SES appliance GUI.
- Support for the named Log4j logger "stdout" has been discontinued. This logger would redirect the JVM stdout stream into the "sls.log" file. This was required a long time ago when not all application servers supported proper rotation of the standard-output-logfile. However, this feature is not only needed anymore nowadays, it is also potentially problematic if there are multiple web applications running inside the same cotainer, because one could then capture the standard output of all the other web applications too. For these reasons, this feature has been removed. Existing Log4j configuration files with the "stdout" logger can safely be updpated by removing this logger, but it also isn’t a problem if the logger entry is still there; it’s just not used anymore.
- Support for the named Log4j logger "statistics" and the related functionality has been discontinued. Mainly because it has become obsolete by now where the SLS is used mostly in appliances or managed environments, where other means exist for gaining statistical data from the log files.
- JEXL 1 has been removed entirely. The SLS now always only uses JEXL 2 when evaluating a JEXL expression.
The URL parameter "cmd", when inserted into the request sent to the SLS, can be used to trigger a number of certain behaviors. By default, using this parameter with a matching model URI will trigger the start of that model, as explained in chapter "Model".
This following paragraphs document all the special, reserved "cmd"-parameter values that will instead trigger a specific functionality in the SLS.
The URL parameter "cmd=pingsls" triggers a simple HTTP 200 status response,
with the custom SLS response header "SLSStatus", which allows to determine if
the SLS is functional and available. See "SLSStatus header"
for details about this response header and its values.
The URL parameter "cmd=cancel" can be used in a link in an SLS form, and when clicked,
it will trigger a reset of the current model. Also, the page will then display
the "USER_CANCEL" error (the exact text being dependent on the mapping of the
messages to this SLS error code).
The special reserved "cmd"-parameter value "displayjsp" allows to directly
display a specific JSP, independently of the currently active model. This
"cmd" value is "displayjsp"; it basically triggers a direct internal
invocation of the "show.jsp" state. Therefore, it also requires a second
URL parameter, "jsp", with the alias or path of the JSP to display, e.g.
../sls?cmd=displayjsp&jsp=jsp.login
when the alias from the message resource file should be used, or
../sls?cmd=displayjsp&jsp=/WEB-INF/jsp/Login.jsp
to use the actual JSP file path directly.
The implements a model-based state-machine mechanism which allows to implement even very specific authentication processes, all just through the configuration.
Once the first request from a client reaches the SLS, a new login session with the appropriate model is created. It depends on some attributes of the request - such as the request URI, or the values of certain parameters - which model is used.
For example, a request to the action-URI "/auth" will trigger the standard
login model, while a request for the URI "/changepwd" could trigger the
change-password-model for an already logged in user.
As long as the user does not have an authenticated SES session, only the URI
"/auth" is available to the client. In order to still be able to start a
different model than the default login model (for instance a password change
process), it is also possible to use the URL parameter "cmd" with the URI
path of the model, just without the slash, like:
http://acme.com/sls/auth?cmd=changepwd
Which would trigger the model configured for the URI "/changepwd".
Each time the SLS receives a GET requests, the model state remains unchanged (with some exceptions for login procedures that require GET requests). This means that the current state (usually a JSP state like "get.cred") remains active, and the page is displayed again. Which is the common, expected behaviour if the user, for instance, performs a page refresh in the browser.
On POST requests, the model is forwarded at request entry, from the current state to the next state, specifically:
-
The current state itself (such as "
get.cred") is not executed anymore - Any JEXL actions that the state may have ARE executed
-
All "
nextStates" of the current state are evaluated, and if there is a follow-up state with a matching condition, that state will be used to forward the model to it.
There is a special model state named "do.generic" which, by itself, does nothing. It’s typical use-case is executing custom JEXL- or Groovy-actions somewhere in the model. But there is another special use related to the previously mentioned behaviour of the SLS when processing a POST request.
Because POST requests always immediately advance the model to the next state at request entry, there are some special cases where this can be a problem. A typical example is when the exactly same model should be used for cases where the very first request can be both a GET request (e.g. from a web browser, after being redirected to the SLS) or a POST request (e.g. from a rich client, as explained in the following paragraphs). Another example is a SAML-based login model, where the first request can be a GET or a POST, depending on the chosen binding.
In such cases, it may be necessary to put an additional "do.generic" state at the beginning of the model, knowing that it will have no effect for a GET request (it will just pass through to the following state), while during a POST request, it will be skipped - instead of the next state, which is really the first one, and which should always be processed.
Usually, in any SAML Identity Provider login model or any OpenID Connect (OIDC) login model, the first model state is one which processes the incoming SAML or OIDC message, e.g.
do.saml.idp.handlemsg
or
do.oidc.op.handlemsg
This state (which is explained in more detail later) basically extracts all SAML or OIDC elements from the incoming request and processes them. But if the incoming request is a POST request, and this state was the first in the model, it would immediately be skipped, and the SAML or OIDC request would not be processed at all. Which would then lead to a number of errors in the rest of the model. So, in order to support POST-binding in SAML and OIDC flows, an additional "dummy" state must be put in front of the message processing state, e.g.
do.generic
do.saml.idp.handlemsg
That way, when the first request is a POST, it will skip the first state - but that is just a dummy no-operation state. In case of a GET, the "do.generic" will be executed, but since it doesn’t do anything by itself, the model also continues to the next state, and processes the SAML or OIDC message.
The previously described SLS behaviour is often (ab-)used to support authentication for rich-clients in the same login model as for browser clients. For example, consider this simple model:
model.login.uri=/auth
model.login.failedState=get.cred
model.login.state.10.name=get.cred
model.login.state.20.name=do.auth
model.login.state.30.name=do.success
Also we are assuming that the SLS will be configured to accept basic authentication credentials, and that the rich-client will send a basic authentication header in its POST request.
With a browser client, the first request is a GET request (redirect sent from the HSP reverse proxy to the SLS). The model starts at the first state "get.cred", the corresponding JSP is displayed.
With a rich-client sending a POST request, the model also starts at the "get.cred" request, but because it is a POST request, is immediately forwarded to the next state - "do.auth". So, conveniently, no JSP will be displayed, which is fine for the rich-client (which couldn't handle a HTML page anyway).
However, the problem starts as soon as there are other states before the "get.cred" state, e.g. something like
model.login.uri=/auth
model.login.failedState=get.cred
model.login.state.10.name=do.generic-log
model.login.state.10.action.1=${function.logAudit('Starting login')}
model.login.state.20.name=get.cred
model.login.state.30.name=do.auth
model.login.state.40.name=do.success
In this example, the POST request from the rich-client will result in skipping the "do.generic-log" state (which doesn't to anyhing by itself), altough the JEXL-action attached to it will still be executed. But then, obviously, the next state is "get.cred", so the HTML page will be sent back to the client. In cases like these, there are two options:
-
Implement a separate login model for the rich-clients, triggered either by a JEXL condition or through the "
cmd" parameter -
Skip the "
get.cred" state using a conditional nextState, e.g.:
model.login.uri=/auth
model.login.failedState=get.cred
model.login.state.10.name=do.generic-log
model.login.state.10.action.1=${function.logAudit('Starting login')}
model.login.state.10.nextState.1=do.auth
model.login.state.10.nextState.1.if=${...is rich-client...}
model.login.state.20.name=get.cred
model.login.state.30.name=do.auth
model.login.state.40.name=do.successEach model consists of some global attributes and a number of states. The global model attributes are:
-
uri: (Optional) Defines the URI path which triggers this model. A switch to this model can also be enforced by setting the request parameter "cmd" to the value of the URI, without the slash (like "cmd=auth" to trigger the model configured for the URI "/auth"). It is also possible to define multiple URLs for one model. -
alwaysIf: (Optional) The model will be triggered if the specified script condition resolves to "true" (this is true for every request, even if there is already a model in the session). -
credentialState: (Optional) The model will be triggered if the SES session credential state is in the configured value. The SES session credential state is "valid" after a successful authentication, but the application could change it to a custom value in order to trigger a special process (like a transaction verification, for example). -
missingAuthorization: (Optional) The model will be triggered if the client was redirected to the SLS due to a certain missing authorization. NOTE: This trigger only works IF the user has a valid, authenticated SES session! The simple reason for this is that before any kind of authorization can be performed, authentication must be completed. Therefore, as long as the "credentialState" value of the SES session is "none", this trigger will be ignored! -
if: (Optional) The model will be triggered if the specified script condition resolves to "true" (but only if there is no model in the session yet). -
failedState: (Mandatory) A default failed state must be defined (must point to one of the states, usually one displaying a page). The model processing will switch to that state if an error occurs, as long as no other failed state has been defined for the current state. -
credentials: (Optional) Defines a comma-separated list of credential types, e.g.username,password,challenge. The "do.success" step will then verify if the session contains all the specified credentials, and all of them have been verified by some adapter. The value can also be a dynamic scripting expression that must result in a comma-separated list of credential types.
See "Triggering a model" for details on how to use a certain model under certain conditions.
Each state has the following attributes:
-
name: Defines what the SLS should do; the value either points to a JSP that should be displayed, or an action to be performed (details later). The dispatch mapping mechanism is used to map this value to an actual JSP path or action class. -
failedState[.x]: Reference to the state to which the model should switch in case that the execution of this current state failed. A typical example is a state that displays an error page. There can be several follow-up failed states coupled with conditions. -
nextState[.x]: Reference to the next follow-up state, if this current state was executed successfully. There can be several follow-up states coupled with conditions. -
action[.x]: Optional, dynamic action(s), defined by a JEXL-function that should be executed. An action can have 1 - n conditions, which must all resolve to "true" in order for the action to be executed. -
param.<name>: Optional parameters that can be used to fine-tune the behaviour of the action that belongs to the state. -
property: Optional property which is just a string value that serves as a parameter for the dispatch-action mapped to the state (used just by a few specific actions). -
adapter: Optional, allows to override the adapter to use for action states that allow different kinds of adapters likedo.authordo.changepassword.
A state can have more than one "Failed States", and more than one "Next States". In that case, conditions (usually based on JEXL expressions) are used to determine at runtime to which state to switch. This allows to implement logical branches in the login flow, just by changing the configuration.
The model itself also requires that a default "Failed State" is defined, which will be used for all states in case of a failure, as long as no specific failed state has been defined.
The models are configured in the "sls.properties"-file through a number of properties grouped by their name structure. Each model is always defined by a set of properties with the prefix "model." followed by the name of that model. The following sample configuration properties would define the model named "login":
model.login.uri=..
model.login.state.1=...
model.login.state.2=...
The following basic - but complete - example explains the various parts of a model configuration. The numbers in front of the brackets are NOT part of the actual configuration, they are just used here to refer to the explanations below:
1> model.login.uri=/auth
2> model.login.credentials=username,password
3> model.login.failedState=get.cred
4> model.login.state.1.name=get.cred
5> model.login.state.2.name=do.auth
6> model.login.state.3.name=do.success
-
The model "login" is mapped to the request-URI "
/auth" - The model requires the credentials of semantic type "username" and "password" to be verified in order for the login process to complete successfully.
-
The default failed state for this model is "
get.cred" -
The first state is "
get.cred", which shows the login page -
The second state is "
do.auth", which performs the authentication - The third step performs everyting necessary after a successful authentication.
A model state property always has certain attributes:
model.login.state.1.<attribute>=<value>
An example would be:
model.login.state.1.nextState=15
Where "nextState" is the attribute, and "15" the value. The following list shows all possible attributes and the meaning of their property values, and which ones are optional:
Table 7.1. State Attributes And Values
| Attribute | Value | Optional |
|---|---|---|
| Mapping to a JSP or action. See "Model to dispatch mapping" for details. Note that a state name may have a suffix after a "-" character. This suffix is just a custom text that serves as a differentiator between multiple states with the same name within a model. Example: " Example 2: " | No |
| Name or number of state to jump to in case the current state successfully completes. Example:
If the name is not unique within the current model, either a suffix of the number must be used. Example for using a suffix:
If this attribute is not defined, the next state in the model configuration automatically becomes the "nextState" of this state. NoteThe default " In other words: If a conditional " | Yes |
| Multiple "nextState" attributes can be set by adding a number suffix; in that case, each of these next states must also have a corresponding condition which defines in what case exactly the defined state should be used as next state. The following example defines an optional next state which will be used once the current state has been completed, and the JEXL variable 'myvar\' has the value 'duh\'. If the condition is not true, the default next state will be used. Example:
NoteUnlike the | Yes |
| Name or number of state to jump to in case the current state fails to complete. Basically the same rules apply as with the " If this attribute is not defined, the global default failed state of the model automatically becomes the " | Yes |
| Multiple "failedState" attributes can be set by adding a number suffix (similar to the "nextState" attribute). Again, every numbered "nextState" must have a condition. The following example defines an optional failed state which will be used if the current state failes to complete, and the JEXL variable ' Example:
NoteUnlike the | Yes |
| JEXL/Groovy expression to evaluate after the state itself has been successfully completed. Typical use cases are functions like setting authorizations, propagating headers to the application etc. For actions it is especially important to know that they are processed in the order of their numbering, if there is more than one. So in the example below, it is guaranteed that the action with the number "1" will be executed before the action with the number "2". Example: ..action.1=${function.doSomething()}
..action.2=${function.doMore()}
..action.2.if.1=${...cond 1...}
..action.2.if.2=${...cond 2...}
NOTE 1: If an action has multiple conditions, they must ALL resolve to "true" for the action to be executed. In other words, the conditions have an " NOTE 2: As already mentioned, actions are only executed after the state has been successfully completed.
For all states that send a response back to the client this means that actions are only eventually
evaluated if/when a new request comes into the SLS and the SLS login session had not been
invalidated. This includes all states that show a JSP, as well as states like NOTE 3: If a JSP state like | Yes |
| Parameter for the action that belongs to this state. There can also be multiple parameters (see documentation of a state for details). The actual name of the parameter is taken from the last part of the property name (after the ".param." string). The following example defines a parameter named " Example:
| Yes |
| Similar to the "param" attribute(s), this single attribute allows to define a custom value for an action that can be used as a parameter to fine-tune the behaviour of the corresponding action. This simple parameter mechanism existed before the more flexible "param" attributes, but is still used by some actions due to its simplicity. Example:
| Yes |
| Allows to to override the adapter to use for action states that
allow different kinds of adapters like Has precedence over configured adapter mappings and has no effect on action states
that only support a specific adapter anyway, like Example:
| Yes |
Note that the "do.success" (or "do.success.jsp") state must be the last in the process. It does not
have to be the last in the model, but all states following it can only be
reached through explicit branching from previous states.
The reason is that this state sends a response back to the client (either a redirect or a JSP), so control is handed back to the client, and it also terminates the SLS session (NOT the client’s session with the WAF).
So, if any custom operations should be performed using the "do.generic" state
in the case of success, it has to be done before the "do.success" state, like this:
4> model.login.state.2.name=do.auth
5> model.login.state.2.name=do.generic
5> model.login.state.2.action.1=${...do something...}
6> model.login.state.3.name=do.successThe ".name"-value of a state is, in itself, just a string without a meaning.
The mapping to an actual JSP or action happens by using that value as a global
forward for the dispatching mechanism.
Therefore, all the mappings described in the tables in the following chapters
can be looked up in the "<global-forwards>"-section in the dispatching
configuration file:
<sls webapp directory>/WEB-INF/struts-config.xml
Please note that most of the JSP mappings in the dispatch configuration do NOT contain the actual path of the JSP file, but only a key like
jsp.login
This key is then used to retrieve the actual JSP file path from the SLS language resource file, based on the user's language (see "Message Resource Files").
The following simplified examples give a quick idea of what to achieve how with custom model configurations.
Here, the first step is displaying the login page ("get.cred"), then
performing the authentication ("do.auth"), and then executing the actions
after a successful authentication ("do.success"), such as creating
authorization headers etc.
model.login.uri=/auth
model.login.failedState=get.cred
model.login.state.1.name=get.cred
model.login.state.2.name=do.auth
model.login.state.3.name=do.success
This slightly extended model tries to authenticate the user against two different back-end systems, first LDAP and then RADIUS. If the LDAP authentication attempt in step one fails, it just continues to the RADIUS authentication. If that fails as well, it will switch back to the default failed state, "get.cred" (the login page).
model.login.uri=/auth
model.login.failedState=get.cred
model.login.state.1.name=get.cred
model.login.state.2.name=do.auth
model.login.state.2.adapter=ldap
model.login.state.2.nextState=do.success
model.login.state.2.failedState=do.auth-radius
model.login.state.3.name=do.auth-radius
model.login.state.3.adapter=radius
model.login.state.4.name=do.success
Note that the "next state" for state 2 ("do.auth", the first authentication attempt with LDAP) is set to "do.success". This means that in case of a successful authentication, the regular next state should be state 4 ("do.success").
If the authentication fails, on the other hand, the model should just switch to the next state in the list, no. 3 ("do.auth-radius"), in order to try to perform the second authentication call with RADIUS. If that one fails too, it will switch back to the default failed state of the model, "get.cred", which is the first state, so the whole process begins anew.
It might be desirable to add some custom functionality at some point of the
model, for example in the last step after a successful authentication. There
are basically two extension points, custom actions and the "do.generic" state:
As mentioned before, each state can have an optional action, which means a JEXL-function that is executed at that time. Since custom JEXL-functions can easily be implemented and actived through the configuration (see "JEXL Expressions"), this allows to incorporate custom Java functionality to be executed in a login flow.
A custom action is configured like this:
model.login.uri=/auth
model.login.failedState=get.cred
model.login.state.1.name=get.cred
model.login.state.2.name=do.auth
model.login.state.2.action=${session.setValue('myValue', 'abcdef')}
model.login.state.3.name=do.success
After the authentication has been performed by the "do.auth"-State, the custom JEXL-function "session.setValue()" is executed, which stores a value in the SLS session (just for the sake of this example).
By adding numbers to the property name after the ".action."-part, multiple actions can be defined:
model.login.uri=/auth
model.login.failedState=get.cred
model.login.state.1.name=get.cred
model.login.state.2.name=do.auth
model.login.state.2.action.1=${session.setValue('myValue', 'abcdef')}
model.login.state.2.action.2=${session.setValue('otherValue', 'xyz')}
model.login.state.3.name=do.successThe following example is the same as above, only that it adds a condition for executing the first action, while the second is always executed:
model.login.uri=/auth
model.login.failedState=get.cred
model.login.state.1.name=get.cred
model.login.state.2.name=do.auth
model.login.state.2.action.1=${session.setValue('myValue', 'abcdef')}
model.login.state.2.action.1.if.1=${session.getValue('someValue') != ''}
model.login.state.2.action.2=${session.setValue('otherValue', 'xyz')}
model.login.state.3.name=do.success
NOTE: An action can have multiple conditions. In that case, ALL conditions must resolve to "true" for the action to be executed!
These custom JEXL-based actions are always executed AFTER the state itself had been processed. This means that actions can be set only for states that refer to dispatch-actions; if the state just displays a JSP, the request processing stops after the JSP has been delivered to the client, and the custom action will not be evaluated.
Also, all the final states of a model (such as "do.success") are special
cases, as the SLS processing stops once they are completed. For such cases, the
actions need to be attached to a generic state that is included in the model,
just before the final state (see below).
It is also possible to add so-called generic states to the model at any point, which refer to a dummy (aka "do-nothing") action. Such generic states basically just serve as holders to which to attach some custom JEXL-functions to be executed.
An example would look like this:
model.login.uri=/auth
model.login.failedState=get.cred
model.login.state.1.name=get.cred
model.login.state.2.name=do.auth
model.login.state.3.name=do.generic
model.login.state.3.action=${session.setValue('myValue', 'abcdef')}
odel.login.state.4.name=do.successEspecially the "do.generic" state is often used multiple times within the same model. In order to reference one as a failed- or next-state, the number must be used (because the name alone would be ambiguous), or a name with suffix. The suffix provides the advantage that no numerical references must be updated, should the model ever be changed by inserting new states or removing existing ones.
model.login.uri=/auth
model.login.failedState=get.cred
model.login.state.1.name=get.cred
model.login.state.2.name=do.auth
model.login.state.2.nextState.1=do.generic-two
model.login.state.2.nextState.1.if=${some.variable == 'someValue'}
model.login.state.3.name=do.generic-one
model.login.state.3.action=${session.setValue('myValue', 'abcdef')}
model.login.state.4.name=do.generic-two
model.login.state.4.action=${session.setValue('myValue', 'xyz')}
oodel.login.state.5.name=do.successAs shown in the previous examples, it is possible to define multiple "nextState" values for one given state. The following rules apply for adding "nextState" entries to one state:
There is always a default!
-
Each state always has a default "
nextState". Either explicitely declared like this:
model.state.10.name=do.ldap
model.state.10.nextState=get.cred
or just the following state in the model, if nothing else is declared.
"if" required for additional
-
Every additional "
nextState", added with a number, must have a corresponding condition, like this:
model.state.10.name=do.ldap
model.state.10.nextState.1=do.auth
model.state.10.nextState.1.if=${myvar eq 'abc'}
model.state.20.name=create.challenge
In this example, the default "nextState" of the state 10 ("do.ldap") is the following state in the model, state 20 ("create.challenge"). So, if the condition for the numbered "nextState" does not resolve to "true", the model will proceed to state 20.
"else" = default nextState
In other words, the default "nextState" of a state always serves as the "else" case, if none of the conditions for the numbered "nextStates" are fulfilled. Example for "if" / "else" conditional branching:
model.state.10.name=get.cred

# Go to state 50, if JEXL variable "domain" equals "acme.com"
# Otherwise ("else"), go to default nextState ("create.challenge")
model.state.10.nextState.1=do.ldap
model.state.10.nextState.1.if=${domain eq 'acme.com'}

# Perform some challenge / response
model.state.20.name=create.challenge
model.state.30.name=get.cred.challenge
model.state.40.name=do.authresponse

# Perform an LDAP lookup
model.state.50.name=do.ldap
model.state.50.property=userlookup
# By default ("else"), continue with state 80 ("do.auth")
model.state.50.nextState=80
# If LDAP attribute "grp" equals "admin", go to state 70
model.state.50.nextState.1=70
model.state.50.nextState.1.if=${attribute.ldap.grp eq 'admin'}

# Perform some HTTP callout notification
model.state.70.name=do.http
model.state.70.property=sendnotification

# Authenticate and complete.
model.state.80.name=do.auth
model.state.90.name=do.successTo define what model must be used by the SLS when a new SLS session is created, the following attributes can be used:
- URI: Based on the URI of the incoming request
- Based on a custom scripting condition (two variants available)
- Based on a missing authorization
- Credential State: Based on the state of the user’s SES session (see below)
-
"
REQ"-Command: Based on the value of the "cmd"-field in the "req"-Parameter (see below)
It is possible to define multiple triggers for one model, e.g. an URI and a JEXL condition. Example:
model.special.uri=/special
model.special.if=${header.trigger == 'special'}
model.special.failedState=get.cred
model.state.100.name=get.cred
In this example, the model will be triggered by both a "/special" request URI, as well as a HTTP request header named "trigger" which contains the string "special". In such a case, those triggers will still be processed as explained in "Trigger Priority".
This is the typical use-case. The default action URI of the SLS is "/auth", so the default login model should be configured to be used if for that URI (any incoming request with an unmapped / unconfigured URI will be forwarded to this path):
model.login.uri=/auth
For other processes, such as password change, other URIs should be defined (in the "web.xml" configuration file), and the models for those processes should be configured accordingly:
model.changepwd.uri=/changepwd
It is also possible to map multiple URLs to one model:
model.changepwd.uri.1=/one
model.changepwd.uri.2=/two
model.changepwd.uri.3=/three
The "changepwd" model could then be triggered by invoking any of the three URLs "/one", "/two" or "/three" (or using the "cmd" parameter, like "cmd=one", "cmd=two" or "cmd=three").
Please note that a URL-parameter "cmd" in a request to the SLS will trigger the use of the model configured for a URI with the same value as the "cmd"-parameter.
For example, the SLS request URI
..../sls/auth?cmd=changepwd
will force the SLS to invoke the model configured for the "/changepwd" URI. Actually, the value of this parameter always overrides the actual request URI value.
Please note that the model also begins from the first state. In other words, using the "cmd"-parameter resets the state of the model in the SLS session. Usually, the "cmd"-parameter is used in links to trigger direct invocation of certain actions on the login service.
The SLS login session remains intact, with all of its JEXL/Groovy variables, but all credentials are removed.
Reserved "cmd" Values
There are some reserved values for the "cmd" parameter:
-
displayjsp- Used to directly invoke the "show.jsp" state. See "Display Single JSP Command" for details. -
pingsls- Triggers a simple HTTP response to see if the SLS is available.
Triggers the model if the script expression evaluates to "true". This trigger is
evaluated on every request, so it can also be used to re-start the model already
being processed in the current session, or to switch to another model entirely.
In this example, if the request has a parameter "restart" with the value "yes":
model.login.alwaysIf=${parameter.restart == 'yes'}
model.login.failedState=get.usererror
model.login.state.1.name=get.cred.token
model.login.state.100.name=get.usererrorTriggers the model if the script expression evaluates to "true" (but only if there was
no model yet in the session). In this example, if the request has a parameter "abc" with the value "dothis":
model.login.if=${parameter.abc == 'dothis'}
model.login.failedState=get.usererror
model.login.state.1.name=get.cred.token
model.login.state.100.name=get.usererrorIf a missing authorization was the reason for the redirect of the client to the SLS, that authorization is signaled to the SLS through some custom HTTP headers by the reverse proxy. The authorization itself is just a string, defined with the "AC_RequireAz" directive in the SRM location.
The following example would trigger the SLS to use the "tokenlogin" model in case that a user needs the authorization "token":
model.tokenlogin.missingAuthorization=token
The HSP/SES session (which has no direct correlation to the SLS session) carries an internal state. At the beginning, when a client browser connects to the HSP but isn't authenticated yet, the state is "Invalid". After a successful authentication, the state changes to "Valid".
For certain special functionality such as transaction verification, the HSP (or the application, to be specific) will change the value of an active, authenticated session to any custom value such as "CredVerify" in order to start a process like verification of a pending transaction. Once the HSP session is not in state "Valid" anymore, any following request from the client will be directed to the SLS. The application session is still valid at this point, though; this serves just as a mechanism to implement processes that require interaction with the SLS while a user is working with an application.
A good example is an E-Banking application, where the user needs to verify transactions. While the application session remains active, the user must be forced to switch to the SLS in order to perform a transaction verification. To achieve this, the application will change the state of the HSP session (by setting a special HTTP header) to a custom value, like "CredVerify". The next request from the client is then redirected to the SLS by the HSP automatically.
At that point, a special model should be invoked to process the verification of a transaction, but the request URI will just be the default URI of the SLS (such as "/auth"), so the URI cannot be used to trigger the right model. Instead, the HSP session credential state can be used:
model.trxverify.credentialState=CredVerify
In some cases, the SLS might need to cooperate with adjoining services to perform certain operations. In cases where no direct communication with these services is possible, data is exchanged through the client redirect, in an encrypted URL-parameter named "req".
This parameter internally consists of a number of key/value-pairs; one of which is named "cmd" and can be used to trigger a certain model:
model.clearvr.reqCmd=clearvr
The various trigger mechanisms outlined above are processed in a certain order. So it may be important to know which one has higher priority than the other one:
-
cmd: The request parameter "cmd" always triggers and restarts the model with the corresponding URI (also "reqCmd") -
alwaysIf: This scripting condition is evaluated on every request and always triggers and restarts the model if the expression evaluates totrue. -
missingAuthorization: The authorization that was required, but missing, for accessing the requested page. NOTE: This trigger only works IF the user has a valid, authenticated SES session! The simple reason for this is that before any kind of authorization can be performed, authentication must be completed. Therefore, as long as the "credentialState" value of the SES session is "none", this trigger will be ignored! -
if: This scripting condition is evaluated only if there is no model in the session yet. -
credentialState: The SES session credential state -
uri: The request URI path
The following example shows two models, one with a URI trigger (model "login"), and one with a "credentialState" trigger (model "reauth"). If a new SLS session is started, both triggers will be evaluated; if the incoming request carries information about the SES session credential state being "Reauth", the "reauth"-model will be instantiated. If not, the URI-based model will be triggered.
# This is the default login model
model.login.uri=/auth
model.login.failedState=get.usererror
model.login.state.100.name=get.cred
model.login.state.200.name=do.auth
model.login.state.300.name=do.success
model.login.state.400.name=get.usererror

# If the field "credentialState" in the incoming
# "SessionInfo" HTTP request header is "Reauth",
# this model will be triggered.
model.reauth.credentialState=Reauth
model.reauth.failedState=get.usererror
model.reauth.state.100.name=get.cred
model.reauth.state.200.name=do.auth2
model.reauth.state.300.name=do.success
model.reauth.state.400.name=get.usererror
This table lists all available model states that are mapped to a JSP.
Table 7.2. Alphabetical list of JSP states
| State | Description |
|---|---|
get.changepassword | Page for regular password change. JSP file: |
get.changeexppassword | Page for changing expired password during login. JSP file: |
get.changepasswordsuccessful | Confirmation page for successfully completed password change. JSP file: |
get.cred | Default login page (usually with username and password input fields). JSP file: |
get.cred.challenge | Page for entering a challenge / response code. JSP file: |
get.cred.token | Can be used instead of " The default login JSP page delivered with the SLS incorporates a check, which displays an additional, third input field for a secret (such as a one-time-password) for this state. Therefore, if for example the RSA adapter is used with SecurID tokens for the authentication, this state should be used in place of the " JSP file: |
show.logged.out | Page which shows that the user has been logged out. JSP file: |
get.hspparm | Page for entering host and/or port information for the HSP back-end connection mapping (see "HSP Parameter Passing"). JSP file: |
get.mobileid.error | Error page adapted specifically for the MobileID login flow. JSP file: |
get.mobileid.state | Page which contains the response for the AJAX request sent during the MobileID login, informing the JavaScript client in the browser about the state of the confirmation process. JSP file: |
get.mobileid.wait | Notification page used in a MobileID login process, which polls the status of the user’s verification process through AJAX requests sent to the SLS. JSP file: |
get.reauth | Re-authentication page (usually contains an input field for entering the name of the user for whom to reset the password). JSP file: |
get.resetpassword | Password reset page (usually contains an input field for entering a one-time-password, such as a SecurID code). JSP file: |
get.resetpasswordsuccessful | Password reset success page; is shown after a successful password reset. JSP file: |
get.slowdown | Notification page which tells the user during a slowdown phase (triggered by several successive failed login attempts) that a short wait period is necessary before the next login attempt. JSP file: |
get.systemerror | Error page for displaying critical system errors. JSP file: |
get.token | Authentication token selection page. JSP file: |
get.usererror | Error page for displaying logical errors. JSP file: |
get.useragent | Displays message about no longer supported client browser. JSP file: |
get.trx | Transaction confirmation page. JSP file: |
get.wait | Notification page used in a delayed login process, which triggers the start of a time-consuming authentication call through an automatic page reload. While the page reloads, it displays a "please wait" message to the user. This page must be activated explicitly, if for some reason the authentication call-out always takes a long time (like more than 10 seconds). JSP file: |
get.webauthn.reg.sendmsg | Renders the page for WebAuthn registration. JSP file: |
get.webauthn.auth.sendmsg | Renders the page for WebAuthn authentication. JSP file: |
show.logged.in | Can be activated in the configuration to display a "You are already logged in" message to any user who invokes the SLS location again after being authenticated already. JSP file: |
show.jsp | Allows to display any JSP. But since this state is actually mapped to an action and not directly to a JSP, it is documented in the table of Action states below. JSP file: |
This table lists all available model states that are mapped to actions.
Table 7.3. Alphabetical list of action states
| State | Description |
|---|---|
create.challenge | Creates the challenge to be sent or displayed to the user in a challenge-/response process. |
create.tokens | Retrieves a list of authentication tokens from the authentication back-end system (such as a SecurID device, or a mobile phone) available to the user currently trying to log in. |
do.applogout | Redirects the client to a logout URI of an application. This is used to enforce an application logout if a problem occurs within certain processes, such as transaction verification. |
do.auth | Performs the authentication with the adapter type specified in the configuration property "adapter.authentication". NOTE: Some adapters allow to override the default configuration settings used for the "do.auth" state, such as backend URLs, with custom action properties; see the corresponding adapter documentation for details: |
do.auth2 | NOTE: Since SLS 5.1.0.0, this use case is better handled with Performs the additional, second authentication with the adapter type specified in the configuration property adapter.authentication2 More such additional authentication steps could be added by copying the corresponding mappings in the dispatch configuration: <action path="/doauth" scope="request" parameter="adapter.authentication" name="loginForm" validate="true" input="jsp.login" type="....LoginAction"> </action> <action path="/doauth2" scope="request" parameter="adapter.authentication2" name="loginForm" validate="true" input="jsp.login" type="....LoginAction"> </action> <action path="/doauth3" scope="request" parameter="adapter.authentication3" name="loginForm" validate="true" input="jsp.login" type="....LoginAction"> </action> This also requires a new entry in the "<global-forwards>"-section: <forward name="do.auth" path="/doauth.do"/> <forward name="do.auth2" path="/doauth2.do" /> <forward name="do.auth3" path="/doauth3.do" /> In the SLS configuration, the adapter type used for that additional authentication must then be defined accordingly: adapter.*authentication3*=radius |
do.authorize | Optional HSP authorization step, which performs the authorization by invoking the corresponding back-end adapter function. Note that for many adapters, such as LDAP, creating the authorization values can also be performed with just one single authentication call, based on the user's attributes, for example. |
do.authresponse | Verifies the response code entered by the user during a challenge / response process. |
do.auth.novalidate | Same as "do.auth", but does not perform any validation of the input parameters (and therefore doesn't even require that there are any parameters in the request). Used only for special cases of authentication (like Kerberos), where the credentials are not sent in request parameters. |
do.changepassword | Performs a password-change callout with the back-end system, if it supports the password change functionality. |
do.cert.auth | Authenticates the user based on the SSL client certificate if the PKI adapter is used. |
do.generic | Dummy action which does nothing by itself. It serves only as a point within the model to which to attach custom actions. |
do.hspparm | Checks if all information is available that is required to provide the information for the HSP for a dynamic application back-end connection (see "HSP Parameter Passing"). If the check finds that something is missing, the model will be switched to the state "get.hspparm". |
do.http | Only available with HTTP adapter! Allows to execute one or several HTTP operations that must be configured in the HTTP configuration file (see "HTTP Adapter" for details). This state always requires a "property" which contains a string identifier. This identifier points to the group of properties in the HTTP configuration which define the operation(s) to be performed. model.xyz.state.3.name=do.http model.xyz.state.3.property=myoperation |
do.ldap | Only available with LDAP adapter! Allows to execute one or several LDAP operations that must be configured in the LDAP configuration file (see "LDAP Adapter" for details). This state always requires a "property" which contains a string identifier. This identifier points to the group of properties in the LDAP configuration which define the operation(s) to be performed. model.xyz.state.3.name=do.ldap model.xyz.state.3.property=myoperation |
do.logout | Performs a logout by invalidating the user's HSP session (sets a response header " NoteThis will NOT terminate the application session, so it is recommended to perform the logout over the application if possible. Otherwise, lingering open sessions could consume a lot of resources on the application server. It is possible to specify the URL where the SLS will redirect the client to after the logout by sending a URL parameter "target" in the logout request, or by using the following model state parameter.
The "target" parameter will always override the model state "url" parameter. NoteTo allow redirects to other hosts use the following setting (else only the URL location is considered):
NoteAlso, the existing optional redirect blacklists or whitelists can be used to restrict allowed redirect URLs. See "Redirect After Successful Login" for details. |
do.mapping | Optional mapping step, which performs the mapping by invoking the corresponding back-end adapter function. Note that for many adapters, such as LDAP, a mapping of the user ID can also be performed with just one single authentication call, based on the user's attributes, for example. |
do.ntlmauth | Authenticates the user against a domain controller. |
do.ntlminit | Initiates an NTLM authentication handshake. |
do.ntlmwait | Sends information to the client during the multi-step NTLM authentication process, if necessary. |
do.reauth | Performs a re-authentication with the back-end system, using the one-time-password or secret code sent by the user in the "get.reauth" state. |
do.redirect | Redirects the client to the URL specified in the value defined in the additional "property"-field (or "param.url"): model.state.10.name=do.redirect model.state.10.property=/some/app or model.state.10.name=do.redirect model.state.10.param.url=/some/app NoteAfter a do.redirect state has been reached in the model, the redirect to the specified location will take place and there will be no next state executed. NoteThe SLS login session will be invalidated by this model state by default. This can be prevented by adding the following optional parameter: model.state.10.param.invalidate=false NoteTo allow redirects to other hosts use the following setting (else only the URL location is considered): model.state.10.param.url.absolute.allow=true Also, actions attached to the do.redirect model state are only executed if the SLS login session is not invalidated and only if/when a following request comes in. NoteTo enforce that the SLS will remain in the same redirect model state in a case where, after a redirect to an external site, a redirect back to the SLS is received, the following parameter can be set: model.state.10.param.goto.next.state=false The default value is |
do.saml.idp. create.assertion | Creates a SAML assertion using the configured SAML IdP adapter. This state is optional. If omitted, the response SAML message will automatically be created by the model state(s) " |
do.saml.idp.createmsg | Creates a SAML message using the configured SAML IdP adapter. If the profile is SSO (default), a SAML Response message is created. (The profile SLO is not allowed.) This state also allows to enforce the creation of a SAML error message, using additional parameters:
Example:
This state is optional. If omitted, the response SAML message will automatically be created by the model state " |
do.saml.idp.handlemsg | Handles an incoming SAML message using the configured SAML IdP adapter. If the profile is SSO (default), a SAML AuthnRequest message is expected, if the profile is SLO, a SAML LogoutResponse message is expected. |
do.saml.idp.sendmsg | Sends a SAML message using the configured SAML IdP adapter. The profile defaults to "SSO", but can
be set to either +..state.1000.param.profile=SSO If the profile is SSO (default), a SAML Response message is sent, if the profile is SLO, a SAML LogoutRequest message is sent. In case of the SSO profile, this state also allows to enforce the creation and sending of a SAML error message,
see model state " NoteAfter this state has been executed, the next incoming request will forward the model to the next state, no matter if it is a GET or POST request. |
do.saml.sp.createmsg | Creates a SAML message using the configured SAML SP adapter. If the profile is SSO (default), a SAML AuthnRequest message is created. (The profile SLO is not allowed.) Allows to access the AuthnRequest (JEXL variable " This state is optional. If omitted, the response SAML message will automatically be created by the model state " |
do.saml.sp.handlemsg | Handles an incoming SAML message using the configured SAML SP adapter. The profile defaults to "SSO", but can
be set to either +..state.1000.param.profile=SSO If the profile is SSO (default), a SAML Response message is expected, if the profile is SLO, a SAML LogoutRequest message is expected. |
do.saml.sp.sendmsg | Sends a SAML message using the configured SAML SP adapter. The profile defaults to "SSO", but can
be set to either +..state.1000.param.profile=SSO If the profile is SSO (default), a SAML AuthnRequest message is sent, if the profile is SLO, a SAML LogoutResponse message is sent. In case of the SLO profile, this state also allows to enforce the creation and sending of a SAML error message, see model state " NoteAfter this state has been executed, the next incoming request will forward the model to the next state, no matter if it is a GET or POST request. |
do.oidc.op.handlemsg | Handles an incoming OIDC message using the configured OIDC OP adapter. NoteBy default, the SLS will run in OIDC mode. If simple OAuth 2.0 should be used,
the state parameter
For more details on OAuth 2.0 mode, see "Plain OAuth 2.0 Mode".
The state parameter In case of the Authentication request in an OpenID Connect flow, the verification is always done, irrespective of this state parameter, because the check is mandatory and there is no good alternative way to handle it in the login model instead. In other cases, namely in OAuth Authorization requests and in Token requests
(both for OAuth and OpenID Connect flows), the state parameter can be explicitly
set to
The state parameter
The state parameter |
do.oidc.op.createmsg | Creates a response OIDC message using the configured OIDC OP adapter. This state is optional. If omitted, the response OIDC message will automatically be created by the model state "do.oidc.op.sendmsg". |
do.oidc.op.sendmsg | Sends a response OIDC message using the configured OIDC OP adapter. |
do.oidc.rp.createmsg | Creates an OIDC request message. The optional parameter The optional parameter The parameter |
do.oidc.rp.sendmsg | Sends a previously created OIDC request message. Note that unlike in other adapters, it is mandatory to explicitly create a message before sending it. There are no parameters, uses the ones defined previously when the message was created. The Authentication Request is sent with a 302 Redirect, while the Token Request is sent with a direct HTTP callout to the respective OP. |
do.oidc.rp.handlemsg | Validates a received OIDC response message. There are no parameters, uses the ones defined previously when the request message was created. In case of a received Token Response if validation is successful, a verified username credential is created with the subject from the received id_token as the username. |
do.webauthn.createmsg | Creates a WebAuthn message. The mandatory parameter Normally afterwards sent with the actions |
do.webauthn.handlemsg | Validates a WebAuthn response message. |
do.sendmail | Sends an e-mail (see "Sending E-Mail" for details). |
do.spnegoinit | Initiates an SPNEGO- (aka Kerberos) based authentication. |
do.success | Performs the steps required to complete a successful authentication. This action creates all headers required to signal a successful authentication to the reverse proxy, create custom SES session attributes, forward custom HTTP headers to the application, create tickets etc. A simple way to "extend" this action with custom functionality is to add a "do.generic"-state right before this state, and attach some JEXL-actions to it (see "Custom Actions"). NoteThis action performs the redirect to the application and terminates the SLS session, so processing ends here (also see Section 7.3.2, “"do.success" / "do.success.jsp" must be last” for details). Optionally, the state property / parameter "
|
do.success.jsp | Is equal to
As with "
|
do.trxcancel | Handles a "cancel"-request of the user during the transaction verification process, by redirecting the client back to the application. |
do.trxinit | Must be at the beginning of the model for the transaction verification process. This action extracts the transaction data from the incoming request and stores it in the SLS session for later verification. |
do.trxresponse | Verifies if the response provided by the user during the transaction verification process is correct, by invoking the corresponding functionality of the back-end adapter. |
do.wait | Either displays the "jsp.wait" page, or forwards to the next action if the wait-page has already been delivered to the client. |
do.validatepassword | Validates one or multiple password credentials using the password policy. By default, the action will validate the NEWPASSWORD-type credential. It will also compare the values of the credentials NEWPASSWORD and NEWPASSWORD2, if (and only if) both are available. In that case, both must have the same value. Optionally, the the state property / parameter "
But to validate the passwords in a password change process, the model state would look like this:
|
get.passwordpolicy | Retrieves the policy for passwords (needed for the password change process, for example) from the authentication back-end system, or from the local password policy configuration. |
select.token | Sets the token selected by the user in the " |
show.json | Sends a plain JSON response back to the client. This state supports the following parameters:
The resulting JSON content is always evaluated by the scripting engine, so any JEXL or Groovy expressions, function calls etc. inside it will be resolved in the final response. The jsonFile parameter must be a valid relative file path within the
SLS web application, e.g. model.example.state.1.name=show.json # 1st Example: Define relative file path model.example.state.1.param.jsonFile=/WEB-INF/json/SomeResponse.json # Set custom HTTP response code model.example.state.1.param.statusCode=277 model.example.state.1.name=show.json
# 2nd Example: Define inline JSON
model.example.state.1.param.json={ "content": { "say": "hello" }}
# And invalidate session right here
model.example.state.1.param.invalidate=true
model.example.state.1.name=show.json
# 3rd Example: Define inline JSON, but get content from a template file
model.example.state.1.param.json=#{function.getTemplateContent('jsonResponse')}
# also set custom content-type
model.example.state.1.param.contentType=text/json |
show.jsp | Displays any JSP of the SLS, independent of any actual login process.
Requires either the URL-parameter " The JSP name must be either the resource key of the JSP in the message
resource file, such as " Alternatively, it is possible to use the URL parameter model.example.state.1.name=show.jsp # 1st Example: Define relative file path model.example.state.1.param.jsp=/WEB-INF/jsp/My.jsp model.example.state.1.name=show.jsp # 2nd Example: Define file with resource key model.example.state.1.param.jsp=jsp.login |
In order to support any possible authentication scheme, the SLS implements an internal abstraction and separation of authentication credentials and so-called "providers" of such credentials. One default provider creates credentials from HTTP request parameters and / or headers.
Internally, the SLS assigns a technical and a semantic type to each credential. The technical type is defined by the type of credential provider, the semantic type of each credential must be configured as explained below.
To define how to create the authentication credentials, a number of properties must be set in the configuration file "sls.properties". Each credential requires a group of properties like this example, which configures how to obtain the username (login ID) credential:
cred.provider.<pn>.cred.<cn>.type=username
cred.provider.<pn>.cred.<cn>.source=parameter
cred.provider.<pn>.cred.<cn>.name=userid
Where <pn> means "provider number" and is used to group a set of properties for one credential provider together. <cn> means "credential number and is used to define 1 - n credentials for the given provider.
As shown in this example, each credential requires three attributes: ".type", ".source" and ".name":
type
Defines the semantic type, so this field must contain one of the predefined values as listed in "Semantic Types".
source
Defines where to the credential is taken / extracted from. The possible values of this attribute depend on the corresponding credential provider. In case of the HTTP credential provider (see below), the possible values are "parameter", "header" or "cookie" (meaning that the value of the credential will be the value of a request parameter, header or cookie).
name
Defines the name of the source, like the name of the request parameter, header or cookie from which to take the value.
A real-world example for the default JSP login forms provided with the SLS delivery package would look like this:
Table 8.1. Sample credential provider configuration
| [source,properties] ---- # Use "HTTP" credential provider as provider no. 1 cred.provider.1=http # Credential from request parameter "userid" cred.provider.1.cred.1.type=username cred.provider.1.cred.1.source=parameter cred.provider.1.cred.1.name=userid # Credential from request parameter "password" cred.provider.1.cred.2.type=password cred.provider.1.cred.2.source=parameter cred.provider.1.cred.2.name=password ---- |
|---|
In this example, the request parameter "userid" (which is defined by the name "userid" of the corresponding HTML form field in the login JSP) is used as a credential of the semantic type "username". And the request parameter "password" is used for a credential of the semantic type "password".
The following credential provider values are available:
http
Provides credentials from HTTP request parameters and / or headers.
basicauth
Provides credentials from a HTTP basic authentication header.
sesticket
Provides credentials from an SES ticket..
As a special case, there is also a JEXL credential provider available. This provider is always active, so it is not necessary to configure just to activate it. It is also always the last one in the list, so it will always override the credentials of the other providers. But this also means that it can be used to "post-process" credentials created by other providers through JEXL.
Because the JEXL provider does not have a number, but an internal ID "jexl", the configuration properties used to configure credentials handled by it must always have the prefix
cred.provider.jexl.cred.
The following example shows how to add a prefix to the value of the username credential created by the "http" provider:
cred.provider.jexl.cred.1.type=username
cred.provider.jexl.cred.1.source=${'acme:' + session.getCred('username')}
cred.provider.jexl.cred.1.name=undefined
Note: Due to internal dependencies, the property ".name" must be set with some value, altough it is really ignored by the JEXL credential provider. But not setting it will result in a configuration error.
Each authentication credential has a unique semantic type. The following credential types are available, as explained in chapter :
username
Credential that represents the username / login ID.
password
Credential that represents the login password.
newpassword
newpassword2
Credentials that represent the two values for a new password, entered in a password-change form.
secret
A third login credential, such as a token code or strike list number.
challenge
A challenge value, such as an SMS- or token-code, entered for a challenge-/response authentication scheme.
mappedid
An alternative user ID which is the result of some mapping process. Some authentication adapters may create such a credential in the login process depending on their own configuration.
tokenselection
Contains the alias of the selected token (meaning a hardware token, such as a SecurID or Vasco USB token). This credential is required if the "create.tokens" state in a model resulted in a list of more than 1 authentication tokens available to the user for the login process. In that case, the user must select which token to use for the authentication step, and the selection form will post a parameter which contains the alias of the selected token.
certificate
An X509 certificate (usually created by the PKI adapter).
sesticket
Contains an SES ticket (see "SES Login Ticket" for details).
string
A generic, additional string credential. For example, if a custom / legacy back-end authentication system requires an additional credential such as the IP-address of the reverse proxy server used to connect, this could be used to define this credential and where to take it from. It is up to the authentication adapter and its configuration then how to deal with such generic credentials.
Internally, there are even more credential types, such as a "mapped ID". But these are created automatically by the authentication adapter during the login process, depending on the adapter's capabilities and the configuration. Consult the documentation of the authentication adapter for details.
As mentioned before, the SLS supports challenge / response authentication procedures. There is quite a wide variety of authentication schemes available that use some form of challenge / response flow, for example:
- Google Authenticator
- NTLM (transparent for the user)
- RADIUS
- SMS
While the first three examples are tightly coupled to their respective authentication adapter, the third one is more generic. For example:
NTLM
- If NTLM authentication is used, the NTLM adapter must also be configured as "challenge" adapter (not only authentication). It will then perform a challenge / response handshake with the client webbrowser, completely transparent for the user.
RADIUS
- With RADIUS challenge / response, it's basically the same as with NTLM (the RADIUS adapter is responsible for all steps), but the user has to perform the challenge-/response step manually.
Generic (SMS)
But there is also a more generic adapter available in the SLS. This adapter simply generates a random number or string and makes it available as a JEXL variable. It is then possible to use, for example, the HTTP adapter to perform a HTTP request to the SMS Sender Web-Interface of a mobile provider, and post the challenge code there so that it is sent to the user by SMS. The same generic random challenge generator adapter will then verify the response entered by the user in the SLS HTML form.
The following chapter will explain how to set up challenge / response authentication with SMS by means of a HTTP-interface of some mobile provider (to actually send out the SMS with the response code).
First, the type of the adapter used for challenge creation and response verification must be defined by setting the property
adapter.challenge=<type>
The following types are supported:
-
basechallenge- The generic generator for challenge strings or numbers that can be used in an SMS login process, for example. -
ntlm- For handling the NTLM challenge and response exchanged between the browser client and the domain controller in an NTLM login flow. -
file- Providing a hard-configured challenge and response from the "user-config.xml" file, useful for local testing purposes.
The "basechallenge" adapter creates either a 6-digit number or a text string.
The following properties can be set in "sls.properties" to configure the base
challenges:
adapter.challenge
Set to "basechallenge" to activate using the internal base challenge / response adapter.
challenge.type
Optional: Set to "numeric" to create a number, by default with 6 digits, or
to "string" to create a random alphanumeric string, by default with 40 characters.
Defaults to "numeric" if not set.
challenge.lifespan
Optional: Allows to define the lifespan (validity period) of the response, in number of seconds. Defaults to 1800 (generous 30 minutes) if not set.
challenge.characters
Optional: Allows to define the list of characters to be used in the generated challenges; this should usually be alphanumeric ASCII characters. Defaults to:
ABCDEFGHJKLMNPQRSTUVWXYZabcdefghijkmnopqrstuvwxyz23456789
NOTE: The default characters intentionally avoid using any characters that are easily confused, such as one ("1") and lower-case L ("l"), or zero ("0") and "O". Consider this issue when configuring a custom set of characters.
challenge.length
Optional: Allows to define the length of the generated challenge. For numeric challenges, the default is 6 characters, for strings it is 40 characters.
This chapter serves as a simplified "how-to" for the implementation of a challenge- / response authentication process with SMS. Assumptions / prerequisites (for the sake of this example):
- The internal, generic challenge-response adapter is used to generate the challenge and verify the response.
- The LDAP adapter is used to verify the password.
- In order to send an SMS, the mobile phone number of the user must be available. This example assumes that it can be read from an LDAP attribute of the user. Since the LDAP adapter is used to verify the password, the attribute is available as a JEXL variable after the authentication step.
- The HTTP adapter is used to send the response code to the user, by performing a HTTP POST call to the HTTP-interface of some mobile phone provider.
The generic challenge-/response adapter is referred to by the alias "basechallenge":
sls.properties
adapter.challenge=basechallenge
The base challenge / response adapter generates a six-digit number by default (which is usually appropriate for SMS login procedures). If for any reason a longer, alphanumeric string should be created, the following property can be set:
challenge.type=string
This will result in an alphanumeric response code string.
sls.properties
adapter.authentication=ldap
ldap-adapter.properties
ldap.url=ldap://ldap.acme.com:389
ldap.principal.default=cn=Manager,dc=acme,dc=com
ldap.password.default=humptydumpty
ldap.auth.type=bind
ldap.auth.bind.dn.1=cn=${session.getCred('USERNAME')}, org=usa,dc=acme,dc=comDefine a group of HTTP adapter properties with the group alias "sendsms" (which will be used in the model to refer to these properties). This example assumes that the HTTP interface of the mobile phone provider takes four POST parameters:
-
customer- The company sending the SMS (the ficticious "acme.com"), which is a customer of the mobile provider. -
password- The password required by "acme.com" to send an SMS -
number- The mobile phone number of the receiver of the SMS (the end-user currently being authenticated by "acme.com") -
text- The message text of the SMS.
http-adapter.properties
# The url of the sms provider.
http.sendsms.url=http://global.phone.com/sendsms

# The HTTP method.
http.sendsms.method=post

# HTTP Header properties
http.sendsms.header.Content-Type=text/xml

# The body of the HTTP request. The challenge is stored
# in the JEXL variable "challenge", and the mobile phone
# number in the variable "attribute.ldap.phone".
http.sendsms.body=customer=acme&password=secu8932&number=${attribute.ldap.phone}&text=code:${challenge}

# Error codes
http.sendsms.code.error=500,503

# Deny codes
http.sendsms.code.denied=401,403If the SMS provider CGI interface requires to post an XML structure, the JEXL templating mechanism can be used. See "Templates" for details on how to define and use templates.
Once a template is defined, insert it into the body of the HTTP POST request:
http.sendsms.body=${function.getTemplateContent('msg')}The following model puts everything together:
sls.properties
model.login.uri=/auth
model.login.failedState=get.cred

# Show login page
model.login.state.1.name=get.cred

# Perform authentication (password check with LDAP)
model.login.state.2.name=do.auth

# Create challenge
model.login.state.3.name=create.challenge

# Use HTTP adapter to send response code with SMS
model.login.state.4.name=do.http
model.login.state.4.property=sendsms

# Display response code page
model.login.state.5.name=get.cred.challenge

# Verify response code
model.login.state.6.name=do.authresponse
model.login.state.6.failedstate=get.cred.challenge

# Authentication completed.
model.login.state.10.name=do.success
The SLS implements a custom session handling mechanism. This allows the SLS web application to gain full control over the login sessions without any dependencies to the servlet container within which it is running. The SLS sessions are also tightly coupled to the "client correlator" ID created by the HSP proxy, in that the value of the HTTP header "ClientCorrelator" is used as the session ID.
The SLS also handles session expiration and clean-up by itself. This also allows to avoid any potential problems that might be related to the session handling implementation of the servlet container.
session.inactivity.timeout
This property in the "sls.properties"-file defines the inactivity period in seconds after which the SLS session expires. Defaults to 300 (5 minutes) if not set.
Please note that SLS sessions have no direct relation to application or HSP sessions. While application and HSP sessions usually require longer timeout settings, login sessions are by definition very short-lived; hence, the inactivity timeout should always be small.
session.final.timeout.minutes
This property in the "sls.properties"-file defines the final timeout duration in minutes after which the SLS session
is terminated and removed under all circumstances. Defaults to 60 (1 hour) if not set. Supported values are:
- number of minutes larger than zero - sets final timeout duration to the given number of minutes
- zero - completely disables the final timeout - only use if necessary!
- Not set the property at all - sets final timeout duration to 60 minutes.
session.cleanup.period
This property in the "sls.properties"-file defines the interval in seconds for the session clean-up thread. This is somewhat similar to the Java garbagge collector settings, because defining a higher interval means quicker clean-up of expired sessions (freeing up memory), but also interfering with ongoing logins more often. This is due to the fact that the clean-up process needs to lock the internal session table while removing expired session from it.
Defaults to 30 seconds if not specified.
IMPORTANT NOTES ABOUT TIMEOUTS
All timeouts are in general enforced by the same one thread, which runs in the interval defined by session.cleanup.period.
Therefore, if the final timeout is set to 1 hour, and the clean-up interval to 5 minutes, it is possible that the final
timeout will indeed be actually enforced after 1 hour + 5 minutes - this may depend a little on at what point in time exactly
the session was created (relative to the clean-up interval).
Secondly, once the number of open sessions exceeds 500 (this is currently not configurable), the SLS will start enforcing the session timeout checks on every request, independent from the clean-up thread. This is meant to help avoid a situation where a sudden spike of new sessions within the clean-up interval would cause memory problems because it takes too long until they are removed again.
session.enable.cookie
This property, if set to "true" in the "sls.properties"-file, activates a persistent cookie named "SLSsecrnd". The purpose of this cookie (the value of which is not security-relevant) is to help the SLS to recognize if requests with different client-correlator values are really coming from the same client. This is a concurrency issue that can pop up with multi-tab support of todays web-browsers (see "Concurrency Issues with Browser Tabs" for details).
Note: The cookie "SLSsecrnd" must be configured to be transparent in the SRM configuration ("AC_GlobalCookies") as well!
As explained in "Features", the SLS avoids the usage of servlet container sessions.
Therefore, it is important not to create container sessions inadvertently by adding custom session-related configuration entries in the "web.xml" file or with invalid JSP files. Each JSP file must contain - just as the provided sample files - a directive which declares that no session is to be created:
<%@ page session="false" %>
It is possible to enable DEBUG or TRACE logging for a single session based on the user login ID, through the following two dynamic configuration properties (in the file "sls-dynamic.properties"):
log.debug.enable
Optional: Contains a comma-separated list of login IDs. If the user sends a login ID that is in this list, the session of that user will be switched to DEBUG log level.
Example definitions:
log.debug.enable=billmiller,johndoe,clarkgable
log.trace.enable
Optional: Contains a comma-separated list of login IDs. If the user sends a login ID that is in this list, the session of that user will be switched to TRACE log level (which includes DEBUG).
Example definitions:
log.trace.enable=billmiller,johndoe,clarkgable
Hint: In order to enable DEBUG or TRACE logging for such a user before an actual authentication attempt is made, the user may just fill in only the username into the login page and post it. Since no password is given, the SLS will not even try to authenticate the user. But because the username credential has already been received, DEBUG or TRACE logging will be active in the session of that user from that moment on, until the session ends or expires.
It is also possible to enable DEBUG or TRACE logging dynamically based on
arbitrary conditions by calling the script functions
session.activateDebugLog(boolean activate) resp.
`session.activateTraceLog(boolean activate)
.
After a successful login, the client browser must usually be redirected to an application page. Usually, a browser client tries to access some application URL first and gets redirected to the login service by the HSP. When the redirected request is sent to the SLS, the HSP inserts meta-information about the originally requested URL. The SLS extracts that information and will automatically redirect the browser back to that URL after a successful login.
However, it is also possible that the browser client accessed the SLS directly, for example because a user bookmarked the login page. In such a case, it depends on the configuration in "sls.properties" to what URL the client will be redirected after a successful login.
The URL parameter "target", if available in the URI of the current request that was sent to the SLS, will always override the current requested page. So if for any reason a redirect to a certain location should be enforced in some cases, it is possible to prepare links pointing to the SLS, and then defining the final redirection URI in the "target" parameter, e.g.
<a href="/sls?target=/myapp">SLS link</a>
This parameter can be especially useful for the logout flow, where it can be used to trigger the logout model and then enforce a redirect to a special page.
The following properties in "sls.properties" are used to define how to handle redirects.
Background: If a user enters data into a HTML form and posts it, current browsers will cache the form data if the response to the request was a HTTP 200 - but not when it's a redirect (HTTP 302). In environments where computers are potentially shared by multiple users, one user could perform a complete login, and another malicious user could then later "replay" that login by pressing the "back" button of the Browser in order to have it post the same form data again.
selfredirect.enable
Optional: If set to "true" the SLS will perform a redirect to itself after
every POST request, in order to eliminate that problem. Defaults to "false"
for reasons of backward compatibility.
ignore.requested.page
Forces the SLS to redirect the client always to the configured default redirect URL (property "redirect.default"), regardless of what page the client originally wanted to access.
Default URL to which the client browser should be redirected after a successful login. Usually, if a browser tries to access an application URL and the HSP redirects the request to the SLS, the originally requested application URL is preserved in the request, and the SLS will automatically redirect the client to it after successful authentication. But if a browser accessed the SLS directly (due to a bookmark, for example), and no requested page could be retrieved from the request, this default URL will be used instead.
The redirect.default URL is also used as the default redirect location during
logout, unless an explicit redirect.logout URL has been configured. See this
property below.
requested.page.whitelist
This optional property holds a regular expression which is a whitelist for allowed requested pages. Only if the regex matches, the requeste page is valid, else it is rejected ant the SLS will redirect to the default page "redirect.default".
requested.page.blacklist
This optional property holds a regular expression which is a blacklist for allowed requested pages. If the regex matches, the requeste page is is rejected ant the SLS will redirect to "redirect.default".
requested.page.postinform
Defines if the requested page is included in any <sls:form> as a hidden POST parameter to distinguish different tabs. Default is true.
redirect.logout
URL to which the client browser should be redirected after a successful logout.
This can be overridden by a "target" request parameter.
If redirect.logout is not set, the redirect.default property is instead used
as the default redirect location.
The model state "do.redirect" also allows to perform a redirect at any point
in the model (see "Action states").
Please note that this state, by default, invalidates the login session before
executing the redirect! If a redirect should be performed without invalidating
the SLS session, the state parameter ".param.invalidate=false" must be set:
model.state....name=do.redirect
model.state....param.invalidate=false
Note also, that actions attached to the do.redirect model state are only executed if the SLS login session is not invalidated and only if/when a following request comes in.
In a login flow with multiple pages, such as a challenge-/response procedure, the SLS usually responds with an HTTP 200 code when the first page with the username and password is posted. The HTTP 200 response contains the next HTML page, with the challenge form. This behaviour can be problematic in an environment where multiple people are using, or have access to, the same client computer. For example, user A could log in to an application, then later log out without closing the browser, and leave the desk. User B might then press the "back" button of the browser multiple times, until the challenge page of the login flow should be displayed. Since that page was the result of a POST request, the browser will usually ask the user if the POST request should be done again; this would potentially give user B access to the POST data, in this case the username and password of user A.
To prevent this, it is possible to force the SLS to use 302 responses whenever a POST requests results in displaying another page.
redirect.response.to.post
Optional: Allows to enable the SLS to respond to POST requests with 302 instead of HTTP 200 (the following GET will automatically load the current JSP). Will apply to all client requests, if no white- or blacklists are configured. Example:
redirect.response.to.post=true
redirect.response.whitelist.regex
Optional: Allows to define a whitelist for all user-agents for which NOT to respond with a 302 status code. Multiple properties can be set by adding a suffix to this property name. Example:
redirect.response.whitelist.regex=Mozilla/[123].
or
redirect.response.whitelist.regex.1=Mozilla/[123].
redirect.response.whitelist.regex.2=MSIE/[789].
redirect.response.blacklist.regex
Optional: Allows to define a blacklist for all user-agents for which to USE 302 status code responses. The syntax is the same as for the whitelist property.
redirect.for.<id>
redirect.to.<id>
In conjunction, these properties allows to specify multiple redirect URLs if one single SLS instance has to process authentication requests from different locations, and / or the SLS does not receive that information as meta data in the client request from the HSP. Typical use cases are programmatic clients which send direct POST requests to the SLS instance.
The <id> part of the property name has no specific meaning, it is just an identifier used to match two properties with each other.
"redirect.for.*" defines the URI path for which the client originally requested authorization, and which the SLS has to specify in certain internal directives sent to the HSP to make clear for which URIs the client may be authorized.
"redirect.to.*" then defines the path to which such a client must be redirected and for which it must be authorized.
For example, one SLS installation may be configured, in the Tomcat deployment descriptor, to process requests for both URIs:
/apps/x/login
/otherapp/sls
The mapping configuration would then look like this:
redirect.for.appone=/apps/x/login
redirect.to.appone=/apps/x

redirect.for.apptwo=/otherapp/sls
redirect.to.apptwo=/otherapp
In this example, the SLS is configured to authorize any authenticated client which authenticated itself through a specific SLS location for a corresponding path:
-
Clients authenicated through "
/apps/x/login" get authorized for path "/app/x" -
Clients authenticated through "
/otherapps/sls" get authorized for path "/otherapps".
IMPORTANT: The SLS session will NOT be terminated automatically if an internal forward is made, instead of the usual redirect performed by the "do.success" state.
As a consequence, when using an internal forward, it is the responsibility of the JSP or custom action, to handle and invalidate the session properly (in a JSP, the JEXL function "session.invalidate()" may be used with the "getJexl" JSP tag).
The SLS allows to redirect the client to an application logout location with the model state "do.applogout". This state redirects to a URL of an application in order to be able to terminate that application session and freeing up resources in the application server.
redirect.app.logout
Defines the location to which to redirect the client. This should be a path without any protocal and hostname information. Example:
redirect.app.logout=/theapp/actions/logout
redirect.app.logout.az
Defines the authorization required to access the logout location. The value must correspond to the value of the "Require_AZ" setting in the SRM configuration for the logout location.
The SLS implements a generic parameter check functionality. It allows to define through the configuration which input parameters may be accepted at all and what the valid value ranges are for each of those parameters. The checker functionality is configured through a set of properties in the global configuration file "sls.properties".
Also, it is possible to define aliases for any of the well-known parameters supported by the SLS, such as "target" or "cmd".
To define one or multiple aliases for a parameter, the following property must be defined:
parameter.alias.<name>=<alias[,alias2,alias3..]>
The <name> part contains the name of the parameter for which to define alias(ses), e.g. "target", and the value of the property contains the alias (comma-separated values for multiple aliases). Example:
parameter.alias.target=MyTarget,endpoint,customerPage
The checker can be enabled or disabled globally through this configuration property:
http.parameter.check.enforce
Default is "false". The checker can be enabled by setting it to "true".
However, since verifying the request parameters is also a security issue, it is strongly advised to keep this functionality enabled.
For each parameter that should be checked, a group of properties must be defined with the following prefix:
parameter.http.<id>.xxx=...
where <id> is just used to group all properties for one parameter together.
parameter.http.<id>.name
Name of the request parameter to check.
parameter.http.<id>.uri
URI path for which the parameter is checked (exclusive context path). This property is optional. If uri is not set, the parameter is checked for each uri, and for POST and GET requests. If an uri is specified, the parameter is only checked for POST request to the specified dispatching action path.
parameter.http.<id>.neverlog
This optional property is enabled if set to "true". When "neverlog" is enabled, the SLS creates a log filter for the parameter value, at the time the parameter is checked. So you can ensure that a parameter is never logged. This can be useful for passwords.
parameter.http.<id>.methods
Defines for which HTTP methods the parameter is allowed (comma-separated list for more than one method). Example:
parameter.http.x.methods=POST,GET
parameter.http.<id>.required
If set to "true", the parameter is mandatory, if set to "false" (default), the parameter is optional.
parameter.http.<id>.regex
This optional property defines a set of valid characters of a parameter. The character set is specified like a regular expresson character class. This is the subset of a regular expression (often between the square barckets).
The following example allows only capital characters from A-Z:
parameter.http.<id>.regex=[A-Z]
For more flexibility see the property: parameter.http.<id>.fullregex
parameter.http.<id>.min-length
Required minimum number of characters in parameter value.
parameter.http.<id>.max-length
Allowed maximum number of characters in parameter value.
parameter.http.<id>.fullregex
This optional property is a regular expression (as always in SLS a Java-Style-Regex ) that must match for the parameter check to succeed.
parameter.http.<id>.trim
If set to true, the parameter is trimmed at the begin of the check, allleading and trailing whitespaces are removed, before further checks.
parameter.http.<id>.tenant
This optional property refers to a tenant. The parameter checker is only active, if the specified tenant is selected at the time of checking. Mostly there is no need for tenant-specific Parameter Checker rules. If this subproperty .tenant is not specified for a rule <id>, the rule is valid for all tenants.
parameter.http.<id>.mand
This deprecated optional property refers to a tenant. "paramter.http.<id>.tenant" should be used instead. They are both used in the same way.
parameter.http.loginpage1.name=password
parameter.http.loginpage1.uri=/doauth.do
parameter.http.loginpage1.methods=POST,GET
parameter.http.loginpage1.required=false
parameter.http.loginpage1.regex=[a-zA-Z0-9]
parameter.http.loginpage1.min-length=6
parameter.http.loginpage1.max-length=20
In this example, the request parameter "password" is allowed to be sent through both GET and POST requests to the URI path
"/doauth.do".
According to the regular expression, the parameter may contain all characters from "a-z", "A-Z" and "0-9", and must be between 6 and 20 characters.
With automatic multi-step authentication types like NTLM, problems can arise when a user starts up a browser with multiple tabs open, where each tab points to an application protected by NTLM. In that situation, the browser tries to perform multiple NTLM authentications in parallel, which doesn't work because the SLS has only one session per client and expects certain steps to be performed in a certain order.
The problems begins with the fact that the cookie check in the HSP reverse proxy can already fail, or create multiple SCDID cookies with different session IDs for the same client, in such situations.
The following SRM configuration directive helps to alleviate this (should be set in the application / SLS location):
SE_SupCredGenerationTime 2
In the "sls.properties" file, the following properties should be set:
already.loggedin.redirect=true
concurrent.use.wait.jsp=true
concurrent.waiting.time=6
session.enable.cookie=true
wait.on.locking=false
-
"
already.loggedin.redirect" will redirect any request in a session, that has already a "valid" SES session state, to the application, regardless of the current SLS model state. -
"
concurrent.use.wait.jsp" instructs the SLS to send the concurrent requests the "WaitConcurrent.jsp" as the response (after the waiting period defined by "concurrent.waiting.time"). That JSP will try to reload the application URL after a few seconds. -
"
concurrent.waiting.time" defines the number of seconds which concurrently processed requests have to wait before the self-refreshing page is returned to the client. This should usually be something around 5 - 10 seconds. -
"
session.enable.cookie" will enable the SLS to recognize multiple concurrent requests from the same physical client through the persistent session ID cookie "SLSsecrnd", even when the requests come with different client-correlator IDs. -
"
wait.on.locking" means that if requests from the same client are really entering the SLS concurrently, while the first one is processed, the other ones immediately recieve a self-reloading page ("WaitConcurrent.jsp"), which waits a short while and then tries to load the application URL again. == Password Policy
During a password change or reset operation, the new password must be checked for compliance to a certain set of rules. Typically, at the very least there is a minimum and maximum length.
The SLS allows to define a policy for these password checks by defining a set of rules in a separate XML configuration file:
WEB-INF/password-policy.xml
The content of that file is a very simple XML tag with some attributes that define the result, like this example:
<password-policy upperCaseCount="1" lowerCaseCount="1" numericCount="0" minLength="4" maxLength="8" generatedLength="8" regularExpression="regularExpression="" inclusionPattern="-_./\\=$+*%@#%><&"" />
To disable the policy, simply remove or rename the policy file. If the file does not exist or cannot be processed, the policy mechanism is disabled.
The password policy is applied in two steps:
-
Verifies that the password length is between
minLengthandmaxLengthand that it does not contain upper/lower case letters or numbers if that is strictly forbidden (i.e. ifupperCase,lowerCaseornumberis set toNONEand the password still contains the corresponding characters). Note that in this case, the policy check always fails immediately, irrespective of a potentialcheckCountconfiguration. -
Next all configured checks are applied.
If
checkCountis set to 1 or higher, all configured checks are performed and the overall check only fails if less than the indicatedcheckCountnumber of checks have succeeded. IfcheckCountis 0 (resp. not set) then checking fails immediately at the first check that fails. Note that the inclusion pattern is only considered if no regex is defined and it is configured, while the regex is always considered unless it is not configured or configured to a blank string. Checks that count are:checkUpperCase(can only fail here ifupperCaseis set toMUST),checkLowerCase(can only fail here iflowerCaseis set toMUST),checkNumeric(can only fail here if setnumericis set toMUST), ifregularExpressionis set to a non-blank string, regex check, elsecheckInclusionPattern.
The following paragraphs explain each attribute of the XML tag.
minLength
Defines the minimum length of the password. Typical values are 4 or 6.
maxLength
Defines the maximum length of the password. A typical value is 8 (often used in older authentication systems).
generatedLength
Defines the length of the password generated during the password reset (aka forgotten password) process. Since the allowed maximum length for a user-chosen password may be set to a large value like 20, the length of generated passwords should usually be set to a sensible, short value, like 8.
upperCase
Defines if the password must contain 0, 0-n or 1-n uppercase characters. Possible values are:
-
NONE= The password must not contain any uppercase characters -
ALLOW= The password may contain uppercase characters -
MUST= The password must contain uppercase characters
lowerCase
Defines if the password must contain 0, 0-n or 1-n lowercase characters. Possible values are:
-
NONE= The password must not contain any lowercase characters -
ALLOW= The password may contain lowercase characters -
MUST= The password must contain lowercase characters
numeric
Defines if the password must contain 0, 0-n or 1-n numeric characters. Possible values are:
-
NONE= The password must not contain any numeric characters -
ALLOW= The password may contain numeric characters -
MUST= The password must contain numeric characters
regularExpression
Allows to freely define a regular expression that the password has to match. If a regular expression is defined, the password will always be checked against it. This property overrides the inclusionPattern property
inclusionPattern
A simplified variant of the "regularExpression" attribute, which is used to define a list of characters that are allowed. This property is only valid if:
- the property "checkInclusionPattern" has value "true", otherwise is ignored.
- the property "regularExpression" is not configured. Otherwise is ignored, since the regular expression overrides the inclussion pattern.
checkUpperCase
Check that the password contains uppercase characters if upperCase="MUST".
checkLowerCase
Check that the password contains lowercase characters if lowerCase="MUST".
checkNumeric
Check that the password contains numbers if numeric="MUST".
checkInclusionPattern
Check that the password does not contain special characters other than the ones defined in inclusionPattern. If this property is set to "true", the property inclusionPattern must be configured, otherwise the check of the password will produce an error.
checkCount
Defines the number of MUST-rules that have to be fulfilled in order to accept a new password. This means that if this attribute is set, for example, to "2", only two MUST-criterias have to be met by the new password. If this attribute is not set, all MUST-rules have to be followed.
The following SLS components can be localized to match the end-user's languages:
- Java Server Pages (JSP)
- Error messages in JSPs
This can be achieved by adapting the language resources properties files (see following chapters). These files contain key-/value pairs, where the key uniquely represents a message or a JSP.
The standard approach for localizing a Java application is to avoid hard-coded text in JSPs. Instead, only IDs of resources should be used (through some taglibs for example), and the text messages themselves should be externalized in the resource properties files.
If multiple languages are supported through message resource files (as described in the following paragraphs), the user can choose the preferred language through links in the JSPs or the URI of the requested page (the application that the user tried to access).
The links must point to the SLS application, with the parameter "language" containing the 2-character code of the desired language ("de" for german, "en" for english etc.). For example:
<a href="?language=en">English</a>
<a href="?language=de">Deutsch</a>
<a href="?language=it">Italiano</a>
The user's language choice is then stored in a persistent cookie named "SLSLanguage" so that the same language will be used automatically the next time the same user performs an authentication again.
Sometimes applications use their URI to decide which language to use, e.g. an application "/demoapp" might use URIs such as:
-
/demoapp/en/something→ English -
/demoapp/fr/something→ French
If a user tries to access such a URI and is redirected to the SLS, the URI of the requested page is sent to the SLS as well. This makes it possible to select the language for the login session based on this URI. There are two options available:
- Using a regular expression
- Defining the index number of the language part of the URI
When using a regular expression, the language part of the URI should usually be a substring of the entire URI, such as the "/fr/" part in the following example:
/demoapp/one/fr/xyz/anything
The following example shows how to configure a regular expression that matches the language part of that URI:
lang.uri.regex
Optional: Defines a regular expression which is used to match against the requested page URI. If it matches, the matching part will be used as the language code, e.g.:
lang.uri.regex=/.*/(.*?)/
Note: This check uses the "matcher.group(1)" method of the Java regular expression matcher for the resulting language code. So, in order to test a regular expression with some Java regex tool, make sure the "matcher.group(1)" method returns the desired result.
Then again, sometimes a regular expression might be overkill when the language part of the URI is always at the exact same location within the URI; in those cases, using the index number might be easier (see following chapter).
When using an index number instead of a regular expression, the URI of the requested page is simply split up into parts, using the slash ("/") character as a separator. The parts are then numbered, beginning with 0 (zero), e.g.
Requested page URI: /demoapp/one/en/so/something
Part 0: demoapp
Part 1: one
Part 2: en
Part 3: so
Part 4: something
For the example above, the configuration would look like this:
lang.uri.part.no
Optional: Defines the index number of the requested page URI part which represents the language code, e.g.
lang.uri.part=2
See "Language Cookie" for information on how to configure the default language.
The creation of the language cookie can be configured through a number of configuration properties that are explained in detail in the chapter "Language Cookie".
In the subdirectory "WEB-INF/classes", there are property files named "sls-resources.properties" or, for specific languages, +"sls-resources_XX.properties",+where "XX" is a language code, like "de" for german. These files are used to provide internationalization support. They contain the text messages used by the . So, an example file list looks like this:
WEB-INF/classes/
  sls-resources.properties - Default (fallback)
  sls-resources_de.properties - German version
There are various groups of message properties:
Table 14.1. Resource Properties Groups
| Property Name Prefix | Usage |
|---|---|
jsp.* | Relative path to JSP page within SLS web application directory. |
errors.* | HTML header and footer for error messages. |
sls.* | Error messages displayed in the JSPs. |
label.id.* | Credential type names. |
text.* | Text labels used in JSPs (title, page text etc.) |
The existing messages are all listed in the provided default resource files. Please read the contents of these files for detailled information.
It is possible to configure additional subdirectories in the "WEB-INF" directory,
which can contain more message resource property files. These files must follow
the exact same name conventions as explained above; and they will ALWAYS have
precedence over the files in the "classes" directory. This means that by adding
an additional subdirectory for custom resource files, it is possible to just
override the properties that need to be different than the SLS’s own default
values; either per language, or per tenant, or both.
custom.resources.path
This property allows to define either an absolute path to a directory anywhere
in the filesystem, or a relative path for a subdirectory of the SLS "WEB-INF"
directory, to contain additional message resources, e.g.
custom.resources.path=more_resources
If multiple subdirectories should be used (for example, if message resources should be split up in separate directories for each tenant), then an arbitrary suffix can be added to this property to add it multiple times, e.g.
custom.resources.path.1=acme_resources
custom.resources.path.2=store_resources
The resource files also contain properties which hold names of JSP-files that could be used for the given language. The default login page JSP, for example, is named "Login.jsp". The file used for a german user, however, could be named "Login_de.jsp", or it could be in a separated directory, like "de/Login.jsp".
This is somewhat contrary to the 'official\' approach of JSP applications as propagated by Sun, where there is only one single JSP page which localizes text through a Java bean. Of course a JSP developer is still free to do it this way. But experience shows that in many companies tools are not available to efficiently handle JSPs with bean-based text localization, and the preferred way is to just create static text for each language by creating a separate set of JSP files. That is why the SLS provides the mechanism to use a custom JSP for each language.
An example file and directory structure could look like this:
sls-webapp/
  WEB-INF/...
  jsp_en/
      Login.jsp
      Welcome.jsp
      ...
  jsp_de
      Login.jsp
      Welcome.jsp
      ...
  jsp_fr
      Login.jsp
      Welcome.jsp
      ...
In each "sls-resources_XX.properties" file, all the jsp path properties would have to be adjusted acordingly as follows:
sls-resources.properties
jsp.login=/jsp_en/Login.jsp
jsp.welcome=/jsp_en/Welcome.jsp
sls-resources_de.properties
jsp.login=/jsp_de/Login.jsp
jsp.welcome=/jsp_de/Welcome.jsp
The common encoding used for dealing with chinese, japanese etc. characters is UTF-8. But Java message resource property files have to be ASCII-encoded, with all special characters in Unicode-escaping notation. See this Sun documentation for details:
https://docs.oracle.com/cd/E19773-01/819-5070/adgjt/index.html
In order to get a JSP in the SLS to properly display asian characters, the following steps must be taken. First, the JSP file must begin with this line:
<%@ page contentType="text/html;charset=utf-8" pageEncoding="utf-8" %>
This ensures, that the resulting output stream sent to the browser client is really UTF-8 encoded.
Furthermore, when a property file is edited with some UTF-8 capable editor, and the special characters are inserted, it must be converted to the proper ASCII encoding before it is deployed in the SLS. This is done using the "native2ascii" tool which comes with Java:
native2ascii -encoding UTF-8 <inputfile> <outputfile>
So, if there was a resource bundle file "SLSResources.properties" that was processed with a UTF-8 editor, and which contains UTF-8 encoded chinese characters, it would have to be converted like this:
native2ascii -encoding UTF-8 SLSResources.properties SLSResources-cn.properties
Then the resulting file "SLSResources-cn.properties" could be deployed in an SLS instance (where it would have to be renamed to its original name of course).
This chapter covers everything related to the SLS JSPs (Java Server Pages) and the SLS JSP tag library.
The various HTML pages displayed by the SLS are created through JSP files. These files are usually located in this directory within the SLS web application:
WEB-INF/jsp
The mapping of model steps to JSPs works as follows:
-
Model state (e.g. "
get.cred") is resolved with the dispatch configuration ("struts-config.xml") to an internal fordward, such as "jsp.login". -
That internal forward is then resolved again through the Java language
resource file (localization) to an actual filename and path. So, in the
language resource file ("
sls-resources.properties"), there is an entry like
jsp.login=WEB-INF/jsp/Login.jsp
The reason for the second step is to allow for the possibility of having completely separated JSP files for each language (see "Localization" for details).
See "Display Single JSP Command" for details on how to directly display a certain JSP (for testing purposes).
The following components can be adapted to customize the JSPs (besides the JSP files themselves):
-
/staticfiles/includes/*.css: Contains all CSS stylesheet definitions. -
/staticfiles/includes/page-heading.inc: Contains the header section HTML. -
/staticfiles/includes/error-message.inc: Contains the error message section HTML. -
/staticfiles/includes/page-footer.inc: Contains the footer section HTML.
The SLS provides a JSP tag library that simplifies creating the various HTML forms the way the SLS needs them to be. Some tags also provide the possibility of using JEXL/Groovy to display dynamic content in a page, or render parts of a page only if a certain JEXL/Groovy condition is met etc.
Moreover (since SLS 4.41.0.0) JEXL/Groovy expressions can generally be used in all tag attributes, except very basic inherited attributes like "id".
Please consult the [TABLIBGUIDE] for a complete list of all available JSP tags, and documentation on how to use them.
There are some global configuration properties that have influence on the rendered HTML pages.
jsp.globalerror.first
Optional: If set to "true", only the first error message from the parameter checker is shown when the message tag
(<sls:message>) is called with the special key "global.error.msg". If set to "false", all error messages are
displayed. When i.e. the username is too short and contains an illegal character, both messages are displayed.
Defaults to false.
NOTE: This property has higher priority than jsp.globalerror.last, if both
are set to "true".
jsp.globalerror.last
Optional: If set to "true", only the last error message from the parameter checker is shown when the message tag
(<sls:message>) is called with the special key "global.error.msg". If set to "false", all error messages are
displayed. When i.e. the username is too short and contains an illegal character, both messages are displayed.
Defaults to false.
NOTE: This property has lower priority than jsp.globalerror.first, if both
are set to "true".
jsp.javascript.minimize
Optional: If set to "true", all the SLS JSP tags that would normally render JavaScript for some functions just
won't do it. This should only be used in cases where it is certain that the client browsers do not support JavaScript,
and it is important to keep the HTML free of any JavaScript as a result.
Defaults to "false".
The latest SLS release comes with Bootstrap 5. If existing JSPs from previous SLS releases should be used with the new Bootstrap version, the following adaptations should be made:
A few style names were changed with Bootstrap 4 and 5. Replace the name prefixes of these style classes accordingly in the JSPs and/or include files:
| State | Description |
|---|---|
*Old* | *New* |
col-xs-* | col-* |
col-sm-offset-* | offset-sm-* |
col-md-offset-* | offset-md-* |
col-lg-offset-* | offset-lg-* |
Remove the following include statements from all JSPs and/or include files:
-
<link rel="stylesheet" href="staticfiles/includes/bootstrap-theme.min.css"> -
<script src="staticfiles/includes/jquery-3.5.1.min.js"></script> -
<script src="staticfiles/includes/bootstrap.min.js"></script>
Unless, of course, you are making explicit use of any functionality in the Bootstrap JavaScript files in your customized JSPs. Please consult the official Bootstrap 5 documentation page for more information about breaking changes in the new Bootstrap releases.
The SLS optionally supports whitelisting or blacklisting of users, based on their login ID . It allows to immediately restrict access to an SLS instance independently of the actual back-end service. This can be useful if it is necessary to quickly lock a user or all but a few users in case of an emergency, and when the people (administrators) with the rights to do that are just not available (at a weekend, for example).
The filter works very simple: It reads a plain text file with login IDs and uses these entries as a white- or blacklist, depending on the configuration setting. If the filter is activated, the SLS will monitor the filter file and re-read it when it is changed, without requiring an SLS restart.
The user filter is triggered, by default, by the following to model states:
do.auth
do.reauth
In cases where a model does not use these states at all, but still requires the user filter functionality, there is an additional option (see property "user.filter.username.credential.verify").
User Blacklisting
If the filtering mode is set to blacklisting, all login attempts performed with one of the user IDs found in the filter file will be denied.
User Whitelisting
If the filtering mode is set to whitelisting, all login attempts performed with a user ID not listed in the filter file will be denied. This can be used to restrict access for all but one or a few users quickly.
The filter file is a plain text file with the default name and location:
WEB-INF/UserFilterFile.txt
The format is simple; it consists of one login ID per line, like:
johnmiller
nobody
baduser
janearcher
The following properties in the "sls.properties" file are relevant to the user
filter functionality:
user.filter.file
Path of a text file with a list of user IDs. By default, the file is interpreted
as a whitelist. If the value is not an absolute file path, it is interpreted as
a relative path within the "WEB-INF" subdirectory of the SLS web application.
If the property is not set, the filter mechanism is disabled.
If the property is set but defines a file that does not exist (yet), the access to all users will be granted.
Note: The filter mechanism will become active as soon as the configured file is created. In whitelisting mode, this will immediately block access for all users (as long as the file is empty). In blacklisting mode, this will have no effect.
Example:
user.filter.file=UserFilterFile.txt
The user filter is not limited to one file. Multiple comma separated files can be set. In this case the SLS merges the userIDs from all the files to one big list. This can for example be useful for handling groups of users, or sharing lists for multiple SLS instances.
Example:
user.filter.file=Local.txt,/share/allSlsFilter.txt
user.filter.dynamic
Boolean property which enables the dynamic filter-file mode. If set to true, the
filter mechanism is enabled and the refresh-thread is running. The property
user.filter.file can be set in sls-dynamic.properties, but it must not be
set in the static configuration file. The advantage of this dynamic filter mode
is, that the list of filter files can be changed when the SLS is running.
Also, the property "user.filter.blacklist" (see below) can be put in the
"sls-dynamic.properties" file, which allows to switch between white- and
blacklist-mode on the fly, without restarting the SLS.
user.filter.blacklist
Set this property to "true" to make the filter list work as a blacklist
instead of a whitelist (as it does by default). If the filter is not enabled,
this property will be ignored.
Example:
user.filter.blacklist=true
Note: An empty blacklist does allow all users, where an empty whitelist does block all users.
If the property "user.filter.dynamic" is enabled, this property can also be
put into the "sls-dynamic.properties" file.
user.filter.username.credential.verify
As mentioned before, the user filter is triggered only by pre-defined model
states by default. In some cases, this might not be sufficient; for example
when a model uses only generic states like do.http, and then sets the
credentials to verified state using JEXL functions.
For such cases, this property can be set to one of the following two values:
create- This value means that the user filter will be triggered as soon as the credential is created (basically, when the POST request from a login form ist processed). And therefore before any backend adapter would be invoked.
markverified- This value means that the user filter will be triggered only when the credential is marked as verified (either by an adapter, or by means of JEXL).
Examples:
user.filter.username.credential.verify=create
or
user.filter.username.credential.verify=markverified
The SLS allows to send any desired e-mail. This function can be used to send notification or information to any receiver by e-mail.
There are two possibilities of activating the sending e-mail mechanism, both of them are configurable in the model.
-
The model state
do.sendmail(requires a property) -
The
sendMail()JEXL Function
To send a mail, the model state "do.sendmail" can be used. It requires an additional "property"-State to define which group of properties to use:
model.state.50.name=do.sendmail
model.state.50.property=<alias>
The "<alias>" value refers to a group of properties which define the details of the mail to be sent:
email.<alias>.to
The list of receiver e-mail addresses. It can be a single address or a comma-separated list.
email.<alias>.from
Address which will be set as sender in the e-mail header.
email.<alias>.subject
The subject of the message
email.<alias>.body
The body/content of the message. As it is desirable to have longer message there are two ways to fill this property:
- In the property like manner:
email.<alias>.body=This is the body.
If the text should continue on the next line add a back-slash ("\") at the end of the line.
email.<alias>.body=This is a long line of the body \
which continues here.
Be aware the whole text will be shown as one line in the body. It will not create a line break at the intended position.
- Using the JEXL Template function (see "Templates"), e.g.
email.<alias>.body=${function.getTemplateContent('XY')}email.<alias>.mimeType
Optional: The MIME type of the mail. Defaults to "text/plain".
The function needs four parameters similar to the model state. The method header is:
sendMail(to, from, subject, body)
The body can use the same template function as the model state. A complete model state could look like this:
model.sendmail.state.25.name=do.generic
model.sendmail.state.25.action.1=${function.sendMail('receiver@domain.com', 'sender@domain.com', 'Mail Subject', function.getTemplateContent('infomail'))}In order to use this mechanism, the e-mail environment must be configured. The following configuration property must be enabled in the "sls.properties" file:
mail.transport.protocol
Specifies the default message transport protocol. Usually to send email it should be smtp.
mail.auth.user
Optional: Username when authentication is required.
mail.auth.password
Optional: Corresponding password for the username. This should be encrypted by the DataProtector/Seal. See "SLS Seal (DataProtector replacement)"
mail.smtp.user
Optional: Default user name to connect to the SMTP server.
mail.smtp.host
The SMTP server to connect to.
mail.smtp.auth
Optional: Set this to "true" to authenticate the user. Defaults to "false".
mail.smtp.port
Optional: The SMTP server port to connect to. Common port numbers are 25 and 465(SMTP over SSL). Defaults to "25".
mail.smtp.ssl.enable
Optional: Set this to "true" to use SSL to connect the server. Defaults to "false".
In general all the JavaMail API Properties can be used for more detailed configuration.
mail.smtp.ssl.protocols
Allows to define SSL/TLS protocols to use, whitespace-separated list with the same constants as also used in JDK settings, e.g. "TLSv1.2 TLSv1.1".
See documentation of the javax.mail client for additional settings and javax.mail-<version>.jar in the SLS WEB-INF/lib directory for currently included version.
The SLS provides multitenancy support, which means that the JSP pages from one single SLS instance can be customized to look differently for different users, depending on things like the request URL or the hostname etc.
Even the login flow can be customized to behave differently, depending on the current tenant.
The basic idea is that the language resource mechanism used to implement support for different languages (see "Message Resource Files") is extended in order to also support multiple tenants. In other words, the tenant is basically just an attribute of the current session, just like the user's language.
The reason is that all paths to resources such as images, style sheets etc., but also the paths of the various JSP files can be put into the language resource files. The JSP tags provided with the SLS provide the simple means to work with these resources from within a JSP (see "taglib-guide.pdf" for details about using the JSP taglib). While usually the language of the current session is used to resolve the path of a resource, the tenant alias is taken into account as well if necessary.
All tenant specific resources should be in separate resource property files which follow the regular Java language resource file naming convention, extended with a tenant prefix:
sls-resources-<tenant>_<lang>.properties
Where "<lang>" is a two-letter language code like "en", "it" etc., and
"<tenant>" is the tenant alias, like "acme". For example, in addition to
the regular resource file holding all english messages, named
sls-resources_en.properties
there could also be an additional file named
sls-resources-acme_en.properties
which holds all paths, messages etc. that are different for the tenant "acme".
Note
When there is no specific message resource for the current tenant, the SLS will just fall back to the default resource properties files. So the tenant-specific properties file can be used to just override those message keys that need to be changed for a tenant.
In order to use tenant support, it must be activated explicitely:
multitenancy.enabled
Set this property to "true" to enable support for multitenancy. Defaults to "false" if not set.
Each tenant needs to be given an alias, which is then used as an extension to the name of the language resource file, or in logical JEXL conditions within the login model.
To define tenants, the following property prefix must be used:
tenant.<no>
The "<no>" part of the property name is a numeric value, beginning with "1". The value of the property is a simple string, which can then be used as an extension for language resource keys, or in JEXL functions.
Example definitions:
tenant.1=acme
tenant.2=multicorp
When a request is processed by the SLS, there must be some criteria for deciding which tenant to use. There are some types of attributes for distinguish tenants:
multitenancy.resolving.<no>
Where "<no>" is a numeric value which also defines the priority of each kind of tenant resolution. Example definitions:
multitenancy.resolving.1=<type>
multitenancy.resolving.2=<type>
The following types are available:
-
samlalias -
urlregex -
urlparam -
hostprefix
Another option is to set the tenant specifically within the model, using the JEXL function "session.setTenant(alias)" (see "JEXL Function").
Determine the tenant based on a part of the requests' URL path, defined through a regular expression. Example:
multitenancy.resolving.1=urlregex
The regular expression for matching the URL must be defined in a property of the following type:
tenant.<no>.regex
Regular expression for matching with the URL path (or a part of it).
The value of a URL parameter is used to determine the tenant. Example:
multitenancy.resolving.1=urlparam
The URL parameter name is pre-defined:
mand
So by invoking the SLS URL with the URL-parameter "mand" set to one of the defined tenant aliases, the corresponding tenant can be triggered:
..../sls/auth?mand=acme
The first part (prefix) of the hostname of the request is used to determine the tenant. Example configuration property:
multitenancy.resolving.1=hostprefix
So if this property is set like this, and the incoming request would be for the host
acme.corp.com
it would result in the usage of the tenant "acme".
NOTE: For this type of tenant resolution, the SRM configuration must also be adapted correctly, or the SLS will not receive the correct host header value. See "Step 3: Configure SRM" for details.
Determine the tenant based on the alias of the sender of the current SAML message. For example, in an SLS Identity Provider setup, all registered Service Providers are configured and usually given an alias, to easily refer to them when using SAML-related JEXL functions etc. Based on that alias, the tenant can be triggered as well.
multitenancy.resolving.1=samlalias
The alias for each tenant, that corresponds to the alias of the SAML provider, must be configured like that:
tenant.<no>.samlalias
Example of an SP registered in the Identity Provider under the alias "acme-ltd-sp":
idp.sp.1.alias=acme-ltd-sp
idp.sp.1.metadata.provider=file
idp.sp.1.metadata.location=WEB-INF/idp/acmesp-metadata.xml
...
tenant.2.samlalias=acme-ltd-sp
The JEXL function "session.setTenant(alias)" allows to enforce a certain tenant from within the model:
model...state.10.name=do.generic
model...state.10.action=${session.setTenant('acme')}
Note: Even if this JEXL function is used, at least one of the previously mentioned resolve mechanisms must still be configured, if the multi tenancy feature is enabled!
The following paragraphs describe how to actually implement custom pages or page content, or even a custom login model for different tenants.
There is a JEXL variable that holds the value of the current tenant:
current.tenant
So, in order to define a condition - for example in a customized model - based on the tenant, the JEXL expression would look something like this:
..state.3.nextState.if=${current.tenant eq 'acme'}If the goal is to have a complete set of JSPs for each tenant, the JSP paths must be defined in the tenant-specific resource files in the SLS web application subdirectory "WEB-INF/classes". For example:
In file "sls-resources-acme_en.properties":
jsp.login=/jsp/acme/Login.jsp
In file "sls-resources-multicorp_en.properties":
jsp.login=/jsp/multicorp/Login.jsp
If there should be only one single set of JSPs that should display different content for different tenants, a number of JSP tags can be used. All relevant SLS JSP tags automatically support usage of tenant-specific resource files, if they are available. So in order to have tenant-specific messages, a message key must be moved from the default resource file "sls-resources.properties" into the tenant-specific resource files.
See "Language Cookie" for information on how to configure a default language for a certain tenant.
There is a jexl function session.getTenantSpecific(), wich allows setting of the following configuration properties in a tenant specific way:
-
redirect.default -
requested.page.whitelist -
requested.page.blacklist -
redirect.app.logout -
browser.blacklist -
fake.token.list
Consult the [JEXLGUIDE] for details about the jexl function.
There are more SLS features, that can be used tenant specific. For example the "Parameter Checker / Aliases" and the "Browser Blacklist".
It is possible to use separate log files for each tenant. In case of URI-separated tenants, it is even recommended, because of potential problems that might occur with log file rotation (see "Log rotation problem with URI-based multi-tenancy" for details).
For details on how to configure Log4J to use separate log files for each tenant, please read "Tenant-specific logging".
NOTE: If multitenancy is enabled, but the logging configuration is not adapted accordingly, some log records may not get written anywhere as a result!
Here is a complete example for using tenants, based on the details described in the previous chapters and paragraphs. The sample tenants used here will be:
- Tenant 1: "asia" (the asian part of the company)
- Tenant 2: "euro" (the european part)
They shall use the same sets of JSPs, but the page should contain a heading - defined in the message resource key "page.heading" - that is different for each tenant.
The tenant should be triggered by two different virtual hosts:
-
asia.acme.com- Hosts the asian company site -
euro.acme.com- Hosts the european company site
First, the additional resource files with the tenant-specific messages should be created. They are to be put into the SLS web applications\' subdirectory "WEB-INF/classes".
The first file, "sls-resources-asia_en.properties" must contain the following property:
page.heading=Welcome to ASIA Corp.
And the other resource file, "sls-resources-euro_en.properties", must contain the same property, but with a different value:
page.heading=Welcome to EURO Corp.
Now in order to have a JSP display the correct heading for the current tenant, include this JSP tag:
<sls:message key="page.heading" />
However, it will not work yet as long as the following steps are not completed.
A few properties must be defined in the "sls.properties" configuration file, as described above:
multitenancy.enabled=true

tenant.1=asia
tenant.2=euro

tenant.resolving.1=hostprefix
If tenant resolution is done by hostname (hostprefix), it is mandatory to add the following directive to the login location of the SRM configuration:
HGW_ForceHost <hostname>
<hostname> must be the actual hostname of the virtual host, e.g.
HGW_ForceHost www.acme.com
If this directive is not set, the SLS usually receives "127.0.0.1" as the hostname. This prevents the hostname-based tenant resolution from working correctly.
The SLS supports an optional blacklist for browser (or client) agents. This blacklist allows to react with different actions to requests from "unsupported" clients.
Please note: This is not a security feature! Its main purpose is to reject, for example, browsers which do not have an appropriate SSL implementation and may therefore pose a problem to the application, the HSP or the client itself. But since determining the browser type is based entirely on the "User-Agent" HTTP request header which can easily be faked, this mechanism cannot and must not be used for any security-relevant purposes.
The blacklist uses regular expressions to match a set of rules to a certain browser agent type. Each set of rules consists of a group of properties. Such a set of properties shares the same name prefix, as explained below. The blacklist basically allows to specify two things for each browser agent:
- If SSL session ID fixation should be used
- What action should be taken before (or instead) performing an authentication (see "Actions" for details).
The HSP supports SSL session ID fixation for increased security. This functionality can either be globally enabled or disabled in the HSP configuration, or the HSP can let the SLS disable or enable it per session, based on the client agent type.
If the HSP delegates the decision to the SLS, it is possible to define a default setting for the SLS using this property:
fix.ssl.sid
If it is set to "true", the SLS will enable SSL session ID fixation for every client for which no overriding rule exists in the blacklist file. If not set, the property defaults to "false".
Example:
fix.ssl.sid=true
As mentioned, the rules in the blacklist file can override the global default for a certain browser type.
To activate the blacklist mechanism, a blacklist file must be specified in "sls.properties" with this property:
blacklist
Defines the path of a blacklist file. Can be either an absolute path, or relative to the SLS "WEB-INF" subdirectory.
Example:
blacklist=BrowserBlacklist.properties
If the blacklist file is changed, it is being reloaded automatically as soon as the next request is processed.
The blacklist file is basically a Java properties file. It contains groups of properties for each browser agent rule, like this:
<rule name>=<regular expression>
<rule name>.desc=Default description text
<rule name>.desc.<lang>=Language-specific description text
<rule name>.fixsslsid=off
<rule name>.action=[popup | info | deny]
An example of properties for a rule matching all Mozilla browsers, older than version 4:
MOZPREV4=Mozilla/[123].
MOZPREV4.desc=Mozilla browser older than version 4 (default)
MOZPREV4.desc.de=Mozilla Browser älter als Version 4 (deutsch)
MOZPREV4.fixsslsid=off
MOZPREV4.action=popup
Another example with a more complex regular expression matching all Versions of Internet Explorer except 5.0.1, 5.5 and above 6 for Windows 2000:
IE_WIN2K_LOWER=MSIE.([1-4])|(5\.0[^1]).*Windows.NT.5\.0
IE_WIN2K_LOWER.desc=IE_W2000_older_than_5_5
IE_WIN2K_LOWER.fixsslsid=off
IE_WIN2K_LOWER.action=info
The value for the <+rule name+> part can be any free text, but ideally it should relate to the browser type it addresses, because this name is also written to the log for clients with the action "deny" (see below).
The order in which the regular expressions in the file are processed is unspecified. Therefore, it is not guaranteed that the expressions are processed top-down.
Syntax: <rule name>=<regular expression>
The first property contains the regular expression. That expression is used to evaluate the HTTP header "User-Agent" sent by the client. If it matches, the action defined by the property set is performed.
See "Regular expressions reference" for more information about regular expressions in the SLS.
Syntax: <rule name>.desc=Default description
Syntax: <rule name>.desc.<lang>=Language-specific description
This property allows to specify a text description that will be displayed to the user by the actions "popup" and "info". Since each session has a language defined by the SLS language cookie, it is possible to create descriptions for each supported language. The <lang> part of the property name must be a 2-letter language code similar to the codes used by the Java localization API ("de", "en", "fr" etc.).
If no description is found for the language code of the session, the default description is used. If no default description is available, an empty String will be used.
Syntax: <rule name>.fixsslsid=on
This property allows to enable or disable the SSL session ID fixation functionality of the HSP for a client that matches with this rule. This value will override the global default setting.
Syntax: <rule name>.tenant=<tenant>
The scope of a rule can be limited to a tenant. If this rule-limitation +.tenant=<tenant>+is used, that rule it is only valid for the given tenant. If an other - or no - tenant is selected, the rule is not active.
The followin rule would deny the IE browser for tenant "secur".
IE=MSIE.
IE.desc=No IE Browser allowed.
IE.tenant=secur
Syntax: <rule name>.action=[popup | info | deny]
This property defines the action that should be performed for requests sent by clients matched by this rule. There are three possible values:
Table 19.1. Blacklist actions
| Action | Description |
|---|---|
popup | This action means that the JSP developer who writes the login JSP should present a popup dialog with the description to the user. This is used mainly to inform users that support for their client will stop soon, and that they should upgrade to a supported browser version. Since a popup dialog is very intrusive, it is only used in cases where it is deemed urgent to have users upgrade their browser. In other, less urgent cases, the "info" action should be used. |
info | This is basically the same as the popup action, only that the description should be presented to the user within the login page and not in a separate popup window. |
deny | This is the default action. If this action is set, any request from a client which matches with this rule is forwarded (not redirected) to the page "useragent.jsp". This page should inform the user that an update of the browser is mandatory, and the browser currently used is no longer supported. |
The SLS implements a forced slow-down of authentication processes in case several subsequent login attempts are performed for the same user ID but with an invalid password. This feature can serve as an addtitional protection against password guessing attackers or certain types of denial-of-service attacks.
Slowdown means that a user will, for example, after the 2nd failed login attempt be forced to wait for 30 seconds before trying for a 3rd time. That does not mean, however, that there will be any hanging requests; the client browser will instead immediately recieve a response, notifying the user that he or she must wait for x seconds before a login can be attempted again.
It is also possible to increase that waiting time after each failed login attempt in different ways, depending on the configuration.
The following model states currently trigger the slowdown mechanism:
-
do.auth -
do.authresponse -
do.trxresponse
The following properties in the "sls.properties" file are used to specify the slow-down behaviour.
slowdown.active
Enables the slow-down mechanism if set to "true". Defaults to "false" if not set.
slowdown.usepage
If this property is set to "true", the separate page defined in the JSP "Slowdown.jsp" will be sent to the client with the notification message about the required waiting time. This JSP contains a self-refreshing meta header which will have the login page being loaded again automatically once the waiting time has passed.
If this property is set to "false", the login page will be returned to the client just as usually when a login fails. It will display the waiting notification message like any error message.
If the property is not set, it defaults to "true" (using "Slowdown.jsp").
slowdown.time
Specifies the number of seconds of a base waiting time unit. The actual waiting time between login attempts depends on the property "slowdown.type" as well, though.
slowdown.type
Defines the mode of calculating the required waiting time between login attempts. The following values are supported:
-
constant
The waiting time between invalid login requests will always stay the same.
-
linear
The waiting time will increase after each failed login by adding the value defined.
-
doubling
Doubles the waiting time after each invalid login attempt.
slowdown.threshold
Defines the number of failed login attempts allowed before the slow-down mechanism kicks in. If set to 2, for example, after 2 failed login attempts the user will be forced to wait before trying a 3rd time.
There are two areas involving the SLS and HTTP basic authentication:
- Integration with an existing back-end application server which uses basic authentication. This is explained in chapter "SSO Integration".
- The SLS itself using HTTP basic authentication instead of HTLM form-based login to authenticate a user.
The second option means that the SLS will use HTTP request and response headers instead of JSP pages to authenticate a user. These headers will trigger the user's webbrowser to show a popup dialog for entering username and password. There may be cases where this can be useful; however, it should be noted that it does not make sense to use this feature together with a 2-step-login (challenge-response), since the second step will always display a custom page for entering the challenge value.
Basic authentication by the SLS is configured with the following properties in the "sls.properties" configuration file:
basic.auth.enable
Enables basic authentication by the SLS if set to "true" (defaults to "false").
basic.auth.realm
Defines the text string for the basic authentication realm (displayed in the username / password popup dialog window of the webbrowser). Defaults to "Secure Login Service".
basic.auth.https.only
Prevents basic authentication over HTTP connections if set to "true" (defaults to "false"). In many cases - especially when basic authentication is used over the public internet - it is advisable to allow it only for HTTPS connections. This helps to prevent clients from sending their passwords over the network unencrypted.
Since the SES reverse proxy handling the client connections could be configured to provide both HTTP and HTTPS connectivity for any given application (or certain parts of it), a configuration error could easily lead to clients authenticating themselves on plain HTTP connections.
Therefore, this setting in the SLS is just an additional precaution.
It is possible to use Basic-Auth only for clients which send a certain type of "User-Agent" header. An example would be some rich client or mobile application which needs to authenticate with Basic Authentication, while browser clients still should perform form-based login.
In order to use this, there must be 1 - n configuration properties with the prefix "basic.auth.match":
basic.auth.match_[.n]_
Each such property contains a regular expression defining a pattern for a "User-Agent" header value for which to use Basic Authentication. Example:
basic.auth.match.1=HttpClient.
basic.auth.match.2=SomeRichClient/[34].
Which would use Basic Authentication for all clients with a "User-Agent" header which contains "HttpClient", "SomeRichClient 3" or "SomeRichClient 4".
See "Regular expressions reference" for more information about regular expressions in the SLS.
The HSP reverse proxy provides an SSL session ID locking mechanism that helps preventing various types of session stealing attacks. This locking mechanism is usually based on the client's IP address. In addition, certain attributes of the actual client browser software can be taken into account to further increase security. This is implemented through client-side JavaScripts that use browser-specific features to provide this additional information.
For more information about this "Browser ID" (in short: "BID") check mechanism, see [HTTPADMIN], chapter 6.x "Browser ID" for details.
In order to use this mechanism, the following configuration property must be enabled in the "sls.properties" file:
bid.check.enable
Optional: Set this to "true" to enable BID check functionality in the SLS. Defaults to "false".
Note that enabling this functionality only works if the SLS JSP tag library is used and, in particular, the following two tags are present:
-
<sls:head>- Must be inside the <head> section of the JSP. -
<sls:mandatoryFooter>- must be below the form in the JSP.
If the feature is enabled, the two JSP tags will render certain HTML fragments (CSS and JavaScript) that activate the BID-check functionality on the client side.
There are several aspects of integration with application servers that need to be considered:
- SSO (single-sign-on) HTTP headers propagated to the application
- SSO Request Filters in the application servers
- Application Server Authentication
SSO HTTP headers
The first one is about configuring custom HTTP headers to be propagated to the application servers through the HSP. These headers carry the user credentials gathered and provided by the SLS during the authentication process. The actual value of the header can consists of just a plain user ID (the actual login ID or a mapped one), a more complex set of key-/value pairs, protected with a timestamp and a signature, or an SES ticket. See "SSO HTTP headers" for information on how to set up such custom HTTP headers.
SSO Request Filters
The second one is about various kinds of filter mechanisms that can be enabled in an application server in order to extract the credentials of an authenticated user from the SSO HTTP headers, and make it available to the application through standard APIs.
This relieves the applications from the need to check each request for valid credentials themselves, and also reduces the potential of security problems caused by the lack of such checks etc. (see "SSO Request Filters" for details about available filters).
Application Server Authentication
The third aspect is about application servers that perform the user authentication on their own, be it with some HTML login page or through HTTP basic authentication or NTLM. In some cases, such login processes cannot be easily switched off and replaced with some kind of SSO filters, especially in cases where the applications perform the authentication themselves (custom-made legacy applications etc.). Changing such hard-coded behaviour would require code-change and new release of the application which often is not an option with tight integration project budgets.
In these cases, the HSP provides ways to act as a browser client towards such an application server and transparently perform the authentication, using credentials received from the SLS (see "Application Server Authentication").
In order for any SSO filter in the application server to extract the credentials of the authenticated user from a request header, that header must first be created somehow. There are a few different ways to instruct the SLS to propagate custom HTTP headers to the application server after a successful login.
There are basically two possible approaches:
-
Setting the "
LoginUserData" header - Propagating a custom named header
The first one means that the SLS sets an HTTP response header with the specific
name "LoginUserData" in its response. This header is then recognized by the
HSP as a header containing user credentials. Its value can then be propagated
to application servers while the name of the header as it is sent to the
application can be changed separately for each location, for example:
-
SLS sets an HTTP response header "
LoginUserData" with the value "user=mrjones". -
HSP is configured to send this header value in an HTTP request header named
"
userinfo" to application "A" -
HSP is configured to send this header value in an HTTP request header named
"
credentials" to application "B"
And so forth. So, this approach requires only one configuration property in the SLS configuration, but also some directives in the HSP location settings, either per (virtual) host or per application location.
Option two means using only SLS configuration properties to define what headers to propagate to the application servers. In that case, the names of the headers sent to the applications and the values are all completely defined within the SLS configuration. This reduces the HSP configuration overhead, but also takes away the flexibility of mapping the header name there.
The following chapters explain both options in more detail.
There is a header that the SLS can set in its response which has a special
semantical meaning for the HSP. This HTTP header is usually referred
to as "LoginUserData" header throughout SLS and HSP documentation files.
This HTTP response header is basically the standard means for the SLS to propagate any kind of credential to the application after a successful login. The mechanism works like this:
-
The SLS sets an HTTP response header with name "
LoginUserData", for example with the plain user ID - The HSP catches that header and checks its configuration for instructions on what to do with it
-
In the HSP location, a directive tells the HSP to propagate an HTTP request
header named "
UserID" containing the value of the SLS HTTP response header "LoginUserData" with every request to the application.
In the SLS, the configuration looks like this:
hsp.header.LoginData=${session.getCred('username')}This will instruct the SLS to create an HTTP response header named
"LoginUserData" with the value of the username credential.
Now, to have this information sent to the application in a custom HTTP
request header "UserCreds", the corresponding application location in the
HSP configuration would need this directive:
HSP configuration
AC_LoginUserDataHeaderName UserCreds
(The default for the header name if not configured is "LoginCredentials".)
There is also a generic mechanism for propagating custom headers to the application.
The main advantage over the "LoginUserData" header mechanism is that it doesn't
require any specific configuration on the HSP side. However, it also means that
the header will always have the same name for all applications, while the
"LoginUserData"-header mechanism allows to implement a mapping in the SRM
configuration.
This property triggers the HSP to send a custom HTTP header with a certain value to the application server with each client request once authentication was completed:
app.header.<headername>=<headervalue>
Where <headername> is the name of the HTTP request header that must be
propagated to the application server, and <headervalue> the text value of
that header. The value can also contain variables
(see chapter "JEXL Expressions") or a
combination of hardcoded strings and variables. The following example shows
how to propagate a header with the name "userid" and the value of the username
credential to the application:
app.header.userid=${session.getCred('username')}The same example but with a hardcoded prefix "User:" in the value:
app.header.userid=User:${session.getCred('username')}IMPORTANT NOTE!
Any custom HTTP header that should be sent to the application server must also be enabled in the HSP configuration (see [HTTPADMIN]). Otherwise, it will be blocked and not be forwarded to the application.
Encoding can be tailored. For example in order to propagate an ISO-8859-1 encoded header to the application do this:
app.header.userid=${function.urlEncode(session.getCred('username'), 'ISO-8859-1')}
app.header.userId.isValueEncoded=true
app.header.userId.encoding=url
In this case the header is propagated from the SLS to the HSP using URL encoding and the URL encoding is already provided in the expression for the header value. The HSP then URL decodes the received header and forwards it URL decoded (and thus now in ISO-8859-1 charset) to the application. That way headers can be forwarded to applications in practically any encodings that the Java VM supports. (Note that this mechanism is meant to be used with encoding "url" (or "base64"), but not with the legacy encoding "string".)
The following types of SSO filters are available currently:
- J2EE Servlet Filter - SSO with single Java Servlet applications
- Tomcat Authenticator Module - SSO with Tomcat Application Server
Not all filters support the exact same range of functionality. There are three filter modes:
-
"
plaintext": Processing a plaintext header with just the user ID -
"
regex": Processing a plaintext header consisting of various key-/value pairs; this is called the "regex" mode because a regular expression is used to extract the user ID. -
"
sesticket": Processing an SES ticket header
The following table shows which filters currently support which types of credential handling:
Table 23.1. Filter Mode Support
| plaintext | regex | sesticket | |
|---|---|---|---|
J2EE Servlet Filter | yes | yes | yes |
Tomcat Authenticator | yes | yes | yes |
The various Java-based filter types provided by the SLS share the same core
functionality, and mostly the same configuration settings. The main difference
is that in one case (J2EE filter) those settings must be defined as
initialization parameters in a "<filter>"-tag in a "web.xml" file, and in
the other case (Tomcat Authenticator module) as properties in a Java property
file.
Since the settings themselves are the same, this chapter describes each setting and what it does. It serves as a list of reference for the following chapters about the configuration of the various filters.
NOTE: The settings names (left column) in the list below are (depending on the type of filter used) sometimes just a part of a full configuration property name. Example:
The setting "mode" from the reference list maps to
-
the Tomcat Authenticator property name "
authentication.mode" -
J2EE Filter "
<init-param>" with "<param-name>" and value "mode".
There are some complete configuration examples for different types of authentication setups in "SSO Configuration Examples". The examples include both filter and SLS configuration.
Especially in cases where the SLS which performs the login and creates the propagated header, and the application with the filter are not running on the same platform / OS, problems may arise with headers containing special characters. In that case, it is recommended to ensure the usage of the same default encoding in both JVMs (SLS and application server), by setting this JVM startup option:
-Dfile.encoding=<encoding>
Where <encoding> is a value like "UTF-8" or "UTF-16".
The filters provided by USP employ Apache’s Commons Logging API for their logging functionality. The library is included in the delivery of each filter for convenience.
NOTE: The commons logging library may already be available in your servlet
container of choice. In that case, it may not be advisable to deploy the
commons-logging-<version>.jar file, or classloader issues may occur
(especially if the library version provided by the container differs from the
one in the filter delivery).
Commons Logging Configuration
A general way to enable the Commons Logging mechanism and have simple debug logs written to standard output would be by setting these two system properties, usually as Java VM parameters:
-Dorg.apache.commons.logging.Log=org.apache.commons.logging.impl.SimpleLog
-Dorg.apache.commons.logging.simplelog.defaultlog=trace
This results in a lot of debug logging information in one of the Tomcat log files; which one depends on the logging configuration of Tomcat. A typical default is the file "localhost.<timestamp>.log".
mode
(Optional) Allows to choose the type of authentication used. The following types are available:
-
plaintext- The header just contains the plain user ID -
regex- The header contains some key-/value pairs, optionally with a timestamp and a signature. A regular expression must be defined to extract the user ID then. For example, for a header like:
roid=123456;LoginKennung=Hugo;[SourceIP=172.130.4.101];
a regex to parse "Hugo" as user name would be:
regex=.*LoginKennung=([a-zA-Z]*);.*
The regex mode also supports the possibility of verifiying a signature included
in the header. For using that, several configuration properties are needed (see
"keyIndexFile", "checksign" and "signkeyid").
-
sesticket- The header contains an SES ticket.
Default is "plaintext".
headerName
The name of the header to get the user credential information. This is the HTTP
SSO header propagated from the SLS which contains either just the user ID (if
"mode" = "plaintext"), or a list of key-/value pairs (if "mode" =
"regex") or an SES ticket (if "mode" = " sesticket").
Default is "userinfo".
requireValidUser
(Optional) If the filter should enforce authentication and enforce an error if
a user is not authenticated. Set this property to "false" to disable this
behaviour.
Default is "true".
checktimestamp
(Optional) Can only be used with "mode" = "regex". If set to "true", the
filter will check the timestamp in the "Timestamp="-key using the configured
"threshold". This is basically an expiration check, used to prevent replay
attacks. Note that if this option is used, the SLS must be configured
correspondingly to actually create a "Timestamp="-key in the propagated custom
header.
Default is "false".
threshold
(Optional) Defines the expiration threshold in number of seconds, if
"checktimestamp" = "true".
denyResponseCode
The HTTP response code to send to the client if access is denied.
Default is "401".
denyResponseMessage
The HTTP response message to send to the client if access is denied.
keyIndexFile
(Optional) Required if (a) "mode" = "sesticket", or (b) "mode" =
"regex" and "checksign" = "true". This key index file contains the path of
the public key required to verify the ticket or the regex signature, and
optionally the path to the encryption key required to decrypt a ticket.
Example Tomcat Authenticator:
authentication.keyIndexFile=/var/list.keyindex
Example J2EE Filter:
<init-param>
  <param-name>keyIndexFile</param-name>
  <param-value>/var/list.keyindex</param-value>
</init-param>
regex
(Optional) If "mode" = "regex", this parameter defines the regular
expression required to parse the user ID from the header.
checksign
(Optional) Can be used only if "mode" = "regex". If set to "true", the
filter will verify the signature (key: "Signature=") in the header.
Default is "false".
signkeyid
(Optional) If "checksign" is set to "true", this parameter must be set to
define the ID of the public key used to verify the signature. This is the ID of
the key in the key index file configured with "keyIndexFile".
Example Tomcat Authenticator:
authentication.signkey=key_2
Example J2EE Filter:
<init-param>
  <param-name>signkeyid</param-name>
  <param-value>key_2</param-value>
</init-param>
The application might need to retrieve further information from the principal and not only the principal name. In this case, all needed information should be added to the userdata header configured in SLS.
The authenticator will store all key-value pairs from this header in the principal and make them available for a later retrieval by the application.
The application can access these values by casting the principal to the following interface, which defines the customized principal with the added key-value-pair store and retrieval capability:
com.usp.sls.appserver.base.IExtendedPrincipal
This class is an extension of the standard principal class
java.security.Principal. Now the proprietary method
getValue(<key>)
of the casted object instance can be called to retrieve a value. For example, if the following header was configured in the SLS:
app.header.userinfo=${function.addSigAndTime('LoginKennung=' + session.getCred('username') + ';SrcIP=' + header.hsp_client_addr + ';' )}Then the value of the source IP from the application could be retrieved in the following way:
((com.usp.sls.appserver.base.IExtendedPrincipal)request.getUserPrincipal()).getValue("SrcIP");The same can be applied to all key-value pairs defined in the configuration file of the SLS.
Please note that, in order to be able to use this feature, it is mandatory to configure the header key-value pairs (in the SLS properties file) in the following format:
...some content...;<key>=<value>;...more content...
A semicolon must be used to separate each key-value pair from the other ones and from the rest of the header. And an equal sign must separate the value and the corresponding key.
In order to be able to compile your application code when using this feature
(cast to IExtendedPrincipal), the jar file of the filter in question (J2EE,
Tomcat Authenticator…) has to be added to the development environment
classpath, which is one of the following files:
usp-j2ee-filter-<version>.jar
usp-tomcat-authenticator-<version>.jar
At runtime, the jar is already available, since it must be added in the container classpath when configuring the filter.
The J2EE filter provides the means to easily integrate J2EE applications with a HSP (Secure Entry Server) environment. It allows to use either a SES ticket, a plain text header or a header consisting of custom key-/value-pair strings to map the username to. The extracted credentials are then made available to the application through the following standard servlet API methods:
javax.servlet.http.HttpServletRequest

java.lang.String getRemoteUser()
Returns the login of the user making this request,
if the user has been authenticated, or null if the user has
not been authenticated.
java.security.Principal getUserPrincipal()
Returns a java.security.Principal object containing the name of
the current authenticated user.
In order to integrate a web application, you must follow several steps:
**
- To enable the servlet filter in your web application, add the following filter to your web.xml.
<!-- HSP authentication filter -->
<filter>
<filter-name>AuthenticationFilter</filter-name>
<filter-class>com.usp.ses.authapi.AuthenticationFilter</filter-class>
<description>This filter handles the user credentials.</description>
...
<init-param>
<param-name>headerName</param-name>
<param-value></param-value>
</init-param>
...
</filter>

<filter-mapping>
<filter-name>AuthenticationFilter</filter-name>
<url-pattern>/*</url-pattern>
</filter-mapping>
Copy the filter jar files into the applications\' "WEB-INF/lib" directory. The filter jar files can be found in this delivery subdirectory:
/appserver/j2ee-filter/libs/
All the settings listed in "Filter Settings Reference" can be used as "init-param"-values. Example:
<init-param>
<param-name>mode</param-name>
<param-name>regex</param-name>
</init-param>
The Apache Tomcat servlet container supports a proprietary filtering mechanism
called "Authenticators". An authenticator basically has a similar job as a
servlet filter, the main difference being the fact that it works server-wide,
for all applications deployed in that container. Hence, it is configured in the
Tomcat container itself, not in each applications "web.xml" file (see
"Step by Step Installation Notes" for details).
Note: The JAAS module contained in the SLS Tomcat Authenticator delivery is a requirement by the authenticator, but cannot be used in any other context.
The SLS "Tomcat Authenticator" allows to use either a SES ticket, a plain text header or a header consisting of custom key-/value-pair strings to map the username to. The credentials are then made available to the application through the same servlet API methods as with the J2EE servlet filter (see "SSO Request Filters").
First you have to patch Tomcat with a new Authenticator.
-
Unpack the original "
catalina.jar" file
The exact location of the file depends on the Tomcat version:
Tomcat 5.5
Unpack $CATALINA_HOME/server/lib/catalina.jar into the server/classes
directory.
Tomcat 6.0, 7.0, and 8.0
Unpack $CATALINA_HOME/lib/catalina.jar into the $CATALINA_HOME/lib
directory.
-
Replace the original "
Authenticators.properties" file:
Replace the file "Authenticators.properties" with the extended version found
in the SLS delivery directory:
Tomcat 5.5 and 6.0
appserver/tomcat-authenticator/tomcat55+6/conf/
Tomcat 7.0
appserver/tomcat-authenticator/tomcat7/conf/
Tomcat 8.0
appserver/tomcat-authenticator/tomcat8/conf/
The location of the file to replace depends on the Tomcat version:
Tomcat 5.5
$CATALINA_HOME/server/classes/org/apache/catalina/startup/Authenticators.properties
Tomcat 6.0, 7.0, and 8.0
$CATALINA_HOME/lib/org/apache/catalina/startup/Authenticators.properties
The unpacked "catalina.jar" file can be removed.
- Install the new authenticator JAR file
The JAR file to copy depends on the Tomcat version:
Tomcat 5.5 and 6.0
Copy usp-tomcat-authenticator-<version>.jar to the Tomcat "lib" directory.
Tomcat 7.0
Copy usp-tomcat7-authenticator-<version>.jar to the Tomcat "lib" directory.
Tomcat 8.0
Copy usp-tomcat8-authenticator-<version>.jar to the Tomcat "lib" directory.
The location of the "lib" directory depends on the Tomcat version:
Tomcat 5.5
$CATALINA_HOME/server/lib
Tomcat 6.0, 7.0, and 8.0
$CATALINA_HOME/lib
Upgrading An Old Release
Note: In previous releases, the authenticator also required to copy two files
named "ses-ticket-*.jar" and "jaas-\*.jar" into the Tomcat lib directory.
The content of these jar files has now been included directly into the
authenticator jar file, so there is now only one single jar file that must be
installed.
IMPORTANT: Delete existing jar files "ses-ticket-*.jar" and/or
"jaas-\*.jar" from the "lib" directory in case they are there.
Servlet Filter Libraries
Make sure that the application does not have the USP J2EE filter library in
it's own "lib" directory, or there will be classloader issues.
- Prepare Java VM strong cryptography
First, in order to enable strong authentication without any limitations in regard to key sizes, the "Unlimited Jurisdiction Strength Policy" files must be installed in the Java VM. Please consult the download pages and instructions of the JVM provider for details.
- Enabling SLS JAAS module
Next you have to install the USP JAAS module. To enable JAAS, add the following
to $CATALINA_BASE/conf/server.xml:
<Realm className="org.apache.catalina.realm.JAASRealm"
appName="SES"
userClassNames="com.usp.sls.appserver.jaas.UserPrincipalImpl"
roleClassNames="com.usp.sls.appserver.jaas.RolePrincipalImpl" />
Make sure the "<Realm>"-tag is a direct child of the "<Engine>"-tag.
Also, make sure there are no other "<Realm>"-tags configured that may have
side-effects, and even deny access for users that would be allowed by the USP
Tomcat Authenticator.
- Configure the JAAS module
Copy "jaas.conf" to "$CATALINA_BASE/conf/".+The path to "+jaas.conf" must be
given to Tomcat in the form of a java system property. i.e. add to
$CATALINA_BASE/bin/setenv.sh:
JAVA_OPTS="$JAVA_OPTS -Djava.security.auth.login.config=$CATALINA_BASE/conf/jaas.conf"
Note: On a Windows System, setting environment variables the usual way won't
impact a Windows Service, because every service runs in an own environment.
Therefore, if the Tomcat container is run as a Windows Service, the startup
system properties must be set through the "Properties" dialog of that service,
in the "Java" tab.
- Configure Tomcat Container, or the web application
At last, you have to configure either Tomcat, or the web application. Add
security constraint, role and auth method to the web.xml file of the
web-application ("webapps/…/WEB-INF/web.xml") or Tomcat ("conf/web.xml"):
<security-constraint>
<web-resource-collection>
<web-resource-name>all</web-resource-name>
<url-pattern>/\*</url-pattern>
<http-method>POST</http-method>
<http-method>GET</http-method>
</web-resource-collection>

<auth-constraint>
<role-name>role</role-name>
</auth-constraint>

</security-constraint>

<security-role>
<description>unique role</description>
<role-name>role</role-name>
</security-role>

<login-config>
<auth-method>SESTICKET</auth-method>
<realm-name>any</realm-name>
</login-config>
Note: If this configuration is added to the Tomcat "web.xml" file, just add it
at the beginning, right after the opening "web-app" XML tag.
The working mode of the authenticator has to be defined in a config file named
"uspauth.properties". The path of this configuration file should be set with
this JVM startup system property:
JAVA_OPTS=$JAVA_OPTS -Dcom.usp.sls.authenticator.configfile=$CATALINA_BASE/conf/uspauth.properties
See "Tomcat as a Windows Service" for details on how to set these properties for a Tomcat running as Windows Service.
There are several configuration properties. The name of each property consists
of the prefix "authentication." and the name of one of the settings listed in
"Filter Settings Reference".
So, for example, to set the authentication mode to regex, set:
authentication.mode=regex
Authenticator looks for the configuration file at the following paths, in strict order:
-
You can set a Java system property when starting Tomcat:
com.usp.sls.authenticator.configfile=<path> -
If the Java system property for
$CATALINA_HOMEis set (which usually is the case with any regular Tomcat instance):$CATALINA_HOME/conf/uspauth.properties -
At the current working directory path, which usually is
$CATALINA_BASEor$CATALINA_BASE/bin, depending on how exactly the Tomcat instance was started:<currentdir>/uspauth.properties
Tomcat 7.0 only
The setting authenticator.authmethod allows to set the value returned by the
getAuthMechanism() method of the Tomcat 7 Authenticator. Default if not
indicated is "SESTICKET".
The Authenticator uses the "Apache Commons Logging" API, which, by default, will
output log into the standard output (the "catalina.out" file in a Tomcat
server).
In order to enable more detailled logs, the following property should be added
to the file "logging.properties" in the "conf" directory of the Tomcat
instance:
com.usp.sls.appserver.level = FINE
It's not important where in the file the property is inserted. Just set the level back to INFO (or remove the property) once debugging is not necessary anymore.
Since the "Apache Commons Logging" API also uses Log4J if it's available in the JVM, it is also an option to add the Log4J libraries to the Tomcat lib directory, and then configure a Log4J appender (as usual with Log4J, the configuration file must be somewhere in the root of the classpath to be found):
<appender name="AUTHENTICATOR_LOG"
class="org.apache.log4j.DailyRollingFileAppender">
<param name="Threshold" value="TRACE" />
<param name="datePattern" value="\'.\'yyyy-MM-dd" />
<param name="file" value="${catalina.base}/logs/authent.log" />
<param name="Append" value="true" />
<layout class="org.apache.log4j.PatternLayout">
<param name="ConversionPattern"
value="%d %-5p %c:%M() %m%n" />
</layout>
</appender>

<logger name="com.usp">
<level value="TRACE" />
<appender-ref ref="AUTHENTICATOR_LOG" />
</logger>The following examples show different authentication mode scenarios, and what to
configure. This includes the SLS configuration in the "sls.properties" file
(for creating the header) and filter configuration (for processing it).
The following configuration files correspond to the component in the left column:
-
SLS - "
WEB-INF/sls.properties" -
J2EE filter - "
<filter>"-tag in "web.xml"-file of application -
Authenticator - "
uspauth.properties" file in Tomcat
A custom header named "username" shall be propagated to the application. The header is supposed to contain just the plain user ID.
SLS
app.header.username=${session.getCred(username)}
J2EE filter
<init-param>
<param-name>mode</param-name>
<param-value>plaintext</param-value>
</init-param>
<!--Optional (because "username" is default) -->
<init-param>
<param-name>headerName</param-name>
<param-value>username</param-value>
</init-param>
Tomcat Authenticator
authentication.mode=plaintext
# Optional (because "username" is default)
authentication.headerName=username
A header named "userinfo" containing various key-/value pairs with user
information should be created. One of the fields, "loginName", contains the
user ID. The header should also be signed and have a timestamp with a 4 hour
(14400 seconds) expiration time.
Signature Keys
Note: This example assumes that there are "SES Ticket API" keys available, an
RSA public and private key pair. Each key is referenced in the index file (which
is a simple text file) "list.keyindex", which must be available on both the
SLS and the application server.
On the SLS, the file must contain the path of the private key with the alias
"key_1", on the application server it must hold the path of the public key
with the alias "key_2".
Please see "26 SES Login Ticket"for more information about SES Ticket API functionality in general, or "SES Ticket API Tool" for information about how to create your own keys and key index files.
SLS
app.header.userinfo=${function.addSigAndTime( + 'loginName=' + session.getCred('username') + ';SrcIP=' + header.hsp_client_addr + ';' )}This property configures the HTTP header "userinfo" to be propagated to the
application. The value of the header will be a key-/value pair string:
loginName=<loginName>;SrcIP=<Client-IP>;sig=<sig>
Where <loginName> contains the user’s login ID, <Client-IP> the IP
address of the browser client, and <sig> is the actual signature and a
timestamp, created by the JEXL function "addSigAndTime()".
The following properties are required to configure the private key with the
alias "key_1" defined in the index file "list.keyindex" to create the
signature:
ses.ticketapi.keyIndexFile=/var/list.keyindex
ses.ticketapi.keyId=key_1
Without these two properties, the JEXL function "addSigAndTime()" will fail
with a runtime error message!
J2EE filter
<init-param>
<param-name>_mode_</param-name>
<param-value>regex</param-value>
</init-param>
<init-param>
<param-name>_headerName_</param-name>
<param-value>_userinfo_</param-value>
</init-param>
<init-param>
<param-name>regex</param-name>
<param-value>.\*loginName=([a-zA-Z]\*);.*</param-value>
</init-param>
<init-param>
<param-name>keyIndexFile</param-name>
<param-value>/var/list.keyindex</param-value>
</init-param>
<init-param>
<param-name>signkeyid</param-name>
<param-value>key_2</param-value>
</init-param>
<init-param>
<param-name>checksign</param-name>
<param-value>true</param-value>
</init-param>
<init-param>
<param-name>checktimestamp</param-name>
<param-value>true</param-value>
</init-param>
<init-param>
<param-name>threshold</param-name>
<param-value>14400</param-value>
</init-param>
Tomcat Authenticator
authentication.mode=regex
authentication.headerName=userinfo
authentication.regex=.*loginName=([a-zA-Z]*);.*
authentication.keyIndexFile=/var/list.keyindex
authentication.signkeyid=key_2
authentication.checksign=true
authentication.checktimestamp=true
authentication.threshold=14400
A header named "sesticket" containing a SES ticket should be created. The
ticket should have an expiration time of 4 hours.
SLS
ses.ticket.One.realm=ACME Corp.
ses.ticket.One.lifetime=14400
ses.ticket.One.keyIndexFile=/var/list.keyindex
ses.ticket.One.public.key=key_2
ses.ticket.One.private.key=key_1
ses.ticket.One.attr.userid=${function.getVerifiedCred('username')}

app.header.sesticket=${function.createTicket('One',function.getCred('username'))}
J2EE filter
<init-param>
  <param-name>mode</param-name>
  <param-value>sesticket</param-value>
</init-param>
<init-param>
  <param-name>headerName</param-name>
  <param-value>sesticket</param-value>
</init-param>
<init-param>
  <param-name>keyIndexFile</param-name>
  <param-value>/var/list.keyindex</param-value>
</init-param>
Tomcat Authenticator
authentication.mode=sesticket
authentication.headerName=sesticket
authentication.keyIndexFile=/var/list.keyindex
Please read chapter "SES Login Ticket" for detailed information about SES tickets.
If a user is authenticated by the SLS and then redirected to the application server, it is necessary to make the authentication information (such as user ID) available to the application.
Also, in some cases, the application server itself may already use basic or FORM-based authentication as a means to identify the client. the HSP provides the required functionality to integrate such an application server with an SLS authentication process, completely transparent to the end-user. This is called the "AAI" (Adaptive Application Integrator). This AAI feature in the HSP can basically do the following:
- After a client was successfully authenticated by the SLS, the HSP retrieves some information about the user credentials from the SLS's response.
-
The HSP will then fill in the login form sent from the application server or perform basic authentication if necessary, using the credentials received from the SLS. This requires both some configuration in the HSP (see [HTTPADMIN]) and in the SLS configuration ("
sls.properties").
The HSP supports the following types of back-end authentication:
- Basic Auth - The application server required HTTP basic authentication)
- NTLM - The application server, usually a Microsoft IIS, authenticates the client through an NTLM handshake)
- Form - The application server sends a HTML login page which is filled in by the HSP automatically.
If the application server is configured to identify clients through HTTP basic authentication, the HSP must send the required HTTP headers to the application server once the SLS has authenticated the user.
If the application server uses a custom HTML login form, the HSP must fill in the correct values into that login form and post it to the application server (completely transparent to the client browser) once the SLS has successfully authenticated the user.
In both cases, the SLS must send certain login information to the HSP after a successful login in order to enable the HSP to perform the automatic basic or form authentication against the application server.
Setting the property "auth.type" to "all" will let the SLS set the headers for both authentication schemes, basic auth and FORM-based.
The SLS can trigger the HSP to send headers for basic authentication by setting this property:
auth.type=basic
The SLS can trigger the HSP to transparently fill in any login forms sent by the application servers by setting this property:
auth.type=form
Note that it is also necessary to add appropriate AAI configuration statements in the HSP configuration (see [HTTPADMIN]).
The names of the parameters as sent from the SLS to the HSP are defined as follows (and must be configured accordingly in the HSP):
-
Login username: "
FormUserName" -
Login password: "
FormPassword"
Any additional login-page form parameter that should be sent to the backend servers in the FORM-based authentication must be defined with a property like this:
formauth.parameter.<name for HSP>=<field name in the login form>
In order to avoid confusion, both names should preferably be equal, like in this example:
formauth.parameter.thirdCred=thirdCred
This chapter covers everything related to the creation of cookies. The SLS itself creates some cookies by default during any login or other processes, while the creation of custom cookies can also be configured, if necessary.
Sometimes a version "0" cookie created by a web application (such as the SLS) running in a Tomcat container is turned into a version "1" cookie by Tomcat. See the FAQ, "Q: A cookie that was created by the SLS as a version 0 cookie …" for some information on why and what to do about it.
Sometimes the SLS will set the language in the session more than once during one request, depending on the flow of logic etc. In such a case, this may result in the same language cookie appearing twice in the HTTP response. This seems to be an issue of some servlet containers, namely Tomcat. In order to avoid this, the following property can be set:
response.avoid.double.cookie
If set to "true", the SLS-internal response wrapper will make sure that any cookie is always set not more than once within one response.
response.avoid.double.cookie=true
Each time a cookie is created, it can optionally have a "domain" attribute set. For the cookies described below, that value can be set specifically, but usually that is not desirable.
If a domain must be set, the following property allows to define a default domain value for all created cookies:
default.cookie.domain
The default domain for all cookies created by the SLS, if no other domain has been specified for them. Example:
default.cookie.domain=acme.com
Note
It is not recommended to set a domain for cookies, because this can cause unwanted maintenance efforts each time a hostname changes. The browser clients by default set the domain of the host which created a cookie for that cookie, so a changing host name does not require a configuration change in the SLS.
The language cookie is a persistent cookie, which means it's meant to be stored on the client, and basically for an infinite amount of time. It stores the language preferred by the user (see "Selecting User Language"). The language cookie can be configured through the following properties in "sls.properties":
lang.default
Defines the default language code to be used ("en" for english, "de" for german etc.). For a complete list of codes see
http://ftp.ics.uci.edu/pub/ietf/http/related/iso639.txt
lang.default.+<tenant>+
Defines the default language code to be used ("en" for english, "de" for german etc.), but only for the given tenant. <tentant> is the alias of the tenant.
lang.cookie.domain
Defines the domain of the language cookie. If none is defined, either the globally defined default domain is used. If that is not defined either, no domain is set (which is the recommended approach!).
lang.cookie.age
Specifies the life span of the cookie in seconds. The default value is 3 years (3 \* 365 \* 24 \* 60 \* 60).
lang.cookie.path
The path for which the cookie is valid.
lang.cookie.name
The name of the language cookie. Mostly, you do not need to set this property and use the default name "SLSLanguage". Anyway, if you set a custom name for the language cookie, make sure to enable it as a transparent cookie in the HSP configuration.
The "preferences" cookie allows to store any kind of custom user preferences in a persistent cookie, similar to the language cookie. The idea is that values requested from the user in customized JSPs can be stored, and be used again in later login attempts (for example, the value of a slider-element that allows to change the visual size of some GUI element in the login page).
The source for preference values are request parameters, since any user preference must have been entered in some HTLM form and then be posted to the SLS. The following property defines from which parameters to store the values.
prefs.parameters
1-n parameters as a comma-separated list of parameter names, for example:
prefs.parameters=preferredColor,preferredSize
The SLS will automatically update the cookie every time one of the defined parameters is posted again.
prefs.cookie.name
The name of the preferences cookie. Defaults to "SLSprefs" if not defined.
prefs.cookie.domain
Defines the domain of the preferences cookie. If none is defined, either the globally defined default domain is used. If that is not defined either, no domain is set (which is the recommended approach!).
prefs.cookie.age
The lifetime for the cookie in seconds. Defaults to 1 year if not specified.
prefs.cookie.path
The path for this cookie. Defaults to the SLS own context path if not set.
In order to make use of values stored in the preferences value in a customized JSP, the "getJexl" JSP tag can be used with the JEXL function "getPreferenceValue()".
The following sample JSP / HTML code shows how to insert the stored preference value "mySize" into the page:
<sls:getScript expression="${function.getPreferenceValue('mySize')}" />"The SLS creates a cookie during an authentication process which holds information about the user. That cookie is NOT meant to be sent to the client, so it should NOT be configured as a transparent cookie in the HSP. It's lifespan is just as long as the HSP session, and it serves as a convenience mechanism for the SLS to store some user information retrieved during the login, just in case the user accessed the SLS again.
For example, if a logged-in user invokes the password change process and is presented the password-change-page, it would be nice if the username would already be filled in. But the SLS's own session had been invalidated at the end of the login process, so the SLS would not have any information present about the user at that time anymore.
At this point the SLS needs this cookie to retrieve the authenticated user's name from it and fill it into the form.
Custom cookies can be defined that should be created after a successful login. For each custom cookie, a set of properties must be defined in the "sls.properties" configuration file.
First, one property must define the names of the custom cookies to be created:
cookie.set.successful.name
A comma-separated list of 1-n cookie names, for example:
cookie.set.successful.name=MyCookie,SomeValues
For each cookie defined in that list, a set of properties must then be defined:
cookie.<name>.value
The value for that cookie (may contain JEXL expressions).
cookie.<name>.path
Optional: The path for that cookie. Defaults to the SLS\' own context path if not defined.
cookie.<name>.domain
Optional: Defines the domain of the cookie. If none is defined, either the globally defined default domain is used. If that is not defined either, no domain is set (which is the recommended approach!).
cookie.<name>.maxage
Optional: Sets the "maxage"-attribute of the cookie. Defaults to "-1" if not set, which means the cookie expires once the connection to the client ends.
cookie.<name>.comment
Optional: Sets the "comment"-attribute of the cookie.
For example:
cookie.MyCookie.value=Name: ${parameter.userid}
cookie.MyCookie.maxage=50000The SLS uses a custom USP logging library which is based on Apache’s open-source logging facility "Log4J 1.2.17" for all logging operations.
NOTE: The logging library is based on the legacy Log4j 1.2.x library, which is officially end-of-life as far as the Apache group is concerned. In order to make it unmistakeably clear that the library in the SLS is NOT end-of-life, but maintained by USP, it has been renamed to "usp-logging". This is why the jar file is named "usp-logging-*.jar", and the configuration file "usp-logging.xml" (but it is backwards compatible and will still work with existing "log4j.xml" configuration files).
Log4j 1.2.x is NOT the same API as Log4j 2.x. While they share the same name, the latter is a completely new API, which was newly written from the ground-up, and which is not backwards compatible to Log4j 1 in any way - not with the configuration, and not on the API level. The SLS has never been "upgraded" to Log4j 2 because it would not be an upgrade, but a jump to a new, completely different API, with lots of new functionality that the SLS does not need. The case of the Log4Shell vulnerability demonstrates quite well why USP has followed a more conservative approach and has been sticking to the logging library in use, following the mantra "don’t fix it if it ain’t broken".
This means that all vulnerabilities discovered in Log4j 2, such as the infamous Log4Shell, are NOT relevant to Log4j 1, and therefore NOT relevant to the SLS / USP logging library, as it is a completely different codebase.
All currently known vulnerabilities of Log4j 1.2.x have been addressed in the USP logging library by removing the corresponding / responsible components (mostly functionality not used by the SLS anyway).
- https://cve.mitre.org/cgi-bin/cvename.cgi?name=CVE-2021-4104
- Remote code execution based on class "JMSAppender"
- https://cve.mitre.org/cgi-bin/cvename.cgi?name=CVE-2020-9488
- Man-in-the-middle-attack based on class "SMTPAppender"
- https://cve.mitre.org/cgi-bin/cvename.cgi?name=CVE-2019-17571
- Remote code execution based on class "SocketServer"
- https://nvd.nist.gov/vuln/detail/CVE-2022-23302
- JMSSink in all versions of Log4j 1.x is vulnerable to deserialization of untrusted data
- https://nvd.nist.gov/vuln/detail/CVE-2022-23305
- JDBCAppender allows SQL injection
- https://nvd.nist.gov/vuln/detail/CVE-2022-23307
- Vulnerability when using the Chainsaw companion app (log viewer)
The relevant classes and packages responsible for the issues listed above have all been removed from the jar file in the SLS. Note that even in case they are still present (in older SLS releases), they cannot be exploited as long as they are not explicitely used by configuring them in the Log4j configuration settings.
The log records can be redirected to any log facility (e.g. files, syslog, etc.) by changing the logging configuration file accordingly.
However, the servlet container also writes custom log records (about servlet-related events, classloading etc.) and standard output info. It depends on the configuration of the servlet container (Tomcat) where all this output ends up.
In case of TOMCAT, all standard output is usually printed into this file:
<tomcat installation directory>/logs/catalina.out
Note
The SLS includes functionality to redirect "stdout" and "stderr" output to
the "sls.log" file. If configured, the mechanism becomes active shortly after
the start of the SLS, so only a few default logs of the Tomcat are visible in
the "catalina.out". After that, all standard out and standard error output
appears in the "sls.log" file.
SLS logging is configured through a separate XML file. This file is named "usp-logging.xml"
and must be located in the subdirectory "WEB-INF". However, the SLS is also fully backwards
compatible with existing Log4j 1 configuration files ("log4j.xml" and "log4j.dtd").
Example configuration files (XML configuration and corresponding DTD) can be found in the SLS delivery archive, in the "samples" subdirectory:
-
usp-logging.xml -
usp-logging.dtd
The SLS creates the following log files by default:
-
sls.log- The debug logfile -
exception.log- The exception stacktrace logfile -
audit.log- The audit message logfile -
performance.log- The performance measurement logfile -
soap-frontend.log- Optional: Only if the SOAP frontend is used
There are five different levels for all log messages:
-
ERROR -
WARN -
INFO -
DEBUG -
TRACE
All log records written to the "audit", "performance" or "exception" log
are either of level "ERROR", "WARN" or "INFO". Debug and trace messages
are written only to the debug/trace logfile "sls.log".
The SLS usually writes one log record into this file for each important event such as a completed or failed authentication, a challenge / response verification etc.
When there is an SLS error, the "exception.log" and sometimes also the
"sls.log" file get one or more log records on level ERROR, like this example:
2009-03-13 17:36:44,126 [CC:...] [RC:...] - [ERROR] [USER_AUTH_FAILED_TECH] Authentication failed due to a technical problem. User: 'demo'. Reason: 'Authentication for user ''miller'' failed, reason: Receive timed out'
This is an example of a RADIUS authentication that failed because the RADIUS server became unavailable, and the connection attempt from the SLS to the RADIUS server timed out.
The highlighted string USER_AUTH_FAILED_TECH is the SLS error message ID that
identifies this kind of error. All SLS error messages are documented in the
separate "sls-log-messages.pdf" file. Please read that documentation for more
information about any given error, its possible causes and what to do.
In this file, the SLS writes two log records per request. The first marks the entry (and beginning of processing) of a request, and the second one contains the total elapsed time required to complete the request, and also the time that was needed for each model state. An example log record would look like this:
2011-12-01 09:48:28,311 [CC:...] [RC:...] - [Request entry]
2011-12-01 09:48:28,455 [CC:...] [RC:...] - [Request exit: 144 [get.cred: 113] ]
2011-12-01 09:48:32,608 [CC:...] [RC:...] - [Request entry]
2011-12-01 09:48:34,258 [CC:...] [RC:...] - [Request exit: 1866 [do.auth: 85 [radius: 26] ] [do.success: 1701] ]
Which means that the "get.cred" state required 113 milliseconds from start of
request entry until the page was delivered. And in the following login POST
request, the entire request took 1.8 seconds, of which the "do.auth" state
took 85 milliseconds, of which again the actual RADIUS call-out took 26
milliseconds, and so on.
This logfile, named "sls.log", is often called the "debug" or "trace" log
file. By default, the file contains only information on level "ERROR" or
"INFO", but if resolving a problem requires more information, this is the
file where the SLS will write it's debugging information into.
DEBUG vs. TRACE
As a rule of thumb, DEBUG log level (while already a lot more verbose than
INFO) contains information that should still be more or less meaningful to
any administrator who is familiar with the SLS in general.
TRACE log level, on the other hand, produces a lot (!) of information that is
useful to - and often required by - SLS 3rd level support. See
"DEBUG and TRACE log levels"
for details.
When the SOAP webservice frontend of the SLS is used (see "SOAP Frontend" for details), the log records of that frontend will be written into this separate log file. The reason for this is that the frontend is actually a separate HTTP request listener which processes the incoming SOAP request and then sends a local HTTP request to the regular SLS HTTP listener on the same system.
So, because it really is an additional service working with the SLS, it uses a separate log file.
The SLS provides an extension of the standard Log4j 1 "DailyRollingFileAppender", which combines the features of that appender with the possibility of setting also size-based limits. The custom SLS appender is called
com.usp.sls.toolkit.log.SlsDailyRollingFileAppender
And it allows to use all the parameters that can be used for the Log4j "RollingFileAppender" and "DailyRollingFileAppender".
In addition, it supports some custom parameters that allow to deal with multiline logging of stacktraces; see "Disabling Multiline Stacktraces" for details.
If the output is formatted as JSON or XML, some characters in a stacktrace can cause problem and break the JSON or XML structure. To avoid this, it is possible with the "SlsDailyRollingFileAppender" to enable escaping of such problematic characters, specificall for JSON or XML:
<param name="EscapingMode" value="json" />
or
<param name="EscapingMode" value="xml" />
This will escape the corresponding problematic characters in the actual log message (Log4j pattern layout variable "%m").
The SLS uses some named loggers which must be defined in the logging configuration:
-
"
com.usp" - Used for info / debug / trace logs -
"
audit" - Used for audit logs -
"
performance" - Used for the performance logging -
"
exception" - Used for the exception stacktrace logging
Some other named loggers are optional:
-
"
com.usp.sesticket" - Eliminates some unwanted error log records.
If the SOAP frontend is used, the following logger must be defined as well:
-
"
com.usp.sls.frontend.soap" - Logs the processing steps of the SLS SOAP frontend.
The SLS logging configuration usually contains the following appenders:
-
SLS_LOG- The debug / info log, set to threshold "TRACE". -
SOAP_FRONTEND_LOG- The SOAP / webservice frontend log, set to threshold "TRACE". -
SYSLOG_LOG- The remote syslog host log, set to threshold "INFO". -
LOCAL_SYSLOG_LOG- The local syslog log, set to threshold "INFO". -
PIPE_LOG- An appender that allows to pipe log output into any local executable binary, set to threshold "INFO". -
AUDIT_LOG- The audit log information; must be used as appender for the named logger "audit", set to threshold "INFO". -
PERFORMANCE_LOG- The performance log information; must be used as appender for the named logger "performance", set to threshold "INFO". -
EXCEPTION_LOG- The appender which will receive all exception stacktrace logs, based on the log levelERROR, set to threshold "ERROR".
To enable or disable a certain type of logging such as performance, simply
insert or remove the corresponding "logger" tag from the
"usp-logging.xml" file.
If there is a problem that cannot be solved with the error message from the
"exception.log" alone, it might be necessary to enable DEBUG or even TRACE
logging to gain more information about a problem:
-
DEBUG- Writes a lot of internal processing and status information to the "sls.log" file. This might provide some interesting information such as available back-end (e.g. LDAP) response attribute, JEXL variables, current model state etc. -
TRACE- Writes even more internal information, including Java method entrances and exits etc. This level of information is usually only helpful for 3rd level support through USP SLS developers.
To enable debug or trace logging in the "sls.log" file, set the
"level"-value of the "logger" for "com.usp" to "DEBUG" or "TRACE":
<category name="com.usp">
        <priority value="DEBUG" />
        <appender-ref ref="SLS_LOG" />
        <appender-ref ref="EXCEPTION_LOG" />
</category>
No restart required
Please note that the SLS is able to re-read its logging configuration file when it changes, so it is not necessary to restart the SLS tomcat instance if the logging configuration is changed. However, it may take about half a minute or a bit longer until the changes become active.
See "DEBUG / TRACE Logging" for details about enabling DEBUG or TRACE logging only for single login sessions.
Important
DEBUG logging (and to an even larger extent TRACE logging) has a
very severe, negative performance impact. Therefore, DEBUG and TRACE logging
must never be enabled in heavy traffic environments, or only for a very short
time, in order to prevent the log files to grow too large. If some users have
problems that must be analyzed, only their sessions should be set to DEBUG or
TRACE logging (see
"DEBUG / TRACE Logging").
If multi-tenancy is used (see "Multitenancy Support"), it is possible to also use separate log files for each tenant.
NOTE: If multi-tenancy is used through different URI paths (as opposed to using different virtual hosts), there may be problems with log file rotation. The reason is that the servlet container may load the SLS web application multiple times, because each URI path is a separate context. Those multiple application instances (all running in the same JVM) are accessing the same log files, which causes problems as soon as one application rotates a file.
One solution for this is to use separate log files per tenant, and, if possible, to avoid separate SLS context URIs, as explained in the paragraphs below.
When using multiple tenants that are supposed to be distinguished through different URIs, there are really two options, a bad and a better one:
- Bad: Use completely separate URIs for the SLS webapp, e.g. "/acme/sls/auth" and "/corp/sls/auth". This is the bad option, because this will make the Tomcat container load the SLS webapp twice, as described in the previous chapter. To avoid this, the tenant part of the URI must be part of the SLS webapp context path, as described below.
Good: Use one singular SLS context path with tenant-specific sub-URIs, e.g. "/sls/acme/auth" and "/sls/corp/auth". This requires configuring those URIs ("/acme/auth" and "/corp/auth") in the SLS web.xml and struts-config.xml files. But it also lets the Tomcat container load the webapp only once, and will thereby automatically avoid all logfile rotation issues. So while it does require slightly more configuration changes, it’s still recommended.
- SLS Configuration Example
In the "sls.properties", the multi-tenancy would be configured just like this:
multitenancy.enabled=true
tenant.1=acme
tenant.2=corp
multitenancy.resolving.1=urlregex
tenant.1.regex=.*acme/.*
tenant.2.regex=.*corp/.*
But then additional mappings need to be added to the "web.xml" file, in addition to the existing mapping for "/auth". NOTE: The "/sls" part of the URI is missing here because it is part of the SLS context webapp URI. Once the request has been dispatched by the Tomcat container to the SLS webapp, only the part after "/sls/.." is relevant for further dispatching:
  <servlet-mapping>
     <servlet-name>action</servlet-name>
     <url-pattern>/auth</url-pattern>
  </servlet-mapping>
  <servlet-mapping>
     <servlet-name>action</servlet-name>
     <url-pattern>/acme/auth</url-pattern>
  </servlet-mapping>
  <servlet-mapping>
     <servlet-name>action</servlet-name>
     <url-pattern>/corp/auth</url-pattern>
  </servlet-mapping>
And the same goes for the "struts-config.xml". Look for the existing mapping for "/auth" and add corresponding ones for the tenants:
    <action path="/auth" scope="request"
        type="com.usp.sls.toolkit.struts.actions.BaseAction" />
    <action path="/acme/auth" scope="request"
        type="com.usp.sls.toolkit.struts.actions.BaseAction" />
    <action path="/corp/auth" scope="request"
type="com.usp.sls.toolkit.struts.actions.BaseAction" />- HSP Configuration Example
It will be necessary to add those SLS sub-URIs as "StartPage" URIs in the SRM configuration of the SLS location as well:
AC_StartPageList /sls/auth /sls/acme/auth /sls/corp/auth
Using separate log files per tenant requires two basic changes to the logging configuration file:
- Defining a separate file appender per log file and tenant, and one as the default. So, for instance, if two tenants are used, there should be three appenders for the audit log file, three appenders for the exception log file and so on.
- Defining a separate named logger, with a tenant-specific name prefix, per log file and tenant - and still the existing default one.
In short: Create an appender with any alias (name). Then create a named logger which uses that additional appender. The logger must have a name prefix with this syntax:
Logger name prefix
tenant-<tenant-alias>.<logger-name>
So, for instance, for the named logger "audit", the tenant-specific logger
must be named "tenant-<tenant>.audit". And the SLS trace / debug logger
"com.usp" must be defined in a logger name "tenant-<tenant>.com.usp".
The reason why the configuration should always contain a default appender and logger for each log file is because there might always be some requests reaching the SLS that don’t match any of the tenants. Also, even requests belonging to a certain tenant, will at least on DEBUG and TRACE level write some log records before the tenant is detected and set for the current request / session, and those log records will be written to the default logger and appender.
Assuming that two tenants "acme" and "company" would be used, the logging
configuration would require the following three appenders for the audit
log file:
Default
<appender name="AUDIT_LOG"
class="com.usp.sls.toolkit.log.SlsDailyRollingFileAppender">
....
</appender>
ACME
<appender name="AUDIT_LOG_ACME"
class="com.usp.sls.toolkit.log.SlsDailyRollingFileAppender">
....
</appender>
Company
<appender name="AUDIT_LOG_COMPANY"
class="com.usp.sls.toolkit.log.SlsDailyRollingFileAppender">
....
</appender>
Also, the following loggers would have to be defined:
Default
<logger name="audit">
<level value="INFO" />
<appender-ref ref="AUDIT_LOG" />
<appender-ref ref="SYSLOG_LOG" />
</logger>
ACME
<logger name="tenant-acme.audit">
<level value="INFO" />
<appender-ref ref="AUDIT_LOG_ACME" />
<appender-ref ref="SYSLOG_LOG" />
</logger>
Company
<logger name="tenant-company.audit">
<level value="INFO" />
<appender-ref ref="AUDIT_LOG_COMPANY" />
<appender-ref ref="SYSLOG_LOG" />
</logger>
The same applies to every other log file, such as "com.usp", "exception"
and "performance".
To send log information to a syslog server, an "SlsSyslogAppender" must be
configured, for example:
Syslog host appender
<appender name="SYSLOG_LOG"
class="com.usp.sls.toolkit.log.SlsSyslogAppender">
<param name="SyslogHost" value="_loghost.acme.com_" />
<param name="Tag" value="SES-SLS" />
<param name="Facility" value="USER" />
<param name="FacilityPrinting" value="true" />
<param name="Threshold" value="INFO" />
<layout class="com.usp.logging.PatternLayout">
<param name="ConversionPattern"
value="%d [CC:%X{cc}] [RC:%X{rc}] - %m%n" />
</layout>
</appender>
The attribute "SyslogHost" must contain the host name of the syslog server,
and "Facility" the corresponding syslog facility. Also, the attribute
"FacilityPrinting" must be set to "true".
Note
The SLS includes a custom Syslog appender, due to two shortcomings of the original Syslog appender provided by Log4j 1:
- The original syslog appender has no support for the "Tag" part of the message, which contains an ID of the component / application that created the log record (important when logs are sent to a central log host).
- The original syslog appender would also print stack traces to syslog. Due to their multi-line nature, they usually break the functionality of log tracking tools.
The custom SLS syslog appender features an additional "Tag"-attribute in the
configuration which defines the "Tag"-part of the message (sometimes also
referred to as "Identity").
The appender alone doesn't do anything yet, however. In order to have the SLS
send some actual log records to it, it must also be added to a logger. One
suggested logger for syslog is "audit", since it contains only log messages
on info level, and usually of the type that is most interesting to collect on
a central log host:
<category name="audit">
        <priority value="INFO" />
        <appender-ref ref="AUDIT_LOG" />
        <appender-ref ref="SYSLOG_LOG" />
</category>
This logger configuration would work with the syslog appender as shown in the paragraph above.
If, however, syslog should be used to track errors (and maybe escalate them if necessary), an other possibility would be to only send all error logs to syslog with this configuration:
<appender name="SYSLOG_LOG"
        class="com.usp.sls.toolkit.log.SlsSyslogAppender">
        <param name="SyslogHost" value="loghost.acme.com" />
        <param name="Threshold" value="INFO" />
        <param name="Tag" value="SES-SLS" />
        <param name="Facility" value="USER" />
        <param name="FacilityPrinting" value="true" />
        <param name="Threshold" value="ERROR" />
        <layout class="com.usp.logging.PatternLayout">
        <param name="ConversionPattern"
                value="%d [CC:%X{cc}] [RC:%X{rc}] - %m%n" />
        </layout>
</appender>
And instead of forwarding "audit" logs to this appender, the SLS info / debug / trace logs would be sent:
<category name="com.usp">
        <priority value="ERROR" />
        <appender-ref ref="SYSLOG_LOG" />
        <appender-ref ref="SLS_LOG" />
        <appender-ref ref="EXCEPTION_LOG" />
</category>To send log information to the local syslog facility, a "SyslogPipeAppender"
must be configured, for example:
Local syslog appender
<appender name="LOCAL_SYSLOG_LOG"
        class="com.usp.sls.toolkit.log.SyslogPipeAppender">
        <param name="Tag" value="SES-SLS" />
        <param name="Facility" value="USER" />
        <param name="Threshold" value="INFO" />
        <param name="PipeCommand" value="/usr/info/logger" />
        <layout class="com.usp.logging.PatternLayout">
        <param name="ConversionPattern"
                value="%d [CC:%X{cc}] [RC:%X{rc}] - %m%n" />
        </layout>
</appender>
The attribute "PipeCommand" must contain the absolute path of the "logger"
binary used to pipe data into syslog, and "Facility" the corresponding syslog
facility.
The pipe appender is a more generic version of the local syslog appender. It allows to pipe SLS log output into any local executable binary, using an arbitrary command, for example:
Pipe appender
<appender name="PIPE_LOG"
        class="com.usp.sls.toolkit.log.PipeAppender">
        <param name="Threshold" value="INFO" />
        <param name="PipeCommand" value="/usr/info/logger -t SES-SLS -p USER.info" />
        <layout class="com.usp.logging.PatternLayout">
        <param name="ConversionPattern"
                value="%d [CC:%X{cc}] [RC:%X{rc}] - %m%n" />
        </layout>
</appender>
The attribute "PipeCommand" must contain the absolute path of the binary used
to pipe data into.
To forward SLS log data to Logstash, a SocketAppender can be used in the SLS logging configuration, in combination with a Log4j plugin in Logstash. But it is important to understand the implications of this set-up for Elasticsearch.
Note
For information on the Log4j plugin for Logstash, please consult the Logstash website, since that plugin is not a SES component.
All logging variables that are created by the SLS when a log message is written, are automatically sent to Logstash through the SocketAppender, and Logstash (or rather the Log4j Logstash plugin) then automatically creates Logstash fields for all these variables. In other words, the SLS logging may lead to the creation of fields in Logstash that are not really needed or wanted. If Logstash then forwards the logs to Elasticsearch, things may get problematic, if there are no format definitions for these new fields (e.g. there may be other sources for Elasticsearch than the SLS, which may accidentally create fields with the same names, but different content type, e.g. numeric instead of strings). All of this can lead to problems later when creating indexes in Elasticsearch.
For these reasons, when using the SocketAppender as described below, to forward logs to Logstash / Elasticsearch, it is advised to enable whitelisting of logging variables, and define specifically which ones should actually be created. Or, rename the variables created by the SLS, in order to avoid name collisions with existing fields from other sources, e.g. rename the variable "user" created by the SLS to "sls_user".
Please read chapter "Add for information on how to whitelist, rename and add logging variables.
  <appender class="org.apache.log4j.net.SocketAppender" name="LOG_LOGSTASH">
    <param name="RemoteHost" value="localhost"/>
    <param name="ReconnectionDelay" value="60000"/>
    <param name="Port" value="5515"/>
    <param name="Application" value="SLS.standalone.default.sls"/>
    <param name="Threshold" value="INFO"/>
  </appender>
The "Threshold" should be set according to what kind of log information is
supposed to be handled by the receiver. Only set it to DEBUG or TRACE
if debug or trace log records are actually expected by the receiver.
It is possible to enable a global filter for password credential values, so that such values will be replaced by a "[hidden]" string even on "debug" and "trace" log level. The following credential types will be filtered out:
-
password -
newpassword -
newpassword2 -
secret
In order to enable this filter, the following property must be set:
log.filter.creds.secrets
Set this to "true" to enable password filtering in all "debug" and "trace" logs.
Defaults to "false".
log.filter.creds.secrets=true
NOTE: Enabling this filter further increases the performance impact of debug and trace logs. However, as long as debug or trace logging is not actually enabled, this feature can be left enabled without a noticable performance penalty. It will then still help avoid accidental logging of sensitive values in cases were trace logging is enabled only for single users.
In cases where the log output is sent to log processing tools like Logstash, it is often formatted into a structure like JSON or XML, and multi-line stacktrace logs are often a problem in such situations.
The following log appender parameter allows to disable new-line break characters whenever a stacktrace is logged in the "exception.log" file:
<param name="MultilineStacktraces" value="false" />
If the parameter "MultilineStacktraces" is set to "false", and all lines of a stacktrace are concatenated, these lines are separated by a pipe character (" | ") by default. To change this, the following parameter can be set with a custom delimiter character:
<param name="MultilineDelimiter" value=" : " />
The SLS provides custom variables that can be used in log records as a means to correlate entries of the same client and / or request. The logging variables are:
- The client correlator ID. This value allows to correlate all log records that belong to request coming from the same client .
- The request correlator ID. This value allows to correlate all log records of one request from the client.
- The current model state. Is empty in all log records written by clean-up threads or during initialization phase.
- The current tenant (if multitenancy support is enabled and used). Is empty in all log records written by clean-up threads or during initialization phase.
An example value for the formatter configuration property
log4j.appender.stdout.layout would be:
%d %-5p %c{2}:%M() [%t] [CC:%X{cc}] [RC:%X{rc}] - %m%nWhich would result in log records similar to this example:
2006-09-05 13:12:53,315 INFO  toolkit.Toolkit:init() [main] [CC:VxfTVycOViU$]
[RC:80c053d0] - Starting Sample Secure Login Service (SLS)
When using a Log4j SocketAppender, all MDC variables are sent to the receiver automatically, which can have unwanted side effects depending on how they are used (e.g. with a system like Logstash / Elasticsearch; see "Logstash and Elasticsearch support" for more information).
Because of this, the SLS allows to add, block or rename existing log variables, all just with some configuration properties. Additional custom variables can be created for certain log messages, grouped by aliases. Blocking variables through a whitelist mechanism, blocking variables with an empty value or renaming already existing ones can all be done globally.
An alias can be defined with a set of variables that should be created for every SLS log message that is marked as belonging to that alias. The syntax is:
log.variables.messages.<alias>=<comma-separated list of SLS message IDs>
Defines which SLS messages belong to the given alias. Every SLS message can be assigned to multiple aliases.
log.variables.add.<alias>.<new variable name>=<variable value>
Defines a new log variable to be created with the given value, every time a log message belonging to this alias is logged.
Value
As for the value, there are two main sources for dynamic values:
- JEXL or Groovy expressions can be used (as usual) to access information related to the current session to which the log message belongs at the time of logging.
-
Logging variables already created by the SLS. These can be accessed using
the JEXL function "
function.getLogVariable(String name)".
The following example should help understanding it:
-
the SLS log message "
USER_AUTH_SUCCESS" is assigned to the alias "CHECK" -
the SLS log message "
BACKEND_UNAVAILABLE" is assigned to the alias "SERVICE" -
both messages are also assigned to the alias "
GLOBAL" -
the alias "
CHECK" gets an additional log variable "user_id" -
the alias "
SERVICE" gets an additional log variable "vhost"
# Assign USER_AUTH_SUCCESS to the alias CHECK
log.variables.messages.CHECK=USER_AUTH_SUCCESS

# Assign BACKEND_UNAVAILABLE to the alias SERVICE
log.variables.messages.SERVICE=BACKEND_UNAVAILABLE

# Assign both messages to the alias GLOBAL
log.variables.messages.GLOBAL=BACKEND_UNAVAILABLE,USER_AUTH_SUCCESS

# Create variable "user_id" for messages with alias CHECK
log.variables.add.CHECK.user_id=${session.getVerifiedCred('username')}

# Create variable "vhost" for messages with alias SERVICE
log.variables.add.SERVICE.vhost=${header.host}

# Create variable "sls_instance" for all messages
log.variables.add.GLOBAL.sls_instance=prod-1
With the example configuration above, the following applies:
-
Whenever "
USER_AUTH_SUCCESS" is logged, the log variable "user_id" is created with the value of the current verified user ID from the session, so it could be referenced in the logging format like "X%{user_id}". -
Whenever "
BACKEND_UNAVAILABLE" is logged, the log variable "vhost" is created with the value of the request header "host" that was sent to the SLS, so it could be referenced in the logging format like "X%{vhost}". -
Whenever one of these two messages is logged, the variable "
sls_instance" is created with the fixed value "prod-1", so it could be referenced in the logging format like "X%{sls_instance}".
The SLS already creates a number of logging variables depending on which message is being logged; some are also created always. For example, the current client- and request-correlator values are always available in the SLS logging variables "rc" (request correlator) and "cc" (client correlator); they are also ususally referenced like that in the log format.
But in a scenario where log records are sent to another system through, for example, a SocketAppender, there might be reasons for wanting to change the names of the variables.
Note
Renaming works like a global filter, and it is applied after all
variables are created. So even when variables are added as described above
using the "log.variables.add..." properties, their name would be changed if
they are matched by a renaming property as described here. The syntax for
configuring logging variable renaming is:
log.variables.rename.<old name>=<new name>
So, in order to rename the logging variable "backend_system" to "backend_ip", for example, the following property would be needed:
log.variables.rename.backend_system=backend_ip
Note
The few custom variables always created by the SLS as documented in "SLS Logging Variables" (such as "rc", "cc", "tenant" etc.) cannot be renamed. They are always created with these names; the reason is that those variables are also used for log records that do not contain one of the documented SLS messages, specifically debug or trace logging.
The following global configuration property will block all variables whose value is empty from being created:
log.variables.allowEmpty=true|false
Set this to "false" to block the creation of variables without a value. If
not set, it defaults to "false", so a variable without a value will not be
sent out.
Similarly to renaming variables, it might be desirable to prevent them from being sent out to the appender at all. Again, a typical use-case for that would be using Logstash / Elasticsearch, where all logging variables would automatically create a field which may be unwanted, or maybe contain sensitive values that are not meant to leave the SLS. So for any such cases, the following global property can be set:
log.variables.whitelist=<comma-separated list of variable names>
If this property is set, whitelist mode is active, and no variables will be created anymore, except those explicitely listed in this property. However, the following variables are automatically whitelisted:
-
cc- The client correlator value -
rc- The request correlator value -
state- The SLS model state -
tenant- The SLS tenant (if multi-tenancy is used) -
Every custom variable specifically added with the "
log.variable.add.." properties described above.
The main reason for using this whitelist mechanism is to block all other
log variables created by the SLS internally, which are different for each log
message. For example, the "USER_AUTH_SUCCESS" message creates a logging variable
"user" which contains the user ID. The message "BACKEND_UNAVAILABLE" creates
(among others) the variable "system" with the IP or hostname of the backend
system. If the backend variable should be sent to the appender, but no other
ones like the user ID, then the following property must be set:
log.variables.whitelist=system
With this property, all logging variables except the ones listed above, and the
one defined by this property ("system") would be blocked.
Note
The few custom variables always created by the SLS as documented in "SLS Logging Variables" (such as "rc", "cc", "tenant" etc.) are not affected by the whitelisting. They are always created with these names; the reason is that those variables are also used for log records that do not contain one of the documented SLS messages, specifically debug or trace logging.
The SLS creates custom logging variables for all request parameters and headers, so that they can be printed with all log records as well. The logging variable syntax in the layout string looks like this:
%X{parameter:<name>}
Prints the value of the HTTP request parameter with the name <name>.
%X{header:<name>}
Prints the value of the HTTP request header with the name <name>.
IMPORTANT: Be aware that some parameters might carry sensitive information, such as passwords. If they are exposed as logging variables, the SLS cannot filter those values out of the log records.
It is possible to create new, custom log messages, or override the text, severity and / or category of the existing ones. A new custom log message can be defined through the following static configuration property in the "sls.properties" file:
log.message.<id>.text=<text>
log.message.<id>.category=<category>
log.message.<id>.severity=<severity>
The first of these properties (with the text) is mandatory, the other two are
optional. The "<id>" part of the message defines the actual message ID,
that will be logged in square brackets in the log record (just like all the
message IDs documented in the "sls-logmessages.pdf" file).
A complete example for a new custom log message would be:
log.message.HELLO.text=Hello user ${session.getCred('username')}
log.message.HELLO.category=USER
log.message.HELLO.severity=WARN
Logging Custom Log Messages
Since the existing SLS code doesn’t know anything about new custom log messages and will never log them, a JEXL function is required in order to actually log such a message:
function.logCustomMessage('<id>');With the example log message defined above, an example invocation in the login model would be:
model.login.state.50.name=do.generic-log
model.login.state.50.action.1=${function.logCustomMessage('HELLO')}The detailed description for each property is as follows:
log.message.<id>.text
Defines the log message text. NOTE: This text can contain JEXL / Groovy expressions that will be evaluated at the time of writing the log record, so it is possible to use session information in a custom log message. Example:
log.message.HELLO.text=Hello user ${session.getCred('username')}log.message.<id>.category
Optional: Defines the category of the message. Must be one of the following values:
-
AUDIT- The message will be logged into the "audit.log" file. -
SYSTEM- The message will be logged into the "sls.log" file and indicates some kind of technical / environment issue. -
USER- The message will be logged into the "sls.log" file and indicates a user-related issue (like a problem with the credentials).
Defaults to "AUDIT" if not specified.
log.message.<id>.severity
Optional: Defines the severity of the message. Must be one of the following values:
-
INFO- For informational log message. -
WARN- For warning log messages. -
ERROR- For messages indicating errors.
These values correspond to the logger level defined in the logging configuration
file. Defaults to "INFO" if not specified.
It is also possible to re-define (and thereby override) existing log messages,
such as "USER_AUTH_SUCCESS", like in the following example:
log.message.USER_AUTH_SUCCESS.text=id=${session.getCred('username')}This would change the text of the log message, so that each time a user successfully completes a login, the following message would be logged to the "audit.log" file:
[AUDIT] [USER_AUTH_SUCCESS] id=MrX
instead of the current message that is logged today:
[AUDIT] [USER_AUTH_SUCCESS] Authentication successfully completed. User: 'MrX'
NOTE: Severity and Category of existing log messages will remain unchanged, as long as they are not explicitely changed (so their existing values are the defaults).
By default the SLS performance log logs durations in millseconds with microsecond
resolution, e.g. 12.345. This behavior can be changed via the configuration
property log.performance.resolution with allowed values millisecs (e.g. 12),
microsecs (e.g. 12.345, the default) and nanosecs (e.g. 12.345678).
If an illegal value is configured, a configuration error is logged once and
the performance log defaults to microsecond resolution.
Note that how precise logged times are depends on hardware and OS, but they can usually help to analyze performance.
The HSP reverse proxy supports load-balancing between multiple SLS instances. It is possible to have the SLS send information about its own load-status, in order to enforce a certain reaction on behalf of the HSP reverse proxy (like starting to send all requests to other SLS instances if one is under heavy load).
Currently, the load of the SLS is calculated simply by the number of open login sessions as percentage of a given maximum threshold. The resulting load number sent to the HSP reverse proxy is always a number between 0 (no load) and 100 (completely used up).
There are a number of configuration properties that allow to activate and adapt how the SLS sends load information.
load.max.threshold
In "sls.properties": The maximum number of login sessions for the SLS. If this number is reached or exceeded, the load value sent to the HSP will be 100.
Example for up to 200 concurrent login sessions:
load.max.threshold=200
load.header.overwrite
In "sls-dynamic.properties": This dynamic property allows to manually override the calculated load value, and instead send a configured one to the HSP. As soon as this property is set in the configuration file "sls-dynamic.properties", the value of that property will be sent to the HSP as the load value.
The idea here is that this allows to manually enforce that the SLS sends the HSP load information which indicates that it wants no more new sessions. This way, the SLS instance can be taken out of the loop for maintenance downtime, without interrupting any ongoing login sessions.
Example:
load.header.overwrite=100
The SLS supports 3 modes of handling multiple backends for different adapters:
- Simple failover (default)
- Failover with a primary system
- Load-Balancing
These 3 modes of operation are mutually exclusive. It is possible, however, to use a different mode for each group of backend systems. For example, simple failover could be used for the LDAP authentication URLs, while load-balancing would be activated for a HTTP adapter backend.
When multiple backends are configured for an adapter, the default behaviour is simple failover. Here is an explanation of each mode, and how it relates to backend-monitoring.
The following adapters support these features:
- LDAP
- HTTP
- Webservice
- RADIUS
- NTLM
See their corresponding chapters for details on how to enable the various backend handling modes.
When multiple backend URLs are configured for an adapter, and nothing else, the SLS will perform a simple round-robin failover. Note: It will only perform a failover whenever the currently used system becomes unavailable. So, in a scenario with a backend "A" and "B", the SLS will start to use "A". Once "A" goes offline, the SLS will switch to backend "B". But if "A" comes back online shortly after that, the SLS will not fall back to it. It will continue using "B", until "B" goes offline, or the SLS is restarted:
...url=A,B

SLS starts -> using "A"
"A" goes offline
SLS failover -> using "B"
"A" goes back online
SLS continues using "B"
SLS restart -> using "A"
The second failover mode (failover with a primary system) supports an automatic fallback to the first backend, as described in the next chapter.
Backend-monitoring, if enabled, will basically just trigger a failover in the background, if the current system becomes unavailable (so it doesn’t happen during the next login session). And it will of course write corresponding log messages that might be evaluated externally.
In this mode, the first system in the list of comma-separated backend URLs is regarded as the "primary" system. This primary system always has higher priority than the other ones, so if the SLS had to perform a failover to one of the fallback systems and the primary becomes available again, the SLS will automatically switch back to it.
Configuration:
...url=A,B
...backendsMode=failoverWithPrimary
Flow:
SLS starts -> using "A"
"A" goes offline
SLS failover -> using "B"
"A" goes back online
SLS switches back to "A"
This feature requires active backend-monitoring. Because of that, monitoring will automatically be enabled when this type of failover functionality is used.
As another option, a simple round-robin load-balancing can be used for handling multiple backend URLs as well. In this case, the SLS will constantly switch between all the listed backends, every time a new SLS session is started (so it sticks to a given backend within one session). When one of the backends goes offline, it will be marked as unavailable and no longer be used by the load balancing mechanism.
This feature requires active backend-monitoring. Because of that, monitoring will automatically be enabled when this type of failover functionality is used. As soon as a backend comes online again and is picked up by the monitoring, it will also be used for the load-balancing again.
Configuration:
...url=A,B
...backendsMode=loadBalancing
Backend monitoring can be enabled optionally in simple failover mode, and is enabled automatically for failover with a primary system or load-balancing.
In the default simple failover mode, its main purpose is to trigger a failover outside of a running session, as soon as a backend goes offline, so that the next login session will already work with the new backend, and not be disturbed at all.
When using failover with a primary system, it is required to detect when the primary system is available again, so a failover back to the primary can be triggered.
With load-balancing it is needed in order to signal to the load-balancing mechanism when a previously offline backend becomes available again.
Note: This monitoring feature can only be enabled or disabled on a global level. If enabled, it will automatically be used for all adapters used in an SLS setup.
monitor.check.interval
The time interval in seconds at which back-end systems are monitored. The back-end systems monitor of the SLS will perform an adapter-specific connection check to the configured backend.
If this property is not set, no back-end monitoring is performed, except if load-balancing is enabled for any adapter. In that case, it will automatically be enabled.
Example:
monitor.check.interval=60
See also "HTTP Connection monitoring" for details about how to configure designated monitoring URLs for the HTTP adapter.
There is a "dynamic" configuration property which allows to completely exclude a certain backend system from the monitoring, and then enable it again, without restarting the SLS.
Since this is a "dynamic" property, it must be stored in the configuration file
WEB-INF/sls-dynamic.properties
The name of the property is
unavailable.backends
And the value is a comma-separated list of backend URLs or IPs that must match the value of the given backend in the adapter configuration. For example, if the LDAP adapter has this URL configured, with load-balancing:
ldap.url=ldap://host-one.acme.com:389,ldap://host-two.acme.com:389
ldap.backendsMode=loadBalancing
and the first system in the list should be taken down for maintenance for a
while, without having the SLS filling the log with "BACKEND_UNAVAILABLE"
messages during that time, the following property could be set in the
"sls-dynamic.properties" file:
unavailable.backends=ldap://host-one.acme.com:389
This means that the monitoring mechanism of the SLS will exclude that backend from monitoring.
Since changes in the "sls-dynamic.properties" file do not require a restart, this allows for a convenient handling of backend downtimes caused by maintenance windows.
This feature is useful in testing environments. It is disabled by default because it has no practical use in a production environment and would pose a serious security risk.
As for the name of this feature - it is intended to allow to pass values for HSP
configuration directives dynamically, instead of using hard-coded settings as usual.
But as of now, only one value can be set this way, that of the HGW_Host directive.
In chapter "Modifying Parameters with "gw-param."",
the configuration property "gw-param." is described which also allows to
configure values to be generated for a variable in the HSP configuration.
However, with that approach, the generated value is set fix, independent
from the login request. There are possibilities to set the value depending
of certain login attributes through JEXL, but that can get quite complicated,
and is still limited.
The feature explained in this chapter extends that functionality in order to explicitely support application development environments, so that application programmers can use a shared SLS instance, but connect to their own local application server instance after the login. The actual host and port values can be entered interactively, either as part of the login URL, or in a separate HTML form provided by the SLS during the login process.
It allows a developer / tester to dynamically specify the host and port of the application back-end server to which he or she will be connected after a successful login. Usually, the (internal) hostnames or IP addresses of the application server are fixed configuration settings in the SES/HSP location configuration (or the SRManager, to be precise). The directive in a simplified sample location usually looks like this:
<Location /web>
SetHandler            http_1_1_gw_handler
HGW_Host              appserv.acme.com:13932
HGW_RequestHeaders    %HTTP11_std %HSP_std %HSP_ssl
AC_AccessArea         Customer
AC_AuthorizedPath     /web
AC_LoginPage          /web/sls/auth
</Location>
However, in integration testing and training environments, it may be useful to be able to use a shared, central SLS instance for authentication, but to be connected to a specific test application server afterwards - for example, an application server instance running on the developers\' local workstation. The following location replaces the fixed host and port value with a variable $ACA:
<Location /web>
SetHandler            http_1_1_gw_handler
HGW_Host              $ACA
HGW_RequestHeaders    %HTTP11_std %HSP_std %HSP_ssl
AC_AccessArea         Customer
AC_AuthorizedPath     /web
AC_LoginPage          /web/sls/auth
</Location>
The SLS can now pass the host and port value for the $ACA variable to the HSP
through special HTTP headers after a successful authentication. The actual
values can either be provided by the user through URL parameters (when the
SLS login page is invoked), or from some optional SLS configuration properties,
or a combination of both. The parameter gateway functionality is configured
through a set of properties in the global configuration file "sls.properties".
Even if this feature is enabled in the configuration (see below), it is not actually available, unless an additional, optional Java library is installed in the SLS classpath directory. The reason for this approach was that it is absolutely imperative that this functionality is not accidentally enabled in a production environment. For this reason, the actual implementation resides in a separate Java library, that can be found in the SLS delivery archive, in the subdirectory "jars":
sls-delivery-<version>/jars/sls-param-gw-impl-<version>.jar
-
Copy this jar file into the subdirectory
"WEB-INF/lib"of the SLS instance where this feature should be used, and restart the servlet container.
The HSP parameter passing feature can be enabled or disabled globally through this configuration property:
hsp.param.passing.active
If set to "true", the functionality is enabled, if set to "false", it is
disabled. As soon as this mechanism is enabled, and an application is accessed
which has its HGW_Host value set to $ACA, the SLS must provide host and
port values to the HSP. This means that for any such application location the
authenticating user must either provide those values through URL parameters,
or default values must have been configured as described below.
Property grouping
The following three configuration properties are always grouped together
through the <name> segment of the property name. One such group of
properties defines defaults for one application location.
Note that this <name> part is also used as a prefix for the names of the
URL parameters explained in the next chapter.
hsp.param.<name>.loc
Specifies the application path to which all default values of the <name>
settings belong. As soon as this property is defined, corresponding host and
port values must be either provided dynamically through URL parameters, or
through the following two default value configuration properties.
The SLS will, after a successful login, create special HTTP headers (so-called
"SES Session Attributes) for the HSP, instructing the SRM to use the host and
port value for the $ACA variable in the corresponding location configuration.
So, if this property is set with the value "/webapp/myapp", there should also
be an application location "/webapp/myapp" configured in the HSP, with the
HGW_Host directive set to $ACA.
hsp.param.<name>.host
Defines a default hostname value for the application referred to by <name>.
hsp.param.<name>.port
Defines a default port value for the application referred to by <name>.
In order to set custom host and port values, those values must be sent to the SLS as URL parameters when invoking the login page. The best way to do this is by creating a shortcut / bookmark in the browser with an appropriate link to the SLS, such as
http://www.acme.com/webapp/sls/auth?Xhost=172.17.8.92&Xport=5000
Note
The names of those parameters depend on the configuration, as described before (see Section 29.4, “Configuration Properties”). The name of the host and port parameters are always built like this:
<name>Host
<name>Port
The <name> prefix refers to the corresponding group of configuration
properies as explained in the previous chapter.
If the parameters are not provided, the SLS has to resort to default values (if there are any in the configuration). If the SLS cannot determine any default value, it will display an additional form, requesting proper values for the missing host and port.
The following example configuration works like this:
- It supposes that there are two applications, for which the reference names "A" and "B" are used. For application "A", default values for the host and port are configured. This means that if anyone logs in and accesses application "A" without providing any custom host and port values in URL parameters, these defaults will be used.
- For application "B", no defaults are configured. If anyone accesses that application without providing the host and port values as URL parameters, an HTML form page will be displayed after the login step, requesting the user to enter the required values. Otherwise, the HSP cannot connect the client to any back-end system.
# Mandatory: Define path of the "A" application
hsp.param.A.loc=/web/a

# Define default host and port
hsp.param.A.host=appserver.acme.com
hsp.param.A.port=80

# Mandatory: Define path for which the "B"
# parameter definitions are valid.
hsp.param.B.loc=/web/b
The following URL would invoke the login page and, after a successful login,
redirect the client to the application "/web/a", while connecting the client
to the application server with the IP address 172.17.2.92 on port 81:
http://www.acme.com/web/sls/auth?AHost=172.17.2.92&APort=81&target=%2fwebapp%2fa
The following URL intends to invoke the login page and, after a successful
login, redirect the client to the application "/web/b". However, since no
host and port values are provided in the URL, and no defaults had been
configured, the SLS will show a HTML form where the missing host and port
values must be entered.
http://www.acme.com/web/sls/auth?target=%2fwebapp%2fb
It is of course also possible to set URL parameters for applications "A" and "B" all at once:
http://www.acme.com/web/sls/auth?AHost=172.17.2.92&APort=81&BHost=172.17.3.65&BPort=90&target=%2fwebapp%2fa
As mentioned in the previous chapters, there is also a more generic way to
override values of the SES configuration by using the SLS parameter passing
functionality. This mechanism is configured through properties in the
configuration file "sls.properties":
gw-param.<HGW-directive>
<host:port>
The following example shows how to configure it appropriately.
SRManager configuration:
<Location /demo/sls>
  SetHandler                  http_1_1_gw_handler
  HGW_Host                    $ACA
  AC_AuthorizedPath           /demo/app
  AC_LoginPage                /demo/sls/auth
</Location>
And the corresponding SLS property in "sls.properties":
gw-param.HGW_Host=192.168.1.54:4566
Of course it is possible to use expressions which enhances the flexibility enormously. The following example shows an expression with a "if" condition.
gw-param.HGW_Host=${if(header.myHeader==2) {'132.23.23.2:234'} else {'132.23.23.2:235'}}The SLS may be configured to generate one or more SES login tickets after every successful login. Such login tickets can then be propagated to the application server in custom HTTP request headers through the HSP reverse proxy.
An SES login ticket contains encrypted authentication information and is digitally signed by the SLS to ensure integrity and authenticity. Backend applications may later make use of the login ticket's information by using the SES Ticket API to extract user specific attributes such as the username or custom attributes.
For the application server (or filters therein) to be able to verify tickets and decrypt information stored in them, they need to be equipped with the appropriate keys. Please read the SES Ticket API developers guide for information about key creation and configuration.
This SES Ticket API provides the necessary functionality to verify the Login Ticket's validity and to access the encrypted data. It supports different application server technologies by providing implementations in Java, C, COM, and Perl. For more informations about the SES Ticket API and its appliance, consult the SES Ticket API developers guide.
The SLS can issue one or multiple login tickets. Tickets can then be propagated to the application either in custom HTTP headers, or as request parameters etc., based on the various configuration options described in "SSO Integration". The typical way of using it is to propagate the ticket in a custom HTTP header to the application..
For every ticket to be created after a successful login (well, usually only one), a group of properties must be defined in the "sls.properties" file. Such a group of properties always has a prefix
ses.ticket.<name>.
where the <name> part is used to group the properties for one ticket definition together. This <name> value also corresponds to the first argument of the JEXL function for creating tickets (see chapter "JEXL Expressions").
The following properties are available to configure one login ticket:
ses.ticket.<name>.realm
The realm of the login ticket.
ses.ticket.<name>.lifetime
The lifetime of the ticket in milliseconds.
ses.ticket.<name>.keyIndexFile
The location of the key index file. This file specifies the actual file locations of the keys referred to by alias in the following properties.
ses.ticket.<name>.public.key
The alias of the public key to use (must be an alias for which a key file is defined in the key index file, e.g.: key_2). This is the key that the application must use to verify the ticket signature.
ses.ticket.<name>.private.key
The alias of the private key to use (must be an alias for which a key file is defined in the key index file, e.g.: key_1). This is the key that the SLS uses to sign the ticket.
ses.ticket.<name>.encryption.key
Optional: A symmetric encryption key, used to encrypt the ticket payload.
With an appropriate set of properties to configure a ticket, such tickets can be created using the JEXL function createTicket() (see chapter "Functions").
The following example demonstrates how to propagate an SES ticket to the application in a custom HTTP header "userinfo". The ticket name in the configuration is "loginticket" and the username is the value of the request parameter "userid" (which would be the name of the form field in the login page):
# Define ticket 'loginticket'
ses.ticket.loginticket.realm=ACME
ses.ticket.loginticket.lifetime=30000
ses.ticket.loginticket.keyIndexFile=/opt/usp/sls/keys/list.keyindex
ses.ticket.loginticket.public.key=key_2
ses.ticket.loginticket.private.key=key_1

# Custom attribute \'pwd\' containing users password,
# is encrypted with symmetrical key
ses.ticket.loginticket.attr.pwd.key_3=${parameter.password}

# For the application to know which key to use to decrypt the
# password attribute, set another attribute holding the alias
# of the encryption key.
ses.ticket.loginticket.attr.pwdid=key_3

# Another custom attribute with a fixed value
ses.ticket.loginticket.attr.location=Connecticut

# Create and propagate ticket
app.header.userinfo=${function.createTicket('loginticket',parameter.userid)}
HSP Configuration
Any custom HTTP header that should be sent to the application server must also be enabled in the HSP configuration (for details see [HTTPADMIN]). Otherwise, it will be blocked and not be forwarded to the application. The following directive enables the custom header "userinfo" for the application "/app". This is the header we need to enable for the above example.
<Location /app>
[...]
HGW_RequestHeaders        +userinfo
</Location>
The SES ticket credential provider allows the login service to process existing SES tickets of logged-in users and extract the username. .
To activate and use this credential provider, the following properties must be added to the "sls.properties" file:
# Internal: Name of provider implementation class
cred.provider.class.sesticket=
com.usp.sls.toolkit.http.cred.SesTicketCredentialProvider

# Extract username credential from SES login tickets
# in incoming HTTP header 'SES_TICKET'
cred.provider.1=sesticket
cred.provider.1.cred.1.type=username
cred.provider.1.cred.1.source=header
cred.provider.1.cred.1.name=SES_TICKET
Certain JSPs such as the login or change password page will then automatically insert the user ID into the appropriate form field.
The SLS supports creation and parsing of JSON Web Tokens (JWTs).
JSON Web Tokens are an open, industry standard RFC 7519 method for representing claims securely between two parties, see http://jwt.io/.
They are used in OpenID Connect and often in OAuth 2.0, but their usage is not limited to that context.
In particular, all major web servers offer filters for authentication with JWTs.
The SLS can issue one or multiple JWTs. JWTs can then be propagated to the application in HTTP headers or request parameters etc., as desired. A common way to propagate JWTs is as an "Authorization" HTTP Header with its value prefixed with "Bearer ".
All of the following items are optional per JWT standard, but usually most of them are set to create a meaningful JWT.
Note that date claims "exp", "nbf" and "iat" must be given in ISO 8601 UTC date+time
format, e.g. "2016-11-16T12:34:53Z".
Use the script functions jwt.getIso8601UtcDateForNow()
and jwt.getIso8601UtcDateFor(Date date) to get date strings for now or for
a java.util.Date obtained/calculated in another way.
jwt.def.<alias>.iss
The issuer of the JWT. A string value, optional.
jwt.def.<alias>.sub
The subject to which the JWT is issued. A string value, optional.
jwt.def.<alias>.aud
The intended audience for the JWT. String values separated by spaces, optional. Stored in the JWT as an array of audiences.
jwt.def.<alias>.exp
When the JWT expires ("expiration time"). A string value in ISO 8601 UTC time format (see above), optional.
jwt.def.<alias>.nbf
From when on ("not before") the JWT is valid. A string value in ISO 8601 UTC time format (see above), optional.
jwt.def.<alias>.iat
When the JWT was issued ("issued at"). A string value in ISO 8601 UTC time format (see above), optional.
jwt.def.<alias>.claim.<name>=<value>
Custom string claims to add to the JWT, optional.
The SLS uses the Nimbus JOSE JWT Library.
Script functions that create a JWT from scratch or by parsing a string
yield a com.nimbusds.jwt.JWT object that can be further operated on
for handling use cases not currently supported by SLS configuration
and jwt script functions.
Values of configuration properties can either have fixed values or can consist of (or contain) JEXL expressions. JEXL (_J_ava _Ex_pression _L_anguage) is a light-weight, efficient open-source expression scripting system that allows to create and use values and access functions dynamically. More information about it can be found on Apache's website:
http://commons.apache.org/jexl/
For the SLS this means two things:
- During any process such as authentication, mapping etc., the SLS creates JEXL variables for values such as request parameters or headers, authentication adapter response attributes etc. These variables can be used within of or as values of configuration properties. More detailled explanations and a few examples follow below.
- JEXL also allows to provide access to simple functions, such as string manipulations, de- or encodings, regular expressions etc. Such functions can be used to dynamically set the value of a configuration property based on the values of the current session.
As of release 5.0.0.1, JEXL 2 is supported (JEXL 1 is no longer supported).
See "JEXL Version Issues" if you need to migrate from JEXL 1. Note that JEXL 2 in general is almost 100% backward compatible with JEXL 1. Besides of some rare special cases (like a different behaviour in using "\" escape characters in strings) a main difference is that it is not possible to set variables with "-" (dash) characters in their names anymore. While this has always been deemed illegal by the official JEXL documentation, it was still possible with JEXL 1. With JEXL 2 however, such variables cannot be used at all anymore. The SLS replaces "-" (dash) characters in variable names with "_" (underscore) characters automatically to work around this issue.
All JEXL expressions must be defined by enclosing them in a "${"-prefix and a "}"-suffix, like this:
${<JEXL expression>}Since a JEXL expression in the end always results in a String value, the simplest and most common expression is just a variable name, like
${ldap.attribute.mailAddress}All JEXL variables have a session scope, which means once they are created, they exist as long as the SLS login session.
It is possible to store JEXL variables automatically in the SLS "Userinfo"-cookie at the end of the session. That cookie (which is only stored in the reverse proxy session, and never reaches the client) stores various information for the SLS about the current user, and is processed automatically whenever the SLS is invoked again after the login (for example, for a password change flow).
In order to define certain JEXL variables to be stored in the user-info cookie, the following property can be used.
persist.variable
The value of the property must be the actual name of the variable (not an expression), e.g. like this to persist the variable "userMail":
persist.variable=userMail
In order to store multiple variables, use a numbering suffix, e.g.
persist.variable.1=userMail
persist.variable.2=streetName
persist.variable.3=city
Note
By default, the variables are restored once per each request, from the cookie. If it is preferable to have it restored only once per session, the following property can be set:
persist.mode=session
By default, the property has the value "request", which means restoring the
variables once per each incoming request.
Strings within JEXL expressions (for function parameters, for example) must be enclosed in single apostrophs <\'>, e.g.:
${session.getCred(username)}
JEXL usually allows to invoke methods of any Java object that is represented by a variable, as long as those methods have simple parameter- and return-types (like String, int etc.). The most typical use-case would be to directly access methods of "java.lang.String" on a JEXL variable, since most JEXL variables are just Java Strings.
This is a practical example of how to extract and change a part of the value of a RADIUS response attribute variable:
${function.getVariable('attribute.radius.21').substring(1,2).toUpperCase()}This example extracts the second character of the value of the RADIUS response attribute 21 (by invoking the method "substring()" of "java.lang.String") and changes it to uppercase (by invoking "toUpperCase()").
Of course not all JEXL variables are always objects of type "java.lang.String", so using this JEXL feature requires some knowledge of the internals of a certain functionality (or a try- and error-approach).
JEXL does not really support invocation of static methods the way it is usually done in Java, e.g. "java.lang.Integer.parseInt(value)". To do this in JEXL, the "new" keyword can be used to create an instance of any class, given that it has the corresponding constructors; then, that instance can be used to invoke the static methods. For example:
// Create an instance of "java.lang.Integer" in the variable "myInteger"
myInteger = new ("java.lang.Integer", "0");
// Invoke method "java.lang.Integer.parseInt()" through the new prefix
myInteger.parseInt(value);Because "java.lang.Math" has only static methods and no public constructors, it is not possible to use the previously described approach to create an instance of it and use its methods. JEXL provides a custom class that substitutes some of the functionality of "java.lang.Math". The following example shows how to create an instance:
mymath = new ("org.apache.commons.jexl2.JexlArithmetic", false);Please consult the online Javadoc for the "JexlArithmetic" class for more information about its functionality:
http://commons.apache.org/proper/commons-jexl/apidocs/org/apache/commons/jexl2/JexlArithmetic.html
It is possible to use nested expressions as well. But in such a case, the whole nested expressions together need to be put within the brackets, and not each single expression.
Nesting of a JEXL variable ("parameter.userid") into a JEXL function:
${function.md5(parameter.userid)}
Good nesting
Correct nesting of two JEXL functions:
${function.md5(session.getCred(username))}
Bad nesting
Invalid nesting example:
${function.md5(${session.getCred(username)})}
Note that it is also possible to invoke JEXL function calls from within the current model, through custom actions, as described in "Custom Actions". This also allows to, for example, invoke custom-written JEXL functions which would perform some kind of update or notification operation at any given point within the model.
There is a bug in the current JEXL implementation when it comes to dealing with entries of array variables. Usually, when a JEXL variable isn't a simple string or integer value, but an array ob values, an entry of the array can be accessed by using one of two notation options:
arrayVariable[<index>]
arrayVariable.<index>
But as soon as the variable name itself contains one or more dots, the parser fails to resolve the expression properly, and the result is unpredictable. So, the following example would not work
array.variable[2]
As a workaround, the variable containing the array can be copied into another variable with a simple name (without dots), and then that new variable can be used to access the array entries. In the SLS model, this could be done with two actions:
...state.10.action.1=${function.setVariable('simple',array.variable)}
...state.10.action.2=${simple[2]}
Array Size
The size of an array can be determined using the built-in JEXL function size(), e.g. "size(myArray)".
Sometimes, it's preferable to put highly complex JEXL expressions in external, separate script files. The directory path for such scripts is
<sls-webapp>/WEB-INF/scripts/
The files are not required to have any specific suffix, but it is recommended to use something intuitive like ".jexl", e.g.:
<sls-webapp>/WEB-INF/scripts/dostuff.jexl
A JEXL script can contain 1 - n lines with JEXL expressions / statements. Each statement must be terminated with a semicolon.
Return Value
If the script is supposed to work like a function and return a value, the variable holding that value must be put at the last line. If the script is used in a condition, the return value should be a string containing either "true" or "false".
Comments
Comments can be inserted by starting a line with a double slash, e.g.:
// This is a comment
Returns a string with a "hello," message, greeting the user defined in the JEXL variable "firstname":
'hello, \' \+ firstname;
A simple example of a JEXL script which creates a counter object named "ctr" on first invocation, then increases it with every following invocation, and returns the current value of the counter:
if(function.getVariable('ctr') == null) {
    function.createCounter('ctr');
}
// Now the variable 'ctr' must exist and can be used
ctr.increase();
// Return current value of counter object 'ctr'
ctr.getCounter();In order to use such a script file, an alias for it must be defined in the "sls.properties" file first, e.g.:
script.file.<alias>
script.file.doit=dostuff.jexl
The script can then be executed from the model like this:
model.state....action.1=${runscript.jexl('doit')}For example, any parameters sent in the authentication request, such as the user login ID or the password, are stored - for the duration of the login session - in variables which can be used in strings in configuration properties.
A reference to a cached variable always follows this syntax:
${<type>.<name>}
<type> defines the source for the variables\' value (a request parameter, a response attribute etc.) and must be one of the values listed in the table below. The allowed values for the <name> part depend on the type of the variable. This is also explained for each type in the following table.
Here are a few variable examples:
-
${parameter.id}Contains the value of the HTTP request parameter "id". -
${header.host}Contains the value of the HTTP request header "host".
A variable might be an array, which means it contains multiple values. A typical real-world example is an LDAP multi-value attribute. The values of an array are referenced by adding an index number to the variable name (indexing starts with 0):
myvariable.0 - Refers to the first value
myvariable.1 - Refers to the second value
For example, in case of a multi-value LDAP attribute named "groups" with values "admin", "users" and "other", the result would be:
-
attribute.ldap.groups.0=admin -
attribute.ldap.groups.1=users -
attribute.ldap.groups.2=other
There are some functions that are helpful to work with arrays, especially "function.arrayContains()". It allows to check if one of the values of an array equals a certain expected / required value. Example:
..state.10.action.1=${response.setAuthorization('admin')}
..state.10.action.1.if=${function.arrayContains(attribute.ldap.groups, 'admin')}- Variables must not contain a dash "-". It would be interpreted as the subtracion of two variables:
myvar.custom-7 is an invalid expression.
- Variables must not end with a dot followed by a number. It would be interpreted as array index:
attribute.radius.11==attribute.radius[11]
In cases where a variable has such a name, it is possible to get around this problem by resolving variables using the JEXL function function.getVariable().
${function.getVariable(attribute.radius.11)}
A nested example for setting a response header "X":
${response.setHeader(X,function.getVariable(attribute.radius.11))}
JEXL variables in the SLS have by default a session scope. This means that once a variable is created, it exists in the SLS session until it is removed, or the session ends.
In some cases, this can lead to unwanted behaviour. For any such cases, there is a configuration switch that instructs the SLS to clear out all JEXL variables everytime a new request is processed.
jexl.clear.request.vars
Optional: If set to "true", the SLS will clear all JEXL variables in the current session for every new request. Defaults to "false".
List of available variable types (meaning prefix) and values:
Table 32.1. List of all variable types and their possible values.
| Variable Type | Variable Name Value(s) | Variable Value |
|---|---|---|
| The SLS automatically creates a variable with this prefix and the name of the request parameter as the suffix for each request parameter. | The value of the request parameter (string). Note that all form fields from the login page etc. are of course also available as variables, for example
|
| The SLS automatically creates a variable with this prefix and the name of the request header as the suffix for each request header. | The value of the HTTP request header (string). |
| The SLS automatically creates a variable with this prefix and the name of the cookie as the suffix for each cookie. | The value of that given cookie (string). |
| Name of a configuration property read from any of the SLS configuration properties files. | The value of that configuration property (or an empty string if no such configuration property exists). |
| Name (or ID) of an additional attribute received in the response from the authentication adapter. Usually, attribute variables have a second part in their type, defining the adapter which created them: attribute.ldap.<name> attribute.radius.<name> What name or ID values can be used depends on the adapter implementation. For example, with the RADIUS adapter, the name must be a numeric ID, referring to the RADIUS response attributes as defined by the standard. With an HTTP / Webservice adapter, on the other hand, the name values would be HTTP response header names. | The value of the response attribute received in the authentication response of the adapter (string). For example, a customized adapter could add additional response attributes which contain a user's account number etc. |
| Additional properties of the HTTP request, like HTTP method or URI. | See following section for details. |
| Special variables for special use cases. | See upcoming section here for details. |
Example: HTTP GET request to the following URL: http://localhost:8080/myApp/A/B/C/hallo?q=a
All following variables have string values except where indicated.
request.method
Contains the HTTP request method, usually either "GET" or "POST".
Corresponds essentially to function.getCurrentRequest().getMethod().
Above sample request: "GET".
request.uri
Contains the part of the URL from the protocol name up to the query string.
Corresponds essentially to function.getCurrentRequest().getRequestURI().
Above sample request: "/myApp/A/B/C/hallo".
request.url
Contains the URL of the request without the query string,
more precisely:
"Reconstructs the URL the client used to make the request.
The returned URL contains a protocol, server name, port
number, and server path, but it does not include query
string parameters.".
Corresponds essentially to function.getCurrentRequest().getRequestURL().toString().
Above sample request: "http://localhost:8080/myApp/A/B/C/hallo".
request.contextPath
Contains the context path of the request.
Corresponds essentially to function.getCurrentRequest().getContextPath().
Above sample request: "/myApp".
request.servletPath
Contains the servlet path of the request, may be an empty string.
Corresponds essentially to function.getCurrentRequest().getServletPath().
Above sample request: "/A".
request.pathInfo
Contains extra path info of the request, may be null.
Corresponds essentially to function.getCurrentRequest().getPathInfo().
Above sample request: "/B/C/hallo".
request.pathTranslated
Contains extra path info of the request, translated to a real path on the server,
may be null.
Corresponds essentially to function.getCurrentRequest().getPathTranslated().
request.query
Contains the query string of the request (without the leading question mark),
is null if there are no query parameters.
Corresponds essentially to function.getCurrentRequest().getQueryString().
Above sample request: "q=a".
request.raw
Contains the raw javax.servlet.http.HttpServletRequest object of the request.
Corresponds essentially to function.getCurrentRequest().
For more details on the exact meanings of all above variables see the JavaDoc
of the corresponding methods of javax.servlet.http.HttpServletRequest.
special.authenticated
Contains a string "yes" as soon as a successful authentication has been performed (defaults to "no").
special.certificate
Contains the certificate of the user after a successful PKI login. The variable contains an object which is of the Java type "java.security.cert.X509Certificate", so all methods of that class can be invoked on this object. Example:
${special.certificate.getIssuerDN()}special.mapped.id
Contains the mapped user ID, if the login model contained the "do.mapping" step and an actual mapping was performed. However, in many cases it is easier to just use some adapter-specific attribute for mapping purposes. For example, after an LDAP lookup during the authentication step, all LDAP attributes of the user are available as JEXL variables and could also be used for mapping purposes, without a "do.mapping"-step in the model.
special.sls.path
Contains the absolute path of the SLS web application directory in the local file system. This could be useful in cases where a third-party library / adapter is integrated with the SLS which requires an absolute path specified for a custom configuration file etc.
special.requested.page
Read-only: Contains the value of the "RequestedPage"-parameter which was inserted into the incoming request by the HSP. This value represents the URL that the client wanted to access before the HSP redirected it to the SLS. In other words, this is the URL where the client should be redirected to by the SLS after a successful login.
This usually happens automatically in the "do.success"-step, but there might be special cases where the redirect is performed in some other ways, for example by using the "do.redirect"-state, and where this variable could be used to define the target:
model.login.state.10.name=do.redirect
model.login.state.10.property=${special.requested.page}
This variable is read-only. Changing it won't impact the redirect behaviour of the SLS!
special.authorized.path
Contains the value of the "ReqAuthorizedPath"-field of the header "SessionInfo" sent by the HSP. This value essentially represents the URL path for which the client wants to be authorized. This value can be used, for example, for the "path"-attribute when configuring custom SES session attributes.
special.authorizations.missing
Set just before displaying the already-logged-in page in order display the appropriate message, because when the page is displayed the session has already been invalidated. Contains the string "true" or "false".
<type>.current.backend
Contains the hostname / address of the currently used back-end system (in failover setups) of a certain type, e.g..
radius.current.backend=172.17.4.15
challenge
Contains the text of the challenge created by the challenge / response adapter.
current.tenant
The current tenant value; see "JEXL Variable" for details.
sessioninfo.<name>
For each field in the "SessionInfo" header sent by the HSP to the SLS, one such variable is created, where "<name>" is the actual name of the field in the header.
rsa.auth.status
The current RSA token status (string); see ""Next Tokencode Required" Problem" for details.
ldap.error
Contains the last LDAP error message (the message string of the Java "NamingException" which was thrown internally).
attribute.ldap.<name>
One such variable (string or array) is created for each attribute of the last LDAP object that was found in a successful search
(with "<name>" being the actual name of the LDAP attribute). Note that the notation of the name begins with
"attribute." for historical reasons, and because there are similar attributes available for other adapters like the
RADIUS adapter, e.g. "attribute.radius.<name>".
radius.response.type
Contains the RADIUS packet type of the last RADIUS response (number or string "unknown" if there was no RADIUS response).
attribute.radius.<id>
One such variable (string) is created for each attribute in the last RADIUS response,
with "<id>" being the numeric identifier of the attribute.
http.error.code
Contains the last HTTP callout error code (number, see "Scripting" for details).
response.holder
A Java object containing all the response information. The class of the object is "CloseableHttpResponse" from the Apache HttpClient 4 API.
response.content
Stores the entire response body content (without the headers) as a string; more precisely contains the response body bytes parsed with UTF-8 encoding to a string, and results in an empty string if there was no response body.
response.contentBytes
Stores the entire response body content (without the headers) as a byte array; results in an empty byte array if there was no response body.
response.code
Stores the HTTP response code of the last call (number).
response.header.<name>
One such variable is created for each header in the response sent by the HTTP backend, where <name> is the name of the response header, e.g.:
response.header.mimetype
response.cookie.<name>
One such variable is created for each "Set-cookie" header in the response sent by the HTTP backend, where <name> is
the name of the cookie, and the variable value is the cookie value, e.g.:
response.cookie.JSessionID
response.holder
Contains a reference to a Java object which holds all the information about the last response received from the backend.
The object is of type "org.apache.http.HttpResponse". The Javadoc API documentation for this class can be found on
the official Apache HttpClient webpage.
ws.request
The HTTP request body as a string.
ws.response
The HTTP response body as a string.
ws.response.headers
Map of HTTP response headers, where the map key is the header name, converted to lower-case and '-\' converted to '_', e.g. 'Content-type\' becomes 'content_type\'.
ws.response.statuscode
The HTTP response status code (number).
ws.soap.fault.value
The SOAP fault code value, if any (string).
spnego.realm
Contains the SPNEGO realm of the user after a successful login (string).
spnego_ms_kerberos_password_login
After a successful login:
- Set to true if it was a Microsoft Kerberos login with password according to MS PAC data in the Kerberos ticket.
- Set to false if it was a certificate login according to MS PAC data in the Kerberos ticket or if the ticket could not be decrypted and parsed or if the decrypted ticket contained no MS PAC data.
spnego_ms_kerberos_certificate_login
After a successful login:
- Set to true if it was a Microsoft Kerberos login with certificate according to MS PAC data in the Kerberos ticket (i.e. typically login with a smartcard or with a similar crypto token).
- Set to false if it was a password login according to MS PAC data in the Kerberos ticket or if the ticket could not be decrypted and parsed or if the decrypted ticket contained no MS PAC data.
So there are three different outcomes for the above two variables:
- true/false: Could decrypt+parse+extract, was certainly a password login
- false/true: Could decrypt+parse+extract, was certainly a certificate login
- false/false: Could not decrypt+parse+extract, no idea what was used for login
In practice this means the following:
-
If you want to treat certificate login as "strong authentication" in a login
model and everything else as "weak authentication", just check the value of
spnego_ms_kerberos_certificate_login; if it is true, authentication was strong, otherwise treat as weak (could not prove that was strong). - Should you need to know whether decrypting/parsing succeeded and the decrypted ticket contained MS PAC data with the above information, verify that one of the two variables is true and the other one is false, and not both are false. (A trace log typically gives more details why could not get the info.)
Decryption currently supports ETypes Aes128CtsHmacSha1(17), Aes256CtsHmacSha1EType(18)
and ArcFourHmac(23); if you set spnego.mslogin.ticket.decipher.useJdkInternalsIfAccessible=true
additionally the key types that the JDK supports are available, with JDK8 those are
DesCbcCrc(1), DesCbcMd5(3) and Des3CbcHmacSha1Kd(16).
JDK internals are available with JDK8; with version 9+ and later they would only be available
if access to the internal modules was given via a number of System Properties at web container
startup, and starting with JDK17 they will no longer be accessible be at all.
Therefore, please inform USP if you need to use JDK internals in practice so that support for
the corresponding EType without using JDK internals could be considered for future releases.
Note however, that all three additional ETypes are officially deprecated for security reasons,
as is ArcFourHmac(23), see RFC 6649 (2012) and RFC 8429 (2018).
[assertion.*]
For many fields in the assertion, corresponding JEXL variables are created (string values). Which variables are actually created can depend on the assertion. Among typical values are:
- common name
- user id
- issuer
etc. Check the TRACE-Log of the SLS once to see a list of all variables that are created.
assertion.attribute.<frienly-name>
For each user attribute in the assertion, a corresponding variable is created (string). The "<friendly-name>" part of the variable name is the friendly name of the attribute in the assertion. For multi-value-attributes, a separate variable is created for each value, where the names of the variables are numbered, e.g:
assertion.attribute.myValue.0=...
assertion.attribute.myValue.1=...
assertion.attribute.myValue.2=...
The built in JEXL functions are grouped by different prefixes:
-
function.<name>Provides "static" utility functions. -
session.<name>Provides functions that use or manipulate the SLS session. -
response.<name>Provides functions for sending custom response headers, redirects, or other manipulation of the response.
So, to actually use a JEXL function in an expression, it must have the proper prefix. Examples:
response.setHeader('myHeader', 'someValue');
session.createVariable('newVar', 'newValue');
"sls-jexl-guide.pdf" documentation
Please consult the "sls-jexl-guide.pdf" document for a complete list of all currently available JEXL functions. Each function as also its prefix listed.
There's a special type of object that can be used with JEXL to implement a counter in a model. Such counter objects can be created using a method from the "function" class:
function.createCounter('mycounter');This creates a counter object in the JEXL context. The object is stored in the variable with the given name, 'mycounter\' in this example. To actually use the counter, its methods can be invoked directly on the variable:
-
mycounter.increase()- Increases the counter by 1 -
mycounter.decrease()- Decreases the counter by 1 -
mycounter.getCounter()- Returns the current numeric integer value of the counter
There is a template mechanism available through JEXL which allows to use any custom text file as a template. The contents of that file can then be used for the value of a custom cookie, for example, amended with user- or session-related values during a login process.
The following JEXL function returns the content of a template file, completely processed (all JEXL expressions in the template evaluated):
${function.getTemplateContent('templateAlias')}or
${function.getTemplateContent('templateAlias', 'unix')}The "templateAlias" argument refers to a template that must be defined first through a configuration property in "sls.properties":
template.file.<templateAlias>=<file path>
Note
The file path cannot be an absolute path! Only relative path values are
allowed. The value will always be used as a path relative to the
"WEB-INF/templates/" subdirectory of the SLS web application.
The "unix" argument referts to the line separator character which should be used for a mulitline template. The allowed arguments are "unix", "windows", "system" and "none" - where "none" is the default. "system" takes the line separator property from the local running machine.
The parameter is needed when line structure of the template should be kept. Otherwise the linebreak will get removed when reading the template in.
So, the following example refers to a file "custom.xml" in the SLS directory "WEB-INF/templates/":
template.file.acme=custom.xml
The following expression would use its content then as the value of a cookie named "info":
${response.createCookie('info', function.getTemplateContent('acme'), '/app', -1)}The content of the file "custom.xml" could be something like this:
<acme>
<user>${session.getVerifiedCred('username')}</user>
<timestamp>${function.getTimestamp()}</timestamp>
</acme>
So the resulting "info" cookie would have a value that consisted of this XML structure, but with the JEXL expressions evaluated and replaced with their actual values.
Another way of using templates is to use them to process JSON data and automatically
create or update variables, based on the contents of the JSON data. By putting
a JSON template structure in a JEXL template file, and then inserting special
markers that define which attribute value or node should end up in which variable,
all that is needed at runtime is a simple function call to "function.updateVarsFromJson()",
with the JSON input data (e.g. the body of a HTTP response from a REST call),
and all the variables will be created automatically.
Markers / Variable Types
The markers for variables to be created are strings of the following format:
@<type>:<name>@
e.g. "@string:userName@", which could create a JEXL variable "userName" containing the value of the corresponding JSON attribute.
The following types are supported:
-
string: A text string, e.g. "hello" (Java.lang.String) -
number: An integer number, e.g. -15 (Java.lang.Integer) -
float: A floating point number, e.g. 0.234 (Java.lang.Double) -
boolean: A boolean value,trueorfalse(Java.lang.Boolean) -
node: A Java POJO for simple JSON nodes which only have attributes. With Groovy, each attribute can be accessed with the same syntax as in the JSON structure (since in Groovy simple Java getter methods can be used like member attributes). This MUST be used for simple JSON nodes, NOT arrays! -
list_node: A list of objects (net.minidev.json.JSONArray), but this is also a Java "ArrayList", so it can be handled easily in Groovy. Each entry in the list is then a POJO as described undernode. This MUST be used for JSON array nodes!
Configuration Properties
There are two optional boolean configuration properties that allow to change the behaviour of the JSON variable processing mechanism:
jsonpath.ignore.missing.nodes
Optional: Allows to enable for an exception to be thrown if a variable
specified in the JSON template could not be matched at all with the given data.
Defaults to false, so if the JSON data does not contain the attribute or
node referenced in the template, the corresponding variable will just not be
created.
jsonpath.ignore.empty.nodes
Optional: Allows to disable variables being created (or updated) if the JSON data value made in the match was empty, e.g. an attribute like "name" existing in the JSON data, but its value being an empty string. By default, the SLS will always created and update variables, even if their value is empty in the JSON data (NOTE: this refers only to existing nodes / attribute with empty values, not to cases where the node/attribute is entirely missing - that would be what the other property is for).
Example / How To
This example assumes that a HTTP call was made to a REST service using the SLS HTTP adapter, and a JSON structure was received in the response body. For the sake of this example, the following JSON structure has been sent back to the SLS:
{ "store": {
    "book": [
      { "category": "reference",
        "author": "Nigel Rees",
        "title": "Sayings of the Century",
        "price": 8.95
      },
      { "category": "fiction",
        "author": "Herman Melville",
        "title": "Moby Dick",
        "isbn": "0-553-21311-3",
        "price": 8.99
      },
    ],
    "members": [
      {
        "person": {
          "name": "Henry Miller",
          "age": 37
        }
      },
      {
        "person": {
          "name": "John Doe",
          "age": 99
        }
      }
    ],
    "bicycle": {
      "color": "red",
      "price": 19.95,
      "verified": true
    }
  }
}
In this example, we want to have variables created for the price and color of the "bicycle" node, and we also want to be able to retrieve information about the books in the array. The "bicycle" part is used to demonstrate the simpler use-case of creating string, integer or float variables from simple JSON attribute values. The "books" and "members" parts are used to show how to use JSON nodes, in Groovy, to easily access their information.
Example / How To
The following example refers to a file "myvars.json" in the SLS directory "WEB-INF/templates/":
template.file.myvars=myvars.json
The file contains this JSON structure, which contains the definition to create or
update the variables "myColor" and "myPrice" from the attributes of the JSON node
"store.bicycle", and a variable "books" with the JSON node "store.book" which will
contain a list of "Pojo" (simple Java objects) representing the nested JSON data.
Template Example
{
        "store": {
                "book": [
                        {
                                "@slsvariable@" : "@node:books@"
                        }
                ],
                "members": [
                        {
                                "@slsvariable@" : "@node:people@"
                        }
                ],
                "bicycle": {
                        "color": "@string:myColor@",
                        "price": "@float:myPrice@",
                        "verified": "@boolean:isVerified@",
                },
                "car": {
                    "maxSpeed": "number:maxSpeed"
                }
        }
}
Next, a HTTP adapter call to a REST service would be performed in the model, e.g.
model.login.state.1000.name=do.http-someRestCall
model.login.state.1000.property=restBackend
After that, the JSON response body is available in the JEXL variable "response.content"; for this example, we assume the JSON response body received from the REST service looks like this:
JSON Response Example
{
  "store": {
    "book": [
      { "category": "reference",
        "author": "Nigel Rees",
        "title": "Sayings of the Century",
        "price": 8.95
      },
      { "category": "fiction",
        "author": "Herman Melville",
        "title": "Moby Dick",
        "isbn": "0-553-21311-3",
        "price": 8.99
      }
    ],
    "members": [
      {
        "person": {
          "name": "Chuck Norris",
          "timesCountedToInfinity": 2
        }
      },
      {
        "person": {
          "name": "Bruce Lee",
          "specialty": "One Inch Punch"
        }
      }
    ],
    "bicycle": {
      "color": "red",
      "price": 19.95,
      "verified": true
    },
    "car": {
      "maxSpeed": "195"
    }
  }
}
It could then be processed to create and update variables like this:
model.login.state.1000.action.1=#{function.updateVarsFromJson('myvars', var('response.content'))}As a result, the variables will be created as explained below.
1: Simple Values
-
myColor=red(string) -
myPrice=19.95(float) -
isVerified=true(boolean)
2: Single Node
-
myCar(POJO)
Example Groovy expression to access the "maxSpeed" attribute:
-
var(myCar).maxSpeed
3: List of Nodes
-
books(List of POJOs) -
people(List of POJOs)
Example Groovy expression to access attributes of a certain book:
-
var(books)[0].author(= "Nigel Rees") -
var(books)[1].isbn(= "0-553-21311-3")
Note
The dynamic nature of Groovy (and JSON) allows to have somewhat irregular structures like in this example, where one book has an attribute "isbn" and another does not. So depending on the use case, it might be necessary to add a null-check to the Groovy code.
Example Groovy expression to access attributes of a certain member:
-
var(people)[0].person.timesCountedToInfinity(= "2") -
var(people)[1].person.specialty(= "One Inch Punch")
Another way of using templates is to use them to process XML data and automatically create or update variables, based on the contents of the XML data. This is the same functionality as provided in the webservice adapter, but it works with the normal standard templates (not the special request and response templates created by the WSDL tool), in conjunction with a scripting function - completely independent of any adapter.
Example / How To
The following example refers to a file "myvars.txt" in the SLS directory "WEB-INF/templates/":
template.file.myvars=myvars.txt
The file contains this XML structure, which contains the definition to create or
update the variable "fieldOne" from XML node "body/someunit/myfield":
XML Template Example
<?xml version="1.0" encoding="UTF-8" ?>
<body>
    <someunit>
        <myfield>@string:fieldOne@</myfield>
    </someunit>
</body>
For more details on possible variable definitions, please check the webservice adapter chapter about "response templates" (same rules apply).
Next, a HTTP adapter call would be performed in the model, e.g.
model.login.state.1000.name=do.http-someSoapCall
model.login.state.1000.property=soapBackend
After that, the XML response body is available in the JEXL variable "response.content"; for this example, we assume the XML response body received from the SOAP service looks like this:
XML Response Example
<?xml version="1.0" encoding="UTF-8" ?>
<body>
    <someunit>
        <myfield>FANTASTIC</myfield>
    </someunit>
</body>
It could then be processed to create and update variables like this:
model.login.state.1000.action.1=#{function.updateVarsFromXml('myvars', var('response.content'))}As a result, the string variable "fieldOne" would be created, containing the
value "FANTASTIC".
There are JEXL functions available for creating timestamp strings that could be used, for example, to be written to an LDAP attribute by using the LDAP adapter. The default functions create the timestamp string based on this global configuration property (in "sls.properties"):
jexl.timestamp.format
A string defining the format of timestamps created by the JEXL timestamp functions. Defaults to "yyyyMMddHHmmss" if not set.
The string consists of characters as defined in Sun's Javadoc API for the class "java.text.SimpleDateFormat":
http://java.sun.com/j2se/1.5.0/docs/api/java/text/SimpleDateFormat.html
Example:
jexl.timestamp.format=yyyyMMddHHmmss
If custom timestamp checks should be performed within the SLS login model, problems may arise if the SLS runs on a Unix / Linux platform, but the timestamp was read from a Microsoft Active Directory server. AD timestamps (such as the time of the last failed login) have a different format than the Unix timestamps, so a conversion is required.
This is the formula to convert a Microsoft AD timestamp (represented here by the JEXL variable "badPasswordTime") to a timestamp which can then be used for calculations:
(badPasswordTime / 10000000) - ((1970-1601) * 365 - 3 + ((1970-1601)/4) ) * 86400)
You can find more about this issue here:
http://fieldmarshallhradek.com/2009/05/w32-versus-unix-time/
An example in an SLS model would look something like this:
model.login.state.15.action.1=${function.setVariable('now', function.currentSeconds())}
model.login.state.15.action.2=${function.setVariable('bad', ((attribute.ldap.badPasswordTime / 10000000) - ((1970-1601) * 365 - 3 + ((1970-1601)/4) ) * 86400))}
model.login.state.15.action.3=${function.setVariable('secFailed', (now - bad))}
This example creates a timestamp for the current time and then compares it to the "badPasswordTime" timestamp that was read from the AD in a previous LDAP operation.
The SLS JEXL function "function.signWithCertificate(certificateAlias, dataToSign)" allows to sign data (a text string) using the private key of a configured certificate. The first argument of the function is the alias of the configured certificate. There must be a group of properties in the "sls.properties" configuration file that define the file, type, password etc. of a certificate with a certain alias.
A certificate is configured with the following group of (partially optional) properties
certificate.file.<alias>
Mandatory: Defines the path of the certificate file. The path can be specified either absolute, in order to load a certificate from anywhere in the file system, or relative. In the latter case, the path will be interpreted as relative to the SLS "WEB-INF" directory. Example:
certificate.file.acme=certificate/acme-cert.pem
certificate.type.<alias>
Optional: Defines the type of the certificate file. Defaults to "der" if not specified. Allowed values are "der" and "pkcs12". Example:
certificate.type.acme=der
certificate.key.file.<alias>
Optional: Defines the path of the private key file. The path can be specified either absolute, in order to load a certificate from anywhere in the file system, or relative. In the latter case, the path will be interpreted as relative to the SLS "WEB-INF" directory. Is not necessary of PKCS12 certificates, because they already contain the private key. Example:
certificate.key.file.acme=certificate/acme-key.pem
certificate.key.password.<alias>
Optional: Defines the password of the private key (file). In case of a PKCS12 certificate file, this must specify the password which protects the PKCS12 certificate keystore. Example:
certificate.key.password.acme=12345678
The JEXL session-related functions "session.getVerifiedCred()" and "session.getCred()" allow to retrieve the value of a user credential of the current session. Both functions take a string value as their single argument. That value specifies the semantic type of the requested credential, no matter what the name of the original request parameter (or header etc.) was.
The main - and important - difference between these two functions is that "getCred()" returns the credential that represents the given type based on the current value received from the client, but without any guarantee that the value has been verified. "getVerifiedCred()" returns the value of the credential only if it was verified (which usually means only after a successfully completed authentication).
So, usually it is recommendable to use "getVerifiedCred()" for things like creating a login ticket with the user's name etc.
Available credential semantic types with description:
Table 32.2. Available semantic credential types
| Type | Description |
|---|---|
username | The users\' login ID; usually what the user entered as user name in the login page. |
password | The users\' password (use with caution!) |
secret | The 3rd authentication credential, such as a SecurID token code, a strike-list value etc. |
challenge | Actually the response to the challenge, as entered by the user (for example in an SMS challenge-response login). |
mappedid | If mapping is activated in the SLS, this variable will contain the mapped ID of the user after the mapping step. |
newpassword | During a password change process, this credential holds the users' new password. |
newpassword2 | During a password change process, this credential holds the users' new password. |
With the NTLM adapter (and probably with other similar technologies), some of the user's login credentials are not available at all (like the password), and some only in the "verified" form. This has to do with the way those authentication adapters work internally.
So, in order to use the user’s login name, it is mandatory to use
${session.getVerifiedCred('username')}The following function will not return any value, because in case of an NTLM login, the users login name was never submitted as a regular request parameter:
${session.getCred('username')}JEXL 2 is running in "strict" mode by default since SLS 5.1.0.0, no longer in "lenient" mode as it was in earlier SLS versions (for backwards compatibility with JEXL 1 behavior). If JEXL 2 is set to lenient and it encounters undefined variables, it will simply ignore them (just like JEXL 1 did). When it's running in strict, non-lenient mode, it will instead throw an exception in such a case, providing usually a more accurate error message and closer to where the issue ocurred. Strict mode is recommended except in legacy setups, but also there it is generally recommended to migrate to strict mode.
To switch to lenient mode, set the following property to "true":
jexl2.lenient
Optional: Makes JEXL behave stricter while parsing expressions,
and throw errors when encountering unknown variables,
if set to "false". Defaults to "false".
This chapter describes some simple typical use cases for variables.
This simple example uses the configuration property "app.header." to propagate a HTTP header named "userinfo" with the user's login ID to the application server after a successful login:
app.header.userinfo=${parameter.userid}The interesting part here is the value of the property, which consists of the variable "${parameter.userid}":
-
"
parameter" is the variable type (refers to a request parameter) -
"
userid" is the name of the parameter (aka login form field).
This eample shows how to fetch a RADIUS response attribute and supply it as a HTTP header Base64-encoded to the application.
app.header.userinfo=*${function.base64encode(function.getVariable('attribute.radius.15'))}The SLS allows to implement custom JEXL functions and use them in the configuration by following these steps:
- Creating a Java class with some instance (not static) methods that implement the functions. It is recommended to use only strings or numerical values as parameters and return values.
-
Adding the JAR file to the classpath of the SLS by either putting it into the right subdirectory path in "
WEB-INF/classes", or in a JAR-file in "WEB-INF/lib". -
Registering the class for JEXL by adding the following configuration property in the "
sls.properties" file:
jexl.class.<alias>
Defines the fully qualified name of a Java class with some instance methods which can be used in JEXL expressions. The "alias" part of the property name will be used as the name of the function provider in the JEXL expression.
The sample Java class "com.acme.OurFunctions" implements a simple method which returns a string saying "Hello, " followed by a name:
package com.acme;

public class OurFunctions {
  public String getHelloYou(String name) {
    return "Hello," + name;
  }
}
The following configuration property in "sls.properties" will allow to use the new custom JEXL function:
jexl.class.ourfunctions=com.acme.OurFunctions
The following sample configuration property would propagate a custom header named "hellotext" to the application, where the content of that HTTP header would be "Hello,<username>" ("<username>" being the login ID of the user, of course):
app.header.hellotext=${ourfunctions.getHelloYou(functions.getVerifiedCred('username'))}This example also shows again how nested functions are used in one expression, in this case one from "ourfunctions" and one from the SLS’s own "functions".
The function prefix "crypto." provides various functions that allow to perform
encryption and decryption operations, based on settings configured with static
properties. Every one of these functions takes an alias as its first parameter, e.g.
#{crypto.encrypt('one', data)}where one is the alias name, and data is a byte array or a string with the
plain data to be encrypted. Please see the JEXL Guide, prefix crypto, for details
about all available encryption and decryption functions.
There are two SAML-related functions that use this encryption functionality:
-
sp_authn_request.addEncryptedData(String, byte[]) -
idp_authn_request.getDecryptedData(String)
They allow to "abuse" the unused field "ServiceProviderName" in the SAML message to add custom data; this can be used in an SLS-only setup to transport custom information from a service provider to the identity provider in an authentication request. Please see the JEXL Guide for details about these functions.
As mentioned before, all encryption and decryption functions take an alias as the
first parameter. That alias refers to a group of properties prefixed with crypto.,
followed by the alias, and then various suffixes. One such group of properties
defines all relevant settings for the encryption or decryption operation, such
as cipher algorithm, keystore to use, alias of key, or passphrase from which to
generate a key etc.
Please check further below for complete configuration examples!
crypto.<alias>.symmetric
MANDATORY: Defines if a symmetric or asymmetric key is to be used. This property
must be set to "true" (for symmetric keys) or "false" for asymmetric keys. Example:
crypto.dummy.symmetric=false
NOTE: If this property is not set, the entire alias group will not be processed.
crypto.<alias>.cipher
MANDATORY: Defines the cipher to be used for the operations. This must be a cipher that is supported by the Java Runtime used to operate the SLS. Example:
crypto.dummy.cipher=RSA
crypto.<alias>.keytype
Optional: This property allows to define the type (algorithm) of the key; this may be necessary if the key is generated dynamically from a passphrase (which is only possible for symmetric keys!).
If not specified, it defaults to "AES". Example:
crypto.dummy.keytype=AES
crypto.<alias>.ivsize
Optional: This property’s usage depends on the cipher algorithm that was configured. Some block ciphers will require an initialization vector, in which case its size must be configured with this property. It defines the number of bytes to use for the initialization vector.
Example:
crypto.dummy.ivsize=16
NOTE: The receiver of the encrypted data may be some application, not the SLS itself, in which case a developer on that side will need to implement the decryption functionality. In order to do this, they will need to use the same initialization vector that the SLS used for the encryption. For this reason, the SLS adds the IV bytes to the resulting cipher message, at the beginning of it, right before the actual encrypted data:
<plain iv bytes><encrypted payload data>
So a Base64 string created using one of the "crypto.encryptToBase()" functions will
contain a byte array where the receiver needs to separate the IV bytes from the
actual payload data before attempting decryption.
crypto.<alias>.saltsize
MANDATORY: This property allows to configure the size of the salt value in number of bytes. A salt value is a collection of random bytes which is injected at the beginning of the encrypted data, in order to make sure that encrypting the same data with the same key will never yield the same result, which helps to prevent a number of possible attacks.
Similar to the initialization vector, the receiver needs to "know" how large the salt part of the data is in order to strip it away after the encryption. If the SLS itself encrypts and decrypts the data, that happens automatically.
Example setting:
crypto.dummy.saltsize=16
crypto.<alias>.passphrase
Optional: Allows to define a passphrase from which to derive a symmetric key. Example:
crypto.dummy.passphrase=This is my passphrase
crypto.<alias>.keystore
Optional: Allows to define a Java keystore file with pre-generated keys. The
value must either be an absolute file path, or a path relative to the "WEB-INF"
directory of the SLS web application. Example:
crypto.dummy.keystore=/usr/lib/keys/cryptokeys.kst
crypto.<alias>.storepwd
MANDATORY: If a keystore is used, this property becomes mandatory. It allows to
define the password for the Java keystore. Defaults to "changeit" if not set.
Example:
crypto.dummy.storepwd=SuperDuperPwd
crypto.<alias>.storetype
Optional: Allows to define the type of the Java keystore. Defaults to "JCEKS" is not set. Example:
crypto.dummy.storetype=JCEKS
crypto.<alias>.keyalias
MANDATORY: If a keystore is used, this property is mandatory. It defines the alias of the key inside the keystore. Example:
crypto.dummy.keyalias=mykey
crypto.<alias>.keypwd
Optional: Allows to define the password of the key inside the keystore. Defaults to the value of the keystore password if not set. Example:
crypto.dummy.keypwd=12345678
To create a symmetric key with the Java keytool, run the following command:
keytool -genseckey -storetype JCEKS -keyalg AES -keysize 256 -alias <key alias> -keystore <filename> -storepass <pwd>
To create a key pair with a private and a public key with the Java keytool, run the following command:
keytool -genkeypair -storetype JCEKS -keyalg RSA -keysize 2048 -alias <key pair alias> -keystore <filename> -storepass <pwd>
Please note: Using a passphrase to generate a key is only supported with symmetric encryption, e.g. AES ciphers.
In this example, the symmetric key for all operations with alias "myalias" is generated from a passphrase, which eliminates the need to handle and manage a Java keystore file:
crypto.myalias.symmetric=true
crypto.myalias.cipher=AES
crypto.myalias.keytype=AES
crypto.myalias.saltsize=16
crypto.myalias.passphrase=This is my passphrase
In this example, the symmetric key is also generated from a passphrase, but with and algorithm that requires an initialization vector. In this case, the initialization vector needs to be 16 bytes long.
crypto.myalias.symmetric=
crypto.myalias.cipher=AES/CBC/PKCS5Padding
crypto.myalias.ivsize=16
crypto.myalias.keytype=AES
crypto.myalias.saltsize=16
crypto.myalias.passphrase=This is my passphrase
In this example, the symmetric key is in an existing Java keystore file named
"cryptokeys.kst" in the SLS "WEB-INF" directory. The key has the alias
"mysecret" inside the keystore, and the password for the keystore is
"changeit".
crypto.myalias.symmetric=true
crypto.myalias.cipher=AES
crypto.myalias.saltsize=16
crypto.myalias.keystore=cryptokeys.kst
crypto.myalias.keyalias=mysecret
crypto.myalias.storepwd=changeit
crypto.myalias.storetype=JCEKS
If the key itself had a different password than the keystore, then this additional property would need to be set as well:
crypto.myalias.keypwd=keypassword
Everywhere where JEXL script expressions can be used with ${…},
Groovy script expressions can be used with #{…},
i.e. using the pound sign instead of the dollar sign.
This applies to configuration properties, including login model actions,
as well as to SLS JSP tags, including getJexl and doJexl.
To execute a Groovy script, use the #{runscript.groovy(…)} functions,
just like the ${runscript.jexl(…)} functions.
Groovy is a modern script language with features and a power of expression similar to Python and Ruby. Its syntax is often identical to JEXL in simple cases. More generally, almost every Java source code is syntactically valid Groovy, although many things can also be written much less verbosely in Groovy. Hence learning Groovy in the context of SLS configuration should be quite easy for anyone familiar with syntactically similar languages like JavaScript, Java, JEXL, C#, C, etc.
More information about Groovy can be found on its main web site:
In simple use cases, Groovy and JEXL can be used equivalently, but in more complex cases Groovy can provide better solutions:
- Complex integrations and utility libraries written in Groovy.
- Temporary solutions to resolve issues in production by accessing functionality that JEXL cannot access.
Usually it is sufficient to replace ${ with #{ and you are using Groovy. For example, the following
configuration property that uses a JEXL expression,
app.header.plainuser=${function.getVerifiedCred('username')}is simply translated as follows to Groovy:
app.header.plainuser=#{function.getVerifiedCred('username')}Or the following scripting JSP Tag,
<sls:getScript expression="${function.getVerifiedCred('username')}"/>is simply as follows in Groovy:
<sls:getScript expression="#{function.getVerifiedCred('username')}"/>Instead of running a JEXL script as follows,
${runscript.jexl('WEB-INF/scripts/foo.jexl')}run a Groovy script like this:
#{runscript.groovy('WEB-INF/scripts/Foo.groovy')}Access to variables that contain a period (".") in their names is not possible by indicating only the name of the variable, as in JEXL, because Groovy expects the period to denote access to a field etc.
A JEXL expression like this one,
${header.content_type}should usually be translated to Groovy as follows:
#{var('header.content_type')}Alternatively, you can also use the already existing (but more verbose) dedicated function
#{function.getVariable('header.content_type')}or the following more low-level/technical approach:
#{this.'header.content_type'}Technical background: this refers to the script class which contains the variables.
Note that the approach with this comes closest to the direct reference
to the variable name in JEXL,
since it throws an exception if the variable does not exist,
while all other methods yield null in this case.
To set a variable with a period in its name, use one of these:
  #{setVar('header.content_type', 'text/html; charset=utf-8')}
  #{function.setVariable('header.content_type', 'text/html; charset=utf-8')}
  #{this.'header.content_type' = 'text/html; charset=utf-8'}
There are also shortcuts for clearing variables, for checking if a variable exists, for getting the variable with a default if not defined, and for getting a sorted list of all variable names:
  #{clearVar('header.content_type'))
  #{String prefix='header.'; clearVars(prefix)}
  #{boolean ok = hasVar('header.content_type')}
  #{String header = var('header.content_type', 'text/html; charset=utf-8')}
  #{def varNames = getVarNames()}
(You could also use binding to get the groovy.lang.Binding of
the current script and then e.g. get the map of all variables with
def varMap = binding.variables, but note that this only works from
Groovy Script expressions, but not from Groovy utility classes because
getBinding() is a method of the class GroovyScript to which script
expressions are compiled.)
It is important to know that there are two types of strings in Groovy. The regular (Java) strings that are
enclosed in single quotes and the Groovy GString strings that are enclosed in double quotes and allow to
enclose variables inline like this:
  def name="Joe"
  def hello="hello $name"      // hello Joe
  def hello='hello $name'      // hello $name
  def helloToo="hello ${name}" // hello Joe
This is only mentioned here because the last line contains the same syntax
as how JEXL expressions are invoked in the SLS.
There is no nesting of JEXL expressions within Groovy in the SLS
using this notation, everything within #{…} is interpreted as Groovy.
Besides using Groovy in SLS login models and JSPs and calling whole Groovy scripts from these places, with Groovy (unlike with JEXL) it is also possible to call individual methods in Groovy scripts. This makes it possible to write utility classes/libraries in Groovy and to use them in the SLS, thus helping to express things more concisely and with less duplicate text in login models.
First some cookbook recipes how to do this in Groovy; later on some rather technical background, but understanding that in detail is typically not necessary in order to write utility Groovy scripts.
Take the following Groovy script in a file Bar.groovy, which defines a utility method that logs some info:
  static def myLogInfoStatic(def info) {
    function.logInfo('>>')
    function.logInfo(info)
    function.logInfo('<<')
  }
Important: Note that it is no longer necessary to define function prefixes like function
above with constructs like def function = var('function') before using the prefixes.
You still need to use var('myVariable') or function.getVariable('myVariable') to get a
variable that has been defined in the JEXL/Groovy context before.
Note also that this is not necessary in a script that you call directly with
runscript.groovy(...); there, all variables are available.
Say, the file Bar.groovy is in a directory called script inside the WEB-INF directory of the SLS web application and the following configuration property has been set:
groovy.classpath.add.scriptdir=WEB-INF/scripts
The indicated path can be absolute or relative to the root directory of the SLS web application.
Now, anywhere where you can use Groovy expressions in the SLS, you can use the following syntax to call the custom logging method:
#{Bar.myLogInfoStatic('Hello World!')}Important: For this to work, the name of the groovy file must start with an upper-case letter (i.e. it must follow the Java naming convention for class names and file names of Java source files).
If you had more methods in Bar.groovy, it might become too verbose to define variables like function
in each method over and over again and, in addition, you might want to initialize you utility script
with some parameters that can be used in all methods. Then you could write Bar.groovy as follows:
class Bar {
  def function = var('function')
  def prefix
  Bar(def prefix) {
    this.prefix = prefix
  }
  def myLogInfo(def info) {
    function.logInfo("$prefix: >>")
    function.logInfo("$prefix: $info")
    function.logInfo("$prefix: <<")
  }
}
In a Groovy script that you run with runscript.groovy(…), say Foo.groovy, you could use Bar.groovy as follows:
def bar1 = new Bar(\'one\')
def bar2 = new Bar(\'two\')
bar1.myLogInfo(\'hello\')
bar2.myLogInfo(\'there\')
In a login model, you could use Bar.groovy as follows:
model.xy.state.20.name=do.generic-groovy-create-bar
model.xy.state.20.action.1=#{function.setVariable('bar', new Bar('my-prefix'))
[...]
model.xy.state.50.name=do.generic-groovy-use-bar
model.xy.state.50.action.1=#{bar.myLogInfo('hello'}If you need more script directories, you can configure them with the setting
groovy.classpath.add.scriptdir.<suffix>.
The reason you have to "get" variables in a utility script with, e.g.,
def function = var('function')is that in Groovy (as in Java), variables are always part of an object or a class.
In the case of a Groovy script that is run with runscript.groovy(…), variables like
function are part of the script class that is run and in Groovy expressions in
#{…} such a class is created on-the-fly (it appears as GroovyExpression in error logs).
A useful feature for testing/integration is to set
groovy.scriptdirs.autorecompile=true
If set, Groovy scripts are automatically updated when the Groovy scripts in the configured script directories change, i.e. usually changes in Groovy scrips can be applied and tested without needing to restart the SLS.
In productive environments it is generally recommended to switch this off, as automatic recompilation with otherwise mostly static SLS configuration that is only read once at startup or first use is not usually not desired. Besides that, currently the feature would not be robust enough to work in all situations, especially race conditions can occur under high load, in ways that are hard to prevent without major changes in the SLS.
Conversely, if Groovy scripts are protected from unwanted changes, having the autorecompile feature active in production could in some cases allow to deploy workarounds without having to restart the SLS, which can be very helpful.
Note that each time the script files have been successfully recompiled, a message with level INFO is logged, and each time this faile a message with level ERROR.
The SLS has a single provider for Groovy functionality, based on the Groovy JDK
plus an additional library, Grengine.
The provider is configured by default (or by explicitly setting the configuration
property groovy.provider=grengine;
the previous provider jdk is no longer supported).
There are two modes in which the Grengine Groovy provider can operate:
-
groovy.grengine.shareclasses=true(default) This is currently the recommended setting. All login sessions share Groovy classes and thus can also overwrite "each others" static (non-final) variables. This is not optimal in terms of security (login session isolation), which is why the SLS logs a warning [GROOVY_STATIC_VARIABLE] for each such variable encountered in Groovy scripts (if operated in this mode). You can choose to convert this warning to a log entry with level info, [GROOVY_STATIC_VARIABLE_INTENTIONALLY_SHARED], by renaming the variable such that its name contains the string "SlsIntentionallyShared" (not case sensitive). -
groovy.grengine.shareclasses=falseAll login sessions have their own set of Groovy classes, and yet are still based on compiling them only once (a unique feature of Grengine). So even static variables are completely separated, relieving operators and integrators of having to look after this.
Historically, the feature of sharing classes had only been introduced into the SLS in order to work around some memory issues, more precisely with garbage collection of classes compiled from Groovy scripts that could lead to an OutOfMemoryError (Metaspace).
These issues are fixed in the current release, but note that loading classes into a Java VM, especially Groovy classes with additional metainfo, is a relatively expensive operation, which will in general reduce the maximal throughput of the SLS.
Therefore sharing classes (the default) is currently the recommended setting for general use.
If you want to use the mode where not sharing classes, make sure you verify the following two things under load:
- How does Metaspace consumption behave, is it regularly garbage collected?
- Is throughput sufficient for your use cases?
In order to monitor Metaspace use e.g. jstat (which is part of the Oracle JDK)
like this:
$ jstat -gc <sls-process-id> 2000 1000
This runs jstat 1000 times, printing output every 2 seconds (2000ms) and look for
MC and MU in the output, which stand for claimed respectively used Metaspace.
Or attach to the Java VM using jvisualvm or a similar GUI tool.
Finally, note that there is a JEXL/Groovy function
function.getGroovyConfig(filename) which should normally be used instead of using a
Groovy ConfigSlurper directly for loading Groovy-based configuration files, because
this function automatically caches already parsed configurations and automatically
reparses if the file text has changed. This function is thus faster and prevents
memory issues, which would otherwise exist in this case even independently
of whether sharing classes or not, because each invocation of ConfigSlurper.parse(...)
implicitly compiles the Groovy config file and loads it into the Java VM.
-
groovy.script.loginfo: If set to true, logs at level INFO for each Groovy expression the resulting class name (Script<MD5-hash-of-script-expression>) and script text at first compilation, as well as for each Groovy file the filename at first compiliation. -
groovy.compile.jdk: The JDK version to create bytecode for when compiling. Defaults to1.8and there is usually no reason to change this. -
groovy.compile.indy: Whether to compile to bytecode with "indy" = invoke dynamic. Defaults totrueand there is usually no reason to change this.
Groovy makes it very comfortable to use Java classes. By default common namespaces like
java.io are imported and even basic Java classes like String or File have been extended
in Groovy with additional methods. For example, to read a text file into a string in Groovy,
you can write the following:
def fileText = new File('/path/to/file').textSince Groovy is syntactically a superset of Java and since Groovy scripts are always compiled to the Java VM, a Google search for a solution in Java is often helpful when Java APIs are involved.
Some quick tips for handling JSON rendered to maps and generally for handling maps and lists in Groovy.
Say, you have the following JSON string:
{
 "mystring": "hello there",
 "mylist": [
  "first"
 ],
 "level1": {
   "level2a": "2a"
 }
}
Then you can parse, modify and render it as follows:
String json = ...

def map = function.parseJson(json)

// change string value
map.mystring = 'hi there'

// add an item to the list with Java-style map operation
map.mylist.add('second')

// add an item to the list Groovy-style
map.mylist << 'third'

// add several items to the list, first Java-style, then Groovy style
map.mylist.addAll(['4th', '5th'])
map.mylist << '6th' << '7th'

// note that you could also replace the whole list (commented out below)
// map.mylist = [ 'aaa', 'bbb' ]

// add item with nested selection
map.level1.level2b = '2b'

// add a sublevel
map.level1.level2c = [ 'level3' : '3' ]

String jsonNew = function.prettyPrintJson(map)
This yields:
{
    "mystring": "hi there",
    "mylist": [
        "first",
        "second",
        "third",
        "4th",
        "5th",
        "6th",
        "7th"
    ],
    "level1": {
        "level2a": "2a",
        "level2b": "2b",
        "level2c": {
            "level3": "3"
        }
    }
}
See general tutorials about how to handle maps and lists in Groovy for more tricks.
When making the switch from JEXL to Groovy scripting, the following table should help to use the right expressions and functions.
Table 33.1. JEXL to Groovy migration table
| JEXL | Groovy | Notes |
|---|---|---|
if(<string>) or if(!<string) | if(<string> == true) or if(<string>) == false) | ImportantIn JEXL, a boolean check can be performed on a String containing the value "true" or "false"; this is not possible in Groovy. Instead, the String value must explicitely be compared to a certain String value. The problem is that while JEXL checks for the String value to be "true" or "false", Groovy only checks if the String is empty or not. So, either use actual boolean variables instead of Strings, or compare against a fixed value. |
eq | \== | All conditional operators have to be changed to the Java format. |
function.setVariable("myvar", "..") | setVar("myvar", "..") | Use new lean Groovy function. |
function.getVariable("myvar") | var("myvar") | Use new lean Groovy function. |
function.getVariable("myvar", "defaultValue") | var("myvar", "defaultValue") | Use new lean Groovy function. |
function.hasVariable("myvar") | hasVar("myvar") | Use new lean Groovy function. |
function.hasNonEmptyVariable("myvar") | hasNonEmptyVar("myvar") | Use new lean Groovy function. |
function.clearVariable("myvar") | clearVar("myvar") | Use new lean Groovy function. |
function.clearVariables("prefix") | clearVars("prefix") | Use new lean Groovy function. |
An introduction to Groovy as a language is beyond the scope of this document. Instead, here are some basic resources and hints.
The already mentioned Groovy web site at groovy-lang.org is a good start. The book Groovy in Action, Second Edition does a very good job at presenting the language from the very basics to expert features, and the introductory chapter of it is available for free. Google seems to usually yield good answers to queries related to Groovy.
And, of course, there is some Groovy know-how at United Security Providers.
The term "SES Session Attributes" refers to a proprietary, HTTP header based communication interface between the SLS and the SES. It allows the SLS to instruct the SES to perform certain actions within the client session after a successful login, such as:
- propagating custom HTTP headers to the application, for example with some kind of login ticket, the user ID etc.
- setting authorizations in the client session
- creating AAI variables that can be used by the SES to integrate form-based logins of application servers (see "Application Server Authentication")
- setting / overriding timeout settings of the reverse proxy
Technically, a SES session attribute is created by the SLS by setting an HTTP response header in its response sent to the client. This header will be intercepted and processed by the SES. The header consists of a number of key-/value pairs. The mandatory keys are:
-
"
usage" - Defines how to handle the attribute / what action to take -
"
name" - Defines the name of the AAI variable, or custom header etc. -
"
path" - The URI path for which the attribute should be valid. Note that his path must be equal to or below the "Authorized Path" of the requested location. -
"
value" - The value of the AAI variable or custom header etc.
Two additional optional keys are:
-
"
encoding" - The encoding of the string in the "value" field (plain, Base64 or URL). -
"
timeout" - A timeout for the session attribute itself; this is only supported for authorization attributes (see "ac-app-az" below). It has nothing to do with setting / overriding HSP session timeout values; that is done withusageset toac-cred-tmo.
The name of such a header consists of a prefix, followed by a number (the numbering must start at 0 and not have any gaps). Examples of such headers set by the SLS after a successful login:
HSP_AC_SESSION_ATTRIBUTES-0=usage="aai-param",name="FormPassword",path="/ite",value="abcd1234"
HSP_AC_SESSION_ATTRIBUTES-1=usage="aai-param",name="FormUserName",path="/ite",value="dummy"
HSP_AC_SESSION_ATTRIBUTES-2=usage="prop-header",name="plainuser",path="/ite",value="dummy"
HSP_AC_SESSION_ATTRIBUTES-3=usage="ac-app-az",name="strong",path="/ite",value="allow"
In this example, the session attribute headers "0" and "1" create AAI variables
"FormPassword" and "FormUserName" for the SES to use in an AAI script in the
SRM configuration.
Header "2" instructs the SES to start propagating a custom HTTP header named
"plainuser" to the application in all following requests, with the user ID as
its plaintext value.
Header "3" creates an authorization "strong" for the URI path "/ite".
The following chapters explain how to create SES session attributes "by hand", using specific sets of configuration properties.
For every SES Session Attribute to be created after a successful login, a group
of properties must be defined in the "sls.properties" file. Such a group of
properties always consists of at least four mandatory and one optional property,
grouped by number suffixes.
Mandatory properties
session-attribute.type.<number>
session-attribute.name.<number>
session-attribute.path.<number>
session-attribute.value.<number>
Optional properties
session-attribute.encoding.<number>
session-attribute.timeout.<number>
where the <number> part is used to group the properties for one session
attribute definition together. The following properties are available to
configure one session attribute:
session-attribute.type.
The usage type of the session attribute.
session-attribute.type.0=aai-param
Supported values for usage type are:
-
ac-app-az: Grant the user the authorization (role) defined in the fieldvalue. -
aai-param: Propagate an AAI variable to the HSP. The name of the AAI variable is defined by the fieldname, its value by the fieldvalue. -
prop-header: Propagate a custom HTTP header to the application backend after a successful login. The name of the header will be defined by thenamefield, its value by thevaluefield. -
ac-cred-tmo: Override a HSP timeout setting. Thevaluefield must contain the number of seconds and thenamefield must contain one of the following names, which corresponds to a certain HSP timeout setting (see list below).
session-attribute.name.
The name of the propagated header, the AAI variable, the autorization to create or the name of the timeout setting to override. Example:
session-attribute.name.0=FormUserName
If type is set to ac-cred-tmo, the following values are supported for name:
-
CredentialFinalTimeout- to set the final timeout (default) -
CredentialValidityPeriod- to set the final timeout (default) -
CredentialUpdateTrigger- to set the validity period (default) -
CredentialFinalTimeoutMember- to set the final timeout for the security class "Member" -
CredentialFinalTimeoutCustomer- to set the final timeout for the security class "Customer" -
CredentialValidityPeriodMember- to set the validity period timeout for the security class "Member" -
CredentialValidityPeriodCustomer- to set the validity period timeout for the security class "Customer" -
CredentialUpdateTriggerMember- to set update trigger time for the security class "Member" -
CredentialUpdateTriggerCustomer- to set update trigger time for the security class "Customer"
For more information about these different types of timeouts, see "HSP Timeouts Appendix".
session-attribute.path.
The URI path for which the session attribute should be valid. Example:
session-attribute.path.0=/apps
Note 1: It is a good practice to set the value of the "Authorized Path" which was currently requested. There is a special JEXL variable for this value (see "Special Variables"). Example:
session-attribute.path.0=${special.authorized.path}This will set the same value for the "path" as was defined by the
"AC_AuthorizedPath" directive in the corresponding location in the SRM
configuration.
Note 2: The "path" field MUST not be set for WAF timeout session attributes,
i.e. attributes with usage type ac-cred-tmo.
session-attribute.value.
The value of the propagated header, the AAI variable etc. Example:
session-attribute.value.0=${session.getCred('username')}session-attribute.encoding.
Optional: The encoding to use for the "value" part in the resulting HTTP
response header. Allowed values are "string" (value is set 1:1, regardless of
any special characters in it), "url" and "base64". Default is "url" if
the configuration property "session-attribute.encodings" had been set to "true"
(see "Session Attribute Value Encoding"). Otherwise, it's always "string".
session-attribute.timeout.
The idle timeout for the attribute. Currently only supported for attributes of usage type "ac-app-az" (authorizations). Example:
session-attribute.timeout.0=300
That way, the authorization expires after 5 minutes of inactivity.
If the value of a session attribute contains special characters, it may be necessary to encode it. A typical use case is an AAI variable containing the password. In some cases, users are allowed to have passwords with special, non-ASCII characters in them. Which can be a problem if that value is then used in a GET request to an application back-end.
In order to enable support for encodings, the following configuration property
must be set in "sls.properties":
session-attribute.encodings=true
If it is enabled, all session attribute values will be "url" encoded by
default. In a case where that is a problem for a single attribute, the
".encoding" property for that one attribute can be set to "string".
session-attribute.encoding.0=string
NOTE: If the property "session-attribute.encodings" is not set at all, all
values will not be encoded (equals to "string" ). Any properties with prefix
"session-attribute.encoding." will be ignored!
If encoding needs to be using a specific charset, the encoding of the value can be done in the script expression instead of letting the SLS do it:
session-attribute.encodings=true
[...]
session-attribute.encoding.0=url
session-attribute.value=${function.urlEncode(session.getCred('username'), 'ISO-8859-1')}
session-attribute.isValueEncoded=true
In other words provide a setting "session-attribute.isValueEncoded=true" and
make sure the value is already URL encoded. The HSP will URL decode but
otherwise not touch the bytes. That way e.g. headers can be forwarded
to applications in practically any encodings that the Java VM supports.
(Note that this mechanism is meant to be used with encoding "url" (or "base64"),
but not with the legacy encoding "string".)
There are a few JEXL functions available to work with SES session attributes:
-
session.getSessionAttributes()- Returns a list of currently available session attributes. See below ( "Session Attribute Object Methods") for more information. -
session.hasSessionAttribute(usage, name, path, value)andsession.hasSessionAttribute(usage, name, path)- Allow to check if a certain session attribute exists in the current session.
Please read the [JEXLGUIDE][JEXLGUIDE] for details about syntax and usage of these functions.
Each session attribute object in the list returned by
"session.getSessionAttributes()" has the following methods:
.getName()- Returns the name of the attribute (aka the name of the AAI
variable, or the propagated header, or the HGW directive, or the authorization).
.getPath() - Returns the URI path for which this session attribute is active.
.getValue() - Returns the session attribute value. For propagated headers,
this is the header value, for AAI variables it's the variable value, and for
authorizations it's always the string "allow".
.getUsage() - Returns the type of session attribute. Which is always one of
the following values:
-
aai-param- AAI parameter -
prop-header- Header propagation -
ac-app-az- Authorization -
ac-cred-tmo- HSP timeout override
.getEncoding() - Returns the encoding of the attribute ("string", "url" or "base64").
Example JEXL script:
## Iterate through all session attributes
for(attr : session.getSessionAttributes()) {
  if(attr.getUsage() eq 'prop-header') {
    function.printToConsole('-- Propagated Header --');
    function.printToConsole('Name ' + attr.getName());
    function.printToConsole('Value ' + attr.getValue());
  }
}How to override the value for the "CredentialFinalTimeout" in the HSP configuration, for the given authorized path:
# Set the final timeout for Member logins to 3600 seconds
session-attribute.type.1=ac-cred-tmo
session-attribute.name.1=CredentialFinalTimeoutMember
session-attribute.path.1=${special.authorized.path}
session-attribute.value.1=3600
The timeout is set to 3600 seconds. If the value set by the SLS is higher than the maximum, or lower than the minimum configured in the HSP, the HSP will automatically adjust the value to either the minimum or maximum.
Note: There is an easier way to create AAI variables after the login:
-
Set a property
"
formauth.parameter.<variable name>=<parameter name>" in the "sls.properties" file (see "FORM-based Authentication Only").
So use the following properties only if for some reason the other approach is insufficient. Example:
# Create an AAI variable "FormPassword" with the password, URL-encoded
session-attribute.type.0=aai-param
session-attribute.name.0=FormPassword
session-attribute.path.0=${special.authorized.path}
session-attribute.value.0=${session.getVerifiedCred('password')}
session-attribute.encoding.0=url
Creates an AAI variable "FormPassword" that can be used in an AAI script for
any location that has the same authorized path as the current location. The
variable has the value of the verified credential with the semantic type
"password". In the AAI script in the SRM configuration, the variable is
referred to with the prefix "AC.SessionAttributes.":
AC.SessionAttributes.FormPassword
Example for creating two variables with the username and password (where the password is URL-encoded), and then using the values of those variables in an actual AAI script:
SLS configuration properies
# Create an AAI variable "FormPassword" with the password, URL-encoded
session-attribute.type.0=aai-param
session-attribute.name.0=FormPassword
session-attribute.path.0=${special.authorized.path}
session-attribute.value.0=${session.getVerifiedCred('password')}
session-attribute.encoding.0=url

# Create an AAI variable "FormUserName" with the user ID
session-attribute.type.1=aai-param
session-attribute.name.1=FormUserName
session-attribute.path.1=${special.authorized.path}
session-attribute.value.1=${session.getVerifiedCred('username')}
AAI Script in SRM configuration
HGW_Aai_AddRule if (  STATE == 0 RC == 200 \
BODY =~ "j_security_check" ) { \
  METHOD = POST \
  URI = "/application/j_security_check" \
  HDR.Content-type = "application/x-www-form-urlencoded" \
  PARAM.j_username = AC.SessionAttributes._FormUserName_ \
  PARAM.j_password = AC.SessionAttributes._FormPassword_ \
  NEXT_STATE = 1 \
}
This will finally POST the request parameters "j_username" and "j_password"
to the applications\' own login location.
Note: There are two easier ways to propagate custom headers to the application after the login:
-
Set a property "
app.header.+<name>+=<value>" in the "sls.properties" file (see "Propagating Custom HTTP Headers"). -
Invoke the JEXL function "
response.propagateHeaderToApp()" from an action in the model (see [JEXLGUIDE] and "Custom Actions").
So use the following properties only if for some reason the other two approaches are insufficient. Example:
# Propagate custom header "plainuser" with user ID
session-attribute.type.0=prop-header
session-attribute.name.0=plainuser
session-attribute.path.0=${special.authorized.path}
session-attribute.value.0=${session.getVerifiedCred('username')}
Propagates a custom HTTP header named "plainuser" with the value of the
verified credential of type "username" to the authorized path of the requested location.
Note: There is an easier way to create an authorization after the login:
-
Invoke the JEXL function "
response.setAuthorization()" from an action in the model (see [JEXLGUIDE] and "Custom Actions").
So use the following properties only if for some reason the other approache is insufficient. Example:
# Set authorization "strong" for current session
session-attribute.type.0=ac-app-az
session-attribute.name.0=strong
session-attribute.path.0=${special.authorized.path}
session-attribute.value.0=allow
Sets the authorization "strong" to the authorized path of the requested
location. Note that the "value" field always has to be set to "allow" in
this case.
While processing a request, the SLS may encounter various types of errors; technical or authentication-related. Usually when an error occurs, this results in a corresponding log message (see chapter for details) and in a message displayed in the end-user's client. What message is displayed to the user for any given error can be customized by changing the error mapping.
Each error has an internal ID, and that ID is mapped to a text message which will be displayed in the HTML page. Usually, it is sufficient to adapt the text messages in the message resource file (see "Message Resource Files"), but if necessary, the mapping can be customized as well.
A list of all error codes is available in the [LOGMESSAGES].
Sometimes it is useful to see the internal error code directly on the login page, and not only in a log file. The following property in the "sls.properties"-file enables displaying internal errorcodes in the JSP:
error.details=true
If not set, it defaults to "false".
If any error occurs during a login, error messages are displayed to a human user in a page. However, programmatic clients require means to determine the reason for a failed login attempt properly, without having to parse a HTML page. This property allows to let the SLS set a HTTP reponse header with the name "SLSError" in case of an error. The value of the header is the message of the internal exception which originally caused the error.
error.header
To enable the HTTP response header "SLSError" , set the property to "true". It defaults to "false" if not set.
Note: If this feature is enabled, the response header "SLSError" must also be enabled in the HSP configuration. Otherwise, the HSP will filter out the header from the response and it will not reach the client.
The mapping of internal SLS error codes to the external messages used to be presented to the user in a JSP, for example, can be configured through a set of Java properties in this file:
WEB-INF/sls-errormap.properties
This file contains key-/value-pairs, each one mapping from an internal error to the ID of a message displayed to the user. Example:
# General technical error
INVALID_CRED = sls.invalid.credentials
In this example, the internal error "INVALID_CRED" is mapped to the generic
error message with the ID "sls.invalid.credentials", as defined in the message
resource properties file (see chapter
"Message Resource Files"
for details).
If there is no mapping defined, the default error message is returned with the ID "sls.default.error".
In cases where there are multiple errors ocurring during the processing of one single request by the SLS, the default behaviour is that the SLS will display all the messages combined in the login page. There are two configuration switches that allow to change that behaviour:
jsp.globalerror.first
Optional: If set to "true", only the first error of all the errors that happened during the last request will be displayed.
jsp.globalerror.last
Optional: If set to "true", only the last error of all the errors that happened during the last request will be displayed.
Sometimes it may be desirable to trigger an error in a flow, based on some arbitrary condition. To do this, the desired error must actually be triggered in the SLS by using one of the corresponding JEXL functions. Simply showing the error JSP (such as "UserError.jsp") will not display any actual error message, because no error actually occurred (no Java exception was thrown within the SLS processing).
The following example shows how to enforce showing an error page with a certain error code. Example scenario:
-
The users can log in from two different virtual hosts, "intranet.acme.com" and "
extranet.acme.com"; the same login model is used for both cases. - When a user logs in over "extranet.acme.com", he/she has to use a SecurID token. A two-step login procedure is used, where first the username and password is checked, then an LDAP lookup is performed to find out if the user owns a SecurID token, and then the token code must be entered.
-
If the LDAP lookup reveals that the user doesn't have a token, an error should be triggered. The fictional LDAP attribute "
hasToken" will be set to "true" if the user actually has a SecurID token; so if that attribute is set to "false", an error should be triggered.
model.login.uri=/auth
model.login.failedState=get.usererror

# Show login page for username and password
model.login.state.100.name=get.cred

# Verify username and password (e.g. with LDAP)
model.login.state.200.name=do.auth

# Look up user information from LDAP.
model.login.state.300.name=do.ldap
model.login.state.300.property=lookup

# Check if user needs, and has, a SecurID token; trigger error if not.
model.login.state.400.name=do.generic-checkForToken
model.login.state.400.action.1=${function.failWithAuthenticationError('ERR_MISSING_CRED', 'User has no token')}
model.login.state.400.action.1.if.1=${header.hsp_https_host == 'extranet.acme.com' && attribute.ldap.hasToken != 'true'}
model.login.state.400.nextState.1=do.success
model.login.state.400.nextState.1.if.1=${header.hsp_https_host == 'intranet.acme.com'}

# No error occurred, so user has token; show challenge page...
model.login.state.500.name=get.cred.challenge
#  ...and verify the SecurID code
model.login.state.600.name=do.authresponse

#  Complete the login
model.login.state.800.name=do.success

# Error page
model.login.state.900.name=get.usererror +
NOTE: It may make more sense to use the "function.failWithCustomError()" functions in order to show completely customized error messages. Alternatively, see "30.4 Error Code Mapping Configuration" for details about how to map SLS error codes like "ERR_MISSING_CRED" to actual on-screen text messages.
In some situations it might be required to have different error messages for the same internal error code, based on the current model state. For example, if there are two different models in the SLS, one for login and one for a challenge / response process, they might look like this:
model.login.uri=/auth
model.login.failedState=get.cred
model.login.state.10.name=get.cred
model.login.state.20.name=do.auth
model.login.state.30.name=do.success

model.challenge.uri=/challenge
model.challenge.failedState=get.cred.challenge
model.challenge.state.10.name=get.cred.challenge
model.challenge.state.20.name=do.authresponse
model.challenge.state.30.name=do.success
Entering an invalid password in the "login" model may result in the same
internal error code "INVALID_CRED" as entering an invalid response code in
the "challenge" model. But in some cases, it may be desirable to display
different messages for each case.
The key to do this is the fact that the SLS will be in the model state
"get.cred" for the "login" model, when showing the error message, and
in the state "get.cred.challenge" for the "challenge" model.
It is possible to trigger a specific error message based on the current model state by adding the model state name enclosed in square brackets as a prefix to the message key in the resource file:
sls-errormap.properties
Example mapping for the error code "INVALID_CRED":
INVALID_CRED = inv.cred
sls-resources.properties
Example definition of a global error message text for this mapping, and an alternative text to be displayed instead if the current model state is "get.cred.challenge":
# Default message
inv.cred={0} Username or password invalid.

# Special message for model state 'get.cred.challenge'
[get.cred.challenge]inv.cred={0} Response code invalid.
Additionally, the name of the model can be prefixed within the square brackets, separated by an underscore ("_") character; in case the same state is used in several models, and there should be a different message for each case:
# Default message
inv.cred={0} Username or password invalid, login failed.

# Special message for model state 'get.cred.challenge',
# with name of model "reauth" prefixed
[reauth_get.cred.challenge]inv.cred={0} Response code invalid, re-authentication failed.

# Special message for model state 'get.cred.challenge',
# with name of model "changepassword" prefixed
[changepassword_get.cred.challenge]inv.cred={0} Response code invalid, password was not changed.debug.info
Optional: Allows to enable displaying session internal information in the footer of the current JSP, such as JEXL variables, current model state, mandator, credentials etc. This can be useful tu support debugging without needing access to a log file. Example:
debug.info=true
The debug info will be generated by the JSP-tag "mandatoryFooter". It will look something like this:
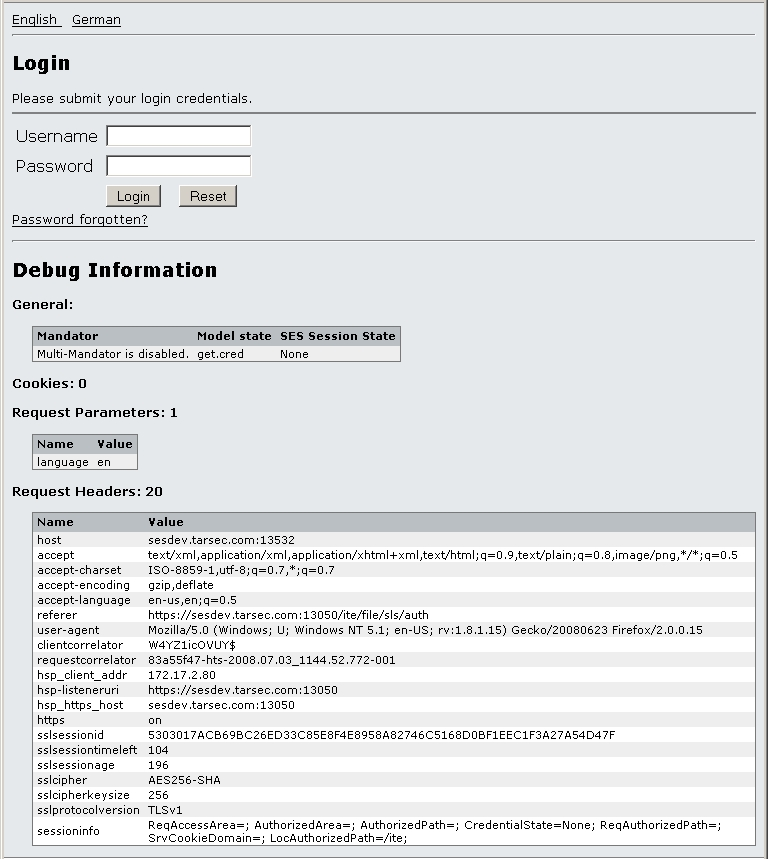
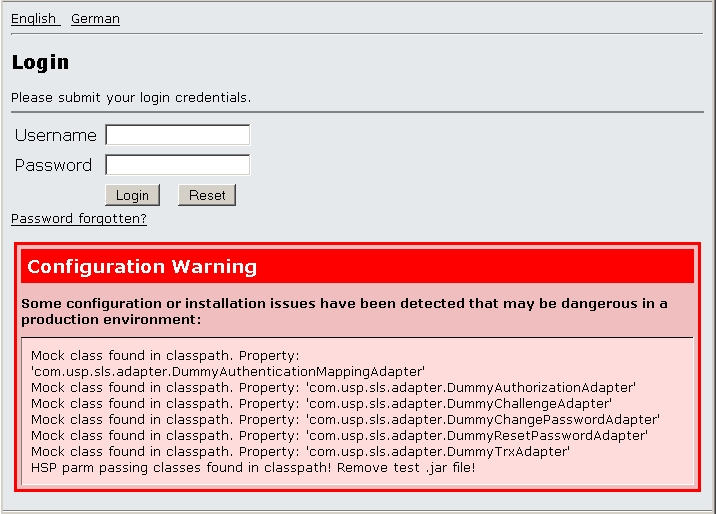
The SLS supports reading data from, and storing data in a Geode store. Apache Geode stores can be both distributed in clusters, and also persisted if necessary.
geode.host
Mandatory / Specifies the hostname (or IP address) of the Geode locator service. Example:
geode.host=geode.server.acme.com
geode.port
Optional / Specifies the port of the Geode locator listener. Defaults to 10334. Example:
geode.port=20334
In order to store and read data, the corresponding scripting functions with prefix "geode." must be used:
-
GeodeClient getClientForRegion(String region)- Returns a client instance used to read and write data -
void writeValue(GeodeClient client, String key, Object data)- Stores a data object in Geode -
Object readValue(GeodeClient client, String key)- Reads a data object from Geode -
void clode(GeodeClient client)- Closes the connection to Geode
See "SLS Scripting Guide" for details.
The SLS sets some custom HTTP headers in its response - some after every request, some only after a completed login attempt. This chapter documents those custom HTTP response headers, their meaning and what they are used for.
Note that all these headers are not sent to the actual client by default. Since some of these headers can be especially useful for programmatic clients (as a very simple means of determining the state of an authentication attempt), it can make sense to enable them; see [HTTPADMIN] for documentation of these SRM directives:
-
RF_ServerResponseHeaderAllow -
RF_LocationResponseHeaderAllow.
This header is always set in every response. It is meant to give a very basic indication of the state of the authentication. It contains a numeric value whose meaning is similar to the corresponding HTTP response codes. The possible values for this header are:
-
200- Authentication was successfully completed. -
401- Default: Authentication (still) required -
500- There was an internal error in the SLS (not the back-end) -
503- There was an error in the authentication back-end system
Note: If the authentication in the back-end system is simply denied (due to invalid credentials, for example), the value of the header will always be 401. 500 and 503 indicate real errors, such as technical problems, JVM errors etc.
This optional header is set by the SLS only if explicitely enabled in the SLS configuration. To enable it, set this property in "sls.properties":
error.header=true
If set, the header contains the last exception error message text (which is the message that is also logged to the "exception.log" in the stacktrace).
This response header is processed by the HSP proxy. It is used by the SLS to either signal a successful authentication, or a logout to the HSP. The following values are allowed:
-
Member- The user has been authenticated on "Member" access level (usually used with weak authentication). -
Customer- The user has been authenticated on "Customer" access level (usually used with strong authentication). -
Invalidate- Terminate the session of the user for the current application (or, to be more accurate, the current authorized path). -
InvalidateAll- Terminate the entire SES session of the user (for all applications).
Note: The "Member" and "Customer" values are accepted by the reverse proxy only if they are set in a response coming from a designated login location. So it is not possible for any application to just act as a login server by simply setting this response header.
The delivery includes the following support tools:
JSP Compile Tool
Allows to compile customized JSPs in a test directory. Useful if the JSPs are adapted and/or extended, for example with custom taglibs etc. By testing compilation with this tool, runtime compilation problems can be avoided.
SLS Seal (DataProtector replacement)
Convenient commandline tool which allows to encrypt text values in the "sls.properties" file or the adapter configuration files. Useful to avoid having server passwords and similar sensitive values lying around in configuration files in plaintext.
SES Ticket API Tool
Convenient commandline tool which allows to create key and index files to be used for SES tickets (RSA key pairs, 3DES encryption keys and samples of key index files), as well as SES tickets for testing and development purposes.
SLS Tool
Convenient commandline tool which allows to do several things that would otherwise require a running SLS instance:
- Obtain metadata for the SAML 2.0 Identity Provider and Service Provider.
This tool allows to compile JSP files delivered by Login Service JSP developers before deploying them. The advantage of this approach is that any syntax errors and potentially also classpath configuration problems can be detected quickly, saving quite a lot of time.
Without this tool, any errors in the JSP files would be detected only once they are compiled by the Tomcat compiler the first that they are invoked by a user. It is also more cumbersome to search the reason for a compile problem in the Tomcat logfiles than to have it presented in a command line shell.
The directory structure of this tool in the delivery package is this:
./tools/jspcompiler/
/compilejsp.sh
/work/
/lib/
/classes/
/webapp/
To compile any JSP files, the JSP files must be copied into the "webapp" directory (not in any subdirectories!) and the compile script must be started:
./compilejsp.sh
It might be necessary to set the JAVA_HOME variable in the compile script to a valid path of a JDK installation. As long as no errors are displayed once the compilation has finished, the files are ok.
If the JSPs are using any 3rd-party classes or libraries, it may be necessary to add those libraries or classes to the compile classpath. There are several possibilites to do so:
-
The variable "
CSLIB" in the compile script can be changed to point to any additional class file directories or JAR files. This variable is included in the compile classpath. -
Single classfiles can be copied into the "
classes" directory (with the correct package-subdirectory structure, of course). -
Any additional JAR files can be copied into the "
lib" directory.
All JAR files in the "lib" directory and the "classes" directory are automatically added to the compile classpath.
SLS Seal is a commandline tool used to encrypt sensitive values in the SLS configuration files. The SLS will decrypt such values automatically, given that the correct keystore used for the encryption is configured accordingly.
Simply put, SLS Seal is a tool for hiding sensitive values in configuration files. To do this, such values can be encrypted on the command line using the SLS Seal tool, and then the encrypted text string is entered in the configuration file. The SLS will then use the SLS Seal API at runtime to automatically decrypt the value again.
One requirement of this mechanism is that the SLS will not need any manual interaction for decryption (like entering a PIN code), since it must be possible to stop and restart the SLS service automatically in a production environment. This leads to the conclusion that, in the end, the key used for encryption must be available somewhere in the file system, and can therefore be stolen by anyone who knows how to use it. That person could then use the DataProtector with the key to decrypt and encrypted value again. So how does it improve security then?
The point is that in many large companies access to the production systems and the keystore files can be restricted through operating system mechanisms, such as file access rights. But quite often configurations are maintained in version control systems such as CVS, where often a large number of groups (also many developers) may have access to. In such situations it is useful to make sure that no production passwords are visible in those files.
The DataProtector can be found in the delivery archive's subdirectory "tools/seal". It can be started there directly by using the "java -jar …" command. See chapter "Prerequisites" for information about the Java version required for the command line client.
If the Jar file is executed without any parameters, it will print out all parameters available.
Please read the README text file in the SLS Seal directory for up-to-date information about how to use the tool, and all possible options.
First, a keystore file must be created before the DataProtector can be used. This file contains the seed for the symmetric encryption key. The key inside the file is usually protected with a password, which may also be host-specific (therefore restricting the use of the keystore file on a specific host system).
To create a keystore, run this command:
java -Dfile.encoding=UTF-8 -jar sls-seal-<version>.jar create /path/to/keystore
To encipher a sensitive text string, run this command:
java -Dfile.encoding=UTF-8 -jar sls-seal-<version>.jar encipher /path/to/keystore <plaintext>
Enciphers the given <plaintext> and prints the enciphered base64-string to the console (standard output). This value can then be copied into the configuration file.
To decipher a sensitive text string, run this command:
java -Dfile.encoding=UTF-8 -jar sls-seal-<version>.jar decipher /path/to/keystore <ciphertext>
Deciphers the given <ciphertext> and prints the deciphered string to the console (standard output).
To configure the SLS to use a keystore to decrypt any encrypted values, the following property in "sls.properties" must define the path of the keystore file:
dataprotector.keystore
Path of a keystore file, either absolute or relative to the SLS subdirectory "WEB-INF".
Example:
dataprotector.keystore=sls-dataprotector.keystore
The SES Ticket API Tool is a commandline tool that allows to create the keys required to create signed and encrypted SES tickets in the SLS, or verify and decrypt them in an application server (using the J2EE filter, for example - see "SSO Integration").
The SES Ticket API Tool can be found in the delivery archive's subdirectory "tools/ses-ticket-api". It can be started there directly using the "java -jar …" command. See chapter "Prerequisites" for information about the Java version required for the command line client.
If the Jar file is executed without any parameters, it will print out all parameters available.
For all operations, the argument -path+<directory> can be used to define a target directory where the files (index or keys) are created. If that directory does not exist yet, it will be created.
For all file creation operations, the argument -prefix <prefix> can be used to define a prefix for the resulting filenames. If all files are created together using the -all option (see "Creating all files at once"), the resulting filenames will have the given prefix, and the entries in the index file will correspond to them.
In order to use a set of keys to create SES tickets, an index file must be created as well. While this is basically just a simple text file that could easily be created by hand, the commandline tool can create one that can be used as a sample.
To create a key index file in the current directory, run this command:
java -jar usp-ses-ticket-tool-1.0.0.jar -create -index
To create a key index file in the directory "/tmp/keys", run this command:
java -jar usp-ses-ticket-tool-1.0.0.jar -create -index -path /tmp/keys
Creating an SES ticket requires an RSA private key which is used to sign the ticket. The corresponding public key must be provided to the application server which uses some kind of SSO filter to verify the ticket.
To create an RSA key pair in the current directory, run this command:
java -jar usp-ses-ticket-tool-1.0.0.jar -create rsa
SES tickets can optionally be encrypted with a symmetric 3DES key. This key must then also be provided to the application server which uses some kind of SSO filter to decrypt the ticket.
To create a 3DES key in the current directory, run this command:
java -jar usp-ses-ticket-tool-1.0.0.jar -create 3des
There is also a shortcut to create all keys (RSA and 3DES) in one go:
java -jar usp-ses-ticket-tool-1.0.0.jar -create -keyset
And the following command creates all keys and a corresponding key index file:
java -jar usp-ses-ticket-tool-1.0.0.jar -create all
This tool also allow to create SES tickets that can be used for testing or development purposes. The following parameters are available for use to create a ticket:
-
-user- The username in the ticket. -
-realm- The realm in the ticket. -
-indexfile- The path of the key index file which defines the path of each key file. -
-privkey- The alias of the private key used to sign the ticket. -
-pubkey- The alias of the public key required to verify the ticket. -
-enckey- Optional: The alias of the encryption key required to encrypt the payload or the entire ticket. -
-lifespan- Optional: The lifetime of the ticket in seconds (default is 300) -
-encrypt- Defines if only the payload (default) or the entire ticket (set to value "ticket") should be encrypted, if an encryption key was set. The SES ticket consists of a header part which contains the user ID and the realm, and all the optional attributes (the payload). The header part is usually plain text, and only attribute values are encrypted. If the entire ticket should be encrypted including the header, use the argument "-encrypt ticket". -
-ticketfile- Optional: Path of a text file where the ticket string will be stored. The ticket will always also be printed to the standard output console.
Example for creating an unencrypted ticket with a lifespan of only 10 seconds:
java -jar usp-ses-ticket-tool-1.1.0.jar -create ticket -indexfile test.keyindex -privkey test_priv -pubkey test_pub -lifespan 10
Example for creating a completely encrypted ticket with some payload attributes:
java -jar usp-ses-ticket-tool-1.1.0.jar -create ticket -indexfile test.keyindex -privkey test_priv -pubkey test_pub -enckey test_enc -encrypt ticket -payload some=thing,here=there
This tool bundles practically all code of the SLS in a single JAR file and makes some SLS functionality available via command line that otherwise would require to install, configure and start an SLS instance.
To show general command line options, run this command:
java -jar sls-tool-fat-<version>.jar -help
To show command line options for a specific component (components were listed in the command above):
java -jar sls-tool-fat-<version>.jar -help <component>
To show the version of the tool:
java -jar sls-tool-fat-<version>.jar -version
Otherwise, the general syntax for using the SLS tool is as follows:
java -jar sls-tool-fat-<version>.jar <component> <method> {<option>}Component and method must be the first two arguments. The following sequence of options can then be in any order and can contain both general options that work for all components and methods and specific options.
NOTE: On Linux the SLS Tool may hang during execution due to lack of true randomness available on the system. If this happens, start the SLS Tool like this (note that the dot in the path is not a typo but necessary):
java -Djava.security.egd=file:/dev/./urandom -jar sls-tool-fat-<version>.jar ...
-verbose
Shows debug output. Equivalent to "-loglevel debug". Default is off (log level info).
-loglevel <level>
Sets log level. Any log4j log level can be indicated (trace, debug, info, warn, error, …). Default log level is info.
java -jar sls-tool-fat-<ver>.jar *idp getMetadata* {<option>}This function allows to get SAML 2.0 Identity Provider (IdP) metadata.
-webapp <dir>
A directory that contains at least minimal IdP configuration in its WEB-INF subdirectory. Typically, an idp-adapter.properties file with minimal entries plus the IdP keystore are sufficient, see example further below. This argument is mandatory.
-keypairalias <alias>
Key pair alias used to obtain the certificate from the key store. If this option
is not specified the global key pair alias in property
idp.keystore.keypair.alias is used as the key pair alias instead. Optional.
-variables <name1>=<value1>,<name2>=<value2>
Optional script (JEXL/Groovy) variables to set.
Needed e.g. if the host is parametrized in EntityID and endpoint URLs:
-variables header.host=acme.com.
Separate multiple name/value pairs with commas.
-out <file>
File to write metadata to. Optional, if not present, metadata is printed out to console.
java -jar sls-tool-fat-<ver>.jar idp getMetadata -webapp /some/path -out /some/other/path/metadata.xml
Directory structure and files:
/some/path/WEB_INF/
idp/idp.jks
idp-adapter.properties
Sample idp-adapter properties (note the that the path to the IdP keystore is indicated relative to the webapp):
idp.entity.id=https://sestest2.tetrade.ch/idp/sls
idp.keystore.file=WEB-INF/idp/idp.jks
idp.keystore.keypair.alias=idp
idp.keystore.pass=changeit
idp.keystore.type=JKS
idp.sso.redirect.url=https://sestest2.tetrade.ch/ite/idp/sls/auth
idp.slo.redirect.url=https://sestest2.tetrade.ch/ite/idp/sls/auth
java -jar sls-tool-fat-<ver>.jar *sp getMetadata* {<option>}This function allows to get SAML 2.0 Service Provider (SP) metadata.
-webapp <dir>
A directory that contains at least minimal SP configuration in its WEB-INF subdirectory. Typically, an sp-adapter.properties file with minimal entries plus the SP keystore are sufficient. This argument is mandatory.
-keypairalias <alias>
Key pair alias used to obtain the certificate from the key store. If this option
is not specified the global key pair alias in property
sp.keystore.keypair.alias is used as the key pair alias instead. Optional.
-variables <name1>=<value1>,<name2>=<value2>
Optional script (JEXL/Groovy) variables to set.
Needed e.g. if the host is parametrized in EntityID and endpoint URLs:
-variables header.host=acme.com.
Separate multiple name/value pairs with commas.
-out <file>
File to write metadata to. Optional, if not present, metadata is printed out to console.
The functionality of the SLS is defined by a number of modules. At startup time, the SLS detects which modules are in use and logs this information to the "sls.log" file on INFO level.
Additionally, it is also possible to configure the path of a property file that is generated by the SLS and contains the list of all used modules. The location of the file is configured through one property in the "sls.properties" file:
modules.usage.file
Must contain the path of the file (not only the directory path, but also the name of the file itself). The path can be specified as an absolute directory path, or relative (to the SLS "WEB-INF" directory).
Note
The SLS process must have write permission for the given file and directory, or this functionality will cause problems at runtime!
Example:
modules.usage.file=/var/logs/sls/modules-usage.properties
The generated file contains properties with information about the modules that are in active use in the SLS instance. A sample file might look like this:
#SLS Module Usage
#Thu Oct 28 19:10:27 CEST 2010
module.0.title=Basic
module.0.reason.1=Property "adapter.*" is set.
module.0.reason.0=Property "sls.title" is set.
module.1.title=HTTP
module.1.reason.0=Property "adapter.class.http" contains value: http
module.2.title=USP SSO
module.2.reason.0=Property "app.header.plainuser" contains value: function.getVerifiedCred
Each module is described by a group of properties with the prefix "module." followed by the same number. The property with the name suffix "title" shows the name of the module (see list below), and the other properties describe the reasons why this module was deemed to be used by the SLS instance.
Note: The properties in this example have been sorted for the sake of better readability. Java property files are not sorted alphabetically, so the properties in the generated file will appear in random order.
The following SLS modules exist:
Base
Contains all the core SLS functionality and supports login credential gathering through HTML forms (JSPs) or "Basic Authentication" between the SLS and the browser client. Also includes the LDAP adapter, allowing for password verification and / or user information retrieval, and support for "Basic-Auth"-SSO-integration with application servers.
SSO
Provides Single-Sign-On functionality between multiple web applications through propagation of custom HTTP headers that can be verified by the various application server filters (J2EE, etc.). It is possible to use either simple HTTP headers with custom key-/value pairs, protected through a signature only, or SES tickets (see "SES Login Ticket" for details).
Certificate
Provides certificate-based authentication. This is basically SSL mutual authentication, in which case the certificate can either be stored in the client web browser, or in a hardware token. In addition, the SLS can trigger an SSL re-negotiation on an existing anonymous SSL connection to start the mutual authentication later (and not right when the browser connects to the site).
The client certificate can be verified against one or multiple Certificate Authorities (CAs). Certificate Revocation Lists (CRLs) and Online Certificate Status Protocol (OCSP) are also supported. Finally, the user CN can be mapped in a flexible way to any custom user ID required by the application.
HTTP
Allows to use any HTTP-based service to verify the user credential through simple HTTP requests and responses. The HTTP adapter also allows to perform custom HTTP callouts during the login process.
Kerberos
Provides transparent, automatic Single-Sign-On (SSO) through Kerberos over HTTP (SPNEGO). The SLS processes the Kerberos Token sent by the browser client and verifies them either through a KDC or the configured keystore.
Nevis
Allows to implement Single-Sign-On (SSO) with applications based on the Nevis framework through creation of a Nevis token.
NTLM
Provides transparent, automatic Single-Sign-on (SSO) through NTLM. The verification of the credentials sent by the client browser is delegated to a Microsoft Windows Domain Controller.
RADIUS
Allows to verify the user credentials through any existing RADIUS authentication service.
SAML IDP
Provides Single-Sign-On (SSO) with an SAP application server through a SAML 1.1 identity provider.
SAML SP
Processes authentication credentials from a SAML request. The SLS extracts the user credential information from the SAML message and performs the actual authentication in any way (using mechanisms like LDAP or RADIUS, for example).
SecurID
Provides strong two-factor authentication with RSA SecurID tokens (up to RSA server 6.x).
SOAP Backend
Allows to delegate the user credential verification to any HTTP SOAP back-end service.
SOAP Frontend
Allows HTTP SOAP clients to perform authentication on the SLS through a SOAP interface.
The following modules contain functionality which is not implemented within the SLS, but relates to it, such as ticket verification filters for application servers:
NTLM Propagation
Allows to propagate the user credentials to the HSP reverse proxy, which can then perform NTLM authentication against applications servers like a browser client.
Tomcat Authenticator
Provides Single-Sign-On (SSO) for all applications within one Tomcat instance through a Tomcat Authenticator module. The eliminates the need to configure a J2EE filter in every application deployed in that Tomcat server.
A number of adapters support TLS/SSL based protocols, such as HTTPS or LDAPS. Usually, using these SSL protocols requires correct configuration of JSSE (Sun's default SSL implementation in the Java Runtime). This chapter describes how to configure and debug SSL.
In general, in-depth information about JSSE can be found on Sun’s Java documentation pages:
https://docs.oracle.com/javase/8/docs/technotes/guides/security/jsse/JSSERefGuide.html
Usually the SLS is the client in an SSL connection. For example if LDAPS is used in the LDAP adapter to perform an authentication or a user lookup during a login process.
During an SSL handshake between the SLS and some SSL server, the server sends his certificate. The SSL implementation in the Java VM of the SLS will then try to verify that certificate, using its local store of known Certificate Authorities (CAs). By default, this CA store is a Java keystore file at this location:
$JAVA_HOME/jre/lib/security/cacerts
To import a CA certificate in a file "customca.cer" in DER encoded format, the Java "keytool" utility can be used:
keytool -import -file customca.cer -trustcacerts -keystore $JAVA_HOME/jre/lib/security/cacerts
If the SSL connection between an SLS and some SSL server requires that the login service provides a client certificate, it must be configured in a separate keystore.
It is possible to import PKCS12 certificates in the Java keystore, but there are some issues with importing PKCS12 files:
Generally it doesn't work with PKCS12 certificates exported from Microsoft IE. It is strongly recommended to export it from a Netscape based browser, such as Firefox. Otherwise JSSE won't be able to read the PKCS12 certificate correctly, and as a result there might occur an SSLException with the description "too Big".
If you want to export a key from openssl it won't work when you just export it with the command:
> openssl pkcs12
You have to re-encode the Java-Base64-encoded private key with the following command:
> openssl rsa -in private.key -out newprivate.key
Thereafter, the re-encoded private key and the corresponding certificate can be converted to the PKCS12 format like this:
> openssl pkcs12 -export -out keystore.p12 -inkey newprivate.key -in cert.pem.crt
The resulting keystore "keystore.p12" can then be used by setting the following two system properties:
-Djavax.net.ssl.keyStoreType=PKCS12
-Djavax.net.ssl.keyStorePassword=<keystore password>
One place to set them is the "bin/setenv.\*" script in the SLS Tomcat instance:
JAVA_OPTS="-Djavax.net...=... -Djavax.net..."
It is possible to enable some SSL debut output that will be printed to the standard output console (usually the "catalina.out" file in a Tomcat instance) through settings some system properties. The official documentation for this can be found here:
http://java.sun.com/j2se/1.5.0/docs/guide/security/jsse/JSSERefGuide.html#Debug
System properties can be set for an SLS by defining them in the JAVA_OPTS variable in the "bin/setenv.*" script of the Tomcat instance. For example:
JAVA_OPTS=-Djavax.net.debug=ssl
will enable debug output for all SSL operations. But since problems usually arise during the handshake, it can be restricted to that:
JAVA_OPTS=-Djavax.net.debug=ssl:handshake
The output shows which keystore files are actually used, the certificate chain received from the SSL server etc.
TLSv1.3 requires Java 8u261 or later.
So far, it is experimentally necessary to set the system property
jdk.tls.client.protocols at startup of the JVM to a string that contains
TLSv1.3, for example:
... -Djdk.tls.client.protocols=TLSv1.3,TLSv1.2 ...
Note that setting the property in a JVM that has already started, like in an SLS login model has no effect.
In the HTTP Adapter you additionally need to allow the protocol, as usual,
in the SLS config property http.tls.versions.
In other words, in order to use Protocol X with the HTTP (or WS) adapter, X
has both to be contained in http.tls.versions and be allowed by the JDK,
either implicitly or explicitly by setting jdk.tls.client.protocols.
Other callouts from the SLS should in principle automatically use TLSv1.3 (if allowed with the above system property) if the server on the other side also allows and prefers it. There are so far no dedicated settings for these other callouts (e.g. LDAP Adapter uses JNDI of the JDK).
TLSv1.3 in SLS front as server requires Tomcat 8.5.
No extra settings are necessary, optionally e.g. accepted protocols can be
limited in server.xml in the Connector tag in the sslEnabledProtocols
attribute.
The SLS provides limited support for HTTP methods other than GET, HEAD, POST and OPTIONS.
Such methods might for example be used by rich clients to access REST webservices.
The methods GET, HEAD and POST are the ones that JSPs are guaranteed to support and since Tomcat 8 those are the only ones supported by Tomcat.
The SLS can internally map other methods configuratively to GET or POST and configure to some degree how to handle them.
Side remark: Note that the HSP must be configured to allow other methods to propagate to the SLS
(and after authentication to applications), using the directives RF_ServerAllowMethod
and/or RF_LocationAllowMethod.
HEAD is handled like GET in the SLS.
The main difference between GET and POST is that after a POST the SLS automatically advances to the next step in the login model.
Moreover, after each POST the SLS redirects to itself ("302 Redirect") to prevent replay attacks from a user reposting a form from an open web browser.
OPTIONS requests are handled like GET requests, except that an additional response header "Allow" is added with a configurable header value.
The header value is configured with the property http.method.options.allow.
The property value is a comma-separated list of HTTP methods (note that HTTP methods
are case-sensitive); the default value is "GET,HEAD,POST". Example:
http.method.options.allow=GET,HEAD,POST,PUT,DELETE
Other methods are mapped either to GET or to POST. In the case of GET, handling is as for a GET request, for POST, too, except that there is no redirect to itself afterwards, because neither would a replay usually be possible from a browser, nor would the client necessarily be able to handle a "302 Redirect".
By default unknown methods are mapped to POST and treated as described above, but this can be configured.
The default can be set to one of three modes:
- advance (the default): Map to POST, adavance in model
- stay: Map to GET, do not advance in model
- error: Respond with an error, typically with a "405 Method not allowed".
Example:
http.method.handle.defaultmode=error
Methods can be specifically indicated for each of these threee modes with comma-separated lists of HTTP methods.
Example:
http.method.handle.advance=PUT
http.method.handle.stay=DELETE
http.method.handle.error=ACME, ROADRUNNER
Defaults are empty.
Currently, the SLS provides only limited support for handling an HTTP request body.
In the case of a POST — an incoming POST, not another method mapped internally to a POST for processing in the SLS — the body is normally parsed as request parameters which are made available as JEXL variables.
In case of e.g. a JSON body, the body typically ends up as the
name of a request parameter with empty value. This parameter
can be accessed e.g. with Groovy by first getting the current
HttpServletRequest with the JEXL/Groovy function
function.getCurrentRequest() and then calling e.g.
request.getParameterNames() and searching for the JSON body in all
parameter names. JSON or XML can then be parsed in Groovy using a
groovy.json.JsonSlurper resp. a groovy.util.XmlSlurper
and elements can be conveniently accessed using "." as accessor.
Example:
def request = function.getCurrentRequest()
def names = request.getParameterNames()
def body
names.each { name ->
  if (<some-condition>) {
    body = name
  }
}
def slurper = new groovy.json.JsonSlurper()
def json = slurper.parseText(body)
def userid = json.auth.user.useridFor other methods, the body is typically not explicitly consumed
by the SLS. When needed, it can be read in a Groovy script by first
getting the HttpServletRequest as above and then consuming
a reader or input stream.
Example:
def request = function.getCurrentRequest()
// short for request.getReader().getText()
def body = request.reader.text
There are two areas regarding the SLS where SOAP is involved:
- Sending SOAP requests from the SLS to an existing back-end web service, to perform an authentication, user data lookup etc. This is explained in the following paragraphs.
- Receiving and processing SOAP requests through the SOAP frontend. This is explained in more detail in the "Frontend" part of this documentation (see "SOAP Frontend" for details).
The SLS does not feature an actual SOAP adapter of any kind. Instead, for sending SOAP requests to web services and processing their SOAP responses, the following technologies are used:
-
Using the USP "
wsdl-tool" commandline utility, the WSDL file from the web service can be processed, and request-XML can be created for each operation defined in the WSDL. - That XML request data can be copied into a JEXL template file (see "Templates"). The variable values in it can be replaced with the appropriate JEXL variables or functions.
-
The HTTP adapter (see "HTTP Adapter") can then be configured to use the content of that template file as the body of a POST request, using the JEXL function "
function.getTemplateContent()". - The SOAP response recieved from the web service is made available by the HTTP adapter in the JEXL variable "response.content".
-
Using the various JEXL XPath functions, such as "
function.xPathGetString()", the XML response can be parsed and handled dynamically in the SLS model.
This chapter gives a complete example of how to set up sending a SOAP request to a webservice. For the sake of this example, the following WSDL is used, which defines a login operation. That operation authenticates a user by verifying the username and password:
Example WSDL file "login.wsdl"
<?xml version="1.0" encoding="UTF-8"?>
<wsdl:definitions targetNamespace="urn:ILogin"
xmlns:apachesoap="http://xml.apache.org/xml-soap"
xmlns:impl="urn:ILogin"
xmlns:intf="urn:ILogin"
xmlns:soapenc="http://schemas.xmlsoap.org/soap/encoding/"
xmlns:wsdl="http://schemas.xmlsoap.org/wsdl/"
xmlns:wsdlsoap="http://schemas.xmlsoap.org/wsdl/soap/"
xmlns:xsd="http://www.w3.org/2001/XMLSchema">

<wsdl:message name="loginResponse">
<wsdl:part name="loginReturn" type="xsd:boolean" />
</wsdl:message>

<wsdl:message name="loginRequest">
<wsdl:part name="in0" type="soapenc:string" />
<wsdl:part name="in1" type="soapenc:string" />
</wsdl:message>

<wsdl:portType name="ILogin">
<wsdl:operation name="login" parameterOrder="in0 in1">
<wsdl:input message="impl:loginRequest" name="loginRequest" />
<wsdl:output message="impl:loginResponse" name="loginResponse" />
</wsdl:operation>
</wsdl:portType>

<wsdl:binding name="LoginSoapBinding" type="impl:ILogin">
<wsdlsoap:binding style="rpc"
transport="http://schemas.xmlsoap.org/soap/http" />

<wsdl:operation name="login">
<wsdlsoap:operation soapAction="/axis/services/Login" />
<wsdl:input name="loginRequest">
<wsdlsoap:body encodingStyle="http://schemas.xmlsoap.org/soap/encoding/"
namespace="urn:ILogin" use="encoded" />
</wsdl:input>
<wsdl:output name="loginResponse">
<wsdlsoap:body encodingStyle="http://schemas.xmlsoap.org/soap/encoding/"
namespace="urn:ILogin" use="encoded" />
</wsdl:output>
</wsdl:operation>

</wsdl:binding>

<wsdl:service name="ILoginService">
<wsdl:port binding="impl:LoginSoapBinding" name="Login">
<wsdlsoap:address location="http://soap.acme.com/services/Login" />
</wsdl:port>
</wsdl:service>

</wsdl:definitions>
Then run the USP "wsdl-tool" (to be found in the "tools" folder in the SLS delivery image) with that WSDL file:
%> java -jar usp-wsdl-tool-<version>.jar login.wsdl
which will result in the following output:
Progress: 1 - Caching Definition from url [file:/C:/devel/java/workspace/usp-wsdl-tool/target/login.wsdl]
Progress: 2 - Loading [file:/C:/devel/java/workspace/usp-wsdl-tool/target/login.wsdl]
Progress: 1 - Loading Definition from url
Retrieving document at 'file:/C:/devel/java/workspace/usp-wsdl-tool/target/login.wsdl'.

**** OPERATION: login:

<soapenv:Envelope xmlns:xsi="http://www.w3.org/2001/XMLSchema-instance"
        xmlns:xsd="http://www.w3.org/2001/XMLSchema"
        xmlns:soapenv="http://schemas.xmlsoap.org/soap/envelope/" xmlns:urn="urn:ILogin">
<soapenv:Header/>
<soapenv:Body>
<urn:login soapenv:encodingStyle="http://schemas.xmlsoap.org/soap/encoding/">
<in0 xsi:type="soapenc:string"
xmlns:soapenc="http://schemas.xmlsoap.org/soap/encoding/">?</in0>
<in1 xsi:type="soapenc:string"
xmlns:soapenc="http://schemas.xmlsoap.org/soap/encoding/">?</in1>
</urn:login>
</soapenv:Body>
</soapenv:Envelope>

SOAPAction: /axis/services/Login
Note: The "SOAPAction:" value is only displayed if a SOAPAction was defined in the WSDL. Some web service containers need a HTTP request header named "SOAPAction" with that value in order to perform some internal dispatching - others don't.
Copy the XML structure (the entire "<soapenv:Envelope .." tag) into a new file named "login.xml" in the SLS web application subdirectory "WEB-INF/templates":
<sls webapp>/WEB-INF/templates/login.xml
In the template, insert the JEXL variables for the username and password credential in the corresponding XML tags:
<soapenv:Envelope xmlns:xsi="http://www.w3.org/2001/XMLSchema-instance" xmlns:xsd="http://www.w3.org/2001/XMLSchema" xmlns:soapenv="http://schemas.xmlsoap.org/soap/envelope/" xmlns:urn="urn:ILogin">
<soapenv:Header/>
<soapenv:Body>
<urn:login soapenv:encodingStyle="http://schemas.xmlsoap.org/soap/encoding/">
<in0 xsi:type="soapenc:string"  +
               xmlns:soapenc="http://schemas.xmlsoap.org/soap/encoding/">${session.getCred('username')}</in0>
<in1 xsi:type="soapenc:string"
xmlns:soapenc="http://schemas.xmlsoap.org/soap/encoding/">${session.getCred('password')}</in1>
</urn:login>
</soapenv:Body>
</soapenv:Envelope>Set up the HTTP adapter to send the SOAP request by setting these properties in the "http-adapter.properties" file:
# Configure template file with alias "soapbody" +
template.file.soapbody=login.xml
# Configure HTTP POST request
http.sendsoap.method=post
http.sendsoap.header.Content-Type=text/xml;charset=UTF-8
http.sendsoap.header.SOAPAction=/axis/services/Login
http.sendsoap.url=http://soap.acme.com/axis/services/Login
http.sendsoap.body=${function.getTemplateContent('soapbody')}
http.sendsoap.code.error=500,503
http.sendsoap.code.denied=401,403To actually send the SOAP request, use the "do.http" model state:
model.login.state.50.name=do.http model.login.state.50.property=sendsoap
The SOAP response will look something like this:
<?xml version="1.0" encoding="UTF-8"?> <soapenv:Envelope xmlns:soapenv="http://schemas.xmlsoap.org/soap/envelope/" xmlns:xsd="http://www.w3.org/2001/XMLSchema" xmlns:xsi="http://www.w3.org/2001/XMLSchema-instance"> <soapenv:Body> <ns1:loginResponse soapenv:encodingStyle="http://schemas.xmlsoap.org/soap/encoding/" xmlns:ns1="urn:ILogin"> <loginReturn xsi:type="xsd:boolean">false</loginReturn> </ns1:loginResponse> </soapenv:Body> </soapenv:Envelope>
In this example, the value "false" in the "loginReturn" tag means that the authentication failed.
Once the HTTP adapter receives the response, it is stored in the JEXL variable "response.content". Therefore, it can be evaluated using the XPath JEXL functions, e.g.
model.login.state.60.name=do.generic
model.login.state.60.action.1=${function.failWithAuthenticationError('USER_AUTH_FAILED', 'User invalid')}
model.login.state.60.action.1.if=${function.xPathGetString(response.content, '//loginReturn') eq 'false'}The SAML 2.0 Identity Provider (IdP) is implemented as an SLS Adapter, see "SAML IdP Adapter".
The SAML 2.0 Service Provider (SP) is implemented as an SLS Adapter, see "SAML SP Adapter". == SAML Global Settings
The following configuration property allows to set the Digest Algorithm in the Reference section of XML signatures (e.g. in SAML Assertions).
saml.securityConfiguration.signatureReferenceDigestMethod
The default value is http://www.w3.org/2001/04/xmlenc#sha256.
Common values include:
-
http://www.w3.org/2000/09/xmldsig#sha1(cryptographically weak, should only be used where needed for compatibility with legacy systems) -
http://www.w3.org/2001/04/xmlenc#sha256 -
http://www.w3.org/2001/04/xmldsig-more#sha384 -
http://www.w3.org/2001/04/xmlenc#sha512
Example of an XML signature:
<ds:Signature xmlns:ds="http://www.w3.org/2000/09/xmldsig#">
<ds:SignedInfo>
<ds:CanonicalizationMethod Algorithm="http://www.w3.org/2001/10/xml-exc-c14n#" />
<ds:SignatureMethod Algorithm="http://www.w3.org/2001/04/xmldsig-more#rsa-sha256" />
<ds:Reference URI="#_9047cac5-7ad8-4ca0-b43f-35d7fdac929b">
<ds:Transforms>
<ds:Transform Algorithm="http://www.w3.org/2000/09/xmldsig#enveloped-signature" />
<ds:Transform Algorithm="http://www.w3.org/2001/10/xml-exc-c14n#" />
</ds:Transforms>
<ds:DigestMethod Algorithm="http://www.w3.org/2001/04/xmlenc#sha256" />
</ds:Reference>
</ds:SignedInfo>
[...]
</ds:Signature>The File adapter is a simple adapter for testing purposes. Other adapters connect the SLS to a backend user authentication system. The File adapter uses a xml file as user authentication backend. All authentication and authorization information is stored in this xml file.
A typical login flow using File adapter:
- A user requests a restricted site.
- The user is getting redirected from the SES to the SLS.
- The SLS displays the Login page to the user.
- The user fills in username and password.
- The File adapter checks the username and compares the password with the corresponding hash from xml file.
- If the username and the password were valid, the SLS grants the access rights to the client.
The following features will give you a brief overview of the File Adapters functionalities:
- Support for user groups and authorizations.
- Supports user attributes which can be resolved by jexl-expressions for later usage.
- No need of SLS restart when changing the user-configuration file.
- Passwords are saved as SHA-1 hashes.
- Easy and simple set-up.
In addition to basic SES/SLS set up, the File-adapter needs some special configurations.
- Enable the File-adapter in SLS configuration.
- Add users to the user-config.xml.
The standard SLS distribution is shipped with a pre configured File-adapter and an example user configuration file.
Make sure, that the file adapter is enabled. The following line in sls.properties activates the File-adapter.
adapter.class.file=com.usp.sls.adapter.file.FileAdapter
If the above line exists, the File-adapter can be used in several models, i.e. for authentication and authorization:
adapter.authentication=file adapter.authorization=file
user.config.file
Defaults to "user-config.xml". If set to an absolute file path, the file must exist at the specified location. If no such file exists, the value is treated as a path relative to the "WEB-INF"-directory of the SLS web application. Examples:
user.config.file=my-users.xml
Points to a file "my-users.xml" inside the SLS "WEB-INF" directory.
user.config.file=/home/jim/some-users.xml
Points to a file "some-users.xml" in the home directory of user "jim".
model.login.uri=/auth model.login.failedState=get.usererror model.login.state.1.name=get.cred model.login.state.2.name=do.auth model.login.state.3.name=do.success model.login.state.5.name=get.usererror
The user-config.xml is the File adapter's backend system, containing all authentication and authorization information. This file can be edited with any text- or xml-editor to add or remove users and change their properties.
The syntax of the user configuration file (user-config.xml) is defined by its document type definition (user-config.dtd). Changing the file with an xml-editor can prevent from syntactic mistakes.
The following paragraphs reference to the example file listed in the appendix. The best way to read this guide is to consider the example in parallel to the following description.
user-config.xml
Each user needs a unique name. With the optional attribute locked=true a user can be locked. In the user's body the password, group membership, and additional attributes are set. Usually an administrator sets the password in the plaintext tag.
<plaintext>mypwd</plaintext>
The File-adapter will replace it with an SHA-1 hash, the next time the file is read. You can force the user to change the password the first time he logs in by setting the password attribute
forcechange="on".
The user needs at least one valid group membership. Valid means, that the file must contain the referenced group. The attributes are optional. Inside the attributes tag an arbitrary number of attributes can be defined, each containing a key-value pair.
Groups can contain authorizations and attributes. Both, the authorizations and the attributes will be available for all members of the group. Note: Do not use the same key in a group attribute and in a user attribute in the same file. There is no priority defined.
The authorizations of a user can be resolved with the following jexl function. The parameter defines the delimiter, when more than one authorization is found.
${Session.getAuthorizations(',\')}
With the user in the example file, the above jexl call would evaluate to:
fullAccess
The attributes can be referenced with jexl, i.e. to set a cookie with additional user or group attributes when a user successfully logged in. For a description of jexl consult the sls-core adminguide. The attributes from File-adapter has the prefix attribute.file.
I.e. resolving the "mykey" attribute from the example user "admin" would evaluate to "myval" :
${attribute.file.mykey}
user-config.xml
<?xml version="1.0" encoding="UTF-8"?>
<!DOCTYPE user-config SYSTEM "user-config.dtd">
<user-config>
<users>
<user name="admin">
<password forcechange="off">
<plaintext/>
<hash>\+eBZ8Okp7gMqv\+ybwqBzZfVPZZ4=</hash>
</password>
<groupmember group="bosses"/>
<attributes>
<attribute key="mykey" val="myval" />
</attributes>
</user>
</users>
<groups>
<group name="group1"/>
<group name="bosses">
<az>fullAccess</az>
<attributes>
<attribute key="groupatt" val="groupval" />
</attributes>
</group>
</groups>
</user-config>user-config.dtd
<!ELEMENT user-config (users, groups)> <!ATTLIST user-config mock (on | off) "off" > <!ELEMENT users (user+)> <!ELEMENT user (password, groupmember+, attributes?)> <!ATTLIST user name ID #REQUIRED state (ok | locked) "ok" > <!ELEMENT password (plaintext, hash)> <!ATTLIST password forcechange (on | off) "off" > <!ELEMENT plaintext (#PCDATA)> <!ELEMENT hash (#PCDATA)> <!ELEMENT mockservice (token*)> <!ELEMENT token EMPTY> <!ELEMENT attributes (attribute*)> <!ELEMENT attribute EMPTY> <!ATTLIST attribute key CDATA #REQUIRED val CDATA #REQUIRED > <!ELEMENT groupmember EMPTY> <!ATTLIST groupmember group IDREF #REQUIRED > <!ELEMENT groups (group+)> <!ELEMENT group (az*, attributes?)> <!ATTLIST group name ID #REQUIRED > <!ELEMENT az (#PCDATA)>
The Google Authenticator adapter supports challenge / response login procedures using a time-based one-time-passcode (OTP). The algorithm for this authentication type is publicly available, and various open-source implementations of mobile apps (Android, iOS etc.) exist.
This type of response / challenge is based on a shared, user-specific secret. This means that both the SLS and the users mobile app have to know the secret. Both can then build the same numeric response codes based on the current time, in specified intervals (typically 30 seconds).
So, in order for a user to log in with a Google Authenticator app, the app must first be initialized with the secret. The secret itself, which can either be generated by the SLS in some form, or be read from a database or similar storage, must be provided to the user in some kind of protected flow, either as a long numeric code, or as a QR-code. The latter can just be photographed with the Authenticator app to input the secret.
The Google Authenticator adapter is configured through a Java properties file,
usually named "googleauth-adapter.properties". The following paragraphs
explain all available configuration properties and values.
googleauth.randomNumberAlgorithm
Optional: Allows to configure the algorithm to be used for generating secure random numbers. Defaults to "SHA1PRNG".
googleauth.randomNumberAlgorithmProvider
Optional: Allows to configure the JCE provider to be used for generating secure random numbers. Defaults to "SUN".
googleauth.secret.encoded
Mandatory configuration property which defines the source for the user-specific secret (seed):
googleauth.secret.encoded=${function.base32encode(function.hmacSHA256('<your-secret-here>', session.getCred('username')))}Note
The resulting value MUST be base32 encoded, or the Authenticator app will not recognize the secret.
Please see "Secret Configuration" for more information about different options for handling the secret and the implications of each approach.
googleauth.qrcode.uri
Mandatory configuration property used to configure the QR-code URI string. While the format of that string is pre-defined for the most part by the mobile app, and could therefore be hardcoded, it contains dynamic parts like the user ID, which is why it must be a configurable value. Example value:
googleauth.qrcode.uri=otpauth://totp/YourIssuerHere:${session.getCred('username')}?secret=${googleauth.getSecret(true, false)}&issuer=YourIssuerHereNote
Some apps seem to have difficulties with the "Issuer:Username" part in the URI. So you might have to adjust the URI, e.g.
googleauth.qrcode.uri=otpauth://totp/${session.getCred('username')}?secret=${googleauth.getSecret(true, false)}&issuer=YourIssuerHeregoogleauth.windowSize
Optional: Allows to configure the size of the response code check window. In case of an invalid response code, one possible reason is a time difference between the mobile client and the server. In that case, the server will verify a number of adjoining response codes along the timeline. Defaults to 10.
googleauth.timeStepSize
Optional: Allows to configure the response code changing interval, i.e. the timespan for which a code is being displayed on the mobile app until it switches to the next code. Defaults to 30’000 milliseconds / 30 seconds.
googleauth.codeDigits
Optional: Allows to configure the number of digits used for the response code. Defaults to 6.
Techically, the secret is a string representing a secure random code. This code must be different for every user, and could be persisted as user meta data, e.g. in an LDAP attribute. However, this also means that using the Google Authenticator means requiring an LDAP directory as well.
There are basically two approaches for handling user secrets, and they both have their advantages and disadvantages, and potential consequences:
Self-Contained
The quickest and cheapest approach is to configure the secret in a way that it does not require any external user data: The secret is just built by combining an SLS instance specific secret (a randomized string in the configuration) with the user’s login ID:
googleauth.secret.encoded=${function.base32encode(function.hmacSHA256('<sls-instance-secret>', session.getCred('username')))}- Advantage: No user data backend (e.g. LDAP) of any kind required.
- Problem 1: If the user ever requires a new, different secret (because her mobile phone was stolen, for instance), the only way to change the secret without changing the username is by changing the SLS instance secret. But that would immediately render all secrets of all other users invalid, so this option basically means that the users could never change the secret.
- Problem 2: Since user login IDs are relatively simple strings, the cryptographic security level is diminished by this approach.
Externally Generated
Alternatively, a pre-generated user-specific value could be used from an external source like an LDAP service, e.g.:
googleauth.secret.encoded=${function.base32encode(function.hmacSHA256('<sls-instance-secret>', ldap.attribute.userSecret))}This is the recommended way of configuring the secret; using both an SLS instance secret, and a proper secure random code different for every user, but not directly coupled with the login ID.
- Advantage 1: Highest possible cryptographic level of security, given that the secret code was generated properly.
- Advantage 2: If the users device gets stolen and a new secret is required, a new one can be generated for that user and stored in the LDAP attribute. It will not have any negative impact on all the other users.
- Problem: Some kind of external storage required; also, organizational processes must exist to pre-generate the secret for each user and store them etc.
SLS Instance Secret
While using an SLS instance secret is technically completely optional, it is highly recommended to use it. Theoretically, it would also be possible to remove it and configure the secret just like this, based only on user data:
googleauth.secret.encoded=${function.base32encode(ldap.attribute.userSecret)}Problem: The LDAP directory itself is often not protected very well. It’s quite common that a lot of administrators / operators etc. may have read access to user objects, and could therefore gain access to the secrets of other employees. Since the LDAP administrators may not necessarily be the same people as the SES administrators, adding an SLS instance secret increases the security considerably. Anyone who gains access to the LDAP secret value of another user will still not be able to reproduce the Google Authenticator initialization code without the SLS instance secret string.
There is one JSP used specifically for the Google Authenticator adapter:
QRCode.jsp
This JSP renders a QRCode with the user’s secret, which can be used by the Google Authenticator app to initialize the user account. In addition to the QR code it also displays the secret as a human-readable string. This allows users without a QR-compatible device to initialize the secret by entering this code. The JSP can be showed to the user in an SLS model like this:
model.qrcode.state.100.name=show.jsp-login model.qrcode.state.100.property=/WEB-INF/jsp/QRCode.jsp
NOTE: Generating a QR-code requires an authenticated session, because the code is generated based on user-specific information. In other words, it must be ensured that a user can only invoke this JSP after they have been properly authenticated by other means. In the model, this could be implemented with a check like this:
model.qrcode.state.50.name=do.generic-checkLoggedIn
model.qrcode.state.50.action.1=${function.failWithAuthenticationError(...)}
model.qrcode.state.50.action.1.if.1=${!session.isAuthenticated()}The following JEXL function allows to create a base64 encoded QR code picture:
${googleauth.createQRcode()}The resulting base64-string can then be used for an embedded picture in a HTML page, like this:
<img alt="QRCode Image" src="data:image/png;base64,<sls:getScript expression='${googleauth.createQRcode()}' />" />The JSP "QRCode.jsp" contains the HTML code for rendering the QRCode. The contents of the QRCode are defined by these two configuration properties:
- googleauth.qrcode.secretValue
- googleauth.qrcode.uri
The following JEXL function is a shortcut for getting the value of the property "googleauth.secret.encoded":
${googleauth.getSecret(boolean stripPadding, boolean humanReadable)}The first boolean parameter allows to define if base32 padding characters ("=") should be stripped off; it is recommended to set this to "true", since the Google Authenticator app on iOS currently does not work if there are padding characters. The second boolean parameter will return the secret as in a user-friendly, human-readable form, e.g.
a4da ha38 jda7 85ey
The following JEXL function creates a 16 characters long, base32 encoded random secret, suitable as as user specific secret for authenticating:
${googleauth.createSecret()}The following property must be set in the "sls.properties" file to use the
Google Authenticator adapter for authentication and challenge / response:
adapter.challenge=googleauth
The login model is really just a standard challenge / response model, e.g.:
model.google.uri=/auth model.google.failedState=get.cred model.google.state.100.name=get.cred model.google.state.200.name=do.auth model.google.state.250.name=get.cred.challenge model.google.state.300.name=do.authresponse model.google.state.900.name=do.success
The following model is an example for displaying the QR-code for the user, after having performed a username / password authentication:
model.qrcode.uri=/googleqrcode
model.qrcode.failedState=get.cred
model.qrcode.state.50.name=do.generic-checkLoggedIn
model.qrcode.state.50.action.1=${function.failWithAuthenticationError(...)}
model.qrcode.state.50.action.1.if.1=${!session.isAuthenticated()}
model.qrcode.state.100.name=get.cred
model.qrcode.state.200.name=do.auth
model.qrcode.state.300.name=show.jsp-qrcode
model.qrcode.state.300.property=/WEB-INF/jsp/QRCode.jspThis model could be invoked through a link which points to the SLS webapp context with a URL parameter "cmd=googleqrcode".
Note
Displaying the secret to the user is something that should be available only once, or maybe only in an otherwise protected environment. For instance, in a company where users are authenticated through Kerberos in the internal office network, the QR code model could be made available only for users authenticated this way. So all employees could get their secret and set up their Authenticator app while they are in the office. Once outside, and accessing the company network over an extranet, only the Authenticator login model would be made available.
The HTTP adapter is a general adapter for multiple purposes. Unlike most of the other adapters, which are meant for a specific usage such as authentication or authorization, the HTTP adapter can be invoked from every step of the model login.
Some examples:
- The HTTP adapter can be used for the authentication. In this case the backend authentication system is a HTTP server which receives a request and will send a response that determines whether the user was successfully authenticated or not.
- The HTTP adapter can be used to send notification messages to a HTTP server. For example, there could be a HTTP service which gets a message from the SLS system if the login process was succesful.
- Since the body/message part is freely configurable, it is also possible to send XML-messages to specialized services, such as a typical SMS message send service (which often provide HTTP/XML-based interfaces).
- The HTTP adapter is able to send HTTP GET, POST, PUT, PATCH and DELETE methods.
- Both success and failure codes can be defined in the configuration file. That means, the behaviour of the system depending on the answer of the HTTP server host can be customized.
- The url of the host which is going to get the HTTP can be defined in the configuration file. Different hosts can be chosen for different purposes of the HTTP adapter.
- The content of the header and/or the body and the parameters of the call are also defined in the configuration file.
- Simple round-robin failover or load-balancing and connection monitoring.
- HTTP Proxy servers are supported, also with authentication.
- Authentication against the HTTP backend (web-)server is supported (Basic Auth, NTLM and SPNEGO/Kerberos).
- A connection timeout threshold can be defined.
The HTTP adapter is able to perform arbitrary HTTP calls to any server. However, be sure to allow the connection through the specified protocol and port. Both HTTP and HTTPS are usually allowed protocols into a corporate network. In the same way, the standard ports 80 and 443 are usually open to send requests through them. But if you want to send calls through non-standard ports, you have to be sure that you are allowed to.
The HTTP adapter is configured through a Java properties file, usually named "http-adapter.properties" that must be
installed in the "WEB-INF" directory of the SLS web application.
The standard SLS distribution is shipped with a pre-configured HTTP adapter and an example configuration file.
The configuration of the HTTP adapter is not the same for the authentication as for the generic HTTP calls.
Read chapter "TLS/SSL (JSSE)" for details on how to properly set up SSL with the Sun Java VM. The login service uses the default SSL implementation available in the JVM, which is usually Sun's JSSE, so all documentation about JSSE applies.
http.ssl.accepted.cns
Optional: allows to specify a comma separated list of accepted CNs in the SSL server certificate, e.g.
http.ssl.accepted.cns=www.acme.org,www.bar.com
More precisely, either CN or any of the Subject Alterative Names (SANs) in the certificate must be contained in the indicated list of accepted CNs.
http.ssl.enforce.host
Optional: allows to enforce a check of the hostname in the common name attribute of the server certificate. If this
property is set to "true", the hostname in the server certificate must be the same as the hostname of the current TCP
connection. Defaults to "false".
http.ssl.enforce.host=true
More precisely, either CN or any of the Subject Alterative Names (SANs) in the certificate must be equal to the hostname.
http.tls.versions
Optional: allows to define which TLS versions may be used for backend
connections. Defaults to "TLSv1.2".
http.tls.versions=TLSv1,TLSv1.2
Known / supported values for this property include
TLSv1.3, TLSv1.2, TLSv1.1 and TLSv1, but whether a protocol is available
is determined dynamically by trying to obtain an SSLContext.
Explicitly no longer supported is SSLv3 (or older), for security reasons and
also since recent Java versions no longer support it (for the same reason).
TLSv1.3 requires Java 8u261 or newer, but see
chapter "TLS/SSL (JSSE)" for more details
regarding TLSv1.3.
(Also affects the WS Adapter, there is currently no separate ws.* setting.)
http.tls.ciphers
Optional: allows to define which ciphers (cipher suites) may be used for backend connections. Defaults to no additional restriction to what the JDK supports and what is restricted in JDK settings. Allowed values are "JSSE Cipher Suite Names".
http.tls.ciphers=TLS_ECDHE_ECDSA_WITH_AES_256_GCM_SHA384, TLS_ECDHE_ECDSA_WITH_AES_128_GCM_SHA256, TLS_ECDHE_RSA_WITH_AES_256_GCM_SHA384, TLS_ECDHE_RSA_WITH_AES_128_GCM_SHA256
Note that it is only possible to reduce the set of ciphers that the JDK and its settings allow, but for security reasons not to add ciphers.
(Also affects the WS Adapter, there is currently no separate ws.* setting.)
http.<alias>.key.alias"
Optional: allows to define the alias of the key in the SLS keystore to be used in an SSL handshake that requires mutual authentication. NOTE: This is only necessary if the keystore of the SLS VM contains multiple private keys and certificates that are a match for the CAs requested by the server during the handshake. The Java SSL stack will automatically select the matching key, if there is only one that matches. However, if there are multiple matching keys, this property allows to make sure that the correct one is used.
http.auth.key.alias=slstechuser
http.dedicated.ssl.trustStore.allowSelfSigned
Optional and generally not recommended:
If set to true and a dedicated truststore is used via system property
javax.net.ssl.trustStore then HTTP adapter callouts will accept any
self-signed server certificate, i.e. trust it blindly. Even though this
may come in handy in test setups, also in that case self-signed certificates
should rather be added to the dedicated truststore; the setting exists mainly
for migration of previous installations. Default value of this configuration
property is false. If the property is set to true, a warning is logged at SLS
startup. Note also that this setting has no effect if no dedicated truststore
is indicated and thus the truststore of the JDK is used, i.e. then self-signed
certificates are not accepted (except, of course, if they are in the truststore).
# temporary hack http.dedicated.ssl.trustStore.allowSelfSigned=true
If the HTTP adapter should be used as an autentication adapter, it must be defined accordingly in the sls.properties file:
adapter.authentication=http
The following property allows to customize the default threshold for connection timeouts:
http.connection.timeout
Optional: Defines the number of seconds after which the call-out will be interrupted if no connection can be made / no data is received. Defaults to 60 (one minute) if not set. NOTE: A timeout can also be specified for each custom HTTP call. See "Setting custom timeouts" for details.
The following property allows to define the maximal number of connections to use:
http.connection.total.max
Optional: Defines the maximal number of connections to use in the connection manager pool. Defaults to 400 if not set.
The following property allows to define the maximal number of connections to use per route (host):
http.connection.perRoute.max
Optional: Defines the maximal number of connections to use in the connection manager pool per route (host). Defaults to 400 if not set.
The following property allows to define the default keepAlive in seconds:
http.connection.keepAlive.default
Optional: Defines the default keepAlive in seconds for keeping an idle connection open. Only has an effect if the server does not explicitly set keepAlive via response headers. Defaults to 60 seconds if not set.
Scripting is used to insert and access the request and response data. For example, in the case of an SMS delivery service
which requires a POST request which contains an XML structure with certain values in its body. In such a case, various
parts of the XML body would be user related attributes such as the telephone number, which might be available in an LDAP
attribute variable like "attribute.ldap.mobile".
state...name=do.http
state...property=sendsms
# Example XML structure encoded in one line
http.sendsms.body=<user phone="${ldap.attribute.mobile}">...</user>Instead of encoding a complex XML (or any other) POST data structure into one single property value, it may be easier to
put that data into a separate template text file which can then be used (see "Templates"
for details). Example for using the contents of a configured template file with the alias "sms":
# POST data taken from template file
http.sendsms.body=${function.getTemplateContent('sms')}For the authentication, we have to use scripting variables containing the user credentials, in order to use them as values for
HTTP parameters. The following example defines the HTTP request parameters "user" and "pwd", which contain the values
of the "username" and "password" credentials:
http.auth.variable.user=${session.getCred('username')}
http.auth.variable.pwd=${session.getCred('password')}The easiest way to automatically create script variables from XML or JSON HTTP
responses is to configure a script template following the convention to name it
template.file.http-response-<alias> and to make sure the file extension of the
template is either .xml or .json, for example:
template.file.http-response-myXmlHttpAction=myXmlTemplateFile.xml template.file.http-response-myJsonHttpAction=myJsonTemplateFile.json
If configured and the content-type header of the HTTP response contains
the corresponding string xml or json, the template is applied and variables
are created accordingly.
For more generic use cases using script functions, see the chapters "Updating variables from XML data with templates" and "Updating variables from JSON data with templates".
Some scripting variables are created by the HTTP adapter after a HTTP callout which provide information about the response (see "HTTP Adapter Variables" for details).
In order to use the HTTP adapter, some properties have to be defined in the
http-adapter.properties file.
Here a configuration sample for the HTTP-adapter used as an authentication adapter. For every property there is an example and its explanation below.
http.auth.url
For the authentication step ("do.auth"), this property is mandatory. It defines the HTTP URL of the service which verifies the user credentials. Example:
http.auth.url=http://localhost:8080/authenticator.jsp
Multiple URLs can be configured, separated by comma, for a simple round-robin failover (if the SLS cannot connect to the HTTP backend system, it will try the next one) or load-balancing.
This will enable simple failover by default. By adding the ".mode" property, failover with a primary, or load-balancing can be enabled:
http.auth.url=http://one/,http://two/,http://three/
The criterion for backend availability is: Could connect to the server and the server returned an HTTP response (with any status code, including 500). Note that query parameters ("?abc=def") are removed from the URL before making the callout when checking for backend availability.
It is possible to use JEXL/Groovy expressions, but only for individual urls in the list, not for the whole list.
The feature to have backend URLs evaluate to "off" described below is deprecated;
please use the generic mechanism using the dynamic property unavailable.backends
instead. That mechanism is supported for all backend types, not just for HTTP.
Expressions that evaluate to the string "off" when the adapter is loaded are skipped. This allows to configure failover hosts separately from various callouts. Example:
my.base.url.1=https://server1:33379/service/
my.base.url.2=https://server2:33379/service/
my.base.url.3=off
http.auth.url=${function.getConfigProperty('my.base.url.1')}, ${function.getConfigProperty('my.base.url.2')}, ${function.getConfigProperty('my.base.url.3')}}Example for enabling failover with a primary backend:
http.auth.url=http://www.acme.com/notify.do,http://www2.acme.com/notify.do http.auth.backendsMode=failoverWithPrimary
Or alternatively, enabling load-balancing instead of failover:
http.auth.url=http://www.acme.com/notify.do,http://www2.acme.com/notify.do http.auth.backendsMode=loadBalancing
The default backend mode is failover, simple round-robin failover.
Please see chapter "Load-Balancing / Failover" for details about failover and load-balancing.
See also the description of the monitoring or connection check URL setting below.
http.auth.method
Defines the HTTP method for the request. Must be one of the following values:
-
GET -
POST -
PUT -
PATCH -
DELETE
Example:
http.auth.method=POST
http.auth.code.error
Defines the HTTP response codes which indicate something went wrong while calling the HTTP authentication service. The HTTP adapter will consider it as a failed authentication, due to a technical problem on the HTTP server side. Example:
http.auth.code.error=500,503
http.auth.code.denied
The HTTP codes which indicate the HTTP server denied the access for the authenticating user. The HTTP adapter will consider it as a failed authentication, due to invalid user credentials. Example:
http.auth.code.denied=401,403
Either this property must be configured, or the regular expression which
defines a success response (http.auth.response.ok).
http.auth.response.ok
The pattern to be found in the HTTP response body in order to consider the
authentication as successful. The adapter will use the value of this property
as a regular expression which has to match with any part of the response body.
For example, if the HTTP server response body contains "The authentication was
OK", the value "OK" will lead to a successful authentication. Example:
http.auth.response.ok=OK
Note: The Java (JDK) regular expression mechanisms apply here. If a match should include preceding and following lines of HTML, including newline characters, these characters must be matched explicitly, as .* does not match \r (carriage return) or \n (newline). Example with "Login:" on one line and "OK" further below in a "<span>" html tag (note double escaped \\r and \\n - once for Java properties file, once for regex itself):
http.auth.response.ok=Login:(.|[\\r\\n])*<span>OK</span>
http.auth.header.ok.<name>
There is a third way to decide if a HTTP authentication was successfully or not: to check the headers of the HTTP response. We can determine the name and value of the header which define a successful authentication. By example:
http.auth.header.ok.userstate=granted
If the HTTP-Response contains a HTTP-Header named "user-state" with value "granted", the user is authenticated.
This property works only if the property http.auth.response.ok is not used,
since configuring both properties would cause a conflict. In case both
properties were configured, the property http.auth.response.ok would be checked
and the property http.auth.header would be ignored.
http.auth.credentials
The semantical types of the credentials that the HTTP adapter has to verify in order to consider the authentication as successful. If those credentials are not available, the HTTP adapter will fail the authentication with a corresponding error message about missing credentials (without performing a HTTP call at all). Example:
http.auth.credentials=username,password
For a list of all allowed, valid values, see "Semantic Types"
Also, all credentials listed in this property will be marked as verified after a successfull completion of the HTTP call.
http.<alias>.action.<no>
A list of JEXL/Groovy actions to perform after a successful HTTP call.
The actions will be performed in order of the <no> number assigned to them.
By default, the HTTP adapter (when used as authentication adapter) requires only the simplest login model:
model.login.uri=/auth model.login.failedState=get.usererror model.login.state.1.name=get.cred model.login.state.2.name=do.auth model.login.state.3.name=do.success
model.login.state.5.name=get.usererror
http.auth.variable.<name>
Defines a parameter for the HTTP request. The <name> part of the property name defines the name of the HTTP parameter. Example:
http.auth.variable.user=${session.getCred('username')}
http.auth.variable.pwd=${session.getCred('password')}This example defines two request parameters, named "user" and "pwd",
containing the values of the session credentials of type "username" and
"password".
Backend groups can be selected dynamically at authentication,
in the example based on the Host header of an incoming HTTP request to the SLS.
Properties for HTTP URLs (backends):
# Default HTTP URL http.url=http://192.168.10.15:80,http://192.168.10.16:80 # Acme HTTP URL http.acme.url=http://172.17.10.1:80,http://172.17.10.2:80
Login Model:
model.login.state.1000.name=do.generic-selectBackend
# use Acme HTTP backends instead of default for all users from virtual host "something.com"
model.login.state.1000.action.1=#{setVar('backendToUse', '')}
model.login.state.1000.action.2=#{setVar('backendToUse', 'acme')}
model.login.state.1000.action.2.if.1=#{var('header.host') == 'something.com'}
model.login.state.2000.name=do.auth
model.login.state.2000.property=#{backendToUse}The SLS has the capability to perform connection monitoring as explained in chapter "Connection monitoring"
In case of the HTTP adapter, the actual backend URLs can sometimes contain dynamic parts like scripting variables, used in URL query parameters; since those variables only contain meaningful or valid values in the context of a login session, they can be a problem when used by the background monitoring process. For this reason, it is possible to configure separate URLs for backend monitoring for the HTTP adapter.
See also the properties http.auth.url and the property immediately below.
http.auth.connectionCheckUrl
Property specifying the back-end URLs to use for monitoring. The format is the
same as for http.auth.url. This setting overrides the http.auth.url for
back-end monitoring purposes.
Note that the URLs in this property correspond to those in http.auth.url: The
list of auth URLs and connection check URLs must be of the same length, and must
have the same URLs active or "off". For each auth URL the corresponding
connection check URL is found at the corresponding position in the list.
The main use case for defining dedicated connection check URLs is when a URL used for HTTP authentication contains variable parts, and cannot be used for the simple monitoring requests as is. Example:
monitor.check.interval=90
http.auth.url=https://auth.acme.com/B2B/Clients/${client_id}/${client_locale}
http.auth.connectionCheckUrl=https://auth.acme.com/B2B/ClientsIn this example, the URL
https://auth.acme.com/B2B/Clients/${client_id}/${client_locale} can not be
used directly since it contains JEXL expressions (${}). The custom
http.auth.connectionCheckUrl makes it possible to do back-end monitoring.
If connection monitoring is active and http.auth.connectionCheckUrl is not
defined, the URLs in http.auth.url will be used for monitoring.
As with the other HTTP adapter configuration properties, the connection check URL feature is also available when performing monitoring with Custom HTTP Actions.
It is possible to define global proxy settings that will then be used by all HTTP adapter calls. In addition, for each custom HTTP operation, separate proxy settings can be defined.
The following optional properties can be used to have the HTTP adapter send all its requests through an HTTP forward proxy server.
http.proxy.host
Optional: Defines the hostname of a HTTP proxy server which should be used for all HTTP calls. Example:
http.proxy.host=172.17.3.10
http.proxy.port
Defines the listener port of a HTTP proxy server which should be used for all
HTTP calls. NOTE: This property becomes mandatory once the property
"http.proxy.host" has been set. Example:
http.proxy.port=3128
Sometimes, the proxy server requires authentication; this has nothing to do with authenticating the end-user. It is a "technical" authentication of the SLS itself towards the proxy server. There are basically two ways to configure this, either directly with the following properties, or by configuring an authentication realm and referencing it (same as how authentication can be configured for the HTTP calls towards the HTTP backend).
Option 1: Properties
http.proxy.auth.password
Optional: Defines the password to use to authenticate against the proxy.
http.proxy.auth.username
Optional: Defines the username to use to authenticate against the proxy.
http.proxy.auth.type
Optional: Defines the type of authentication to perform. Must be one of the
values basic (Basic Auth), ntlm or spnego (Kerberos over HTTP).
http.proxy.auth.domain
Optional: Defines the authentication realm to use (e.g. the basic auth realm).
A complete example for authenticating at the proxy using NTLM:
http.proxy.auth.username=slsuser http.proxy.auth.password=slspwd http.proxy.auth.type=ntlm http.proxy.auth.domain=ACME
Option 2: Authentication Realm
See chapter ""Authentication Realms" for more general details on the subject.
http.proxy.realm
Optional: Defines the authentication realm configuration settings to use for the authentication against the proxy (see "Authentication Realms" for details). Set the alias (ID) of the authentication realm property group to be used. Example:
http.proxy.realm=_ntlmlogin_
The following optional properties can be used to have the HTTP adapter use a certain proxy for one specific custom HTTP action. The property names are almost the same as for the global property settings, only with the additional custom action alias included. Here is a complete example of a custom HTTP call with specific proxy settings only for this call:
http.sendsms.url=https://www.smsprovider.com http.sendsms.method=post http.sendsms.header.Content-Type=text/xml http.sendsms.header.host=www.smsprovider.com http.sendsms.body=...some custom body data... http.sendsms.proxy.host=192.168.10.15 http.sendsms.proxy.port=3128 http.sendsms.proxy.realm=simpleauth
The HTTP adapter supports authentication against the target HTTP service, and / or a proxy server. This has nothing to do with authenticating the end-user; it is all about the SLS identifying itself towards the backend service, usually with a technical user account.
The authentication information must be configured in property groups, each group defining one authentication realm, for example:
http.realm.1.id=simpleauth http.realm.1.type=basic http.realm.1.basicRealm=Sample App http.realm.1.username=techuser http.realm.1.password=abcd1234
This example configures an authentication of type "basic" (Basic Authentication), for a Basic-Authentication-Realm
"SampleApp", with the username "techuser" and the password "abcd1234". This configuration property group can then
be referenced by its alias / ID "simpleauth", either in the proxy configuration or a custom HTTP action:
http.auth.url=https://www.auth.com
http.auth.code.error=500,503
http.auth.code.denied=401,403
http.auth.response.ok=<span>OK</span>
http.auth.method=post
http.auth.variable.username=${session.getCred('username')}
http.auth.variable.password=${session.getCred('password')}
http.auth.realm=simpleauthor
http.proxy.host=127.0.0.1 http.proxy.port=3128 http.proxy.realm=simpleauth
This allows to configure the authentication type and credentials only once for multiple HTTP operations and / or proxy settings. The details of the authentication realms properties are explained in the following paragraphs.
A group of authentication realm properties always follows this naming scheme:
http.realm.<no>.id=<alias> http.realm.<no>.type=basic | ntlm | spnego http.realm.<no>.basicRealm=<realm> http.realm.<no>.ntlmDomain=<domain> http.realm.<no>.username=<username> http.realm.<no>.password=<password>
http.realm.<no>.id
Defines the alias (ID) of this group of properties. This alias is used to refer to these settings from other parts in the configuration (see examples in previous paragraphs). Example:
http.realm.1.id=ntlmlogin
http.realm.<no>.type
Defines the type of authentication to perform. Supported types are:
-
basic- Simple HTTP basic authentication -
ntlm- NTLM authentication -
spnego- Kerberos over HTTP authentication
http.realm.<no>.basicRealm
Optional: Is required only if "type" has been set to "basic". Defines the name of the basic authentication realm
of the target webserver for which the configured credentials are to be used.
http.realm.<no>.ntlmDomain
Optional: Is required only if "type" has been set to "ntlm". Defines the Windows domain for which the configured
credentials are valid.
http.realm.<no>.username
Optional: Is required only if "type" has been set to "basic" or "ntlm". Defines the username credential for the
login. For type "spnego", the credentials are configured in a separate JAAS configuration file
(see "SPNEGO backend authentication" for details).
http.realm.<no>.password
Optional: Is required only if "type" has been set to "basic" or "ntlm". Defines the password credential for the
login. For type "spnego", a Kerberos keytab file must be used instead (see
"SPNEGO backend authentication" for details).
The SLS HTTP adapter uses the "Apache HttpClient 4.x" library for all its HTTP functionality. That library, in turn, uses the SPNEGO functionality of the underlying Java VM to perform SPNEGO authentication. Therefore, in case that there are problems related to Java SPNEGO, please refer to either Oracle's Java SPNEGO documentation, or the Apache HttpClient documentation:
http://hc.apache.org/httpcomponents-client-ga/tutorial/html/authentication.html http://docs.oracle.com/javase/6/docs/technotes/guides/security/jgss/lab/part5.html
In order to perform SPNEGO authentication towards the backend or proxy server, the "type" must be set to "spnego"
and some additional configuration files are needed:
- keytab - A Kerberos keytab file with the key (password) of the authentication principal.
-
krb5.conf- The Kerberos configuration, containing necessary information about the DNS domains, realms, KDC addresses etc. Please refer to general Kerberos documentation for in-depth information about this file. A simple example has been added here below. -
login.conf- These are the settings required by the JAAS API employed by the Java SPNEGO implementation during the authentication process. It defines the Kerberos principal name and keytab file location.
To enable Kerberos debug output, the following system property must be set (either as a JVM startup argument, or as a property in one of the SLS properties files):
sun.security.krb5.debug
Optional: Set to "true" to enable Kerberos debug output in the standard output logfile ("catalina.out"):
sun.security.krb5.debug=true
Also, to get maximum debug output, each module defined in the "login.conf" file can get a debug option as well, e.g:
com… …module.Krb5LoginModule required debug=true
java.security.krb5.conf
Defines the path of the Kerberos configuration file, e.g.:
java.security.krb5.conf=/opt/usp/sls/prod/webapps/sls/WEB-INF/krb5.conf
This file must be provided by the Kerberos / KDC administrator(s). It configures the Kerberos realm, the mapping of DNS names to Kerberos realms, the address of the KDC etc. Example:
[libdefaults]
default_realm = ACME.COM
kdc_timesync = 60
forwardable = true
allow_weak_crypto = true
udp_preference_limit = 1
[realms]
ACME.COM = {
kdc = 172.17.3.35:88
}
[domain_realms]
slskerberos = ACME.COM
.ourapp.acme.com = ACME.COM
ourapp.acme.com = ACME.COMThis is NOT an SLS specific configuration file; please refer to standard Kerberos documentation for in-depth information about the syntax and contents of this file.
====== TCP vs UDP
UDP is limited in size (plus less certain that data arrives),
so in some situations TCP has to be used.
The line udp_preference_limit = 1 above effectively forces that TCP will be used
and UDP not tried (maximal size of UDP packet 1 byte).
Java SE documentation says:
When sending a message to the KDC, the Java SE Kerberos library will use TCP if the size of the message is above udp_preference_list. If the message is smaller than udp_preference_list, then UDP will be tried at most three times. If the KDC indicates that the request is too big, the Java SE Kerberos library will use TCP.
This configuration file is required by the JAAS API, used by the Java GSS API. To define the location of the
"login.conf" file, set this property (in the "http-adapter.properties" file:
java.security.auth.login.config
Defines the path of the JAAS login configuration file, e.g.:
java.security.auth.login.config = /opt/usp/sls/prod/webapps/sls/WEB-INF/login.conf
The "login.conf" file must define the Kerberos principal name and the path of the keytab file to use for the
authentication. Example:
com.sun.security.jgss.login {
com.sun.security.auth.module.Krb5LoginModule required
client=TRUE
useTicketCache=true;
};
com.sun.security.jgss.initiate {
com.sun.security.auth.module.Krb5LoginModule required
client=TRUE
useTicketCache=true
storeKey=true
useKeyTab=true
principal="<principal>"
keyTab="<absolute path of keytab file>";
};
com.sun.security.jgss.accept {
com.sun.security.auth.module.Krb5LoginModule required
client=TRUE
useTicketCache=true;
};The HTTP adapter also allows to send custom HTTP requests for any purpose
(besides authentication) at any time from within the model, using the
"do.http" state.
For each such custom HTTP call, a set of properties must be defined. These are
exactly the same properties as for the authentication part. The only
difference is that the ".auth." part of the property name is instead some
alias which is then used in the model to reference these properties. For
example, the following group of properties (stored in the file
"http-adapter.properties") are grouped with the alias "notify":
http.notify.url=http://www.acme.com/notify.do http.notify.method=POST http.notify.body.one=ParameterOne http.notify.body.two=ParameterTwo http.notify.code.error=500,501 http.notify.response.ok=<span>OK</span>
In the model, the following state would then perform the HTTP call defined by these properties:
model.login.state.50.name=do.http model.login.state.50.property=notify
or, alternatively
model.login.state.50.name=do.http model.login.state.50.param.alias=notify
NOTE: There are very minor differences between custom HTTP calls performed
with "do.http" and a custom alias, or the call performed during "do.auth"
with the ".auth." alias:
-
In the
"do.auth"state, the alias is optional. If none is provided in the model state (e.g."property=somethign", it will automatically fall back on the default alias"auth"and use the corresponding properties. -
The HTTP call property
".credentials"is mandatory during a"do.auth"model state execution, but optional in a"do.http"state. But IF it is used in a"do.http"call, that call will mark the specified credentials as verified upon successful completion of the HTTP call, which means this will basically be an authentication step similar to the one performed in"do.auth".
IMPORTANT NOTE
The alias part of the property name MUST NOT CONTAIN DOTS! For example, a property like "http.notify.me.url" is not allowed, because it leads to problems for the SLS to properly recognize which part is the alias. The correct name would be "http.notify-me.url" instead!
It is also possible to use a ".property" for a HTTP call in a "do.auth*"-state. In this case, the HTTP adapter will use the corresponding properties of the custom action, if - and only if - such properties exist. For example, if the model states are configured like this:
model.login.state.1000.name=do.auth model.login.state.1000.property=myapp
then the HTTP adapter will use the properties with the prefix "http.myapp." instead of "http.auth.", as far as they are available, e.g.
# Use "http.myapp.url" instead of "http.auth.url" http.myapp.url=http://backend.acme.com/myapp # Use "http.myapp.credentials" instead of "http.auth.credentials" http.myapp.credentials=username,password # etc.
Just as with the "http.auth.url" property, multiple URLs can be configured, separated by comma, for a simple round-robin failover (if the SLS cannot connect to the HTTP backend system, it will try the next one):
http.notify.url=http://one.com,http://two.com
To specify a particular timeout value for a custom HTTP call, set the property like this:
http.<alias>.connection.timeout=<number of seconds>
Sets the timeout for this connection to the given number of seconds, overriding the global default timeout value. Example:
http.notify.connection.timeout=10
The HTTP-adapter also offers the possibility to set custom headers which will be part of the HTTP request. The configuration property for defining a custom request header looks like this:
http.<alias>.header.<header-name>
The <header-name> part of the property name defines the name of the actual
request header. Example:
http.notify.header.myHeaderName=myHeaderValue
This would add the following HTTP header to the call:
myHeaderName: myHeaderValue
The following example shows a setup for sending HTTP requests to an SMS sending service.
http.sendsms.url=http://www.smsprovider.com/send.asp
The URL of the HTTP service of the SMS provider.
http.sendsms.method=post
The HTTP method, which has to be GET or POST.
http.sendsms.code.error=500,503
Defines the HTTP response codes which indicate that something went wrong during the HTTP call.
http.sendsms.body=phone=079123123&msg=hello
The HTTP request body. In this case, the body is configured as an unique parameter. Another option would be to configure key-value pairs as body of the request:
http.sendsms.body.key1=value1 http.sendsms.body.key2=value2
The default Content-Type header is "text/plain; charset=UTF-8" if a single body is defined and "application/x-www-form-urlencoded" if individual parameters are indicated.
Alternatively, instead of encoding a complex XML (or any other) POST data
structure into property values, it may be easier to put that data into a
separate template text file which can then be used (see
"Templates" for details).
Example for using the contents of a
configured template file with the alias "sms":
# POST data taken from template file
http.sendsms.body=${function.getTemplateContent('sms')}If the custom HTTP call is supposed to perform an operation that is really considered to be an authentication check, such as verifying a credential, a property with the suffix ".response.ok" can be configured with a regex which is used to match the response content against. If the regex matches, the response is OK; if it doesn’t, an authentication error occurs:
# Check response body content http.sendsms.response.ok=<span>OK</span>
The Web Service (WS) adapter is a general adapter for making HTTP Web Service (WS) callouts from the SLS. Currently, it supports XML-based Web Services in a generic way, with additional support specifically for SOAP-based Web Services.
The WS adapter extends the HTTP adapter, which allows to inherit features like failover / load-balancing or proxies and more from the HTTP adapter.
Web Service requests and responses are generically configured via XML template files, which - for SOAP-based Web Services - can be prepared using the WSDL tool, a simple Java command line tool, which parses a WSDL and creates base material for the XML templates and adapter configuration properties.
- The WS adapter supports HTTP POST callouts with essentially the same features as the HTTP adapter (failover, load-balancing, authentication (to the backend), SSL including custom hostname verifiers, HTTP Proxies).
- The request body can be freely configured using template files and JEXL/Groovy variables and expressions embedded within.
The response can be mapped in various ways to JEXL/Groovy variables, as well as to different reactions, as follows.
- Placeholders in a response template file or explicit configurations by XPath expressions allow to extract variables of different types from the response. Variables can be of type string, number, float or node (for XML node objects), or lists of these basic types.
- HTTP status codes can be mapped to errors and warnings, as in the HTTP adapter.
- SOAP (1.1/1.2) fault messages are recognized and the fault code value can be mapped to configurable actions: ignore (debug log), warn, error. In case of error, the fault code can be mapped to either a technical error, a user error or an authentication error.
-
A SLS session object can be created for using with the
<sls:selection>JSP tag and - after the user posted the selection - via thedo.selectaction to automatically create a JEXL/Groovy variable containing an XML subnode corresponding to the selected part of the WS response for further processing. - A list of JEXL/Groovy commands can be run automatically after a successful call for further generic processing.
The WS adapter is able to perform arbitrary HTTP calls to any server. However, be sure to allow the connection through the specified protocol and port. Both HTTP and HTTPS are usually allowed protocols into a corporate network. In the same way, the standard ports 80 and 443 are usually open to send requests through them. But if you want to send calls through non-standard ports, you have to be sure that you are allowed to.
The WS adapter is configured through a Java properties file, usually named "ws-adapter.properties" that must be
installed in the "WEB-INF" directory of the SLS web application.
Many settings are inhertited from the HTTP adapter, simply use ws.* instead of http.\* to configure these settings.
The following property allows to customize the default threshold for connection timeouts:
ws.connection.timeout
Optional: Defines the number of seconds after which the call-out will be interrupted if no connection can be made / no data is received. Defaults to 60 (one minute) if not set. NOTE: A timeout can also be specified for each custom HTTP call. See "Setting custom timeouts" for details.
The following property allows to define the maximal number of connections to use:
ws.connection.total.max
Optional: Defines the maximal number of connections to use in the connection manager pool. Defaults to 400 if not set.
The following property allows to define the maximal number of connections to use per route (host):
ws.connection.perRoute.max
Optional: Defines the maximal number of connections to use in the connection manager pool per route (host). Defaults to 400 if not set.
The following property allows to define the default keepAlive in seconds:
ws.connection.keepAlive.default
Optional: Defines the default keepAlive in seconds for keeping an idle connection open. Only has an effect if the server does not explicitly set keepAlive via response headers. Defaults to 60 seconds if not set.
HTTPS / SSL can be configured in almost the same way as for the HTTP adapter (see "HTTPS / SSL" for details). The only difference is that all the configuration properties must be prefixed with "ws." instead of "http.", like this:
ws.ssl.accepted.cns
It is possible to define global proxy settings that will then be used by all WS adapter calls. In addition, for each custom webservice operation, separate proxy settings can be defined.
WS proxy support can be configured in almost the same way as for the HTTP adapter (see "Proxy Support" for details). The only difference is that all the configuration properties must be prefixed with "ws." instead of "http.", like this:
ws.proxy.host
instead of
http.proxy.host
The following optional properties can be used to have the Webservice adapter use a certain proxy for one specific custom webservice action. The property names are almost the same as for the global property settings, only with the additional custom action alias included. Here is a complete example of a custom webservice call with specific proxy settings only for this call:
ws.restcall.proxy.host=192.168.10.15 ws.restcall.proxy.port=3128 ws.restcall.proxy.realm=simpleauth
Authentication realms (used for authenticating proxies or authenticating backends) can be configured in almost the same way as for the HTTP adapter (see "Authentication Realms" for details). The only difference is that all the configuration properties must be prefixed with "ws." instead of "http.", like this:
ws.realm.1.id=simpleauth ws.realm.1.type=basic ws.realm.1.basicRealm=Sample App ws.realm.1.username=techuser ws.realm.1.password=abcd1234
Then reference this realm with the ID "simpleauth" as you would do with the HTTP adapter; for example, to use it for a proxy, configure
ws.proxy.realm=simpleauth
ws.wscalls.directory
Defines the directory that contains the XML templates, either an absolute path or relative to the web application. Example:
ws.wscalls.directory=WEB-INF/ws-calls
The directory must have the following structure:
<ws-calls>/
request-templates/
- <ws-call-1-alias>.xml
- <ws-call-2-alias>.xml
- …
response-templates/
- <ws-call-1-alias>.xml
- <ws-call-2-alias>.xml
- …
The WS call alias is used in various configuration properties to configure the WS callout and how to handle the response, and it is also the name of the XML template files (without extension).
Aliases generated by the WSDL tool are usually of the form
<wsdl-file-name>_<operation-name>_soap<soap-version>
where camel case names are converted to lower-case plus underscores, for example for the operation getABCDById from
the WSDL GenericABCD the generated alias would be:
generic_abcd_get_abcd_by_id_soap11
The format is the same as in normal templates in the SLS, i.e. plain text plus JEXL/Groovy expressions in ${…} resp.
#{…}. The file is read assuming UTF-8 encoding, then expressions are evaluated and the resulting string is sent as
the request body.
Very simple sample request template (not SOAP):
<custom>
<method>getSelection</method>
<param name="userid">
${session.getCred('username')}
</param>
</custom>Here is a very simple sample response template (not SOAP):
<select> <id>@list_string:selectId@</id> <text>@list_string:selectText@</text> <node>@list_node:selectNode@</node> </select>
Strings between @…@ are interpreted as <variable-type>:<variable-name>.
The following variable data types are supported:
-
string: A text string, e.g. "hello" (Java.lang.String) -
number: An integer number, e.g. -15 (Java.lang.Integer) -
float: A floating point number, e.g. 0.234 (Java.lang.Double) -
node: An XML node object (org.w3c.dom.Node) -
list_string: A list of strings (List<String>) -
list_number: A list of numbers -
list_float: A list of floating point numbers -
list_node: A list of nodes
Technically, the placeholders are mapped to rules for mapping an XML XPath to a variable. For example, the first
placeholder above implicitly defines a rule that maps the XPath /select/id to a variable selectId, which is a list
of strings.
The following response body would result in a variable selectId which contains three items, the numbers 1 to 3 as strings.
<select>
<id>1</id>
<text>Application A</text>
<node>
<sub>
<key>12345</key>
</sub>
</node>
<id>2</id>
<text>Application B</text>
<node>
<sub>
<key>998877</key>
</sub>
</node>
<id>3</id>
<text>Application C</text>
<node>
<sub>
<key>55555</key>
</sub>
</node>
</select>In case where a node contains subnodes that are to be mapped to variables, the node itself can be mapped itself to a variable with the special attribute "slsvariable":
<select slsvariable="node:mySelection> <id>@list_string:selectId@</id> <text>@list_string:selectText@</text> <node>@list_node:selectNode@</node> </select>
For the sample response body further above, a variable with name "mySelection" of type "node" would have been created with a value that is the <select> node, i.e. the node for the complete xml response.
ws.<alias>.var.<type>.<name>
For cases where it is not possible or not desired to define the rules with placeholders, rules for mapping an XPath to a variable can also be indicated explicitly. The value of the property is the XPath. Example:
ws.sample_alias.var.list_string.selectId=/select/id
Rules are read and processed from configuration at SLS startup. If errors occur, they are logged, but reading of rules normally proceeds until all rules have been processed. Only then the SLS stops if errors occurred, in order to make it easier to maintain the rules.
Common misconfigurations in rules are:
- Illegal variable type (e.g. list_sting)
- Two rules for the same XPath (if same alias)
- Two rules for the same variable name (if same alias)
By default, when a "string" variable has been configured for a certain XML node in the SOAP response, the SLS will create or update that variable if the given node exists, even if the node’s value is empty. In some use-cases, it makes sense that variables in the session should only be updated if the XML node actually had a value. For this case, the following configuration property can be set:
xpath.ignore.empty.nodes=true
It defaults to false if not set. If set to true, XML response nodes with empty
values will be ignored, and not update the corresponding JEXL/Groovy variables.
Besides the template directory, only two properties are mandatory to use the WS adapter with the do.wscall action:
ws.<alias>.url
The URL for the callout, see HTTP adapter
ws.<alias>.backendsMode
Allows to configure which mode of backend-handling to use (simple failover, failover with a primary system or load-balancing).
The criterion for backend availability is the same as for the HTTP adapter: Could connect to the server and the server returned an HTTP response (with any status code, including 500). Note that query parameters ("?abc=def") are removed from the URL before making the callout when checking for backend availability.
Please see chapter "Load-Balancing / Failover" for details about failover and load-balancing.
ws.<alias>.code.error
The HTTP status codes to treat as an error, see HTTP adapter
To specify a particular timeout value for a webservice call, set the property like this:
ws.<alias>.connection.timeout=<number of seconds>
Sets the timeout for this connection to the given number of seconds, overriding the global default timeout value. Example:
ws.sample_alias.connection.timeout=10
ws.<alias>.header.<name>
Additional request headers can optionally be set, see HTTP adapter.
SOAP 1.1 example:
ws.sample_alias.header.Content-Type=text/xml;charset=UTF-8 ws.sample_alias.header.SOAPAction=http://acme.org/Xyz
SOAP 1.2 example (with action):
ws.sample_alias.header.Content-Type=application/soap-xml;charset=UTF-8 ws.sample_alias.header.action=http://acme.org/Xyz
The do.wscall action has a single mandatory property (resp. parameter with name "alias"), namely the alias of the WS
call. Example:
model.login.state.3.name=do.wscall model.login.state.3.property=sample_alias
The callout is processed roughly as follows:
- Read request template and evaluate expressions
- Make HTTP callout
Create the following JEXL/Groovy variables:
-
ws.request: The HTTP request body as a string. -
ws.response: The HTTP response body as astring. -
ws.response.headers: Map of HTTP response headers, where the map key is the header name, converted to lower-case and - converted to _, e.g. Content-type becomes content_type. -
ws.response.statuscode: HTTP response status code. -
ws.soap.fault.value: The SOAP fault code value, if any.
-
- Process SOAP fault, if any (processing may end here).
- Process HTTP status code (processing may end here).
- Process rules, i.e. get data via XPath expressions from the response and create the respective variables.
- Process configured actions, if any are configured.
-
Create session variables for the
<sls:selection>JSP tag, if any are configured.
ws.<alias>.action.<no>
A list of JEXL/Groovy actions to perform after a successful WS call. The actions will be performed in order of the
<no> number assigned to them.
The fault code value of a SOAP fault can be detected automatically and depending on the fault, different reactions can be configured. The XPaths to extract the fault code value are as follows, for SOAP 1.1 resp. SOAP 1.2:
/Envelope/Body/Fault/faultcode /Envelope/Body/Fault/Code/Value
The default behaviour for faults is to log a warning.
ws.fault.default
With this setting, the default behaviour for all aliases can be changed. Possible values are ignore (debug log entry),
warn and error.
ws.<alias>.fault.default
With this setting, the default behaviour can be overridden for the given alias. Same possible values as above.
ws.<alias>.techFaults
ws.<alias>.userFaults
ws.<alias>.authFaults
In the case where error is configured, specific fault code values can be mapped to different types of errors, namely
technical error (SLSException), user error (UserException) and authentication error (AuthenticationException). The
default is a technical error.
For each setting, a comma separated list of fault code values can be given. Example:
ws.sample_alias.userFaults=xy:IllegalUserName,xy:NoPassword
To simplify user selections from a list of options returned by a Web Service, there are configuration properties that
allow to easily create the necessary data to use the <sls:selection> JSP tag, plus a new action do.select to process
the user selection.
ws.<alias>.select.session.<key>.id
ws.<alias>.select.session.<key>.text
ws.<alias>.select.session.<key>.node
These three settings define the data for the selection:
-
id: Alist_stringof IDs; an item from this list will be the posted selection. This setting is optional, if not present, IDs 0, 1, 2, and so on will be posted. -
text: Alist_stringof texts; this is what that the user will see in the selection. -
node: Alist_nodeof XML node objects; the selected node will be available after thedo.selectaction.
The values of these settings must be the name of a variable created by a mapping rule, either from template or explicit rule setting.
Example properties:
ws.sample_alias.select.session.selectlist.id=selectId ws.sample_alias.select.session.selectlist.text=selectText ws.sample_alias.select.session.selectlist.node=selectNode
unless you want to determine the variable name dynamically.
Example XML response template:
<select> <id>@list_string:selectId@</id> <text>@list_string:selectText@</text> <node>@list_node:selectNode@</node> </select>
The <sls:selection> JSP tag must then simply refer to the key. (Technically, the three properties cause an object to
be stored in the SLS session under the configured key, which the tag then uses.)
Example usage of the JSP tag:
<sls:selection name="selection" listKey="session.selectlist" type="list"> </sls:selection>
The next model step after showing the JSP is then normally the do.select action. It has two mandatory parameters:
-
id: The value given in the name attribute of the JSP tag, i.e. the name of the posted parameter. -
listkey: The list key.
Example:
model.login.state.5.name=do.select model.login.state.5.param.id=select model.login.state.5.param.listkey=session.selectlist
The result of the selection is stored in a JEXL variable called selection which is a map which contains the following
fields:
XML Namespace Issues
-
id: The id, i.e. the posted parameter value. -
text: The text that the user selected. -
node: The XML node object (org.w3c.dom.Node); this is the raw data, but relatively cumbersome to use - usually it is much easier to use thegpathfield instead. -
xml: The node object in text form, complete with XML declaration<?xml …?>and Namespaces. Theoretically, this field can be null if creating the text from the node object failed, but in practice this should normally not be the case. Note that the text can span multiple lines, depending on the contents of the node object. -
gpath: The node object in form of a GroovyGPathResultobject, which allows to handle the node very easily in Groovy expressions and scripts. Theoretically this field can be null, if creating the object failed, but in practice this should normally not be the case.
Example usage in Groovy:
#{function.setVariable(\'key\', selection.gpath.sub.key.text())}This gets the tag <sub> of the selection node, then its subtag <key> and finally the text value of that <key> tag.
An XML document in text form can be parsed into a Groovy GPathResult as follows:
#{def gpath = new XmlSlurper().parseText(text)}For example, you could use the whole WS response or use the JEXL function nodeToXmlString() to process a node variable from a rule:
def gpath1 = new XmlSlurper().
parseText(var('ws.response'))
def gpath2 = new XmlSlurper().
parseText(function.nodeToXmlString(someNode))See e.g. here for some more advanced uses of GPathResult:
http://groovy.codehaus.org/Reading+XML+using+Groovy%27s+XmlSlurper
Sometimes, the XML response template generated by the WSDL tool may contain different namespace prefixes than the actual SOAP response sent back from the web service (depending on what kind of framework was used to implement the web service).
In a case like that, the XPath handler in the SLS will fail with an exception which indicates that the XPath expression (generated based on the local response template) contained prefixes for which there were no namespace definitions in the SOAP response. There are two ways to address this issue:
If the SOAP response really contains XML nodes of the same name, for which a namespace prefix MUST be used in order to correctly match them, then there is no other way than to adapt the local template to the SOAP response. i.E., changing the namespace prefixes in the response template until they match the responses from the server.
In most cases, the easiest way is to simply disable namespaces in the SLS Web Service Adapter, by setting this configuration property:
ws.adapter.ignore.namespaces
Optional: If set to "true", all namespace definitions and prefixes are removed from the XPath expression which the
SLS generates based on the local response templates, as well as from the SOAP response before processing it. That way,
most namespace conflict issue can easily be eliminated. Defaults to "false".
It is possible to enable logging of the entire response body on log level "ERROR" if the response contained a SOAP fault (which basically resembles a technical error in the SOAP backend):
ws.soap.fault.log
Optional: If set to "true", the SOAP response body will be logged on level
"ERROR" if the response contained a SOAP fault (defaults to "false").
ws.soap.fault.log.filter
Optional: If the property ws.soap.fault.log is set to true, this additional
property allows to define a comma-separated list of values that should be filtered
from the log output, in the same way the value of the password credential is usually
filtered from the SLS log output. For example, if the request template contained
a JEXL variable userAccountNumber which contains a sensitive account number, the
property would need to be set like this:
ws.soap.fault.log.filter=#{userAccountNumber}The log mechanism will then evaluate this variable immediately before logging the request and response body, and hide every occurence of the resulting value found in either one (the values will be replaced with a string "[hidden]").
Multiple values can be defined separated by comma, e.g.
ws.soap.fault.log.filter=#{userAccountNumber},#{userSocialSecurityNumber}This LDAP adapter may be used within the Secure Login Service Framework. It allows to perform authentication, mapping and password change using an LDAP back-end server.
The LDAP-adapter supports two different types of authentication "bind authentication" and "Comparison authentication".
This option uses the credentials (ID and password) provided by the user in the login page to bind to the LDAP directory server. This is the most basic and simple way of authenticating a user. Optionally, an additional search can be performed after the bind in order to make sure that the user also exists in a certain directory tree. This allows to generally restrict access to a group of people.
This type of authentication is used often, for example, with a Microsoft Active Directory, where this authentication uses the user's credentials to authenticate against a Windows domain controller.
In this case, the bind to the directory is performed with a technical user. The login name provided by the user in the login page is used to look up a user object based on a configurable base DN, and then the provided login password is compared with the value of an attribute of the user object.
The password value may either be an MD5 or SHA1 hash, or a plain text password.
NOTE: This way of performing a password change is very unusual and not the common way to go. It is more of an additional option for the rare case that the actual authentication-functionality of the LDAP back-end system cannot be used for whatever reason.
The user password can be changed using the LDAP adapter my modifying the user
password attribute. If only default values are used, the configuration is
extremely simple. All that is really needed is an LDAP lookup operation first -
such as an authentication step - and then the "do.changepassword" step can be
performed in the model to change the password, if the LDAP adapter is set as the
password change adapter.
See "Password Change" for details on how to configure the password change step.
Mapping can be achieved with a "do.mapping" step in the model and the LDAP adapter. All it basically does is perform an additional lookup which also creates an additional JEXL variable that can be used, for example, as the user ID in a login ticket.
See "Mapping" for details on how to configure the mapping step.
An LDAP search result may sometimes (depending on the LDAP service and configuration) contain not only LDAP objects, but also referrals, which are basically pointers to other objects. By default, these referrals are not supported by the SLS and will be ignored in a search result. The SLS will log a warning message when it encounters referrals in a search result, but not follow them.
It is possible to attempt to change the behavior of the JNDI API in the Java VM by setting the following configuration property:
ldap.referral
This property can have 3 possible, supported values:
-
ignore: With this setting, if the search result contains referrals, the search will abort immediately, only logging a warning, but not returning any results (default). -
throw: Any referrals in a search result will be ignored at first, until the search results are processed, and then an exception will be thrown. -
follow: Finally, with this value, the referrals may be resolved, but that depends on the JNDI internals and the behavior of the LDAP backend. In case that it works, it may have a potentially big negative impact on the performance though, so using this is not recommended.
Example:
ldap.referral=follow
It is generally advised to not set this property unless there is a good reason to do so. There are other ways to get around problems with referrals in search results, as outlined below.
With Microsoft Active Directory servers, the behavior in regards to referrals is usually depending on the port that is being used. On the standard LDAP ports (389, 636) the result may contain referrals. If the special, designated ports 3268 (plain) or 3269 (SSL) are used, no referrals will be returned at all.
In other words, if problems occur caused by referrals detected in LDAP search results, just switch the port either from 389 to 3268, or from 636 to 3269, to fix the issue.
It is also possible to perform custom LDAP operations at any point of a login model, where a number of searches, attribute updates / removals / inserts etc. can be performed at any such point.
The LDAP adapter is configured through a Java properties file, usually named "ldap-adapter.properties" that must be installed in the "WEB-INF" directory of the SLS web application.
For reasons of backwards compatibility, the LDAP adapter does not perform any kind of escaping of characters in the configured DN and filter strings. Blocking "evil" characters can be achieved (and often is) through proper filtering in the HSP and / or SLS parameter checker. However, the following property enables escaping of a number of special characters in the dynamic parts of configured LDAP search filters:
ldap.enable.escaping
Optional: Set this to "true" to enable automatic escaping of illegal characters in LDAP search filters. NOTE: Only the dynamic parts of such strings will be escaped, i.e. the ones comprised of JEXL expressions. Defaults to "false" if not set.
Note
To escpape characters in LDAP DNs or to escape characters in LDAP search filters with more granularity, use the following JEXL functions instead of the global setting:
-
ldap.escapeDNValue(String) -
ldap.escapeFilterValue(String).
For general information about using JEXL scripting in SLS configuration files, see chapter "JEXL Expressions".
${ldap.search.dn}
The last DN found in any search can always be referenced in other LDAP operations with the JEXL variable ${ldap.search.dn}.
${ldap.search.dns}
The last DNs found in any search, IF there were multiple search results. This is usually the case for group searches. Please note the following facts:
- The variable is a string array
-
The first entry equals the value of
ldap.search.dn -
The LDAP adapter will only further process the first entry (or
ldap.search.dn) and read the attributes of that object.
${attribute.ldap.<name>}
All attributes of the LDAP object found in the last search can be referenced with JEXL variables that follow this syntax:
${attribute.ldap.<attribute-name>}
Example for using the value of the user's LDAP attribute "email":
${attribute.ldap.email}
The following example would trigger the HSP reverse proxy to forward a custom HTTP header named "surname" to the application server after the login. The header would contain the value of the LDAP attribute "surName" of the authenticated user:
app.header.surname=${attribute.ldap.surName}${ldap.error}
Contains the last LDAP error message (the message of the Java "NamingException" which was thrown internally).
For LDAP multi-value string (!) attributes, the SLS creates array variables (see "Using Arrays (Multiple-Value Variables)"). This means that the single values of the variable can be referenced by using an index value:
attribute.ldap.groups.0 - The first value of the attribute "groups"
attribute.ldap.groups.1 - The second value of that attribute
NOTE: A bug in the current JEXL implementation might require the use of a workaround to access entries of a multi-value array variable. See "Array Handling / Parsing Bug" for details.
Furthermore, there are various JEXL functions available to work with arrays, as explained in Section 32.3.12, “Using Arrays (Multiple-Value Variables)”. Also consult the [JEXLGUIDE] documentation for a complete reference of available JEXL functions.
${parameter.userid}
When defining a search DN, the JEXL variable ${parameter.userid} can be used to substitute any part of the search DN with the login ID as entered in the login form.
There may be cases where special attributes in an LDAP object will not be returned by a search, unless the LDAP client specifically asks for them. For these cases, an additional configuration property can be set, whose name is the same as the corresponding "..search"-property, with an additional ".attributes"-suffix. It may contain one or a comma-separated list of attribute names. For example, if the following property is set for a custom search:
ldap.mapping.search=...
then this additional property would have the SLS specifically ask for the attribute "email":
ldap.mapping.search.attributes=email
Depending on the LDAP system, only the requested attribute may be returned, or all attributes of the user. In a case where the ".search"-property has a numerical suffix, the property for the attributes has the same name as the ".search"-property without the numerical suffix, followed by the ".attributes"-suffix, e.g.:
ldap.auth.search.1=... ldap.auth.search.2=...
requires this property to specify the attribute names (for both searches):
ldap.auth.search.attributes=email,subschemaSubentry
Please note that the SLS LDAP adapter will generally use all properties with the prefix "com.sun.jndi.ldap." for the environment properties used to create a JNDI LDAP Context object. That way, new functionality in future JNDI releases that can be activated through such properties can also be used with the current LDAP adapter release.
Specify additional properties like this:
com.sun.jndi.ldap.xx.yy.zz=...<value>...
The LDAP adapter uses Sun's JNDI LDAP implementation which provides the mechanism for pooling LDAP connections. In order to use this pooling, the following properties can be set:
Limits the number of connections by configuring (activating) JNDI connection pooling (see Oracle's website at
http://docs.oracle.com/javase/jndi/tutorial/ldap/connect/pool.html
for details about these settings).
com.sun.jndi.ldap. connect.pool
Enables or disables connection pooling (defaults to "true").
com.sun.jndi.ldap. connect.pool.maxsize
The maximum size of the connection pool (defaults to 50).
com.sun.jndi.ldap. connect.pool.initsize
The initial size of the connection pool (defaults to 10).
com.sun.jndi.ldap. connect.pool.prefsize
The preferred size of the connection pool (defaults to 20).
com.sun.jndi.ldap. connect.pool.timeout
The number of milliseconds that an idle connection may remain in the pool without being closed and removed from the pool (defaults to 600000 ms = 10 minutes).
See:
http://docs.oracle.com/javase/tutorial/jndi/newstuff/readtimeout.html
com.sun.jndi.ldap. read.timeout
Sets timeout for LDAP read operations in milliseconds (defaults to 60000 ms = 1 minute).
This chapter describes all configuration properties for the LDAP adapter and some simple usage examples.
ldap.url
Defines the URL of the LDAP directory server. This property is mandatory! It must always be set, even if only custom actions are used. In that case, its value is used as a fallback URL in case the custom URLs are not reachable.
Example:
ldap.url=ldap://ldap.acme.com:389
To define more than one LDAP directory that should be used as a fall-back in case the connection to the current directory fails, specify additional LDAP URLs, each one separated by comma:
ldap.url=ldap://ldap.acme.com:389,ldap://ldap-shadow.acme.com:389
This will enable simple failover by default. By adding the ".mode" property, failover with a primary, or load-balancing can be enabled.
The criterion for backend availability is: Connect with principal username/password was successful, i.e. a valid password is required; configuration properties for a specific alias have precedence over configuration properties without an alias (fallback).
Example for enabling failover with a primary backend:
ldap.url=ldap://ldap.acme.com:389,ldap://ldap-shadow.acme.com:389 ldap.backendsMode=failoverWithPrimary
Or alternatively, enabling load-balancing instead of failover:
ldap.url=ldap://ldap.acme.com:389,ldap://ldap-shadow.acme.com:389 ldap.backendsMode=loadBalancing
The default backend mode is failover, simple round-robin failover.
Please see chapter "Load-Balancing / Failover" for details about failover and load-balancing.
ldap.principal.<alias>
ldap.password.<alias>
In some cases, it is necessary to use a technical user to bind to the directory and perform certain operations. As a general rule, any tech user principal used for a bind to the LDAP server must be specified using two properties:
ldap.principal.<alias>=...<username>... ldap.password.<alias>=...<password>...
The <alias> part of the property names must be the same for the two properties to correspond to the same user. There are some "special" pre-defined aliases that are described in the examples below.
If the "comparison" authentication type is used, or some custom LDAP operations are performed, the following property should specify the technical user id for the bind to the LDAP service.
ldap.principal.default=...<username>... ldap.password.default=...<password>...
"mapping" technical user principal
Optionally, a separate technical user "mapping" can be configured for the mapping search operation. If not specified, the "default" principal is used instead.
ldap.principal.mapping=...<username>... ldap.password.mapping=...<password>...
ldap.auth.type
Defines which type of authentication to use (bind or comparison). Allowed values are:
-
bind- for "bind" authentication mode (see chapter "Bind Authentication"). -
comparison- for "comparison" authentication mode (see chapter "Comparison Authentication"). Note that if this mode is enabled, it is mandatory to also specify a search DN for the look-up of the user object with the password attribute (see configuration property "ldap.auth.search.<no>").
ldap.auth.bind.principal
Option 1: Allows to use a fixed (known) DN as the credential for the bind. To use the actual client users login credentials instead of the "default" tech user for the bind, set the bind principal name with this property:
ldap.auth.bind.principal=...<user DN>...
ldap.auth.bind.dn.+<no>+
Option 2: Search for user DN in several branches. If the DN of the user must first be looked up from a number of LDAP branches, use the following properties instead of the previously mentioned "ldap.auth.bind.principal":
ldap.auth.bind.dn.1=...<first user DN>... ldap.auth.bind.dn.2=...<second user DN>... ldap.auth.bind.dn..=...etc...
This approach performs the bind as follows:
-
If a specific bind credential has been configured with "
ldap.auth.bind.principal", the bind for searching for these DNs will be performed with that principal and the user's login password. Once a matching DN was found, the user has been authenticated successfully. - Otherwise, if a technical "default" user has been configured, that "default" user will be the bind credential while checking for the existence of each DN. Once a matching DN has been found, that DN will then be used as the credential for a follow-up bind with the user's login password.
- If no technical "default" user was configured, and no specific bind principal was set as described in 1., each of the DNs to be checked will be used as the principal for the bind, with the user's login password. As soon as a bind was successful, it means the right DN was found, and the user was successfully authenticated.
In short: Either the "ldap.auth.bind.principal" must be configured, or a list of "ldap.auth.bind.dn.+<n>" entries, but not both!
If Windows Domain users are to be authenticated against an Active Directory Server (AD), the bind credential must usually be specified as follows:
ldap.auth.bind.principal=<DOMAIN>\<username>
Note that the properties described in the following paragraph allow to perform an additional lookup of the actual user DN for this kin d of environment (since the user principal does not represent a valid DN).
**
If the bind was not performed using an actual LDAP DN (for instance in case of a Windows AD bind authentication), the following property (or properties) can be used to look up the DN of the authenticated user.
Note
If such a search is configured, it will be performed in the following two situations:
-
If the configured "
ldap.auth.bind.principal" contains the JEXL variable "${ldap.search.dn}". In that case, the variable might not contain a valid value yet, so the search is performed (if configured) before the actual bind is performed. NOTE: In this case, a "default" tech user must be configured to be used for the pre-authentication search. - If the bind was completed successfully, but after it no user DN had been found yet. This is usually the case with the Windows AD authentication setup as described above. So, if no DN is available yet after a successful bind authentication, the search is performed (if configured).
A list of DN / branches to search is configured like this:
ldap.auth.search.1=...<first user DN / branch>... ldap.auth.search.2=...<second user DN / branch>...
ldap.auth.filter
These additional searches can also use a filter, if necessary:
ldap.auth.filter=...<search filter for all DNs>...
The filter is used for all search DNs specified above.
ldap.auth.successful. search.required
The searches above are optional by default. If no object is found, there will just be no attributes to be used. However, the following property allows to enforce that the searches must return a matching DN:
ldap.auth.successful.search.required=true
This allows to make sure that the user must also be member of a certain LDAP branch. If the search does not find any matching DN, the authentication will fail at this point.
ldap.attribute.password
If "comparison" authentication mode is used, this property defines the name of the user LDAP attribute that holds the password or hash value.
ldap.attribute.password. hash
Defines the type of password hash ("MD5" or "SHA1"). If this property is not set, the password is expected to be stored in plain text in the user's password attribute. Allowed values are:
The password change functionality that is performed by the LDAP adapter during
the "do.changepassword" model state can be configured through the following properties.
ldap.principal.changepassword / ldap.password.changepassword
Optional: Tech user "changepassword" for password change. If not specified,
the "default" principal is used.
ldap.changepassword.search
Optional: Search DN of user object whose password must be changed. NOTE: If
this property is not specified, a lookup must have been performed before; in
that case, the resulting value of the JEXL variable "${ldap.search.dn}" is used. Example:
ldap.changepassword.search=cn=Users,dc=acme,dc=com
ldap.changepassword.filter
Optional: filter for the change password search. Example:
ldap.changepassword.filter=(&(group=admin,givenName=*))
ldap.changepassword.attributeName
Optional: Name of the password attribut to update. By default, the attribute "userPassword" will be used if this property is not specified. Example:
Note: Cannot be set per backend if dynamic backends are used. This property only works as a global setting!
ldap.changepassword.attributeName=otherPwd
ldap.changepassword.attributeValue
Optional: Value for the updated attribute. For special requirements, this property allows to define fixed values or use any custom JEXL expression to create anything particular. By default, the value of the session credential of type NEWPASSWORD will be used if this property is not specified. Example:
Note: Cannot be set per backend if dynamic backends are used. This property only works as a global setting!
ldap.changepassword.attributeValue=${'someFixedPwd'}ldap.changepassword.isOctet
Optional: Allows to change a user password attribute of type "octet". This
is the case with Microsoft Active Directory servers. Defaults to "false". Example:
Note: Cannot be set per backend if dynamic backends are used. This property only works as a global setting!
ldap.changepassword.isOctet=true
ldap.changepassword.isAD
Optional: Allows to define if the LDAP server is a Microsoft Active Directory
server. If set to "true", the LDAP adapter will not perform a simple "modify"
operation, but first "delete" the password and then "add" it again, as
specified by Microsoft:
http://msdn.microsoft.com/en-us/library/cc223248.aspx
Also, it will automatically treat the attribute as an octet value, so it
is not necessary to set the property "ldap.changepassword.isOctet" in this case.
Note: Cannot be set per backend if dynamic backends are used. This property only works as a global setting!
Defaults to "false". Example:
ldap.changepassword.isAD=true
Just as with the "do.auth" states, it is also possible to dynamically select
an LDAP backend with the "do.changepassword" state. However, only the actual
backend (URL, mode), the search DN and the corresponding connection principal
credentials can be set. Example:
Model
model.changepwd.state.1000.name=do.changepassword model.changepwd.state.1000.property=acme
LDAP configuration (AD example)
# Backend-specific settings for alias 'acme'
ldap.acme.url=ldap://ad.acme.com:389
ldap.acme.backendMode=loadbalancing
ldap.acme.search=OU=org,OU=acme
ldap.principal.acme=slsuser
ldap.password.acme=pass1234
# The following properties cannot be set per backend
ldap.changepassword.filter=CN=#{session.getCred('username')}
ldap.changepassword.isAD=true
#ldap.changepassword.isOctet=true
ldap.changepassword.attributeName=unicodePwd
ldap.changepassword.attributeValue=#{session.getCred('NEWPASSWORD')}Note: It is a known issue and a limitation that the filter property can only be set globally, while the search property can be set by backend. This is an obvious inconsistency and may get changed in a future release.
Mapping the login ID to some other user ID is an optional, additional step to be performed after the actual authentication. Usually, that is not really necessary with LDAP since the lookup during the authentication usually already delivers all attributes of the user (that can then be used for mapping purposes).
However, if the mapping function is still to be used, it will create a special JEXL variable "special.mapped.id" which contains the mapped
user ID.
To enable this mapping function, the model state "do.mapping" must be added to the SLS login model in "sls.properties". Also, mapping must be configured to use the LDAP adapter by setting this property in "sls.properties":
adapter.mapping=ldap
Define the LDAP attribute which should represent the mapped user ID.
Note
If the following search property is not specified, this will refer to an attribute created by the authentication. But this requires that a search was performed for the authentication. If the user was only authenticated through a simple bind, a search DN must be defined for the mapping, or the mapping step will not work.
If a mapping search is specified, it will refer to an attribute from the result of that search.
ldap.mapping.attribute=racfId
Optional: search for the mapping step. If this property is not set, the LDAP adapter will simply used the configured mapping value to create the mapped ID based on an attribute found in the authentication lookup. But if it is set, an additional search operation is performed.
ldap.mapping.search=_...<search DN>..._
Optional: It is possible to define a filter for the mapping search:
ldap.mapping.filter=(&(<attribute-name>=<attribute-value>)(<attribute-name>=<attribute-value>))
ldap.errorcode.extract. pattern
The LDAP adapter allows to map LDAP error codes to custom error messages to be displayed to the user in the login page. The list of LDAP error codes can be found at various website locations such as:
http://java.sun.com/docs/books/tutorial/jndi/ldap/exceptions.html
However, since the JNDI API unfortunately does not allow to extract the numerical LDAP error code in a well-defined manner, it must be extracted from the error message string as provided the the JNDI API. In order to remain independent of any changes in future JNDI implementations, this extraction mechanism as been implemented using a regular expression mechanism.
This LDAP code mapping mechanism is inactive by default. It can be activated by setting the configuration property "ldap.errorcode.extract.pattern" as described below.
The following optional property can define a regular expression pattern which matches the LDAP error code in the message text of the LDAP exception (see SLS exception log for an example). The first group in the regex is the error code to extract.
Recommended default value as tested with JNDI in Java 6 and OpenLDAP:
ldap.errorcode.extract.pattern=.*LDAP: error code (\d+) .*
In order to define an actual mapping to a custom message, add a mapping to the "sls-errormap.properties"-file with the prefix ERR_LDAP_EXCEPTION_.
Example entry in "sls-errormap.properties" for displaying the message with the resource key "ldap.auth.failed" for the LDAP error code 49:
ERR_LDAP_EXCEPTION_49 = ldap.auth.failed
Assuming the LDAP bind operation with a Microsoft AD server resulted in the following exception log entry:
Caused by: com.usp.sls.toolkit.error.AuthenticationException: [USER] [INVALID_CRED] Invalid credential(s). Reason: Principal was: cn=slsservice,ou=users,dc=testdomain,dc=local, cause: javax.naming.AuthenticationException: [LDAP: error code 49 - 80090308: LdapErr:DSID-0C090334, comment: AcceptSecurityContext error, data 525, vece]
Then the following regular expression can be used to extract the actual cause of the error:
ldap.errorcode.extract.pattern=.*AcceptSecurityContext error, data *([0-9]+)*, .*
The resulting code extracted from the exception message text would be "525". A corresponding entry in the "sls-errormap.properties" configuration file would then look like this:
ERR_LDAP_EXCEPTION_525 = ldap.auth.failed
Which would display the error message defined for the resource key "ldap.auth.failed" (in the SLS message resource files) in the login page.
The following properties define names of LDAP attributes whose values are used to specify a policy for valid passwords, used for the change password and reset password functionality. If these properties are not set, the SLS internal default password policy mechanism will be used instead (see admin guide for details).
ldap.policy.refresh
Defines the interval in seconds for refreshing the policy attribute values. The refresh happens during the next login once the interval threshold is reached, and not in a separate thread. The value is specified in number of seconds, default is once every 24 hours. Set 0 to refresh the policy with every login attempt. Example:
ldap.policy.refresh=3600
ldap.policy.dn
Defines the DN of the object with the following attributes. Example:
ldap.policy.dn=cn=policy,ou=global,o=acme.com
ldap.policy.principal
Mandatory: tech user principal and password for accessing the
policy object. NOTE: It is advised to use the DataProtector/Seal
to encrypt the password string (see admin guide for details). Example:
ldap.policy.principal=techuser ldap.policy.password=12345678
ldap.policy.maxlen. attribute
Name of LDAP attribute which defines the maximum length of a password.
ldap.policy.minlen. attribute
Name of LDAP attribute which defines the minimum length of a password.
ldap.policy.lowercase. attribute
Attribute which defines how to handle lower-case characters:
- -1 = must not contain lower-case characters in the password
- 0 = may contain lower-case characters in the password
- >0 = must at least contain x lower-case characters in the password
ldap.policy.uppercase. attribute
Name of LDAP attribute which defines how to handle upper-case characters:
- -1 = must not contain upper-case characters in the password
- 0 = may contain upper-case characters in the password
- >0 = must at least contain x upper-case characters in the password
ldap.policy.numeric. attribute
Name of LDAP attribute which defines how to handle numeric characters. Values:
- -1 = must not contain numeric characters in the password
- 0 = may contain numeric characters in the password
- >0 = must at least contain x numeric characters in the password
ldap.allowed.chars. attribute
Name of LDAP attribute which defines a list of allowed characters for the password. NOTE: It is not advised to allow any non-ASCII special characters. If they have to be used, they must be defined as Unicode, e.g. '\\u0020\'. Example:
ldap.allowed.chars.attribute=abcdefghijklmnopqrstuvwxyzABCDEFGHIJKLMNOPQRSTUVWXYZ0123456789
The SLS model engine and LDAP adapter allow for execution of any custom LDAP operations during the login model, such as special lookups and/or udpates of user attributes etc. The following operations are available today:
-
search- Performs a custom search / lookup -
update- Updates an attribute value on an LDAP object -
add- Adds an attribute to the LDAP object -
delete- Deletes an attribute from the LDAP object -
create- Create a new LDAP object, such as a user -
remove- Remove an LDAP object
The following example properties and comments demonstrate how to add a custom
LDAP operation to a simple login model. In the login model in the "sls.properties"
file, add a step (or several steps) like this:
model.login.state.<n>.name=do.ldap model.login.state.<n>.property=<ldap-config-alias>
or, alternatively
model.login.state.<n>.name=do.ldap model.login.state.<n>.param.alias=<ldap-config-alias>
"do.ldap" is a model state which refers to a generic LDAP action. It can be
used as many times as required. It allows to perform any arbitrary search
operation and / or insertion, update or removal of attributes at any point
during the login process.
The LDAP configuration properties for such a custom step must be grouped with
an alias which corresponds to the <ldap-config-alias>-value as shown in the
examples below.
ldap.<ldap-config-alias>.<type>.url=... ldap.<ldap-config-alias>.<type>.ignoreErrors=true|false ldap.<ldap-config-alias>.<type>.attribute.1.name=... ldap.<ldap-config-alias>.<type>.attribute.1.value=...
Where <type> refers to the LDAP operation, such as "add", "delete",
"create", "remove" etc. And <ldap-config-alias> corresponds with the
alias / property used in the model with the "do.ldap" state. Example:
# Perform custom LDAP operation "newUser" in model
model.login.state.100.name=do.ldap
model.login.state.100.property=newUser
# Create new user (operation alias "newUser")
ldap.newUser.create.url=ldap://ldap.acme.com:389
ldap.newUser.create.dn=cn=${session.getCred('username'),dc=acme.com
ldap.newUser.create.ignoreErrors=false
ldap.newUser.create.attribute.1.name=objectClass
ldap.newUser.create.attribute.1.value.1=person
ldap.newUser.create.attribute.1.value.2=organizationalPersonJust as with the default LDAP URL defined in "ldap.url", it is also possible
to define multiple URLs for a custom action to activate failover support, or
optionally load-balancing, e.g.:
# Multiple URLs for failover support ldap.newUser.create.url=ldap://ldap.acme.com:389,ldap://ldap2.acme.com:389
ldap.newUser.create.url=ldap://ldap.acme.com:389,ldap://ldap2.acme.com:389 # Enable load-balancing instead of failover ldap.newUser.create.backendsMode=loadBalancing
More examples can be found in chapter "Custom LDAP Operations".
Please see chapter "Load-Balancing / Failover" for details about failover and load-balancing.
It is also possible to use custom credentials for the bind during a custom LDAP operation. To do this, define a corresponding set of properties with the credentials:
ldap.principal.<ldap-config-alias>=<username for bind> ldap.password.<ldap-config-alias>=<password for bind>
For example:
# Tech user for custom LDAP operation (if not "default") ldap.principal.something=...<username>... ldap.password.something=...<password>...
In a Microsoft Active Directory server, the user passwords are stored in the field "unicodePwd", but not as simple plain text value. They are stored as octets as described in
http://msdn.microsoft.com/en-us/library/cc223248.aspx
If a custom LDAP "update" or "add" operation aims to change or add the value
of this "unicodePwd" attribute, the value must therefore be stored as an octet.
To achieve this, the additional custom operation attribute "isOctet" must be set to "true", e.g.
ldap.<alias>.update.attribute.1.name=unicodePwd
ldap.<alias>.update.attribute.1.value="${session.getCred('NEWPASSWORD')}"
ldap.<alias>.update.attribute.1.isOctet=trueIt is also possible to use a ".property" for an LDAP call in a "do.auth*"-state. In this case, the LDAP adapter will use the corresponding properties of the custom action, if - and only if - such properties exist. For example, if the model states are configured like this:
model.login.state.1000.name=do.auth model.login.state.1000.property=myapp
then the LDAP adapter will use the properties with the prefix "ldap.myapp." instead of "ldap.auth." (see properties listed below), e.g.
# Use "ldap.myapp.url" instead of "ldap.auth.url" ldap.myapp.url=ldap://backend.acme.com:389
Supported properties that can be configured separately to be used in a "do.auth" state are:
-
ldap.<alias>.url -
ldap.<alias>.bind.principal -
ldap.principal.<alias> -
ldap.password.<alias>
Note
Since it is possible to use JEXL / Groovy expressions in almost every
configuration property except the backend URL, that one together with the
corresponding principal and password properties are really the only ones
that MUST be configured with separate properties with a custom alias, while
things like the bind DN, for example, could be solved by using an expression
for the normal property ldap.auth.bind.principal directly.
In some cases, it might be useful to ignore any errors during attribute updates, deletes or custom LDAP operations. The default value is update.ignoreErrors=false.
In order to activate this fault-tolerance, set these properties for updates and / or deletes:
ldap.<alias>.update.ignoreErrors
Globally ignore all attribute update errors. Example:
ldap.<alias>.update.ignoreErrors=true
ldap.<alias>.update.attribute.<no>.ignoreErrors
Ignore only errors while updating a certain attribute. Example:
ldap.<alias>.update.attribute.<no>.ignoreErrors=true
ldap.<alias>.delete.ignoreErrors
Globally ignore all attribute delete errors. Example:
ldap.<alias>.delete.ignoreErrors=true
ldap.<alias>.delete. attribute.<no>.ignoreErrors
Ignore only errors while deleting a certain attribute. Example:
ldap.<alias>.delete.attribute.<no>.ignoreErrors=true
One common issue with users and groups in an LDAP directory is the fact that a group hierarchy may result in a user being member of some groups indirectly, for example:
group "employees" contains sub-groups "internal" and "external". John Doe
is a member of group "internal", and as such, implicitely also a member of the
"employees" group. But in the LDAP object entry for John Doe, only the
membership for "internal" is registered:
-
John Doe → memberOf "
internal" -
"
internal" → memberOf "employee" -
Result: John Doe is really member of "
internal" and "employee"
In cases like this, it can be difficult to perform a search to find out all the
groups to which a given user belongs, or rather if the user is member of a certain
top-level group such as "employees", without having to resort to multiple,
potentially very slow, complicated LDAP searches.
With Microsoft Active Directory, this problem can be solved by using a filter
named LDAP_MATCHING_RULE_IN_CHAIN:
"memberOf:1.2.840.113556.1.4.1941:="
The result of such a search may return multiple LDAP objects (the DN of each group
that was found). This will be stored in the variable ldap.search.dns, as a string
array, in which each entry holds the DN string of a group.
Note
ldap.search.dns (with an s) holds ALL DNs that were found, while the
variable ldap.search.dn holds only the first search result.
The following example LDAP custom search properties demonstrate how to use this
filter. The first LDAP operation "userlookup" retrieves the LDAP object for the user:
# Save the result of this query in the "ldap.userlookup.result" variable,
# which will be used below.
ldap.userlookup.url=ldap://msad.intra.net:389
ldap.userlookup.search.1=OU=acme,DC=com
ldap.userlookup.filter.1=(&(sAMAccountName=${session.getCred('username')})(objectClass=user))The next LDAP operation, "groupcheck", first searches the LDAP entry for the "employee" group:
ldap.groupcheck.url=ldap://msad.intra.net:389 # First LDAP query finds group ldap.groupcheck.search.1=OU=acme,DC=com ldap.groupcheck.filter.1=(&(objectClass=group)(CN=employee}))
Then a second search is performed which will only return a result, if the user
is member of the group "employees":
# Second LDAP query finds whether user is in group or not.
ldap.groupcheck.search.2=${ldap.userlookup.result}
ldap.groupcheck.filter.2=(&(objectClass=person)(memberOf:1.2.840.113556.1.4.1941:=${ldap.search.dn}))This allows to check for the membership in a certain group, even if the user object itself does not directly contain that information.
The following paragraphs demonstrate how to set certain configuration properties in order to use a specific kind of authentication.
- The following examples also assume that there are four branches in the LDAP directory which contain user objects. One for european and one for american users, and within each of them one for internal and external users:
cn=..<userid>..,cn=internal,ou=Europe,o=acme.com cn=..<userid>..,cn=external,ou=Europe,o=acme.com cn=..<userid>..,cn=internal,ou=USA,o=acme.com cn=..<userid>..,cn=external,ou=USA,o=acme.com
- The windows domain for the users in the following example is called
ACMECORP
- The login ID as entered by the user in the login form can be referenced within the configuration properties using the JEXL variable
${parameter.userid}Goal:
The user is authenticated with the user ID and password entered in the login form. For the sake of this absolutely minimal example, the user is to be expected to be only from the "Europe" branch of the directory tree.
Properties:
ldap.auth.type=bind
ldap.auth.bind.principal=cn=${parameter.userid},cn=internal,ou=Europe,o=acme.comGoal:
The user is authenticated with the user ID and password entered in the login form. The user must also be an "internal" user, but from either the european or the american branch. The non-AD example:
Properties:
ldap.auth.type=bind
ldap.auth.bind.dn.1=cn=${parameter.userid},cn=internal,ou=Europe,o=acme.com
ldap.auth.bind.dn.2=cn=${parameter.userid},cn=internal,ou=USA,o=acme.comThere is another way to achieve the exact same result with AD:
ldap.auth.type=bind
ldap.auth.bind.principal=*ACMECORP\${parameter.userid}
ldap.auth.search.1=cn=${parameter.userid},cn=internal,ou=Europe,o=acme.com
ldap.auth.search.2=cn=${parameter.userid},cn=internal,ou=USA,o=acme.com
ldap.auth.successful.search.required=trueWhy would anyone want to use the second approach? The answer is that it makes sense in a case where the user ID credential for the bind is not an actual DN, which is usually the case when a Microsoft Active Directory server is used; see the following paragraphs for details.
Goal:
The user is authenticated with the user ID and password entered in the login form. The user is also a Windows Domain user.
Properties:
ldap.auth.type=bind
ldap.auth.bind.principal=ACMECORP\${parameter.userid}However, this extra-short configuration has a problem; while it does verify the user's password (and therefore also the existence of the user ID), it does not look up any actual DN in the LDAP tree. And for this reason, this operation also does not find any user attributes.
Also, it may be desirable to make sure that the user is member of a specific branch in the LDAP tree. For example, there could be separate SLS instances for company employees and for external users (customers, partners). The following paragraphs show how to deal with that.
Goal:
The user is authenticated with the user ID and password entered in the login form. The user is also a Windows Domain user. Furthermore, it is ensured that the user object is part of a certain branch - or of one of a number of certain branches - in the LDAP tree. In this example, the user must be an internal user, but may be from Europe or the USA.
Properties:
ldap.auth.type=bind
ldap.auth.bind.principal=ACMECORP\${parameter.userid}
ldap.auth.search.1=cn=${parameter.userid},cn=internal,ou=Europe,o=acme.com
ldap.auth.search.2=cn=${parameter.userid},cn=internal,ou=USA,o=acme.com
ldap.auth.successful.search.required=trueGoal:
Select backend group based on some conditions, in the example based on the Host header of the incoming HTTP request.
Properties:
# Default LDAP URL (AD) ldap.url=ldap://192.168.10.15:389,ldap://192.168.10.16:389 # Domino LDAP URL ldap.domino.url=ldap://172.17.10.1:389,ldap://172.17.10.2:389
Login Model:
model.login.state.1000.name=do.generic-selectBackend
# use Domino LDAP instead of AD for all users from virtual host "something.com"
model.login.state.1000.action.1=#{setVar('backendToUse', '')}
model.login.state.1000.action.2=#{setVar('backendToUse', 'domino')}
model.login.state.1000.action.2.if.1=#{var('header.host') == 'something.com'}
model.login.state.2000.name=do.auth
model.login.state.2000.property=#{backendToUse}Goal:
The user changes their own password by themselves. They have to provide both the old and the new password for this.
This flow can be configured using the password change functionality of the
LDAP adapter. Usually (for other LDAP servers), the password change operation
performs an LDAP modify operation. But in case of Microsoft AD, it is
necessary to first perform a delete operation, with the value of the old
password, and then an add operation with the value of the new password, as
documented by Microsoft:
SLS configuration:
adapter.changepassword=ldap
Model configuration:
model.login.state.10.name=do.changepassword
LDAP configuration:
ldap.principal.changepassword=slsadmin
ldap.password.changepassword=pwd1234
# Set DN (either from previous search, or perform new one)
ldap.changepassword.search=${ldap.search.dn}
# Optional: set search filter
ldap.changepassword.attributeName=unicodePwd
ldap.changepassword.isOctet=true
ldap.changepassword.isAD=trueThe last attribute, "isAD", is important; it causes the LDAP adapter to perform
the aforementioned "delete" and "add" operations, instead of a "modify"
operation.
Goal:
The password of the user is set to a predefined value by the administrator, usually because the user forgot his or her password.
To implement this with a Microsoft AD, the LDAP attribute "unicodePwd" must be
modified with an actual "update" operation (as opposed to a "delete" and
"add" operation like in the password change flow). Therefore, a custom LDAP
"update" operation is used for this, NOT the regular password change functionality.
Also, the password attribute must be set as an octet value, and must also be enclosed in double quotes.
Furthermore, the tech-user principal used for this update operation must have the permission to update a user password attribute, configured under "Delegate Control…":
"Reset user passwords and force password change at next logon"
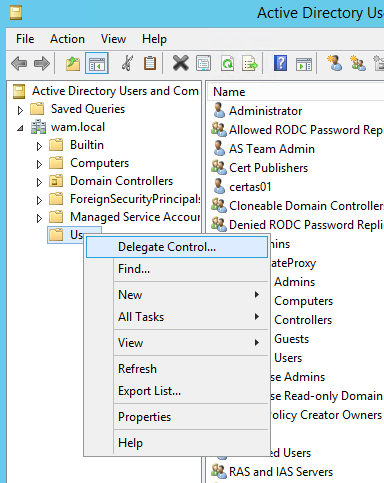
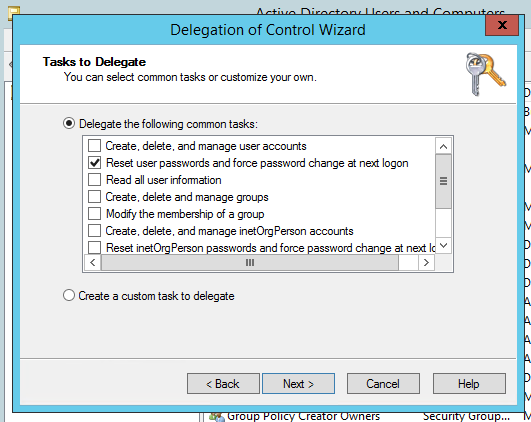
Model configuration (LDAP alias "pwdreset"):
model.login.state.10.name=do.ldap model.login.state.10.property=pwdreset
LDAP configuration:
# Credential of tech user with permissions for password reset
ldap.principal.pwdreset=slsadmin
ldap.password.pwdreset=pwd1234
# Define user DN
ldap.pwdreset.update.dn=${ldap.search.dn}
ldap.pwdreset.update.ignoreErrors=false
# Modify the "unicodePwd" attribute
ldap.pwdreset.update.attribute.1.name=unicodePwd
# Ensure it's written as an octet
ldap.pwdreset.update.attribute.1.isOctet=true
# Set value (MUST be encloded in double quotes!)
ldap.pwdreset.update.attribute.1.value="${session.getCred('PASSWORD')}"Perform a custom LDAP execution step, such as searching, retrieving or adding / updating attributes etc. The complete minimal example login model (note the "do.ldap" action in state 3, with the "something"-alias):
model.login.uri=/auth model.login.failedState=get.cred model.login.state.1.name=get.cred model.login.state.2.name=do.auth model.login.state.3.name=*do.ldap model.login.state.3.property=something model.login.state.11.name=do.success
Corresponding LDAP configuration for the "something" custom action(s):
# Tech user for custom LDAP operation (if not "default") ldap.principal.something=...<username>... ldap.password.something=...<password>...
search entry
A custom search (if only one). Note that the second property with the filter is always optional.
ldap.something.search.1=...<search DN>... ldap.something.filter.1=...<search filter>...
update attribute
Update LDAP attribute "email" by changing it from its current value to lowercase, and set attribute "upid" to value "1":
ldap.something.update.dn=${ldap.search.dn}
ldap.something.update.ignoreErrors=false
ldap.something.update.attribute.1.name=email
ldap.something.update.attribute.1.value=${function.getVariable('attribute.ldap. email').toLowerCase()}
ldap.something.update.attribute.2.name=upid
ldap.something.update.attribute.2.value=1add attribute
Add LDAP attribute "email" with value "user@acme.com":
ldap.something.add.dn=${ldap.search.dn}
ldap.something.add.attribute.1.name=email
ldap.something.add.attribute.1.value=user@acme.comdelete attribute
Delete LDAP attribute "email":
ldap.something.delete.dn=${ldap.search.dn}
ldap.something.delete.attribute.1.name=emailcreate subcontext (DN) entry
Creates a new LDAP object, e.g. a user. Must define all multi-value attributes with all their values.
ldap.newUser.create.dn=cn=${session.getCred('username')},ou=acme,dc=com
ldap.newUser.create.ignoreErrors=false
ldap.newUser.create.attribute.1.name=objectClass
ldap.newUser.create.attribute.1.value.1=organizationalPerson
ldap.newUser.create.attribute.1.value.2=personremove subcontext (DN) entry
Removes (deletes) an LDAP object, e.g. a user.
ldap.deleteUser.remove.dn=cn=${session.getCred('username')},ou=acme,dc=com
ldap.deleteUser.remove.ignoreErrors=falseDefault URL for operation
While a separate URL can be defined for each subtype of operation (search, update, delete), it is also possible to define a "global" URL for a custom operation with the property "ldap.+<group-alias>.url":
ldap.something.url=...<default URL for operation>...
Custom Searches
How to enumerate custom searches, if more than one DN should be searched
ldap.something.search.1.url=...<optional search URL>... ldap.something.search.1=...<search DN>... ldap.something.filter.1=...<optional search filter>... ldap.something.search.2.url=...<optional search URL>... ldap.something.search.2=...<search DN>... ldap.something.filter.2=...<optional search filter>...
Custom update and delete
Defining a custom update and delete in one custom operation:
ldap.something.update.url=<LDAP url>
ldap.something.update.dn=<dn of object to modify, e.g. ${ldap.search.dn} >
ldap.something.update.ignoreErrors=true | false
ldap.something.update.attribute.1.name=<attribute-name>
ldap.something.update.attribute.1.value=<new value>
ldap.something.update.attribute.1.ignoreErrors=true | false
ldap.something.update.attribute.2.name=<attribute-name>
ldap.something.update.attribute.2.value=<new value>
ldap.something.delete.url=<LDAP url>
ldap.something.delete.dn=<dn of object to delete, e.g. ${ldap.search.dn} >
ldap.something.delete.ignoreErrors=true | false
ldap.something.delete.attribute.1.name=<attribute-name>
ldap.something.delete.attribute.1.ignoreErrors=true | false
ldap.something.delete.attribute.2.name=<attribute-name>By setting different LDAP URLs for separate custom operations, more than one LDAP directory can be used by one SLS instance. Example model extract:
model.login.state.3.name=do.ldap model.login.state.3.property=updateHere model.login.state.4.name=do.ldap model.login.state.4.property=updateThere
Corresponding configuration in "ldap-adapter.properties":
ldap.updateHere.update.url=ldap://dir.one.acme.com:389
ldap.updateHere.update.dn=<dn of object to modify, e.g. ${ldap.search.dn} >
ldap.updateHere.update.attribute.1.name=myAttribute
ldap.updateHere.update.attribute.1.value=the new value
ldap.updateThere.update.url=ldap://dir.two.acme.com:389
ldap.updateThere.update.dn=<dn of object to modify, e.g. ${ldap.search.dn} >
ldap.updateThere.update.attribute.1.name=otherAttribute
ldap.updateThere.update.attribute.1.value=the second new valueThe NTLM adapter allows users to perform authentication over the NTLM protocol. This form of authentication is a user friendly solution in a trusted network environment. End users may not have explicitely to log in if they are already authenticated by a Windows Domain Controller.
The following steps explain how the NTLM login works:
- A user requests a restricted site.
- The user is getting redirected from the SES to the SLS.
- The SLS initiates an NTLM authentication.
- A challenge from the domain controller will be encrypted by the client with a key derived from the client's password.
- If the authentication was successful, the SLS grants the requested access rights to the client.
The following features will give you a brief overview of the NTLM Adapters functionalities:
- Windows 2003/XP compatible
- Support for NTLMv2
- SSO (Single Sign On)
- Failover / Load-Balancing
This is a feature introduced by Microsoft to improve the security of Netlogon Remote Protocol, and is being enforced in newer AD installations. In such cases, the NTLM adapter will no longer be able to work correctly. Since NTLM is a proprietary legacy protocol, support for the feature will not be implemented anymore in the NTLM adapter.
In such cases, USP advises to migrate to using the SPNEGO (Kerberos) adapter instead. See chapter "SPNEGO Adapter" for more information.
- The SLS requires a computer account for its connection to the domain controller (see for details).
The computer account used for the connection between the SLS and the Windows domain controller also requires a password to be able to connect. However, there seems to be no standard utility for setting the password of a computer account. For this reason, a VB script has been included in the "tools" directory of the SLS delivery / web application:
tools/vb-scripts/SetComputerAccountPassword.vbs
This script must be executed on the domain controller by an administrator. It requires the DN (distinguished name) of the computer account in the Active Directory, e.g.
CN=SLSUSER$,CN=Computers,OU=Acme,OU=Corp
So, to set the password, the script can be executed like this:
C:> cscript SetComputerAccountPassword.vbs CN=SLSUSER$,CN=Computers,...
The NTLM adapter is configured through a property file, usually named "ntlm-adapter.properties", but some basic settings are made in the "sls.properties" file.
The following properties are required to use the NTLM adapter for the authentication (certificate verification) and mapping step:
adapter.authentication=ntlm adapter.challenge=ntlm
And the following states are required in the login model:
model.login.uri=/auth
model.login.failedState=do.generic-ERROR
model.login.state.1000.name=do.ntlminit
model.login.state.2000.name=create.challenge
model.login.state.3000.name=do.ntlmwait
model.login.state.4000.name=do.ntlmauth
model.login.state.5000.name=do.success
model.login.state.8000.name=do.generic-ERROR
model.login.state.8000.action.1=#{response.setHttpStatusCode(401)}
model.login.state.8000.action.2=#{response.setHeader("WWW-Authenticate", "NTLM")}
model.login.state.9000.name=get.usererrorThe model above will show the contents of the "UserError.jsp" if the user entered invalid credentials. In order to enforce a complete new start of the model for the next request, add the following line to the end of the JSP in order to forcibly invalidate the current session:
<sls:doJexl expression='${session.invalidate()}' />This line should be the very last line in the JSP, after all the HTML code. As a result, when the page is displayed, the SLS login session is invalidated, and when the user sends another request, a new session will be started to try the login again from scratch.
Due to it's nature of being a fully automatic multi-step login (takes more than one request / response to complete), the NTLM authentication process can cause problems with clients sending multiple authentication requests concurrently. A typical cause of that would be a web browser with multiple tabs, trying to restore the application session in each tab at startup time.
Please see chapter "Concurrency Issues with Browser Tabs" for information about how to deal with this.
ntlm.dc
This property specifies the domain controller thru the DNS or IP address. It is possible to specify multiple addresses comma seperated. The SLS will use the domain controller addresses in the order they are listed. If a domain controller isn't responding, it will use the next available domain controller in the list. Example:
ntlm.dc=hostone.acme.com,hosttwo.acme.com
ntlm.hostname
Defines the DNS hostname (simple name, not fully qualified) of the Windows
domain controller host. If multiple domain controllers are specified in the
"ntlm.dc" property, a corresponding hostname must be specified for each
of them in this property as well, e.g.:
ntlm.hostname=hostone,hosttwo
ntlm.backendsMode
Allows to enable load-balancing, or failover with a primary system, instead of simple failover, if multiple AD backends have been configured.
The criterion for backend availability is: Connect with username/password was successful, i.e. a valid password is required.
Example for configuration with multiple hosts for failover support (default):
ntlm.hostname=hostone,hosttwo
Or enabling failover with a primary backend:
ntlm.hostname=hostone,hosttwo ntlm.backendsMode=failoverWithPrimary
Or alternatively, enabling load-balancing instead of failover:
ntlm.hostname=hostone,hosttwo ntlm.backendsMode=loadBalancing
The default backend mode is failover, simple round-robin failover.
Please see chapter "Load-Balancing / Failover" for details about failover and load-balancing.
ntlm.domain
Defines the Windows domain name, e.g.
ntlm.domain=ACMECORP
ntlm.user.name
The computer account used for the NETLOGON connection between the SLS and the Windows domain controller. NOTE: a computer acocunt name always ends with "$", e.g. "SLSUSER$". Otherwise, the given account is not a computer account. Also, the account must be specified as <accountname>@<domain>, e.g.
ntlm.user.name=SLSUSER$@ACMECORP.COM
NOTE: If the account configured here is not a computer account, the legacy NTLM adapter (without NTLMv2 support) will be used!
ntlm.user.password
The password of the computer account user. Use the VB script provided in the SLS delivery package to set the password of this account on the domain controller (see "Computer Account Password Setup" for details). The script can be found in the subdirectory "tools/vb-scripts" of the delivery archive or the SLS web application.
ntlm.max.login.attempts
The maximal number of login attemps a user has till the login fails. Supply a number from 1 to 5.
Here is a configuration example for the following setup:
-
The domain controller’s IP address is
10.0.1.201 - The DNS hostname of the domain controller is "dc-acme1" (do NOT use fully qualified name here)
-
The name of the SLS computer (!) account user is "
slsclient$". -
The Windows domain name is "
AS-TEST"
ntlm.dc=10.0.1.201 ntlm.hostname=dc-acme1 ntlm.user.name=slsclient$ ntlm.user.password=QlG5zK+sC8QGXEQR7ESMWQ== ntlm.domain=AS-TEST ntlm.max.login.attempts=3
NTLMv1, which was originally developed in 1987 and is by now severely broken in terms of security, is no longer supported.
ntlm.version
This setting is ignored. NTLMv1 configurations are recognized by configured
users that neither contain $@ nor end with $; also for NTLMv2 configuring
a hostname and domain are mandatory.
To allow the SLS to send NTLM messages, the HGW_Allow401 SES property is mandatory on the SLS location. Add this property to your configuration in the SRManager and the HttpLstener or HttpsLstener.
<Location /demo/sls/auth> HGW_Host mydomain.com:14132 HGW_Allow401 ...
Since NTLM works with the Windows credentials, it is possible to configure a Windows client to automatically login. This enables a transparent login and the user doesn't see a login page.
The configuration is very browser dependent. Please consult the documentation of your browser and version for proper configuration. Following some brief notes about two popular browsers:
Internet Explorer
You have to add the site to the trusted Sites in the Browser Preferences.
In case the SES domain is the same domain as your Windows domain the site is trusted anyway and you don't have to configure anything at all.
Firefox
You have to add the site to the trusted Sites in the Browser Preferences. This can be done by using about:config. Just enter about:config in the URL field and press enter. Afterwards, find the propery called +network.automatic-ntlm-auth.trusted-uris+and add the domain name of your SES deployment. You can enter multiple domain names comma seperated.
NTLM
NTLM employs a challenge-response mechanism for authentication, in which clients are able to prove their identities without sending a password to the server. It consists of three messages, commonly referred to as Type 1 (negotiation), Type 2 (challenge) and Type 3 (authentication).
SMB
Server Message Block (SMB) is an application-level network protocol mainly applied to shared access to files, printers, serial ports, and miscellaneous communications between nodes on a network. It also provides an authenticated Inter-process communication mechanism. It is mainly used by Microsoft Windows equipped computers.
The RADIUS adapter allows to carry out RADIUS authentication calls with support for adding custom attributes to the call and receiving custom attributes with the response.
Custom attributes in the authentication request to the RADIUS server could be used, for example, to send additional credentials (like the NAS-ID) to the RADIUS server. See the following chapter for details.
The adapter uses the open source Java library "jradius-client" from SourceForge:
http://jradius-client.sourceforge.net/
Challenge / Response
The adapter supports username / password authentication as well as simple challenge / response authentication as defined by RFC 2865:
http://www.ietf.org/rfc/rfc2865.txt
Failover / Load-Balancing
The RADIUS adapter supports simple round-robin failover or load-balancing between a list of RADIUS server hosts.
All RADIUS response attributes received from the RADIUS server during the authentication callout are available as string variables of the following format in the SLS configuration:
attribute.radius.type<id>
Where <id> is the numeric RADIUS attribute ID. The following example shows how to configure the SLS to propagate a custom HTTP header "RadiusResponse" containing the value of the RADIUS response attribute 14 to the application server after a successful login:
app.header.RadiusResponse=${attribute.radius.type14}Furthermore, the numeric code of the last RADIUS response is available in this JEXL variable:
radius.response.type
Note that in case of connection problems, this variable may be set to the string "unknown" (if there was no RADIUS response).
The RADIUS adapter is configured through a Java properties file, usually named "radius-adapter.properties". The following paragraphs explain all available configuration properties and values.
radius.shared.secret
The shared secret required to enable the SLS to connect to the RADIUS server. Ask your RADIUS server administrator for the required value.
radius.server.acct.port
The number of the RADIUS server "accept" port, usually the value is 1813.
radius.server.auth.port
The number of the RADIUS authentication port, usually the value is 1812.
radius.server.host
The hostname of the RADIUS server. This property can optionally contain a comma-separated list of host names. In that case, the adapter will perform simple round-robin failover by default between these hosts, if one becomes unavailable. Alternatively, it is possible to enable load-balancing instead. Note: all other settings (port numbers, shared secret etc.) must be the same for all hosts in this list.
The criterion for backend availability is:
Got a response from the server when trying to authenticate,
even if the password was wrong.
Typical use case is to define a dummy username/password
just for checking backend availability,
see the corresponding configuration properties radius.monitor.*
described further below.
Example for configuration with multiple hosts for failover support (default):
radius.server.host=host.one.com,host.two.com
Or enabling failover with a primary backend:
radius.server.host=host.one.com,host.two.com radius.backendsMode=failoverWithPrimary
Or alternatively, enabling load-balancing instead of failover:
radius.server.host=host.one.com,host.two.com radius.backendsMode=loadBalancing
The default backend mode is failover, simple round-robin failover.
Please see chapter "Load-Balancing / Failover" for details about failover and load-balancing.
radius.retries
Optional: The number of connection retries. The default value is 3.
radius.timeout
Optional: The RADIUS connection timeout in milliseconds (1000 = 1 second).
radius.tokencode
Optional: Defines how to handle a 3rd credential token, like a SecurID code or a strike-list number. There are three possible settings:
concat
If the property is set to this value, the token will be concatenated to the password. Note that this is also the default behavior.
<numeric RADIUS attribute ID>
If it is set to an integer number that represents a valid RADIUS request attribute, the token will be sent in that RADIUS request attribute.
If the property is set to the empty string, a third token will be ignored, and only the username and password will be used for authentication.
radius.mapping.attribute
Optional: Defines the server response attribute whose value should be used for the mapped user ID. Example:
radius.mapping.attribute=20
This would create a JEXL variable "special.mapped.id" (and a credential of semantic type "MAPPEDID") in the SLS session. The value of the variable (or the credential) would be the value of the RADIUS server response attribute 20 ("callback_id").
radius.request.attr.NO
Optional: Allows to specify additional, custom RADIUS request attributes to be sent to the RADIUS server. The value of the attribute can be any valid SLS configuration expression (see SLS Administrator's Guide for information about JEXL-based expressions and variables).
The following example fills the value of the HTTP request header "hsp-listeneruri" as sent from the SES into the RADIUS attribute 14:
radius.request.attr.14=${header.hsp_listeneruri}A typical use case might also be to send a NAS-Identifier (32).
See e.g. http://freeradius.org/rfc/attributes.html for a list of all attributes.
radius.monitor.username
radius.monitor.password
Optional: If monitoring of backends is activated (monitor.check.interval set), all backends
are periodically monitored. The monitor for RADIUS backends tries to perform a "fake" login
with a dummy username and password. The RADIUS server is considered available if
authentication fails (typically the case with dummy credentials) or if it is successful,
but not if the server does not answer or other errors occur.
Default username and password are both "dummy". However, there can be technical reasons that cause the RADIUS server not even to answer to login attempts with these "fake" credentials. In this case, one or both of the above properties can be used to override the username and/or password to use for monitoring. Note that normally you would not set a correct password, only one that causes the RADIUS server to deny access.
radius.monitor.request.attr.NO
Optional: Allows to define arbitrary attributes to send during monitoring. A typical use case might be to send a NAS-Identifier (32) different from the one used during authentication in order to signal that the request is from a monitor. Note that these attributes are only evaluated the first time the monitor checks the availablility, so JEXL/Groovy expressions can only use things that are globally available.
The RADIUS adapter needs the following states in its login model in order to support both simple username / password and challenge / response authentication:
# Login model with support for challenge-/response flow.
model.challengelogin.uri=/auth
model.challengelogin.failedState=get.cred
model.challengelogin.state.10.name=get.cred
model.challengelogin.state.20.name=do.auth
model.challengelogin.state.20.nextState.1=do.success
model.challengelogin.state.20.nextState.1.if=${radius.response.type == '2'}
model.challengelogin.state.30.name=get.cred.challenge
model.challengelogin.state.40.name=do.authresponse
model.challengelogin.state.90.name=do.successNote: In the "do.authresponse" state, the RADIUS adapter sends the SLS "challenge" credential (as the RADIUS password), and the username credential to the RADIUS server.
The following properties must be set in the "sls.properties" file to use the RADIUS adapter for authentication and challenge / response:
adapter.authentication=radius adapter.mapping=radius adapter.challenge=radius
Note: The "adapter.mapping" property is only necessary if the model contains a "do.mapping" step, and the user ID mapping property "radius.mapping.attribute" has been set.
The PKI adapter allows to perform authentication using X.509 certificates. It may be deployed in a full PKI environment or in a minimal certificate trust environment.
The following features will give you a brief overview of the PKI Adapters functionalities:
- X.509 compliant
- Certificate validation via OCSP and/or CRLs.
- CRL caching for local and remote CRLs.
- Flexible certificate to user mapping.
- Dynamic selection of trusted CA and OCSP signer certificates as well as of CRL and OCSP checks to do during login with configurable trust groups.
- Support for Microsoft Windows PKI environment.
After a successful login, the PKI adapter sets a JEXL variable named "special.certificate" which holds the X509 certificate object (see "Special Variables" for details).
The PKI adapter is configured through a property file, usually named "pki-adapter.properties".
There are some settings that have to be adjusted in the SRM configuration. The first is a timeout setting in the server configuration (not a virtual host):
1. Timeout
SE_L1Cds_TimeOutRequestCounterTmo 120
The reason is that the user sometimes needs a few seconds to select the appropriate client certificate for the login (based on the browser configuration). If the time gap between the first and second request is too big, a Denial-of-service prevention mechanism of the SRM could invalidate the login session too early, if this timeout setting (default value is 20) is not increased.
The following settings are to be made within the SLS login location.
2. Allow SSL Headers
The following variable must be set in addition to any other headers allowed for the SLS location:
+%HSP_ssl
For example:
HGW_RequestHeaders +%SRM_ls_std +%HSP_std +%HSP_ssl
3. URL Query String
Since the SLS performs a redirect to its own URI location during the PKI login process with some additional URL parameter, the query string filter should be set unrestricted for the login location:
AC_StartQueryString ^.*$
4. Header Size Limit
Some request headers exchanged between SRM and SLS can grow beyond the usual size limit. Because of that, the following directive must be set on the server or virtual host (not the location):
LimitRequestFieldSize 16384
5. Require Mutual Authentication
On the location in question, enable mutual authentication (if it’s not enabled on the virtual host overall):
# Transport Layer Security (SSL/TLS)
Require expr "%{SSL_CLIENT_VERIFY} == 'SUCCESS'"The following properties are required to use the PKI adapter for the authentication (certificate verification) and mapping step:
adapter.authentication=pki adapter.mapping=pki
And the following states are required in the login model:
model.login.uri=/auth model.login.failedState=get.usererror model.login.state.3.name=do.cert.auth model.login.state.7.name=do.mapping model.login.state.9.name=do.success model.login.state.10.name=get.usererror
The PKI credential provider must be activated (check for correct provider numbering based on your current configuration):
# PKI Certificate provider cred.provider._<no>_=certificate cred.provider._<no>_.cred.1.type=certificate cred.provider._<no>_.cred.1.source=header cred.provider._<no>_.cred.1.name=<header-name>
Where <no> is the number of the credential provider, and <header-name> the actual name of the HTTP header containing the client certificate.
pki.trusted.ca.dir
A custom directory where the trusted CA certificate files are stored. If no value is supplied, the default directory is ./WEB-INF/trustedCas
(In a CA hierarchy, supply all trusted CA's.)
You may specify a relative path beginning with a dot from the web application directory. For security reasons make sure you put it into the /WEB-INF/… directory to keep it private.
pki.trusted.ocspsigner.dir
A custom directory where certificate files that are trusted as signers of OCSP responses are stored. If no value is supplied, the default directory is ./WEB-INF/trustedOcspSigners
You may specify a relative path beginning with a dot from the web application directory. For security reasons make sure you put it into the +./WEB-INF/…+to keep it private.
pki.check.<nr>
Certificate validation steps to do. Possible values for identifying the step:
-
ocspPerform OCSP validation. Fall through to next step if could not obtain a definitive CertStatus of either 'good\' or 'revoked\'. -
crlPerform CRL check.
If the CRL check is present, it must be the last step. Step numbers must be 1 and up, without gaps (1,2,3,…). Only client certificates will be checked (not CA certificates).
pki.crl.check
Deprecated setting to enforce CRL checking. Only has an effect if no pki.check.<nr> settings exist and in that case is equivalent to pki.check.1=crl, with no further validations steps.
pki.validation.timeout
Total timeout for all validation steps in seconds. Default is 60.
pki.crl.check.ignore.dates
Defines if the "issuing date" \& "next update date" should be ignored in all CRLs. This property prevents users from being rejected, if no up to date CRL can be retrieved. Set this property to true to ignore dates. Otherwise set it to false (recommended).
pki.crl.plugins
Choose how and in what order you want to check the CRLs for revoked certificates. (see "Plugins")
pki.crl.update.interval
The periodic update interval of cached CRLs in minutes. Supply a number from 1 to \* or 0 for no CRL caching. (30-120 minutes are recommended)
NOTE: If the URL for a CRL is not reachable, the SLS will write a corresponding exception log, but not change the currenlty locally cached CRL list. So the certificate validation process will still run with the currently locally available CRLs.
pki.crl.dir
To use local CRL files, set the CRL directory. This property will be used by one of the plugins. (see "File CRL Plugin")
pki.cert.mapping.attribute
Defines from what certificate attribute the username should be determinded.
Valid values are: subjectDN, email or an OID (e.x.: 2.5.29.17)
(see "Certificate mapping")
pki.cert.mapping.regex
Defines a regular expression for extracting the actual username of the attribute. (see "Certificate mapping")
pki.ocsp.force.url
URL to use for all OCSP requests, independently of what is indicated in the certificate.
pki.ocsp.responder.maxage
Maximal age than an OCSP response is allowed to have (thisUpdate) in seconds. Default is 0 (no maximal age).
pki.trustgroup.<alias>.trusted.ca.certs
Comma-separated list of filenames of CA certificates in the configured directory of CA certificates to trust for this trust group alias. Default is all certificates in the configured directory for CA certificates.
Example: pki.trustgroup.apple.trusted.ca.certs=apple.cer
pki.trustgroup.<alias>.trusted.ocspsigner.certs
Comma-separated list of filenames of OCSP signer certificates in the configured directory of OCSP signer certificates to trust for this trust group alias. Default is all certificates in the configured directory for OCSP signer certificates.
Example: pki.trustgroup.apple.trusted.ocspsigner.certs=apple-ocsp.cer
pki.trustgroup.<alias>.useFileCrl
Whether to use the file CRL plugin or not for this trust group. Only has an effect if the file CRL is globally active by configuration. Default is true.
Example: pki.trustgroup.apple.useFileCrl=false
pki.trustgroup.<alias>.useUriCrl
Whether to use the URI CRL plugin or not for this trust group. Only has an effect if the URO CRL is globally active by configuration. Default is true.
Example: pki.trustgroup.apple.useUriCrl=false
pki.trustgroup.<alias>.useOcsp
Whether to use OCSP or not for this trust group. Only has an effect if OCSP is globally active by configuration. Default is true.
Example: pki.trustgroup.apple.useOcsp=true
The PKI Adapter may be configured to look up certificate revocation lists of user certificates. This enhances your SES deployment with a tighter security policy. Make sure that you are familiar with the impact of using CRL checking and be aware of the correct configuration settings for your specific deployment.
Currently there are two CRL fetching plugins supplied. They are included in the PKI Adapter distribution. Once you know in which way you want to check certificate revocation, you must configure the correct plugin, for example as follows (usage of the file CRL plugin):
pki.crl.plugins=com.usp.sls.pki.service.crl.CachedFileCRL
You may specify several plugins separated by commas. Note that in case you specify multiple plugins, verification will stop at the first plugin that found a CRL and the certificte was not revoked on that CRL.
Name: com.usp.sls.pki.service.crl.CachedFileCRL
This plugin allows you to manage CRLs in the file system. You must specify a local directory from where all CRLs should be retrieved. For example:
pki.crl.dir=/data/sls/crls
You may specify a relative path beginning with a dot from the web application directory. For security reasons make sure you put it into the +./WEB-INF/…+to keep it private.
If you use this plugin, make sure you periodically update the files in the desired CRL directory. All CRL files will be reloaded before expiration or in the defined update interval.
You may supply multiple CRL files issued by the same CA. This may come in handy in case you use delta CRLs.
If no CRL is found for the CA, verification fails (further plugins are not checked).
A typical setting might define two validation steps: OCSP followed by CRL as a fallback if OCSP is not accessible. In the future, possibly additional online validation schemes might be supported besides OCSP.
In the list below validation automatically proceeds to the next line, unless explicitly noted:
- If certificate has expired or is not valid, yet, fail.
-
If certificate is not signed by a trusted CA certificate (one of the certificates in the directory specified by
pki.trusted.ca.dir), fail. - If certificate is a CA certificate, success.
If OCSP validation is configured (
pki.check.<nr>=ocsp):-
If no OCSP URL is forced (
pki.ocsp.force.url) and there is no OCSP URL in the certificate, skip to after OCSP validation. - Compose OCSP request and try to get response. If you do not get a ResponseStatus success, skip to after OCSP validation.
Verify signature of OCSP response. There are three cases:
- Response signed by issuer of client certificate.
-
Response signed by an implicitly trusted OCSP signer certificate (one of the certificates in the directory
pki.trusted.ocspsigner.dir). - Response signed by a certificate that is valid and signed by the issuer of the client certificate, and the certificate is authorized to sign OCSP responses (certificate extension).
- If none of these cases applies, skip to after OCSP validation.
- If CertStatus is good, success. If CertStatus is revoked, fail. If CertStatus is unknown or something else, continue.
-
If no OCSP URL is forced (
If CRL check is configured (
pki.check.<nr>=crl):- Check certificate status using configured CRL plugins.
- If suitable CRL found: fail if revoked, success if not revoked.
- If no suitable CRL found, fail.
- Success.
The total validation timeout (pki.validation.timeout) is divided between validation steps as follows. If the next step is the last one, it gets all of the remaining time, else it gets half of the remaining time. If a validation step times out and there are further steps, these are tried with the remaining time. If no time remains, validation fails.
There are basically three possibilities to map certificates to a username. First, you must specify which attribute in a certificate you want to use for the mapping process by the property pki.cert.mapping.attribute. Second, you must specify a correct regular expression to parse the desired username from the attribute value. There is a regular expression reference in the SLS Administration Guide Appendix.
This is probably the most common way to retrieve a username. It is done as following:
Example
Parsing the CN out of CN=username,OU=SES development,C=CH
pki.cert.mapping.attribute=subjectDN
pki.cert.mapping.regex=CN=(.),OU=.
Checks all email addresses that are contained in the subject field as well as email addresses that are contained in the SubjectAltName extension, if present.
Example
Use the users email address of the certificate.
pki.cert.mapping.attribute=email
pki.cert.mapping.regex=(.*)
List of some extension OID’s:
2.5.29.17 - Subject Alternative Name
2.5.29.19 - Basic Constraints
2.5.29.30 - Name Constraints
2.5.29.32 - Certificate Policies
2.5.29.33 - Policy Mappings
2.5.29.37 - Extended key usage
Example
Parsing the Windows Logon ID out of a Subject Alternative Name similar as "username@myDomain.com". This may be useful in a Windows PKI environment. The Subject Alternative Name corresponds to the User Principal Name.
pki.cert.mapping.attribute=2.5.29.17
pki.cert.mapping.regex=.([a-zA-Z]\*)@.
Since the PKI Adapter generates extensive traffic between the SES and the SLS it is important to increase the maxHttpHeaderSize to 48k. This property must be set in the server.xml for the specific connector.
<Connector port="8080" maxHttpHeaderSize="48000" …
If you are using an other Servlet Container, check for a similar property in this context.
Trust groups allow to tailor trusted CAs and OCSP signers, as well as whether to
do CRL and/or OCSP verifications dynamically. They are configured with several
configuration proporties documented further above, in the format
pki.trustgroup.<alias>.<suffix>=<value>.
Basically, a trust group can define a certain list of trusted CA certificates to be used for the login (instead of all CA certificates in the "trustedCa" directory), and if OCSP and / or CRL should be used.
Each "Trust Group" is basically just an abstract definition of what features to use for an authentication, grouped together with an alias. When the login starts, the appropriate "Trust Group" can then be selected in the model, using the JEXL function "pki.setTrustGroup(alias)".
The following example shows two trust groups; one of which uses OCSP, the other one doesn’t. Note that CRL and OCSP must explicitely be disabled for a trust group if they are not to be used, since they are active by default:
# Trust Group "no-ocsp" with CA "company" pki.trustgroup.no-ocsp.trusted.ca.certs=company.cer pki.trustgroup.no-ocsp.useFileCrl=true pki.trustgroup.no-ocsp.useUriCrl=true pki.trustgroup.no-ocsp.useOcsp=false # Trust Group "with-ocsp", with OCSP, and CA's "ACME" and "Portal" pki.trustgroup.with-ocsp.trusted.ca.certs=acme.cer,portal.cer pki.trustgroup.with-ocsp.ocspsigner.certs=acme-ocsp.cer pki.trustgroup.with-ocsp.useFileCrl=true pki.trustgroup.with-ocsp.useUriCrl=true pki.trustgroup.with-ocsp.useOcsp=true
The following model state would then choose the OCSP-enabled trust group "with-ocsp":
model.login.state.20.name=do.generic-setTrustGroup
model.login.state.20.action.1=${pki.setTrustGroup('with-ocsp')}PKI
A public key infrastructure (PKI) is an environment that establishes a level of trust between different entities. It allows binding of public keys to users. The public keys are typically in X.509 conform certificates.
X.509
X.509 specifies a standard format for public key certificates and algorithms.
CRL
A certificate revocation list (CRL) is a list of certificates (more accurately: their serial numbers) which have been revoked, are no longer valid, and should not be trusted anymore.
CDP
A certificate distribution point (CDP) defines the URI location a CRL may be retrieved to check a certificate for revocation.
OCSP
Online Certificate Status Protocol. Defined in RFC 2560. Defines an internet standard for validating certificates without requiring CRLs.
The RSA SecurId adapter enables a transparent SecurId logon. It allows users to authenticate with a RSA SecurId token. The SLS will represent an Authentication Agent and pass the user login credentials to the RSA Security Manager to verify them. This connection is based on a proprietary secure protocol.
The following features will give you a brief overview of the RSA Adapters functionalities:
- Next Token Mode This feature is used for synchronization of the token with the RSA Security Manager and to increase the security level, after a specifyable number of unsuccessful logins.
- New PIN Mode If a user requires to set a new password, the Login Service forces the user to define a new password.
The current RSA client API used by the SLS provides full support for ACE servers up to version 5. With newer releases, while the authentication process still works, there are known issues concerning the automatic synchronization of the node-secret.
securid-adapter.properties
The RSA SecurId adapter is configured through a property file, usually named "securid-adapter.properties". This is the file where the RSA SecurID settings should be configured.
rsa_api.properties
The RSA client libraries used by the SLS are configured through a file called "rsa_api.properties". The SLS will generate this file based on the content of the "securid-adapter.properties" after the start. Therefore the file "rsa_api.properties" should never be edited by hand. But the location of this generated file can be changed from its default (in the SLS "WEB-INF" directory) with the following property.
securid.rsa.api.file.dir
Optional: Defines the absolute path of a directory where the "rsa_api.properties" file should be created. NOTE: The directory must already exist and be writable!
In a typical system environment you do not have to change any settings in this file.
RSA_AGENT_HOST
(Optional) Indicates the IP address of the Agent Host in the RSA Authentication Manager database. This property is only used if you have multiple network interfaces on your machine.
The following two properties must be set to use the RSA adapter for authentication and challenge / response:
adapter.authentication=securid adapter.changepassword=securid
In addition, the login model is configured in this file as well.
In some cases, it may be desirable to disable sending the password to the RSA backend (requires corresponding configuration of the ACE server as well). The following property allows to enable a mode where the adapter will send only the value of the SecurID code (secret) to the ACE server, and ignore the value of the password credential:
rsaadapter.pwdcred.autoconcat.disable
Optional: Set to "true" to disable inclusion of the password into the passcode. Defaults to "false". Example:
rsaadapter.pwdcred.autoconcat.disable=true
The typical default login model looks like this:
model.login.uri=/auth model.login.failedState=1 model.login.state.1.name=get.cred model.login.state.2.name=do.auth model.login.state.2.nextState=8 model.login.state.3.name=get.passwordpolicy model.login.state.4.name=get.changepassword model.login.state.5.name=do.changepassword model.login.state.5.failedState=4 model.login.state.6.name=get.changepasswordsuccessful model.login.state.6.nextState=1 model.login.state.8.name=do.success
IMPORTANT NOTE!
However, sometimes a login model may be more complex and contain other states before the "get.cred" state. This can lead to a particular problem whenever the RSA server sends the response code for "next tokencode required":
When "next tokencode required" is received, the SLS resets the model back to the first state, expecting it to be the "get.cred" state. For reasons of backwards compatibility, this behaviour cannot be changed.
So, if starting the model from the first state again is a problem, it is possible to use a "do.generic" state as the first model state, and perform conditional branching to other states, based on the value of the JEXL variable
rsa.auth.status
which contains the value of the status code. Example:
model.login.uri=/auth
model.login.failedState=1
model.login.state.10.name=do.generic
model.login.state.10.nextState.1=...
model.login.state.10.nextState.1.if=${rsa.auth.status == 'NEXT_CODE_REQUIRED'}
model.login.state.20.name=get.cred
model.login.state.30.name=do.authThere are several additional installation steps to perform before you will be able to use this adapter.
Contact the RSA Security Manager administrator to register your SLS instance as an Agent host in the RSA Security Manager. In the following screenshot you see the required Agent host configuration settings.
The file sdconf.rec contains the RSA Security Manager server information. Ask your Security Manager administrator to supply this file. Copy this file into the WEB-INF directory of your Secure Login Service instance.
This file is optional, thought, it may be important to guarantee failover and load-balancing functionalities. You may receive this file from your Security Manager administrator. Install this file as well into the WEB-INF directory of your Secure Login Service instance.
This file contains a secret used for the encryption of the communication between the SLS and the ACE server.
Please note that this file is client-host (aka SLS-host) specific. Meaning that it cannot just be copied from one SLS system to another one.
This file should usually be created automatically the first time the SLS contacts the ACE server. However, for some unknown reasons, this handshake process does not always seem to work. If it fails, the file must be installed manually following as described below.
The ACE administrator must create the node-secret file in advance. But the file created by the administrator will not be the final node secret, but a special "transportable" form. This "transport"-file must then be installed on the SLS system using a command-line tool from the ACE server software library:
agent_nsload
Given that the node secret transport file sent by the ACE administrator was named "nodesecret.rec", the actual command to be performed in the Unix shell would be:
> ./agent_nsload -f nodesecret.rec -p <pwd>
Where <pwd> is the password with which the file is protected. Ask the administrator to send you that password on a secure / separate channel, such as per SMS or by phone.
The installed node secret file must be in the "WEB-INF"-directory of the SLS, and must be named "securid.rec".
The SPNEGO adapter allows users to perform authentication over the SPNEGO protocol. SPNEGO describes the exchange of Kerberos tokens over http. This form of authentication is a user friendly solution in a trusted network environment. End users may not have explicitly to log in if they are already authenticated to a Kerberos Realm.
The following steps explain how the SPNEGO login works:
- A user requests a restricted site.
- The user is getting redirected from the SES to the SLS.
- The SLS initiates an SPNEGO authentication.
- The browser requests a Kerberos token for the SLS from the designated Key Distribution Center.
- The browser sends the token to the SLS.
- If the token is valid, the SLS grants the requested access rights to the client.
The following features will give you a brief overview of the SPNEGO Adapters functionalities:
- Windows compatible
- Support for Kerberos authentication
- SSO (Single Sign On) within a Kerberos Domain/Realm
The SPNEGO Adapter implementation has been tested with the following environment. Other Kerberos implementations or software environments could work but are not supported.
- Windows 2003 Active Directory (for the Kerberos infrastructure)
- Windows 2000 or XP with Internet Explorer or Mozilla Firefox joined to the AD domain.
- SLS running on Tomcat 5.5 with JAVA SDK 1.6 (required for the Kerberos GSS-API). To avoid incompatibilities with some combinations of IE and Windows, use at least JAVA SDK 1.6.0_29.
The following issues are common to cause hard to track problems with SPNEGO login:
- The principal name must start with "HTTP/", i.e. "HTTP/<host>@<REALM>". This is particularly important to implement since at least with Microsoft KDCs login will most likely still work without this prefix as long as only authentication to a single KDC is configured at the SLS, but as soon as more than one KDC is configured, most likely not all KDCs will be able to log in, even if otherwise configured correctly and would work if configured as only one. Note that SPNEGO mandates the HTTP prefix (RFC4559, Section 4.1) and that experimentally with MIT KDCs login only works with that prefix; Microsoft KDCs in combination with the JDK seem to be a bit more forgiving in that respect.
- Under Windows, the keytab file MUST be generated by the Administrator user. Other users can generate a keytab file as well, but the SLS will not be able to perform a login with it!
- NTP not in sync: For a Kerberos login to work, all participating systems must have the same time. Therefore, enabling NTP is recommended. However, note that simply enabling NTP does NOT necessarily sync the time immediately, since the NTP deamon usually brings the time in sync in small, slow increments. So it may be necessary to force an immediate time sync by hand.
- Communication: The SLS needs to be able to connect to the KDC directly, because it needs to be able to get a TGT (Ticket Granting Ticket) once.
- Authorization header size: The "Authorization" header can grow to very large sizes, depending on the user’s roles; this is typically a problem with some MS Active Directory setups. When a user has a very large number of roles, the "Authorization" header with the Kerberos ticket can grow to serveral KBs, which can cause problems due to both some general header size limitations in the HSP reverse proxy, as well as some specific "Authorization" header size limits in the HSP. In such cases, it may be advisable to review the AD setup, and check if it is possible to adapt the user configuration in order to reduce the number of roles.
SPNEGO is a generic super protocol defining the token exchange of the users web browser and the SLS. We use Kerberos as the underlying authentication schema.
SPNEGO stands for Simple and Protected GSS-API Negotiation Mechanism. It is defined in RFC 4178, which obsoletes RFC 2478.
The protection of the negotiation depends on the strength of the integrity protection. In particular, the strength of SPNEGO is no stronger than the integrity protection of the weakest mechanism acceptable to GSS-API peers.
Kerberos is a computer network authentication protocol, which allows clients and servers communicating over a network to prove their identity in a secure manner. First versions of Kerberos were proposed from MIT in the 1980s. There exist several implementations of the actual Kerberos V5. Variants of Kerberos are the default authentication protocols in MS Windows 2000, XP, 2003, Vista and MacOS X.
Kerberos uses as its basis the Needham-Schroeder protocol. It makes use of a trusted third party, termed a Key Distribution Center (KDC), which consists of two logically separate parts: an Authentication Server (AS) and a Ticket Granting Server (TGS). Kerberos works on the basis of tickets which serve to prove the identity of users.
The KDC maintains a database of secret keys; each entity on the network shares a secret key known only to itself and to the KDC. Knowledge of this key serves to prove an entity's identity. For communication between two entities, the KDC generates a session key which they can use to prove each other their identity.
For more information on Microsoft implementation of Kerberos v5, please refer to:
http://www.microsoft.com/windowsserver2003/technologies/security/kerberos/default.mspx
Several tutorial/documentation talking about Kerberos can be found on the net.
In addition to basic SES/SLS set up, the SPNEGO Adapter needs some special configurations.
- A properly configured Kerberos Realm.
- The Kerberos configuration for Java GSS-API.
- Adapted SES/SLS configuration.
Discussing all the configuration details of a Kerberos Realm would really go beyond the focus of this document. An example of Kerberos Realm is set up in Section "Example".
The web browser must be able to request a session ticket for the SLS from the KDC. We do also show how to generate the mapping of the URL the browser is asking for and the Kerberos principal.
In SPNEGO the web browser retrieves the user credentials from KDC. This enables a transparent login. The user does not see a login page.
Usually a browser desires permission before sending a SPNEGO token to a certain
web server. You have to add the authentication site to the list of allowed
sites. It is the hidden site where a not yet authenticated client is redirected
to by SES. For illustration we assume the site is "http://sls.dog.ch/sls/auth".
The configuration is very browser dependent. Please consult the documentation of your browser and version for proper configuration. Following some brief notes about two popular browsers:
Internet Explorer
You have to add the authentication site to the local intranet zone in the Browser Preferences.
-
Internet Properties - Security - Local Intranet - Sites - Enhanced - type
"
sls.dog.ch" and click add.
The following two default settings are mandatory:
- Internet Properties - Security - Custom Level… - User Authentication - Logon - [x] Auto logon only in Intranet zone.
- Internet Properties - Advanced - [x] Enable Integrated Windows Authentication
Mozilla Firefox
You have to add the authentication site to the trusted sites for negotiation in
the browser preferences. This can be done by using about:config. Just enter
"about:config" in the URL field and press enter. Afterwards, find the property
called "network.negotiate-auth.trusted-uris" and add the domain name, in our
example: "sls.dog.ch". You can enter multiple domain names comma seperated.
Kerberos is designed to enable secure point to point communication. The source or initiator of a connection requests the KDC to issue a ticket for a certain destination. In case of SPNEGO, the destination does not directly match to the Kerberos Principal Name. In a Windows domain the Principal Name is the user's login name.
Service Principal Name
A service demanding SPNEGO authentication is associated with a Service
Principal Name (SPN). For SPNEGO the full domain name of the authentication
site is important. The web browser will request the KDC for a Kerberos Service
Ticket with the currently logged in user as source, and the SPN "HTTP/<FQDN>"
as destination.
The mapping between the Principal Name and the Service Principal Name must be constructed by hand. A Principal can be associated with many Service Principal Names.
If the login page URL of the SLS is "http://sls.dog.ch/sls/auth", the SPN
would be "HTTP/sls.dog.ch". The SPN is constructed using the DNS record of
type A. This means that if the URL contains an alias name for the host (a CNAME
entry), the browser will still be able to construct the original SPN.
IMPORTANT: As already stated earlier, the SPNEGO standard mandates the "HTTP/" prefix. Without it, authentication experimentally still works with a single Microsoft KDC, but that is not guaranteed in any way and as soon as you have multiple KDCs configured, it experimentally no longer works. Also, experimentally with an MIT KDC it only ever works if the "HTTP/" prefix is present. Short, setups that do not use the prefix as part of the Service Principal Name, are not supported!
setspn
The utility setspn from Microsoft can add new mappings. The syntax is
"setspn -a <SPN> <Principal Name>". For example executing the command:
"setspn -a HTTP/sls.dog.ch SLSaccount" in a command shell maps the above login
domain with the principal "SLSaccount". The mapping can be tested with
"setspn -L SLSaccount". Note: Sometimes the client needs a restart before the
new setting is accepted.
The Java JAAS and GSS API is used to process the Kerberos authentication.
This API needs two configuration files. Their names and locations must be set in
the default property file for SLS; details in section
the section called “SLS Configuration”. The first file contains general
realm informations. We will call it always "krb5.conf". A minimal
configuration only contains one default realm, with its default domain and the
associated KDC.
krb5.conf
[libdefaults]
default_realm = DOG.CH
[realms]
DOG.CH = {
kdc = 2test.dog.ch
}Several KDCs (for failover) and timeouts can be configured as follows in the krb5.conf:
[realms]
DOG.CH = {
kdc = 2test.dog.ch
kdc = 3test.dog.ch
kdc_timeout = 3s
}The information about how the SLS logs in to the realm is stated in a file named
"spnegoLogin.conf". We give again a minimal example, fitting the example
Kerberos realm in Section "Example".
kdc_timeout
Note
In the Java Kerberos implementation, this setting uses millisecond units (while many other Kerberos implementations use seconds). However, it is possible to specify the value in seconds by adding an "s", e.g.
kdc_timeout = 10s
spnegoLogin.conf
com.sun.security.jgss.krb5.initiate {
com.sun.security.auth.module.Krb5LoginModule required
storeKey=true
principal="HTTP/sls.dog.ch@DOG.CH";
};Using this configuration, you are prompted for a password when starting the SLS. Mostly using a keytab file is the more appropriate solution. in the following table you can see the possible properties.
Table 55.1. Possible properties in spnegoLogin.conf
| Key | Value | Description |
|---|---|---|
storeKey | true | mandatory |
principal | <username> | the kerberos principal name |
useKeyTab | true|false | enables the use of a keytab file |
keyTab | <filename> | the name of the keytab file |
doNotPrompt | true|false | avoids prompting for password |
isInitiator | true|false | deny the principal initiating of connections |
As result, using a keytab file, you have the following configuration example:
com.sun.security.jgss.krb5.initiate {
com.sun.security.auth.module.Krb5LoginModule required
storeKey=true
principal="HTTP/sls.dog.ch@DOG.CH"
useKeyTab=true
keyTab=/export/home/pathtokeytab/keytab.file;
};Multiple principals that are tried one after the other can be configured like this:
com.sun.security.jgss.krb5.initiate {
com.sun.security.auth.module.Krb5LoginModule optional
storeKey=true
useKeyTab=true
keyTab="/var/lib/usp/sls/default/webapps/login/sls/WEB-INF/sls.coyote.keytab"
principal="HTTP/coyote.acme.org@ACME.ORG";
com.sun.security.auth.module.Krb5LoginModule optional
storeKey=true
useKeyTab=true
keyTab="/var/lib/usp/sls/default/webapps/login/sls/WEB-INF/sls.bugs.keytab"
principal="HTTP/bugs.acme.org@BUGS.ACME.ORG";
};See Javadoc for the JDK class javax.security.auth.login.Configuration,
e.g. https://docs.oracle.com/javase/8/docs/api/javax/security/auth/login/Configuration.html,
for what the allowed values "required", "requisiste", "sufficient" and "optional" mean.
Note: Observed behavior appeared to be that if you used "sufficient" and a KDC rejected login, then login would fail, i.e. the subsequent KDCs would not be tried, but if you used "optional", subsequent KDCs would be tried. Conversely, if a KDC was not reachable, observed behavior appeared to be that then both with "sufficient" and "optional" following KDCs would be tried.
keytab file
The keytab file contains trust information. From a security point of view
possession of a principal's keytab is equivalent to knowing its password.
Therefore the file should be handled carefully, only the SLS must have access
rights to it. We name our keytab file "keytab.file".
The command line utility ktab can generate keytab files. You can find it in
the "\\bin" directory of the JDK. The syntax is:
ktab -a <user name> [password] -k <keytab file>
If the password is not specified, it will be prompted on enter. Generating a keytab for our example in section "Example" could be done with the command:
ktab -a SLSAccount mypwd -k C:\keytab.file
Note, if useKeyTab is enabled, but the file could not be found, the SLS
prompts the user for a password, unless the property "doNotPrompt=true" is set.
krb5.ini
The Java utility ktab needs a configuration file "C:\Windows\krb5.ini" which
corresponds exactly to "krb5.conf". Just copy and rename the file on the
computer you want to use ktab.
We do not introduce any new or specialized configuration properties for the SPNEGO adapter. With a few changes the configuration for an SLS to authenticate by SPNEGO can be adapted from another SES/SLS configuration.
To allow the SLS to initiate a SPNEGO authentication, the HGW_Allow401 SES property is mandatory on the SLS location. Add this property to your configuration in the SRManager and the HttpListener or HttpsListener.
<Location /sls/auth> HGW_Host sls.dog.ch:80 HGW_Allow401 ...
The http headers named WWW-Authenticate in the SLS response and Authorization in the request must be able to pass the SES.
The following settings are configured in the default properties definition
for SLS: sls.properties.
Enable the SPNEGO Adapter
# Spnego Authentication Adapter adapter.class.spnego=com.usp.sls.spnego.SpnegoAdapter adapter.authentication=spnego
Login Model
# Login Model Configuration
model.spnego.uri=/auth
model.spnego.failedState=get.usererror
# Some browsers may send authorization header immediately, in which case
# the "do.spnegoinit"-state must be skipped.
model.spnego.state.1000.name=do.generic-checkChallenge
model.spnego.state.1000.action.1=${session.processNextGETasPOST()}
model.spnego.state.1000.action.1.if.1=${function.hasNonEmptyVariable('header.authorization') && header.authorization.toLowerCase().startsWith('negotiate ')}
model.spnego.state.1000.nextState.1=do.auth
model.spnego.state.1000.nextState.1.if.1=${function.hasNonEmptyVariable('header.authorization') && header.authorization.toLowerCase().startsWith('negotiate ')}
model.spnego.state.2000.name=do.spnegoinit
model.spnego.state.3000.name=do.auth
model.spnego.state.5000.name=do.success
model.spnego.state.6000.name=get.usererrorCredential Provider
# Credential Provider cred.provider.class.spnego=com.usp.sls.toolkit.http.cred.HttpStringCredentialProvider cred.provider.spnego=spnego # SPNEGO token from request header: Authorization cred.provider.spnego.cred.1.type=string cred.provider.spnego.cred.1.source=header cred.provider.spnego.cred.1.name=Authorization
GSS-API Configuration Files
# System properties for jaas and gss api system.property.java.security.krb5.conf=krb5.conf system.property.java.security.auth.login.config=spnegoLogin.conf
Remarks
The Java JAAS and GSS API is used to process the Kerberos authentication. We need Java System Properties to declare the location and names for configuration files of this API. The file location can be set using relative or absolute pathnames.
Since the user credential in the SPNEGO protocol is a kerberos token sent in an
http header named "Authorization", the appropriate credential provider is a
"HttpStringCredentialProvider".
The SLS does not receive a password credential of the authenticated user.
Therefore it is not possible to use the SES/SLS to authenticate the user for the
backend application with form based or basic authentication. Do not set the
property: "auth.type".
After a successful login, a "spnego.realm" script variable with the user’s
SPNEGO realm is created, plus the variables "spnego_ms_kerberos_password_login"
and "spnego_ms_kerberos_certificate_login" (see
"SPNEGO Adapter Variables" for details,
including supported ETypes ("ciphers") for obtaining the MS Login related variables).
The following checklist corresponds to a tested and working configuration with Kerberos V5 (Microsoft Windows 2003 Server Active Directory) and Windows XP Pro as client/browser. Other configurations could be possible but no support is given for them.
The following elements are necessary to make the SPNEGO / Kerberos authentication mechanism working.
- Creation of a domain user within the Active Directory associated with the SPNEGO Adapter (from now called SLSaccount).
- SPN correctly defined for the SLSaccount using the tool "setspn" (Microsoft Support Tools).
You can check the configuration with: "setspn -L SLSaccount". You should see in the result an entry HTTP/sls.dog.ch matching with the FQDN of the URL you are accessing (in this case https://sls.dog.ch/something). Refer to Section "Mapping" for more details.
- The SLSaccount must be enabled in the Active Directory and must have the flag "Password never expires" enabled.
- The workstation must be joined to a Windows domain.
- The joined domain is within the same forest where the SLSaccount is defined. If it is not the case, look at the Section "Kerberos cross-domain checklist" below for cross domain/forest authentication.
- The browser (Internet Explorer or Mozilla Firefox) has the correct configuration to allow Kerberos authentication. Refer to Section "Browser Single-Sign-On" for more details.
- The time is synchronized with the AD Domain Controller. Issued Kerberos tickets could be invalid otherwise.
- In case you use the …/system32/drivers/etc/hosts file for forcing name resolutions without DNS, make sure you do not have two names for the same IP entry. SPNEGO won't work correctly.
- Security issue: Force NTLM version 2. If a Kerberos error occurs, the browser will use NTLM as fallback authentication protocol. The Windows default configuration (2k and XP) is to allow NTLMv1 tokens across the network, which is highly not recomended since passwords are easily recovered from them. To avoid this, force the OS to use only NTLMv2, which is more secure than NTLMv1.
- The SLS Framework needs to be running on top of Tomcat 5.5 and JAVA SDK 1.6 (otherwise the Kerberos implementation GSS-API is not available).
-
The krb5.conf file exists and contains a "
default_realm" and a "kdc" entry. Refer to Section "Kerberos Configuration for JAAS and GSS API" for configuration help. - On the SLS: the spnegoLogin.conf file exists and is correctly configured. When you start the SLS and try to access the SPNEGO login page for the first time, you should see a log entry into the KDC's System Event Viewer, under Security, saying that a Kerberos user ticket has been delivered to the SLS for the user SLSaccount.
- The SLS SPNEGO Adapter has an up to date keytab.file file, containing the current defined password for the SLSaccount. Refer to Section "Kerberos Configuration for JAAS and GSS API" for more details on this file generation (remember to control the krb5.ini file).
- The time is synchronized with the AD Domain Controller (KDC). If not, the Kerberos won't work due to the ticket's lifetime.
Additionally, if you need to achieve cross domain/forest authentication, you need to be sure that the following configuration elements are correctly set.
Several scenario are provided corresponding to different realities and domain/forest structures.
Having one single forest for the entire organisation is the best solution for a Kerberos infrastructure. Cross domain authentication is transparent and automatically supported by the Active Directory.
- First of all, make sure that the SPNEGO Adapter works within the same domain.
- Make sure that the SPN is correctly configured in the destination/trusting domain. Kerberos will do the rest for you. The GC (Global Catalog) will locate the SPN within the forest and indicate to the client in the source/trusted domain the necessary steps to get a Kerberos service ticket for the destination domain/user (in our case the SLSaccount).
This is the first and "clean" method you can use to cross forests with the SPNEGO authentication.
The following requirements need to be fullfilled:
- Make sure both forests are raised to functional level 2003. To do this all domains within the forest need to be raised to functional level 2003 too. If this is not possible, look at the second method in Section "Different forests: multiple SLSaccounts in each forests".
- A Forest Trust is established between the forests (only possible if both functional level is 2003). The reason for this is that SPNs (Service Principal Names) are not accessible/searchable across forests if an External Trust type (or another type) is established.
- Your SES/SLS FQDN must be in the trusting domain, otherwise the SPN search across forests won't work. This means that if the trusting domain is A.com, your SLS FQDN must be something.A.com.
Global Catalog can locate SPNs in another forest only if a Forest Trust is established. With this type of trust, a cross mapping of the type *.A.ch and *.B.ch is made in both Global Catalog. This is what allows to find the SPN HTTP/something.A.ch in the other forest.
Establishing another trust type creates only a mapping with the Kerberos Realm of the other domain, which is not sufficient for the SPN to SLSaccount resolution problem.
When you are browsing the Kerberos protected resource, you don't know the exact user/Realm you are requesting access to. The only information you have is the FQDN (retrieved from the URL). The FQDN allows you to construct the SPN and only when it is located in the Kerberos infrastructure, you know for whom you need a serviceticket!
There is another really usefull scenario that can be used to establish authentication across forests if Forest Trust is not possible or if the SLS's FQDN is not within the domain.
Kerberos uses shared secrets between entities (KDC - user or KDC - computer) to encrypt service tickets given to users wanting to access another Kerberos protected resource. This shared secret is, in the Microsoft Kerberos implementation, the password for that user or computer. Since Microsoft password hash function do not yet use a salt, if you replicate the exact username with the same password in the second domain/forest, you can obtain service tickets from that second domain's KDC that the first domain's user can decrypt!!
To use this Microsoft Kerberos leak to cross forests for our SPNEGO authentication, you need to:
- Create a second SLSaccount in the second domain (same username and password as in the original domain).
- Define the correct SPN for this account in the second domain. The SPN is exactly the same as in the original domain. Ex: in the original domain we defined HTTP/something.A.ch, in the second domain we will set the SPN HTTP/something.A.ch to SLSaccount_even if we are in domain _B.ch.
- No trusts between domains or forests is needed.
Once this user is replicated, a client in the second domain will be able to find, within the same domain, a SPN corresponding to the FQDN accessed and will obtain a service ticket for the SLSaccount_of the second domain. This ticket will be given to the SLS SPNEGO Adapter and decrypted without any problems since the two _SLSaccount have the same passwod. Access will be granted to the user.
In this section we will set up a minimal Kerberos Realm including an SLS on a Windows Network and give some important hints on the general configuration.
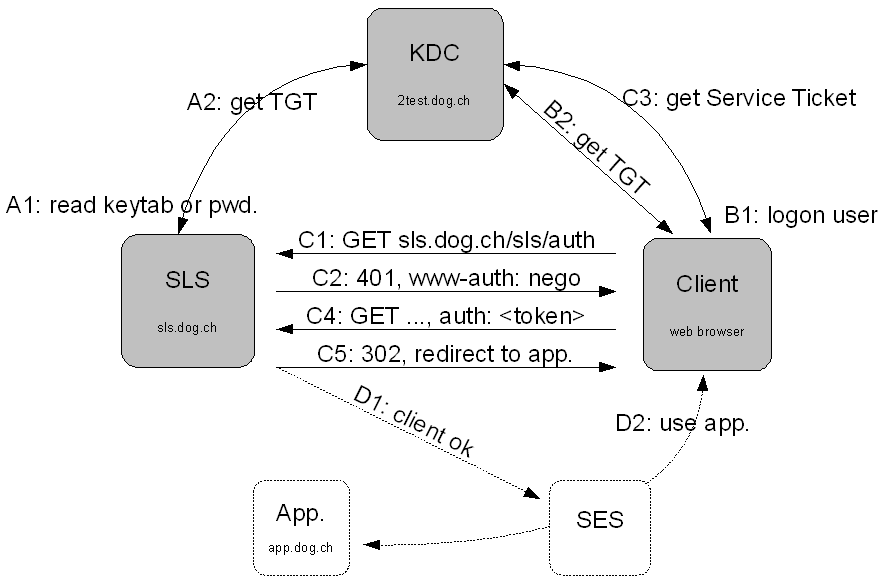
Our Network consists of three computers, connected through a ethernet hub. A Windows 2003 Server takes the role as Active Directory Server, DNS Server, and KDC. The SLS is running on a Windows XP machine, like the user's web browser.
.
| Role | OS | Computer Name | User Name |
|---|---|---|---|
AD Server | Windows 2003 | 2test.dog.ch | Admin |
SLS | Windows XP | computer_01.dog.ch | SLSaccount |
User PC | Windows XP | computer_02.dog.ch | Alice |
On the Active Directory Server we generate the domain users "SLSaccount" and
"Alice". We always choose default preferences. All the three computers are
part of the domain "dog.ch". The users can log in to the domain at any of the
computers. For the DNS resolving we add the entry "sls.dog.ch" and connect it
to the IP of "computer_01". On this computer we install the SLS and configure
it to listen for "/sls/auth" on port 80. Section
"Kerberos Configuration for JAAS and GSS API"
and "SES/SLS Configuration"
gives more information about configuration of the SPNEGO Adapter.
Keeping it as simple as possible - we directly access the (hidden) login site of
the SLS "http://sls.dog.ch/sls/auth". The part of configuring SES not specific
to the SPNEGO Adapter is omitted here. In a productive environment the user
would try to access a restricted site, and the SES would redirect him to the
above site.
The web browser will request the KDC for a Kerberos Service Ticket with the
currently logged in user as source, and the Service Principal Name
"HTTP/sls.dog.ch" as destination. We must construct the mapping between this
SPN and the Principal "SLSaccount". We execute the following command in a
command shell:
setspn -a HTTP/sls.dog.ch SLSaccount
The last step is to allow the client browser to send the SPNEGO token to the server. Section "Browser Single-Sign-On" explains it in detail.
The diagram contains several main steps (A, B, C, D) which are subdivided in a sequence of substeps. The dotted components on the bottom are independant of the SPNEGO Adapter and therefore not installed in our example.
A Startup SLS
B Logon User
C Authentication
When A and B succeed, we start the web browser and try to load the page
"sls.dog.ch/sls/auth". The SLS initiates the SPNEGO login by answering with
a http status code 401 and the header "WWW-Authenticate: Negotiate". The
browser requests a Service Ticket for the SLS. When the SLS receives the valid
token, the user is authenticated by SLS.
D Further processing. The user is now allowed to use the secured application.
Following a list of common problems and hints how they can be solved.
Your browser sends a Kerberos token, but the SLS does not accept it.
- If you changed the SLSaccount password, you need to regenerate the keytab file. Otherwise the issued Kerberos tokens are not valid. As result, your browser sends Kerberos token received from the KDC, but the SLS cannot open and use them.
- Check that the krb5.conf file on the SLS is correctly defined. The same for the spnegoLogin.conf file.
- The time difference between KDC (Domain Controller) and the SLS server is more than 5 minutes. It is highly advisable to synchronize time periodically.
The browser sends an NTLM token (Tl….) instead of a Kerberos token (YII….)
Most of the time it is a problem with Kerberos and its configuration. These are possible reasons:
- SLSaccount user is disabled, no Kerberos service ticket can be delivered from the KDC. As result the browser uses NTLM as fallback.
-
DNS resolution problem. If using hosts file entries, make sure you do not
have multiple names per IP address in your
…/system32/drivers/etc/hostsfile. -
SPN not correctly set. Check that the SLSaccount has the correct SPN
corresponding to the host FQDN you are trying to access in your browser URL.
This can be controlled using: "
setspn -L SLSaccount". - Restart the client if one of the reasons here above is the problem. Kerberos keeps a local cache of request failures.
- The client is trying to access the SES using the IP adress instead of the FQDN. As result, no mapping with the SPN is correctly made and NTLM is used as fallback. Check the URL used to access the SES.
- The Windows client logged on using cached credentials. No communication with the KDC is possible. As result the Kerberos infrastructure is not available to access the required resouce. NTLM tokens are used as fallback. Check the network connectivity and reboot the client.
Client does not send any "Authorization: Negotiate …." header
- Check the browser configuration. Kerberos negotiation need to be allowed for specific URL. See Section "Browser Single-Sign-On" for more details.
- Your Windows user is not currently logged into the Windows Domain or an error with the login occured. As conseguence, no Kerberos ticket can be fetched from the KDC (Domain Controller).
Set the SLS config property system.property.sun.security.krb5.debug=true and also debug=true
in spnegoLogin.conf, for example like this:
com.sun.security.jgss.krb5.initiate {
com.sun.security.auth.module.Krb5LoginModule required debug=true
storeKey=true
useKeyTab=true
keyTab="/path/to/WEB-INF/acme.keytab"
principal="HTTP/acme.org@ACME.ORG";
};Trace output is written to stdout, which on a Tomcat ends up normally in the catalina.out
log file.
Note that if the HTTP Adapter is used with SPNEGO-authenticated callouts, its settings might
interfere. In particular, if the property sun.security.krb5.debug is set (without
system.property. prefix), the HTTP Adapter sets the System Property
sun.security.krb5.debug to the specified value at very callout with SPNEGO authentication.
Active Directory
Directory service by Microsoft for central authentication and authorization in Windows based networks.
FQDN
Full Qualified Domain Name. Ex: www.google.com.
GSSAPI
Generic Security Services Application Program Interface
Kerberos
A standardized computer network authentication protocol.
Keytab
File containing trust (keys) for a kerberos principal.
KDC
The Kerberos Key Distribution Center manages the Kerberos users, services, keys, permissions, and tickets.
Realm
A Kerberos environment with a specified name and KDC. It can be partitioned in several Realms, and Realms can be connected.
SPN
Kerberos Service Principal Name.
SPNEGO
Simple and Protected GSSAPI Negotiation Mechanism
ST
Kerberos Service Ticket
Ticket
Kerberos uses tickets to authenticate and authorize users.
TGT
Kerberos Ticket Granting Ticket.
Token
The SPNEGO equivalent to a Kerberos ticket.
The SAML IdP Adapter implements a SAML 2.0 Identity Provider (IdP).
- The user visits a SAML Service Provider (SP).
- The SP redirects to the SLS IdP (which is typically at a different domain) with a SAML AuthnRequest (authentication request).
- The IdP validates the AuthnRequest.
- The user is authenticated using some means, typically using other SLS Adapters (e.g. username/password login with an LDAP Adapter).
- If the user presents the necesssary credentials, the IdP sends back a self-posting form that contains a SAML Response, which, in turn, contains a signed SAML Assertion that confirms that the user has been authenticated.
- The Response is posted to the SP, the SP validates the Assertion signature and the user is authenticated at the SP.
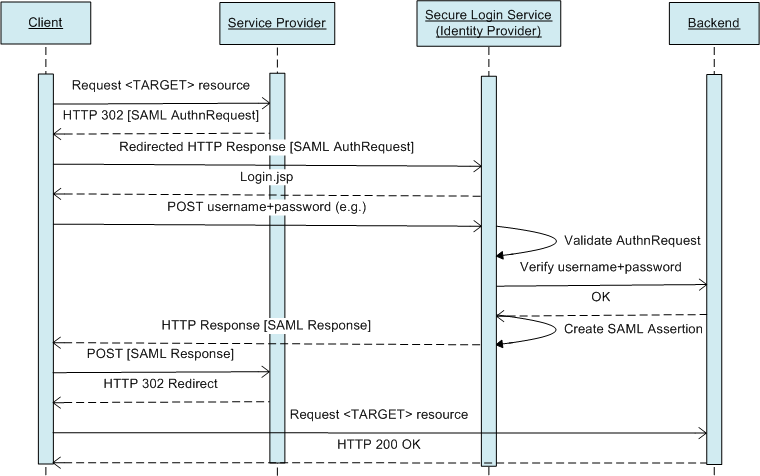
This shows an SP-initated login. An IdP-initiated login simply starts at the IdP with authentication there and then the Response containing the Assertion is posted to the SP without a prior AuthnRequest.
- The client visits the SLS IdP Single Logout location.
- The IdP redirects to the first SP with a SAML LogoutRequest.
- The first SP logs out the user and redirects back to the IdP with a SAML LogoutResponse.
- The IdP redirects to the second SP with a SAML LogoutRequest.
- The second SP logs out the user and redirects back to the IdP with a SAML LogoutResponse.
- The IdP returns a page to the client with the result of the logout.

- Supports the SAML 2.0 "Web Browser SSO Profile" ("Login") with HTTP Redirect Binding and HTTP POST Binding for the AuthnRequest and HTTP POST Binding for the Response, SP- and IdP-initiated.
- Optional SAML Single Sign On (SSO). As long as the HSP session remains authenticated after a first login of a user at the IdP, requests from other SPs (or the same SP) are automatically authenticated - except if configuration or the AuthnRequest mandate reauthentication of the user.
- For the AuthnRequest, the signature can be verified, NameID Policies are supported and also enforcing a given Authentication Context, details further below.
- The Assertion can contain any number of configurable attributes, is always signed and can optionally be encrypted. The enclosing Response can optionally be signed.
- Any number of SPs are supported.
- AuthnRequest, Assertion and Response can optionally be inspected and directly modified at the level of OpenSAML or at higher levels using various provided convenience functions.
- The SLS can act as an IdP Broker, i.e. it can dispatch authentication, acting as an SP, to other IdPs.
- Supports the SAML 2.0 "Single Logout Profile" ("Single Logout") with HTTP Redirect Binding and HTTP POST Binding for both LogoutRequest and LogoutResponse, IdP-initiated.
- The LogoutRequest can be sent signed, the signature of the received LogoutResponse can be verified.
- Lots of configurable options and JEXL functions for how to handle and create SAML messages, including the assertion and expecially its attributes, with different levels of abstraction and depth.
- SAML messages and the assertion can optionally be freely manipulated after receiving them and before sending them, even down to the OpenSAML Java API, in order to allow to provide workarounds immediately (without a new SLS release) in cases where SAML SPs are punctually not SAML conformant.
Attributes and elements in the AuthnRequest are handled as follows:
- NameIDPolicy: Supported, the function used to create the NameID is configurable via a JEXL Expression.
- ForceAuthn: Supported.
- IsPassive: Not supported, if true authentication fails.
- AssertionConsumerURL, AssertionConsumerIndex: Supported, if not present URL is obtained from the SP Metadata.
- ProtocolBinding: Supported, defaults to POST if not present.
- Subject, Scoping, Conditions, AttributeConsumingServiceIndex, ProviderName: Not supported, ignored if present.
- AssertionConsumerURL and ProtocolBinding must match an entry in the Metadata of the corresponding SP, else authentication fails.
- Typically, if authentication fails for reasons not related to the user not being able to present the necessary credentials and the AuthnRequest contained both an AssertionConsumerURL and a ProtocolBinding, a SAML error Response is sent back there.
- If sending back a SAML error Response is not possible, instead an error page is shown to the user.
- The Assertion contains Signature, Subject, Conditions, AuthnStatement and AttributeStatement, it can optionally be encrypted.
- A success Response contains Issuer, Status and Assertion, and optionally a Signature; encryption is not supported.
- The LogoutRequest contains Issuer and NameID, and if a RelayState was sent by the SP at login, it is sent along.
- Logout proceeds sequentially from SP to SP. This means that if one of the SPs does exceptionally not respond to the LogoutRequest at all, single logout remains incomplete until the user visits the IdP logout location once more and thus triggers Single Logout to proceed with the next SP (if any). Once logout is complete (possibly with errors from some SPs) a result page is shown to the user and the user is logged out from the SLS IdP (the HSP session is terminated).
- Encryption: The first found certificate in SP Metadata with usage "encryption" is used, with fallback to the first found certificate in SP Metadata with undefined usage.
- Signature verification: All certificates in SP Metadata with usage "signing" or undefined usage are tried one after the other; all with usage "signing" are tried before any with undefined usage.
A SAML 2.0 Service Provider must be available that supports the required Profiles and Bindings. Of course, using an SLS as SP is possible and supported.
Error handling for a simple password login is shown in the flow chart below. The IdP tries to respond to a SAML request message with a SAML Response whenever possible. Note that as long as the user can keep trying to present credentials, the SP gets no response back. This is common to happen, as the user might also simply change his mind and close the browser window, etc.
More complex login models regarding the SAML part of authentication are described later on. These cover features like presenting the user with a SP selection page if no SAML message was present in the initial request or automatic redirects to an URL at the corresponding SP if a SAML message contained an already expired AuthnRequest ("bookmark issue").
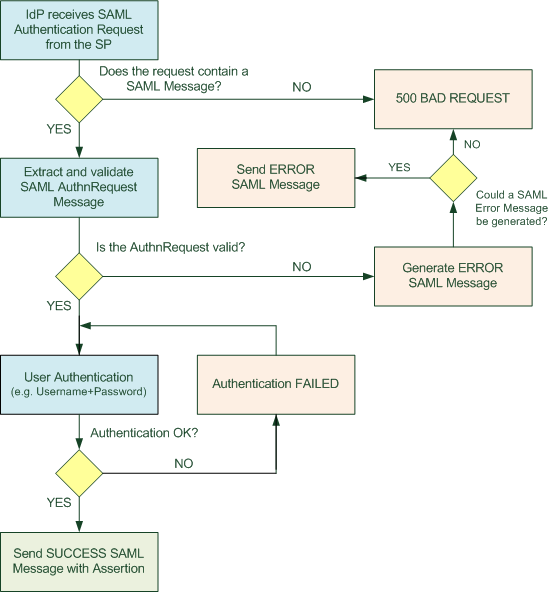
For SSO, after successful login, the following information is saved in the user info cookie (the cookie value is encrypted and stored in the HSP, it does not go to the client):
- All verified string credentials that have not explicitly secret values.
- A number of configurable attributes (key/value).
The main purpose of storing these values is that they can be reused as attribute values in the SAML Assertion. Credentials are restored from the cookie and set to verifed.
SSO lifetime is as long as the HSP session lifetime. Note that since SPs are usually at different domains than the IdP and thus user activity is not visible at the HSP except for the IdP logins, the HSP's SE_L1Cds_InactiveTimeOut setting for the IdP's virtual host should be increased as desired, as well as maybe other SE_L1Cds_\* settings.
The IdP adapter is configured through a Java properties file, usually named "idp-adapter.properties"
that must be installed in the "WEB-INF" directory of the SLS web application.
The standard SLS distribution is shipped with an example configuration file.
In a typical SAML setup (IdP or SP), there may a problem with how the SAML API calculcates the endpoint URL for a received message. In a SAML message exchange between two providers, each message always contains the intended message recipient URL. The SAML API of a receiver then basically compares the endpoint URL in the message with the URL of the current request, and if they don’t match, a message like this will be displayed:
... [CC:...] [RC:...] - SAML message intended destination endpoint 'https://www.acme.com/sls/auth' did not match the recipient endpoint 'https://localhost:13533/sls/auth'
In a Tomcat container, the URL of the current request is built from various factors, one of them the value of the "host" request header. In a regular HSP and SLS setup, the value of the header "host" in the incoming request will be the name of the SLS host as configured in the SRM, e.g. "localhost:port" or some internal hostname. As a result, the destination endpoint calculation of SAML will fail with the above error, because the SAML message itself contains an endpoint URL with the external (Virtual) host name, while the "host" header of the request contains an internal hostname.
SLS Remedy (Version 4.40.x and newer)
The SLS of version 4.40.x and newer contains this configuration property which allows to enable a mechanism that lets the SLS dynamically set the correct, external hostname in the current request based on custom headers sent by the HSP:
auto.host.header.enable
Set this property to true to enable the fix:
auto.host.header.enable=true
For older SLS releases, where this mechanism doesn’t exist, a change to the SRM configuration is required.
HSP Remedy (SLS pre-4.40.x)
To set the "host" header in the request to the SLS to the required, external
hostname, use the HGW_ForceHost HSP directive, for example:
HGW_ForceHost idp.acme.com:12345
Note
For pre-4.40.x SLS, it is also necessary to use HTTPS (SSL) for the connection between the SRM and the SLS.
A SAML credential provider must be defined (replace <no> by an actual number):
cred.provider.<no>=samlidp cred.provider.<no>.cred.1.type=saml cred.provider.<no>.cred.1.source=header cred.provider.<no>.cred.1.name=does-not-matter
There are a number of IdP specific JEXL functions that are used in models and JSPs. See the SLS JEXL guide for a description of these functions ("idp").
In order to use the IdP adapter, some properties have to be defined in the
idp-adapter.properties file.
idp.entity.id
The EntityID of the IdP. Example:
idp.entity.id=https://xyz.acme.com/idp/sls
idp.keystore.file
Path and filename of the keystore that contains private key and certificate of the IdP. Can be an absolute path or a path relative to the web application. Example:
idp.keystore.file=WEB-INF/idp/idp.jks
idp.keystore.type
The IdP keystore type. Default is JKS (a Java keystore). Example:
idp.keystore.type=PKCS12
idp.keystore.pass
The IdP keystore passphrase. Example:
idp.keystore.pass=jsdi284ksau1m49284j234239c3dleuw
idp.keystore.keypair.alias
The alias of the IdP key pair (private key plus certificate) in the key store. Example:
idp.keystore.keypair.alias=idp
The key pair alias can be overridden on a per-SP basis. See the property
idp.sp.<no>.keystore.keypair.alias below.
idp.keystore.future.keypair.alias
The alias of a future IdP key pair (private key plus certificate) in the key store. Is not used by the IdP except always exported in IdP metadata, see the section Replacing the IdP key pair and certificate for how to use this setting.
idp.sso.<binding>.url
The URL to use for each supported binding for SSO (Web Browser SSO Profile). Binding can be "redirect", "post" or "artifact". Currently "redirect" and "post" are supported. The URL given is so far simply the SLS login location. Example:
idp.sso.redirect.url=https://xyz.acme.com/idp/sls/auth
idp.slo.<binding>.url
The URL to use for each supported binding for SLO (Single Logout Profile). Binding can be "redirect", "post" or "artifact". Currently "redirect" and "post" are supported. The URL given is normally the SLS location of the SLO model. Example:
idp.slo.redirect.url=https://xyz.acme.com/idp/sls/slo
idp.redirectWithMetaRefresh
Determines whether to use the “meta refresh” mechanism when SAML Redirect binding is configured.
“Meta refresh” is a feature of HTML. Redirecting with “meta refresh” is a (non-standard) alternative to the standard HTTP Redirect (status code 302). This feature can be a lifesaver in situations where excessive redirection with HTTP Redirect would fail, typically in SLO scenarios with many SPs. This usually happens because some major browsers limit the number of redirects they follow.
Allowed values are true, false, or any comma-separated combination of sso
and slo. Defaults to false (that is, never redirect with “meta refresh”).
idp.redirectWithMetaRefresh=sso,slo
idp.blockcipher
Defines the block cipher to use for encrypting the assertion (if encrypting the assertion). Possible values include:
Default is the first item in the list (unless a block cipher is specified for a given SP).
idp.message.sigalg
Defines the signature algorithm to use for signing SAML messages. Possible values include:
Default is the first item in the list (unless a signature algorithm is specified for a given SP). Algorithms with SHA-1 should not be used any more unless the partner cannot handle stronger algorithms, because SHA-1 has been broken. Note that for Redirect Binding, i.e. signature not in XML but in request parameters, only exactly the algorithms above are supported.
Note that for XML signatures you might want to adapt the global setting for the "XML Signature Reference Digest Algorithm" to match the strength of the strongest signature algorithm.
idp.issueinstant.offset.secs
Offset in seconds to subtract from the issue instant in Assertions and Responses. Use as workaround for problems with clock sync on IdP and SP. Note however, that some SPs will conversely not accept Assertions that have nominally been issued before the Request was created/sent. Default is 0. Example:
idp.issueinstant.offset.secs=60
idp.assertion.validity.secs
Validity period of Assertion and conditions in Assertion (issue instant offset is added to that). Default is 600 sec (10 min). Example:
idp.assertion.validity.secs=300
idp.assertion.authentication.method
Authentication method in the Assertion. Example:
idp.assertion.authentication.method=urn:oasis:names:tc:SAML:2.0:ac:classes:Password
idp.assertion.sigalg
Defines the signature algorithm to use for signing SAML assertions. Possible values include:
Default is the first item in the list (unless a signature algorithm is specified for a given SP). Algorithms with SHA-1 should not be used any more unless the partner cannot handle stronger algorithms, because SHA-1 has been broken.
Note that for XML signatures you might want to adapt the global setting for the "XML Signature Reference Digest Algorithm" to match the strength of the strongest signature algorithm.
idp.assertion.attributes.legacyFormat
If set to false, attributes in the assertion are created such that the Assertion is valid according to the respective XML Schema. If set to true (which is the default if the property is not configured), the "xs" namespace declaration is missing.
Some SPs cannot handle the new format in the case of base64 encoded attributes if the assertion had been sent encrypted, hence the legacy format is the default. Conversely, the Google Apps SP validates the XML Schema and rejects assertions with the legacy attribute format. However, in the use case of Google Apps, no attributes are currently needed anyway.
idp.assertion.nameid.<no>.format idp.assertion.nameid.<no>.allowcreate idp.assertion.nameid.<no>.value
These settings define supported NameIDs. Settings are numbered from 1 upwards.
When processing an AuthnRequest, the NameID to be used is determined as follows:
- If the AuthnRequest contains a NameIDPolicy it is taken to specify the NameID to use.
-
Else, the SP metadata is consulted: the first NameIDFormat that has a
corresponding
ipd.assertion.nameid.<no>.formatconfiguration property is used. - Else, the first NameID in the configuration is used as a fall-back.
The suffixes "format" and "allowcreate" correspond to the respective entries in the NameIDPolicy and must both match for the setting to match. The setting with the suffix "value" defines the NameID value, typically a JEXL function is used here.
Example:
idp.assertion.nameid.1.format=urn:oasis:names:tc:SAML:2.0:nameid-format:transient
idp.assertion.nameid.1.allowcreate=true
idp.assertion.nameid.1.value=${idp.createRandomId()}idp.assertion.attr.<no>.nameformat idp.assertion.attr.<no>.name idp.assertion.attr.<no>.friendlyname idp.assertion.attr.<no>.value idp.assertion.attr.<no>.value.variable idp.assertion.attr.<no>.value.type idp.assertion.attr.<no>.profile
These settings define the attributes to include in the Assertion, settings numbered from 1 upwards.
(Side remark: For Google Apps, no attributes should be added,
or set idp.assertion.attributes.legacyFormat to false.)
The setting with suffix "nameformat" identifies the NameFormat XML attribute in the assertion, allowed values are "basic" and "uri". (This replaces the attribute with suffix "type" that is now deprecated but still supported with same meaning as suffix "nameformat".)
The setting with suffix "name" is for the full name (typically a urn), the one with suffix "friendlyname" is for a shorter name for human readers.
The value can either be indicated directly as a single string value with the setting with suffix "value" or indirecty by indicating a variable name in the setting with suffix "value.variable". In the latter case, the variable may contain either a single string value or a (possibly empty) array of strings. Note that the variable name
The optional setting with suffix "value.type" allows to define the type XML attribute of the attribute value, allowed values are "string", "base64" and "base64.provided". For "base64", the string value(s) are first UTF-8 and then base64 encoded, for "base64.provided" it is assumed that the string value(s) have already been encoded. Default if not indicated is "string".
The optional setting with suffix "profile" allows to enforce a profile for the attributes. Allowed settings are "basic" and "x500ldap". Default if not indicated is that no profile is enforced.
The first setting enforces the "Basic Attribute Profile" (name format must be "basic", value type must be "string"), the second setting enforces the "X500/LDAP Attribute Profile" (name format must be "uri", for each attribute value the XML attribute "Encoding" is set to "LDAP"), see examples below.
Example 1: Basic Attribute with a single attribute value
idp.assertion.attr.1.nameformat=basic
idp.assertion.attr.1.name=urn:oid:0.9.2342.19200300.100.1.1
idp.assertion.attr.1.friendlyname=uid
idp.assertion.attr.1.value=${session.getCred('USERNAME')}
idp.assertion.attr.1.profile=basicwhich is equivalent to making the following JEXL function call in the login model:
idp.setAssertionAttributeBasic('uid', 'urn:oid:0.9.2342.19200300.100.1.1', session.getCred(\'USERNAME\'))The resulting attribute would look like this:
<saml2:Attribute
FriendlyName="uid"
Name="urn:oid:0.9.2342.19200300.100.1.1"
NameFormat="urn:oasis:names:tc:SAML:2.0:attrname-format:basic"
xmlns:saml2="urn:oasis:names:tc:SAML:2.0:assertion"
>
<saml2:AttributeValue
xmlns:xsi="http://www.w3.org/2001/XMLSchema-instance"
xsi:type="xs:string">
myuser
</saml2:AttributeValue>
</saml2:Attribute>Example 2: X500/LDAP attribute with several attribute values
idp.assertion.attr.2.nameformat=uri idp.assertion.attr.2.name=urn:oid:1.3.6.1.4.1.1466.115.121.1.12 idp.assertion.attr.2.friendlyname=dn idp.assertion.attr.2.value.variable=attribute.ldap.ismemberof idp.assertion.attr.2.value.type=base64 idp.assertion.attr.2.profile=x500ldap
which is equivalent to making the following JEXL function call in the login model:
idp.setAssertionAttributeX500Ldap('dn', 'urn:oid:1.3.6.1.4.1.1466.115.121.1.12',attribute.ldap.ismemberof, 'base64')The resulting attribute would look like this (for two values):
<saml2:Attribute
FriendlyName="dn"
Name="urn:oid:1.3.6.1.4.1.1466.115.121.1.12"
NameFormat="urn:oasis:names:tc:SAML:2.0:attrname-format:uri"
x500:Encoding="LDAP"
xmlns:saml2="urn:oasis:names:tc:SAML:2.0:assertion"
xmlns:x500="urn:oasis:names:tc:SAML:2.0:profiles:attribute:X500"
>
<saml2:AttributeValue
xmlns:xsi="http://www.w3.org/2001/XMLSchema-instance"
xsi:type="xs:base64Binary">
Y249am9lLGRjPWFjbWUsZGM9b3Jn
</saml2:AttributeValue>
<saml2:AttributeValue
xmlns:xsi="http://www.w3.org/2001/XMLSchema-instance"
xsi:type="xs:base64Binary">
Y249amFuZSxkYz1hY21lLGRjPW9yZw==
</saml2:AttributeValue>
</saml2:Attribute>idp.sso.attr.<no>.key idp.sso.attr.<no>.value idp.sso.attr.<no>.value.variable
SSO attributes, numbered from 1 upwards. Only during a user login, these values are actually evaluated, for SSO they are taken from the last user login (i.e. from the user info cookie).
The value can either be indicated directly as a single string value with the setting with suffix "value" or indirecty by indicating a variable name in the setting with suffix "value.variable". In the latter case, the variable may contain either a single string value or a (possibly empty) array of strings. Note that the variable name must be indicated as a constant, e.g. "var", not as a JEXL expression, e.g. "${var}".
Example:
idp.sso.attr.1.key=email
idp.sso.attr.1.value=${<some-jexl-expression>}idp.sp.<no>.\*
Settings that define things that are specific per SP. See immediately below for the specific settings.
idp.sp.<no>.alias
This optional setting defines an alias for the SP. Default if not indicated is the the EntityID from the SP Metadata. The idea is to chose a short unique ID like "acme-ltd-sp" that can then be used to parametrize things, e.g. as part of a file name and also serve as a key to a obtain e.g. a human readable description of the SP from message resources, e.g. "Acme Ltd. Service Provider".
idp.sp.<no>.metadata.provider
Defines the provider to use for obtaining SP Metadata. Currently only "file" is supported.
idp.sp.<no>.metadata.location
Defines the location to get SP Metadata from. Currently for type "file" this must be the path and file name of the SP Metadata file. Can be an absolute path or a path relative to the web application.
NOTE: The metadata XML file may use <xi:include tags in order to separate
parts of the metadata file from its XML structure, e.g. the certificate data:
<xi:include xmlns:xi="http://www.w3.org/2001/XInclude" parse="text"
href="...certificate data text file..."/></ds:X509Certificate>idp.sp.<no>.blockcipher
Defines the block cipher to use for encrypting the assertion to the given SP (if encrypting the assertion). Possible values include:
Default is idp.blockcipher, resp. if that is not defined the first item
in the list above.
idp.sp.<no>.assertion.encrypt
Indicates whether to encrypt SAML Assertions sent to the SP or not. The setting can be set generally for all profiles and bindings ("true" or "false") or it can be set individually with a comma separated list of "<profile>.<binding>" pairs. Allowed values for profile are "sso" and "slo"; allowed values for binding are "redirect", "post" and "artifact". So far only the pair "sso.post" has any effect here.
Default is "false".
idp.sp.<no>.assertion.sigalg
Defines the signature algorithm to use for signing SAML assertions for the given SP. Possible values include:
Default is idp.assertion.sigalg, resp. if that is not defined the first item
in the list above.
Algorithms with SHA-1 should not be used any more unless the partner cannot
handle stronger algorithms, because SHA-1 has been broken.
Note that for XML signatures you might want to adapt the global setting for the "XML Signature Reference Digest Algorithm" to match the strength of the strongest signature algorithm.
idp.sp.<no>.message.sign
Indicates whether to sign SAML messages sent to the SP or not. The setting can be set generally for all profiles and bindings ("true" or "false") or it can be set individually with a comma separated list of "<profile>.<binding>" pairs. Allowed values for profile are "sso" and "slo"; allowed values for binding are "redirect", "post" and "artifact". So far only the pairs "sso.post", "slo.redirect" and "slo.post" have any effect here.
Default is "slo.redirect,slo.post". (Note that Assertions in a success SAML Response message are always signed.)
idp.sp.<no>.message.sigalg
Defines the signature algorithm to use for signing SAML messages to the given SP (if signing messages). Possible values include:
Default is idp.message.sigalg, resp. if that is not defined the first item
in the list above.
Algorithms with SHA-1 should not be used any more unless the partner cannot
handle stronger algorithms, because SHA-1 has been broken.
Note that for Redirect Binding, i.e. signature not in XML but in request
parameters, only exactly the algorithms above are supported.
Note that for XML signatures you might want to adapt the global setting for the "XML Signature Reference Digest Algorithm" to match the strength of the strongest signature algorithm.
idp.sp.<no>.message.checksign
Indicates whether to check signatures in SAML messages received from the SP or not. If active, unsigned messages are also rejected. Syntax is the same as for suffix "message.sign". So far only the pairs "sso.redirect", "sso.post", "slo.redirect" and "slo.post" have any effect here.
Default is "sso.redirect,sso.post,slo.redirect,slo.post". (Note that the SP is not obligated to sign messages and if message integrity can be enforced by other means, it may make sense to set this setting to "false". Besides, this setting may be useful for initial setup and testing.)
idp.sp.<no>.sso
Indicates whether to do SAML SSO or not. Default is true.
idp.sp.<no>.url
Optional setting that allows to specify a URL at the SP which initiates a SAML at the IdP. Default if not indicated is none (corresponding JEXL functions return null).
idp.sp.<no>.keystore.keypair.alias
Specifies the key pair alias to use to obtain certificate information from the
key store. This setting overrides the global setting
idp.keystore.keypair.alias. Specifying a specific key pair alias is
especially useful in a scenario where an IdP whose certificate is about to
expire serves a number of SPs. In such a scenario it may not be possible to
migrate all SPs to the new certificate at once. The property
idp.sp.<no>.keystore.keypair.alias makes it possible to migrate the SPs one
by one.
Example:
idp.sp.1.alias=acme-ltd-sp idp.sp.1.metadata.provider=file idp.sp.1.metadata.location=WEB-INF/idp/acmesp-metadata.xml idp.sp.1.message.sign=sso.post,slo.redirect idp.sp.1.message.checksign=true idp.sp.1.sso=false idp.sp.1.url=https://www.acme-ltd.com/sp idp.sp.1.keystore.keypair.alias=myidp
Here is a simple login model. Note that a second adapter (e.g. LDAP) is assumed to be defined for authentication. More complex login models essentially have to extend the part between do.saml.idp.handlemsg and do.saml.idp.sendmsg. It is important that the failed state of do.saml.idp.handlemsg is do.saml.idp.sendmsg, because then the SLS attempts to send back a SAML error Response to the SP, and only if this is not possible, displays an error page to the user.
Note also the first model state which does nothing and which is only needed if the login is initiated with an AuthnRequest sent with POST binding, as then the SLS skips the first state.
model.login.uri=/auth
model.login.failedState=get.cred
model.login.state.5.name=do.generic-skipped-if-post-binding
model.login.state.10.name=do.saml.idp.handlemsg
model.login.state.10.failedState=do.saml.idp.sendmsg
model.login.state.20.name=do.generic
model.login.state.20.nextState.1=do.saml.idp.sendmsg
model.login.state.20.nextState.1.if=${idp.isAuthenticated()}
model.login.state.30.name=get.cred
model.login.state.40.name=do.auth
model.login.state.50.name=do.saml.idp.sendmsgIn order to display IdP Metadata (e.g. for import into SP configuration), a separate model is used:
model.metadata.uri=/metadata model.metadata.failedState=show.jsp model.metadata.state.10.name=show.jsp model.metadata.state.10.param.jsp=jsp.idp.metadata
The IdpMetadata.jsp JSP that is displayed in this model accepts an additional
query parameter keypairalias that may be used to specify the key pair alias
to use for obtaining the certificate from the key store (overriding the default
key pair alias specified in the global property idp.keystore.keypair.alias).
An example request URL for IdP metadata with key pair alias "myidp" then might look like this:
https://idp.somehost.com/sls/auth?cmd=metadata&keypairalias=myidp
Here is the typcial model for Single Logout:
model.slo.uri=/slo
model.slo.failedState=show.jsp
model.slo.state.5.name=do.generic-skipped-if-post-binding
model.slo.state.10.name=do.saml.idp.handlemsg
model.slo.state.10.param.profile=SLO
model.slo.state.20.name=do.generic
model.slo.state.20.nextState.1=show.jsp
model.slo.state.20.nextState.1.if=${idp.isSloComplete()}
model.slo.state.30.name=do.saml.idp.sendmsg
model.slo.state.30.nextState=do.saml.idp.handlemsg
model.slo.state.40.name=show.jsp
model.slo.state.40.param.jsp=jsp.idp.logoutresultWith the settings idp.sso.attr.<no>.key and idp.sso.attr.<no>.value it is only possible
to define a fixed list of attributes for the SAML Assertion, i.e. the list is the same for
Responses to all SPs with identical attribute names, only the values can be calculated
selectively with JEXL expressions.
(Side remark: For Google Apps, no attributes should be added,
or set idp.assertion.attributes.legacyFormat to false.)
In cases where this is not flexible enough, it is possible to configure attributes flexibly in the model and to define attribute templates via JEXL scripts.
A typical login model which defines attributes separately for its two SPs could be configured as follows:
model.login.uri=/auth
model.login.failedState=get.cred
model.login.state.10.name=do.saml.idp.handlemsg
model.login.state.10.failedState=do.saml.idp.sendmsg
model.login.state.20.name=do.generic
model.login.state.20.nextState.1=do.generic-add-attrs
model.login.state.20.nextState.1.if=${idp.isAuthenticated()}
model.login.state.30.name=get.cred
model.login.state.40.name=do.auth
model.login.state.50.name=do.generic-store-sso-variables
model.login.state.50.action.1=${session.setUserInfoValue('domain', <jexl-expression-that-determines-domain>)}
model.login.state.60.name=do.generic-add-attrs
model.login.state.60.action.1=${runscript.jexl('WEB-INF/add-attrs-' + idp.getSamlMessageIssuerAlias() + '.jexl')}
model.login.state.90.name=do.saml.idp.sendmsgAfter presenting credentials at first login, information that is needed for attributes also
later (for SAML SSO) is stored in the user info cookie in the HSP session, using
session.setUserInfoValue(). (Note that the USERNAME and TOKENSELECTION credentials are
remembered and restored automatically, no need to store them separately).
Before creating the Assertion and sending the SAML Response, in the state do.generic-add-attrs,
attributes are set individually per SP, which is identified by its alias obtained with
idp.getSamlMessageIssuerAlias(). Aliases are usually short strings like "sp1" and "sp2"
so that they can be used as part of file names of JEXL scripts as above.
(Alternatively, it would also be possible to identify SPs via their EntityID obtained with
idp.getSamlMessageIssuer(), but then the automatic dispatching to scripts would have
to be replaced by a sequence of ifs).
The JEXL scripts (acting as attribute templates) contain lists of statements like these:
idp.setAssertionAttributeBasic('email', 'urn:oid:0.9.2342.19200300.100.1.3', session.getCred('USERNAME') + '@' + session.getUserInfoValue('domain'))The attributes defined by idp.assertion.attr.<no>.* are always added, but their values can be
overwritten in the model and new attributes can be added with the
idp.setAssertionAttribute[…](…) family of JEXL functions.
Experience shows that users bookmark the login location at the IdP. In case of a login with Redirect Binding, the bookmarked URL would include a formally valid SAML AuthnRequest, which the IdP would normally process and send a success Reponse to the SP, who would then usually not be able to handle the response because it was for an old request.
In this case it is often desired to simply redirect the user to a login location at the corresponding SP or maybe to let the user choose between several SPs. Similarly for access to the login location at the IdP without any SAML message.
For this purpose, there are JEXL functions and a JSP that are typically used similarly to the example below (the JEXL functions are in bold):
model.login.uri=/auth
model.login.failedState=get.cred
# determine if have no AuthnRequest or a bookmarked one+
model.login.state.10.name=do.generic
model.login.state.10.nextState.1=do.generic-redirect-or-select-sp
model.login.state.10.nextState.1.if=${!idp.hasSamlMessage() || idp.getSamlMessageAgeSecs() > 3600}
model.login.state.20.name=do.saml.idp.handlemsg
model.login.state.20.failedState=do.saml.idp.sendmsg
# (rest of normal login model not shown)
# determine redirect URL
model.login.state.10000.name=do.generic-redirect-or-select-sp
model.login.state.10000.action.1=${function.setVariable('redirectUrl', idp.getSamlMessageIssuerSpUrl())}
model.login.state.10000.nextState.1=show.jsp-select-sp
model.login.state.10000.nextState.1.if=${redirectUrl == null}
# redirect to SP
model.login.state.11000.name=do.redirect
model.login.state.11000.param.url=${redirectUrl}
model.login.state.11000.param.url.absolute.allow=true
# show SP selection JSP
model.login.state.12000.name=show.jsp-select-sp
model.login.state.12000.param.jsp=jsp.idp.spselectionThe JEXL function idp.getSamlMessageIssuerSpUrl() returns a URL if a SAML message was
present in the HTTP request and if there is a URL configured for the corresponding SP
(correlated via the SP EntityID in the SAML message).
IdP-initiated login is very similar to the SP selection described above.
The user accesses the IdP and is presented a JSP for SP selection, only that this time,
the links do not point to the login location at the SP but instead point to the IdP itself,
with a request parameter that contains the EntityID of the desired SP to log in.
In fact, it is even the same JSP that is used, except that before using it the
JEXL/Groovy variable idp_IdpSpSelection_jsp_idp_initiated is created and set to true.
After selecting the SP, the JEXL/Groovy idp.setLoginSp(entityIdOrAlias) must be
called to set the SP. Note that calls to idp.isAuthenticated() and idp.isReauthentication()
for SSO should only be called after setting the SP, because they need to know the SP; before
calling idp.setLoginSp(entityIdOrAlias) they both return always false.
model.login-idp-init.uri=/login-idp-init
model.login-idp-init.failedState=get.cred
#
# skip SP selection JSP if SP is already indicated
model.login-idp-init.state.500.name=do.generic-skip-sp-selection-if-indicated
model.login-idp-init.state.500.nextState.1=do.generic-choose-login-sp
model.login-idp-init.state.500.nextState.1.if=${function.hasNonEmptyVariable('parameter.spentityid')}
#
# show SP selection JSP with URLs for IdP-initiated login
model.login-idp-init.state.1000.name=do.generic-select-sp
model.login-idp-init.state.1000.action.1=${function.setVariable('idp_IdpSpSelection_jsp_idp_initiated', true)}
model.login-idp-init.state.2000.name=show.jsp-select-sp
model.login-idp-init.state.2000.param.jsp=jsp.idp.spselection
#
# choose SP selected by user
model.login-idp-init.state.3000.name=do.generic-choose-login-sp
model.login-idp-init.state.3000.action.1=${function.setVariable('spEntityId', parameter.spentityid)}
model.login-idp-init.state.3000.action.2=${idp.setLoginSp(spEntityId)}
#
# skip authentication if already authenticated (SSO)
model.login-idp-init.state.4000.name=do.generic-check-sso
model.login-idp-init.state.4000.nextState.1=do.generic-store-sso-variables
model.login-idp-init.state.4000.nextState.1.if=${idp.isAuthenticated()}
#
# login at IdP
model.login-idp-init.state.5000.name=get.cred
model.login-idp-init.state.6000.name=do.auth
#
# (set assertion attributes etc., as desired, not shown)
#
# send Response with Assertion to SP
model.login-idp-init.state.9000.name=do.saml.idp.sendmsg
model.login-idp-init.state.9500.name=get.usererrorIt is possible to separate SAML message creation from message finalization (sign/encrypt) \+sending and to modify SAML messages between these two steps. This allows, for example, to implement workarounds in order to interoperate with SPs that punctually violate the SAML 2.0 standard, and it allows to flexibly provide additional SAML IdP features that are not or not yet available by SLS configuration properties or JEXL functions.
The actions and JEXL/Groovy variables in detail (applies to SAML Login, not to SAML Single Logout):
-
do.saml.idp.handlemsg(mandatory): Creates the variable idp_authn_request which wraps the AuthnRequest. -
do.saml.idp.create.assertion(optional): Creates the variable idp_assertion, which wraps the (yet) unsigned and unencrypted Assertion. The assertion contains at this point only a single empty AttributeStatement, i.e. also missing (yet) in the Assertion are attributes which have been defined by configuration or have been added with JEXL/Groovy functions. These attributes are kept in a separate list in the login session and are automatically added before signing/encrypting the Assertion and sending the Response in thedo.saml.idp.sendmsgaction. Yet, it is still possible to define a totally custom AttributeStatement (or even several): Just add attributes to the empty AttributeStatement via OpenSAML and don’t define/add any attributes by configuration or with JEXL/Groovy functions, and, if desired, add additional AttributeStatements. -
do.saml.idp.createmsg(optional): Creates the variable idp_response, which wraps the (yet) unsigned Response message, excluding also the Assertion. do.saml.idp.sendmsg(mandatory): Does two possible things:- Creates the Assertion and Response if everything was OK, unless already created using the two actions above, signs and encrypts as needed/configured and tries to send the message.
- Creates a SAML error message if there was an error, or if configured with corresponding parameters (see "List of model states","Table 4: Alphabetical list of action states" for an example of how to create custom SAML error messages).
Between these actions, the SAML objects can be manipulated as needed via the variables. See the JEXL Guide for the prefixes that are same as the variable names above for available methods.
A method that is available for each variable is one that returns the "raw" Java OpenSAML 2 object. This object is bascially a 1:1 abstraction of the resulting XML elements, i.e. provides the lowest level access with still lots of convenience in many cases.
The Response is always sent with POST binding.
The LogoutRequest is sent with the supported binding found in the SP Metadata, i.e. either with redirect or with POST binding.
In the generated IdP Metadata, redirect binding is listed first if both bindings are defined via properties. This can be manually adjusted as desired when deploying the IdP Metadata to different SPs.
The SLS can act as a SAML 2.0 IdP Broker by dispatching logins to other IdPs, as follows.
An SP sends an AuthnRequest to the SLS acting as IdP. The SLS determines in the login model whether to handle the login directly or to dispatch to another IdP, based on the AuthnRequest, including especially an IdP list that may be contained in it, and potentially also on other parameters.
Then the SLS acts in the same login model as an SP adapter and composes an AuthnRequest for
the remote IdP, using the do.saml.sp.createmsg action, and then sends the AuthnRequest and
receives the Assertion, using the usual SP adapter actions.
Finally, the IdP extracts attributes from the assertion, plus potentially other elements, and
creates a new assertion for the original SP using do.saml.idp.create.assertion, and sends
it back to the SP, using the usual IdP adapter actions.
Here is an overview about what can be get/set in AuthnRequest and Assertion and a list of corresponding JEXL/Groovy functions.
AuthnRequest
- IDPList: The list of IdPs from which one IdP should be chosen for the actual user authentication.
Assertion
- Attributes: The attributes of the authenticated user.
- AuthnContext: Access to the authentication method used to authenticate the user at the IdP.
There is no automatic handling of the ProxyCount element in the AuthnRequest.
When creating an AuthnRequest to be sent to another IdP, it must be explicitely set using the JEXL function
sp_authn_request.setProxyCount(int value)
Correspondingly, the ProxyCount value of a received AuthnRequest must be read using the JEXL function
int idp_authn_request.getProxyCount()
Increasing it during a proxying process must be done in the model using these JEXL functions.
See the JEXL Function Guide for details and possibly some additional functionality.
Holder for the "AuthnRequest" that the SLS IdP received from an SP.
- AuthnRequest getOpenSamlRequest() - String getRequestedAuthnContextComparison() - boolean containsRequestedAuthenticationMethod(String methodURN) - boolean hasIdpList() - boolean idpListContains(String providerID) - IDPEntry getIdpListEntry(String providerID) - List<IDPEntry> getIdpList() - boolean hasProxyCount() - int getProxyCount()
Holder for the "AuthnRequest" in the SP, created by the model state "do.saml.sp.createmsg", before being sent to another IdP.
- AuthnRequest getOpenSamlRequest() - void addToIdpList(String providerID, String name, String loc) - void addToIdpList(String providerID) - void addToIdpList(IDPEntry) - void addToIdpList(List<IDPEntry>) - void setProxyCount(int value)
Collection of JEXL functions for the SLS IdP.
- void setAssertionAttribute(AttributeWrapper attr) - void setAssertionAttributes(List<AttributeWrapper> attrs) - void setAssertionAttribute(...) - void setAssertionAttributeBasic(...) - void setAssertionAttributeX500Ldap(...) - Assertion createAssertion() - String sealAssertion()
Holder for the assertion created in the SLS IdP by the model state "do.saml.idp.create.assertion",
before being sent to the SP.
- Assertion getOpenSamlAssertion() - void setAuthenticationMethod(String methodURN)
Holder for the assertion in the SLS SP, as received from an IdP.
- Assertion getOpenSamlAssertion() - String getAuthenticationMethod() - AttributeWrapper getAssertionAttribute(String name) - AttributeWrapper getAssertionAttributeByFriendlyName(String friendlyName) - List<AttributeWrapper> getAssertionAttributes()
Holder for the SAML response in the IdP as created by the model state "do.saml.idp.createmsg",
before being sent to the SP. This state will also create an assertion object if none was created before.
- Response getOpenSamlResponse() - Assertion getOpenSamlAssertion()
- Attribute getOpenSamlAttribute() - String getName() - String getFriendlyName() - String getNameFormat() - String getShortNameFormat() - String getValueType() - String getShortValueType() - String getValue() - List<String> getValues() - byte[] getBase64DecodedValue() - List<byte[]> getBase64DecodedValues()
By default, if the username credential stored in the user info cookie of the HSP session differs from the username credential stored in the login session, the credential in the session is removed and a warning is logged.
However, in an IdP Broker, the broker itself does not authenticate users directly and trusted IdPs may provide different username strings for the same user. This can happen normally, for example, if the user logged in at IdP A with username "johndoe" and later on logged in at IdP B with username "jdoe@acme.org".
In order to support this use case, it is possible to declare the username credential
received from the IdP as "mutable", by adding an additional parameter
mutableUsernameCredential to the do.saml.sp.handlemsg action:
model.login.state.50.name=do.saml.sp.handlemsg model.login.state.50.param.mutableUsernameCredential=true
For security reasons, this parameter should only be set on an IdP broker and not for a regular SAML SP. If the same SLS instance does both, determine the use case in the login model and use a JEXL/Groovy expression for the parameter value.
Say, you have a SAML IdP with 5 SPs, SP1 to SP5 and want or need to change the IdP’s key pair / certificate, and hence also all five SPs must become aware of the new key pair / certificate via their metadata.
In the past this required to make changes simultaneously on the IdP
and on at least one of the SPs. To do the change, say, for SP1 you
would typically add a new key pair / certificate to the keystore at
the IdP and configure to use it only with SP1, thus you would set
idp.sp.<no-of-SP1>.keystore.keypair.alias=<new-keystore-alias>,
restart the IdP and obtain metadata for SP1 with the new certificate
(or alternatively obtain the metadata offline using the command line
SLS Tool), install the new metadata at the SP and restart also the SP.
This has been greatly simplified so that IdP and SPs can be updated at different times, basically using the same approach as Microsoft. You can now proceed as follows:
- Add the new key pair / certificate to the IdP keystore.
-
Configure
idp.keystore.future.keypair.alias=<new-keystore-alias>. - Either restart the IdP and obtain IdP metadata with both the current and future certificate included or use the SLS command line tool to generate SP metadata.
- Update metadata at SPs and restart them, in any order, at any time, the IdP is not using the future key pair / certificate, yet, so there is no pressure.
-
Once all SPs have the new metadata, configure the future keystore alias
as
idp.keystore.keypair.alias=<new-keystore-alias>and restart the IdP. (Note that you are not forced to update all SPs, you could still define a dedicated key pair alias for the respective SPs at the IdP, if needed.)
The opposite case, where an SP needs or wants to change its key pair / certificate that is used by one or more IdPs, is handled analogously, see the corresponding description in the chapter about the SAML Service Provider.
The IDP functionality of the SLS allows to create SAML assertions either by using the corresponding model states, or the following scripting functions:
-
idp.createAssertion()- Perform the same functionality as the model statedo.saml.idp.create.assertion: It creates an assertion object in the SLS session. Once this function has been called, it is possible to use other scripting functions for setting / adding custom attributes etc. for the assertion, and the finally to actually create the signed (and, depending on the configuration, encrypted) assertion using the function below. -
idp.sealAssertion()- Seals the assertion by signing it (and possibly encrypting it) and returns the final assertion as an XML string. This can be used to create assertions and the use them to be propagated to an application in a HTTP header, instead of returning them to an SP in a regular SAML flow.
NOTE 1: The function idp.createAssertion() requires that either an actual
SAML AuthnRequest exists in the session (i.e. that an incoming AuthnRequest
had been processed by the state do.saml.idp.handlemsg), OR that an SP has
been selected using the script function idp.setLoginSp(alias). The reason
is that when the assertion is created, the SLS needs to know which SP it is
intended for (there must be at least one SP configured).
NOTE 2: The function idp.sealAssertion(), which creates the signed (and possibly
encrypted) assertion, is idempotent. This means that if the function is called once
and the assertion has not been sealed yet, it will be signed and stored in the session.
If the function is then invoked again, it will just return the already created and
finalized assertion.
NOTE 3: One idp.sealAssertion() has been invoked, it is not possible anymore
to change the assertion in any way (since it has been signed already). So other
scripting functions like idp.setAssertionAttributeBasic() cannot be used anymore
until a new assertion is created with idp.createAssertion().
Scripting Only
This example shows some some actions in a model that use this scripting functionality to create a SAML assertion, without the need for any actual SAML communication:
model.login.state.1000.name=do.generic-createAssertion
model.login.state.1000.action.1=#{idp.setLoginSp('acme')}
model.login.state.1000.action.2=#{idp.createAssertion()}
# Add custom attributes
model.login.state.2000.name=do.generic-createAssertion
model.login.state.2000.action.1=#{idp.setAssertionAttributeBasic('givenName' ,'urn:oid:2.5.4.42', 'Karl-Heinz')}
model.login.state.2000.action.2=#{idp.setAssertionAttributeBasic('email' ,'urn:oid:0.9.2342.19200300.100.1.3', 'karl@acme.com')}
# Finally, create variable "assertionXml" with XML of signed assertion
model.login.state.3000.name=do.generic-createAssertion
model.login.state.3000.action.1=#{setVar('assertionXml', idp.sealAssertion()}The following samples are intended to illustrate the SAML elements during a SAML login and logout. Note that their exact contents depends on configuration (and may possibly also depend on the actual SLS version).
Here is the request line for a signed SAML AuthnRequest with HTTP Redirect Binding (i.e. sent in a HTTP GET request):
https://idp-domain.org/ite/idp/sls/auth?*SAMLRequest*=rZLdauM...w8%2BfbfYP &*SigAlg*=http...sha1 &*Signature*=nSQ...Y%3D
The AuthnRequest is contained in the SAMLRequest parameter. The (optional) signature in the two other request parameters. The SP may also provide a RelayState parameter that is later sent back along with the SAML Response in order to correlate request and response.
Here is a simple decoded AuthnRequest:
<?xml version="1.0" encoding="UTF-8"?>
<saml2p:AuthnRequest xmlns:saml2p="urn:oasis:names:tc:SAML:2.0:protocol"
AssertionConsumerServiceURL="http://sp-domain.org/saml/SSO/alias/defaultAlias"
Destination="https://idp.idp-domain.org/ite/idp/sls/auth" ForceAuthn="false"
ID="a4i0jgbfhc2613id1g6jb4j13ebai7h" IsPassive="false"
IssueInstant="2012-10-23T15:35:28.150Z"
ProtocolBinding="urn:oasis:names:tc:SAML:2.0:bindings:HTTP-POST*"
Version="2.0">
<saml2:Issuer xmlns:saml2="urn:oasis:names:tc:SAML:2.0:assertion">
http://sp-domain.org/saml/metadata/alias/defaultAlias
</saml2:Issuer>
</saml2p:AuthnRequest>Destination is the EntityID of the IdP, Issuer the EntityID of the SP. The SP wants a response sent to the AssertionConsumerServiceURL with HTTP POST Binding.
To respond with POST Binding the IdP returns a HTML page with a form that posts a SAMLResponse (plus a RelayState if one was given in request) to the AssertionConsumerServiceURL.
The Response (if login was successful) contains a SAML Assertion that is signed and contains some attributes about the user.
Here is a sample AttributeStatement from an Assertion, which contains only a single attribute:
<saml2:AttributeStatement>
<saml2:Attribute FriendlyName="uid"
Name="urn:oid:0.9.2342.19200300.100.1.1"
NameFormat="urn:oasis:names:tc:SAML:2.0:attrname-format:basic">
<saml2:AttributeValue xmlns:xsi="http://www.w3.org/2001/XMLSchema-instance"
xsi:type="xs:string">someuserid</saml2:AttributeValue>
</saml2:Attribute>
</saml2:AttributeStatement>Here is sample IdP Metadata:
<?xml version="1.0" encoding="UTF-8"?><md:EntityDescriptor xmlns:md="urn:oasis:names:tc:SAML:2.0:metadata" entityID="https://idp.idp-domain.org/idp/sls">
<md:IDPSSODescriptor protocolSupportEnumeration="urn:oasis:names:tc:SAML:2.0:protocol">
<md:KeyDescriptor>
<ds:KeyInfo xmlns:ds="http://www.w3.org/2000/09/xmldsig#">
<ds:X509Data> <ds:X509Certificate>MIIB...QkdjW9</ds:X509Certificate>
</ds:X509Data>
</ds:KeyInfo>
</md:KeyDescriptor>
<md:NameIDFormat>urn:oasis:names:tc:SAML:2.0:nameid-format:transient</md:NameIDFormat>
<md:SingleSignOnService Binding="urn:oasis:names:tc:SAML:2.0:bindings:HTTP-Redirect"
Location="https://idp-domain.org/ite/idp/sls/auth"/>
<md:SingleLogoutService Binding="urn:oasis:names:tc:SAML:2.0:bindings:HTTP-Redirect"
Location="https://idp-domain.org/ite/idp/sls/slo"/>
</md:IDPSSODescriptor>
</md:EntityDescriptor>The IdP declares its EntityID, a certificate for signatures, a SingleSignOnService and a SingleLogoutService with HTTP Redirect Binding.
SP Metadata is similarly structured, instead of an IDPSSODescriptor it contains an SPSSODescriptor with its services.
Here is a typical LogoutRequest message:
<saml2p:LogoutRequest xmlns:saml2p="urn:oasis:names:tc:SAML:2.0:protocol"
Destination="http://sp-domain.org/saml/SingleLogout/alias/defaultAlias"
ID="_a54db037-bc9f-4258-be6b-e6f0c3cfc179" IssueInstant="2013-02-06T10:05:07.448Z"
Version="2.0">
<saml2:Issuer xmlns:saml2="urn:oasis:names:tc:SAML:2.0:assertion">
https://idp.idp-domain.org/idp/sls*
</saml2:Issuer>
<saml2:NameID xmlns:saml2="urn:oasis:names:tc:SAML:2.0:assertion"
Format="urn:oasis:names:tc:SAML:2.0:nameid-format:transient"
NameQualifier="https://idp.idp-domain.org/idp/sls">
_2073acb9-db26-4399-947e-371bf8bc848d
</saml2:NameID>
</saml2p:LogoutRequest>and here is a corresponding LogoutResponse message (succesful logout in this example):
<saml2p:LogoutResponse xmlns:saml2p="urn:oasis:names:tc:SAML:2.0:protocol"
Destination="https://idp.idp-domain.org/idp/sls/slo" ID="a3dbibh540h1e52hb04fc79j161f4d"
InResponseTo="_a54db037-bc9f-4258-be6b-e6f0c3cfc179" IssueInstant="2013-02-06T10:05:07.799Z"
Version="2.0">
<saml2:Issuer xmlns:saml2="urn:oasis:names:tc:SAML:2.0:assertion">
http://sp-domain.org/saml/metadata/alias/defaultAlias
</saml2:Issuer>
<saml2p:Status>
<saml2p:StatusCode Value="urn:oasis:names:tc:SAML:2.0:status:Success" />
</saml2p:Status>
</saml2p:LogoutResponse>Note that when these messages are sent with Redirect Binding, they are again signed outside of the message with separate request parameters, and a RelayState is sent along, too, if one was received from the SP during login.
The SAML SP Adapter implements a SAML 2.0 Service Provider (SP).
For an overview of the SAML protocols during login and single logout, including how exchanged messages typcially look like, see the corresponding sections in "SAML IdP Adapter".
- Supports the SAML 2.0 "Web Browser SSO Profile" ("Login") with HTTP Redirect Binding and HTTP POST Binding for the AuthnRequest and HTTP POST Binding for the Response, SP- and IdP-initiated.
- The AuthnRequest can optionally be signed.
- For the Assertion, the signature is verified and decrypted, if necessary. A signature of the enclosing Response can be verified.
- Any number of IdPs are supported.
- Supports the SAML 2.0 "Single Logout Profile" ("Single Logout") with HTTP Redirect Binding and HTTP POST Binding for both LogoutRequest and LogoutResponse, IdP-initiated.
- The signature of the LogoutRequest can be verified, the LogoutResponse can optionally be signed.
- Lots of configurable options and JEXL functions for how to handle and create SAML messages, with different levels of abstraction and depth.
- SAML messages and the assertion can optionally be freely manipulated after receiving them and before sending them, even down to the OpenSAML Java API, in order to allow to provide workarounds immediately (without a new SLS release) in cases where SAML IdPs are punctually not SAML conformant.
AuthnRequest (sent to the SP):
- The attributes AssertionConsumerServiceURL, Destination, ForceAuthn (false), ID, IsPassive(false), IssueInstant, ProtocolBinding (always POST) and Version (2.0).
- Issuer element and an empty Scoping element.
- Optionally, via a JEXL function, an IdP list can be added.
- Using OpenSAML and JEXL functions, any part of the AuthnRequest can be modified, as needed, before sending it.
Response/Assertion (received from the SP):
- The signature of the Response is validated if configured to do so (and then it a signature is mandatory).
- Multiple assertions in the Response are not supported; the Response must contain exactly 1 Assertion (possibly encrypted).
- The Assertion must always be signed and the signature is always validated.
The Conditions element, which contains, for example the validity period of the Assertion, and other security relevant items is validated strictly according to the SAML 2.0 standard by default.
- By default, AudienceRestriction elements are validated according to the SAML 2.0 standard. Optionally this check can be omitted, because in some cases what the IdP mandates may not be relevant for the SP resp. for client and applications.
- By default, the OneTimeUse element, if present leads to a rejection of the Assertion in the SLS, because due to the general architecture of the SES, it cannot be supported strictly according to the SAML 2.0 standard. The OneTimeUse element is unlikely to be encountered in practice, but if so, the check can optionally be omitted and this case may then be handled as desired in the login model.
- ProxyRestriction elements must be handled in the login model.
- The presence of mandatory Assertion attributes, like Version, is verified.
- An Issuer element must be present.
A Subject element must be present.
- Optionally, it can be checked if the assertion contains at least one InResponseTo attribute within SubjectConfirmationData within SubjectConfirmation within Subject with a value equal to the ID of the AuthnRequest. This is quite commonly the case, but several elements in this check are optional according to the SAML 2.0 standard.
- Advice elements are ignored (the SAML 2.0 standard explictly allows to do).
- Statement elements are ignored.
- For AuthnStatement elements, if a SessionNotOnOrAfter is specified, it is validated (as mandated by the SAML 2.0 standard).
- AttributeStatement and AuthzDecision elements are ignored.
- Using OpenSAML and JEXL functions, any part of the Response and the Assertion can be further validated, as needed.
- Encryption: The first found certificate in IdP Metadata with usage "encryption" is used, with fallback to the first found certificate in IdP Metadata with undefined usage.
- Signature verification: All certificates in IdP Metadata with usage "signing" or undefined usage are tried one after the other; all with usage "signing" are tried before any with undefined usage.
A SAML 2.0 Identity Provider must be available that supports the required Profiles and Bindings. Of course, using an SLS as IdP is possible and supported.
The SP adapter is configured through a Java properties file, usually named
"sp-adapter.properties" that must be installed in the "WEB-INF" directory
of the SLS web application.
The standard SLS distribution is shipped with an example configuration file.
Please see chapter "SAML Endpoint Issue" for important information about avoiding problems with the SAML endpoint URL.
A SAML credential provider must be defined (replace <no> by an actual number):
cred.provider.<no>=sp cred.provider.<no>.cred.1.type=saml cred.provider.<no>.cred.1.source=header cred.provider.<no>.cred.1.name=does-not-matter
There are a number of SP specific JEXL functions that are used in models and JSPs. See the SLS JEXL guide for a description of these functions ("sp").
In order to use the SP adapter, some properties have to be defined in the
sp-adapter.properties file.
Please also consider the follwing Security Concerns.
sp.entity.id
The EntityID of the SP. Example:
sp.entity.id=https://xyz.acme.com/sp/sls
sp.keystore.file
Path and filename of the keystore that contains private key and certificate of the SP. Can be an absolute path or a path relative to the web application. Example:
sp.keystore.file=WEB-INF/sp/sp.jks
sp.keystore.type
The SP keystore type. Default is JKS (a Java keystore). Example:
sp.keystore.type=PKCS12
sp.keystore.pass
The SP keystore passphrase. Example:
sp.keystore.pass=jsdi284ksau1m49284j234239c3dleuw
sp.keystore.keypair.alias
The alias of the SP key pair (private key plus certificate) in the key store. Example:
sp.keystore.keypair.alias=sp
The key pair alias can be overridden on a per-IdP basis. See the property
sp.idp.<no>.keystore.keypair.alias below.
sp.keystore.future.keypair.alias
The alias of a future SP key pair (private key plus certificate) in the key store. Is not used by the SP except always exported in SP metadata, see the section Replacing the SP key pair and certificate for how to use this setting.
sp.sso.<binding>.url
The URL to use for each supported binding for SSO (Web Browser SSO Profile). Binding can be "redirect", "post" or "artifact". Currently only "post" is supported. The URL given is so far simply the SLS login location. Example:
sp.sso.post.url=https://xyz.acme.com/sp/sls/auth
sp.slo.<binding>.url
The URL to use for each supported binding for SLO (Single Logout Profile). Binding can be "redirect", "post" or "artifact". Currently "redirect" and "post" are supported. The URL given is normally the SLS location of the SLO model. Example:
sp.slo.redirect.url=https://xyz.acme.com/sp/sls/slo
sp.redirectWithMetaRefresh
Determines whether to use the “meta refresh” mechanism when SAML Redirect binding is configured.
“Meta refresh” is a feature of HTML. Redirecting with “meta refresh” is a (non-standard) alternative to the standard HTTP Redirect (status code 302). This feature can be a lifesaver in situations where excessive redirection with HTTP Redirect would fail, typically in SLO scenarios with many SPs. This usually happens because some major browsers limit the number of redirects they follow.
Allowed values are true, false, or any comma-separated combination of sso
and slo. Defaults to false (that is, never redirect with “meta refresh”).
sp.redirectWithMetaRefresh=sso,slo
sp.message.sigalg
Defines the signature algorithm to use for signing SAML messages. Possible values include:
Default is the first item in the list (unless a signature algorithm is specified for a given IdP). Algorithms with SHA-1 should not be used any more unless the partner cannot handle stronger algorithms, because SHA-1 has been broken. Note that for Redirect Binding, i.e. signature not in XML but in request parameters, only exactly the algorithms above are supported.
Note that for XML signatures you might want to adapt the global setting for the "XML Signature Reference Digest Algorithm" to match the strength of the strongest signature algorithm.
sp.credential.username.nameidbased
Whether to use the NameID value of the Subject element in the Assertion for the username credential.
By default, the SP adapter uses the Attribute name configured in
sp.credential.username.attrname to extract the username from the SAML
Assertion and use it as the username credential.
This property allows a SAML setup to use the NameID value as the username
credential instead. When this property is on ("true"), the username credential
will be extracted from the NameID, and the attribute name in
sp.credential.username.attrname is ignored. Default is false.
It is an error if this property is true, and the Assertion does not contain a NameID element.
See sp.idp.<no>.credential.username.nameidbased below for how to make this
configuration in an IdP-specific manner.
sp.credential.username.attrname
The name or friendlyName XML attribute of the SAML attribute in the assertion
to use as the username credential. First searched by name then by friendlyName.
sp.credential.username.nameidbased must be off for this property to have an
effect. If sp.credential.username.nameidbased is on, the username credential
is based on the NameID element instead, and the attribute name is not taken into
account.
Default is "urn:oid:0.9.2342.19200300.100.1.1", the UID typically used as the attribute name.
sp.credential.username.nameidbased=false sp.credential.username.attrname=acme:idp:user-id
sp.assertion.validity.offset.allowed.secs
The tolerated offset for the validity of the received assertion in seconds. If set, assertions that are not valid yet or not valid any more, but within the indicated offset, are still accepted. Default is 0. Example
sp.default.idp
The EntityID or alias of the IdP to which to use for login by default.
IdP selection is processed as follows in the SLS, with highest precedence first:
HTTP request parameter idpentityid,
IdP set with the JEXL/Groovy function idp.selectIdp(entityIdOrAlias)),
property sp.default.idp,
the IdP with the lowest index in config properties.
sp.assertion.validity.offset.allowed.secs=60
sp.idp.<no>.\*
Settings that define things that are specific per IdP. See immediately below for the specific settings.
sp.idp.<no>.alias
This optional setting defines an alias for the IdP. Default if not indicated is the the EntityID from the IdP Metadata. The idea is to chose a short unique ID like "acme-ltd-idp" that can then be used to parametrize things, e.g. as part of a file name and also serve as a key to a obtain e.g. a human readable description of the IdP from message resources, e.g. "Acme Ltd. Identity Provider".
sp.idp.<no>.metadata.provider
Defines the provider to use for obtaining SP Metadata. Currently only "file" is supported.
sp.idp.<no>.metadata.location
Defines the location to get IdP Metadata from. Currently for type "file" this must be the path and file name of the IdP Metadata file. Can be an absolute path or a path relative to the web application.
NOTE: The metadata XML file may use <xi:include tags in order to separate
parts of the metadata file from its XML structure, e.g. the certificate data:
<xi:include xmlns:xi="http://www.w3.org/2001/XInclude" parse="text"
href="...certificate data text file..."/></ds:X509Certificate>sp.idp.<no>.message.sign
Indicates whether to sign SAML messages sent to the IdP or not. The setting can be set generally for all profiles and bindings ("true" or "false") or it can be set individually with a comma separated list of "<profile>.<binding>" pairs. Allowed values for profile are "sso" and "slo"; allowed values for binding are "redirect", "post" and "artifact". So far only the pairs "sso.redirect", "sso.post", "slo.redirect" and "slo.post" have any effect here.
Default is "sso.redirect,sso.post,slo.redirect,slo.post".
sp.idp.<no>.message.sigalg
Defines the signature algorithm to use for signing SAML messages to the given IdP. Possible values include:
Default is sp.message.sigalg, resp. if that is not defined the first item
in the list above.
Algorithms with SHA-1 should not be used any more unless the partner cannot
handle stronger algorithms, because SHA-1 has been broken.
Note that for Redirect Binding, i.e. signature not in XML but in request
parameters, only exactly the algorithms above are supported.
Note that for XML signatures you might want to adapt the global setting for the "XML Signature Reference Digest Algorithm" to match the strength of the strongest signature algorithm.
sp.idp.<no>.message.checksign
Indicates whether to check signatures in SAML messages received from the IdP or not. If active, unsigned messages are also rejected. Syntax is the same as for suffix "message.sign". So far only the pairs "sso.post", "slo.redirect" and "slo.post" have any effect here.
Default is "slo.redirect,slo.post". (Note that the assertion received during SSO is always checked for a valid signature)
sp.idp.<no>.credential.username.nameidbased
Whether to use the NameID value of the Subject element in the Assertion for the username credential. Default is false.
IdP-specific override for the property sp.credential.username.nameidbased. See
that property for a detailed explanation.
sp.idp.<no>.credential.username.attrname
The full name of the attribute to use as the username credential. Default is "urn:oid:0.9.2342.19200300.100.1.1", the UID typically used as the attribute name.
IdP-specific override for the property sp.credential.username.attrname. See
that property for a detailed explanation.
sp.idp.<no>.assertion.audiencerestrictions.check
Whether to check AudienceRestriction condition elements in the assertion. Should typically be left at its default value, which is true.
sp.idp.<no>.assertion.onetimeuse.ignore
Whether to silently ignore a OneTimeUse condition in the assertion. Default is false.
OneTimeUse is unlikely to be encountered in practice, but strictly by the letter of the SAML 2.0 standard, the SLS has to reject an assertion that contains it because due to the general architectiure of the SES it is not possible to support OneTimeUse as required by SAML 2.0, In other words, by default all assertions that contain OneTimeUse are rejected and by explicitly setting to ignore, the case can be handled as desired in the login model.
sp.idp.<no>.assertion.inresponseto.require
Whether to require that the assertion contains at least one InResponseTo attribute within SubjectConfirmationData within SubjectConfirmation within Subject with a value equal to the ID of the AuthnRequest. Default is false.
It is quite common that IdPs includes this information and if so, it is recommended to activate this check. However, since several elements in this check are only optional in the SAML 2.0 standard, the default is false so that SAML 2.0 conformant assertions are not wrongly rejected with the default setting.
This setting has no effect in case of an IdP-initiated login, since then there was no initiating AuthnRequest.
sp.idp.<no>.sso.idpinit.allow
Whether to allow IdP-initiated logins or not. Default is false. It is recommended keep this at false whenever IdP-initiated login is not needed, since IdP-initiated login lacks some security checks of SP-initiated login. See "Security Concerns".
sp.idp.<no>.sso.idpinit.inresponseto.allow
Whether to allow InResponseTo for IdP-initiated login, as a Response attribute
or in the SubjectConfirmation of the Assertion. Default is false.
It is recommended to keep this setting at its default (false).
See "Security Concerns".
sp.idp.<no>.keystore.keypair.alias
Specifies the key pair alias to use to obtain certificate information from the
key store. This setting overrides the global setting
sp.keystore.keypair.alias. Specifying a specific key pair alias is especially
useful in a migration scenario where the certificate of an SP is about to
expire. The property idp.sp.<no>.keystore.keypair.alias makes it possible to
migrate the dependent IdPs to a new certificate one by one.
Here is a simple login model. More complex login models essentially have to
extend the part between do.saml.sp.handlemsg and do.saml.sp.sendmsg.
model.login.uri=/auth
model.login.failedState=get.usererror
model.login.state.10.name=do.generic-skip-sendmsg-if-idp-initiated-login
model.login.state.10.nextState.1=do.saml.sp.handlemsg
model.login.state.10.nextState.1.if=${sp.hasSamlMessage()}
model.login.state.20.name=do.saml.sp.sendmsg
model.login.state.30.name=do.saml.sp.handlemsg
model.login.state.40.name=do.success
model.login.state.90.name=get.usererrorIn order to display SP Metadata (e.g. for import into IdP configuration), a separate model is used:
model.metadata.uri=/metadata model.metadata.failedState=show.jsp model.metadata.state.10.name=show.jsp model.metadata.state.10.param.jsp=jsp.sp.metadata
The SpMetadata.jsp JSP that is displayed in this model accepts an additional
query parameter keypairalias that may be used to specify the key pair alias
to use for obtaining the certificate from the key store (overriding the default
key pair alias specified in the global property sp.keystore.keypair.alias).
An example request URL for SP metadata with key pair alias "mysp" then might look like this:
https://sp.somehost.com/sls/auth?cmd=metadata&keypairalias=mysp
Here is the typcial model for Single Logout:
model.slo.uri=/slo model.slo.failedState=get.usererror model.slo.state.5.name=do.generic-skipped-if-post-binding model.slo.state.10.name=do.saml.sp.handlemsg model.slo.state.10.param.profile=SLO model.slo.state.30.name=do.saml.sp.sendmsg model.slo.state.40.name=get.usererror
Note the first model state which does nothing and which is only needed if the logout is initiated with a LogoutRequest sent with POST binding, as then the SLS skips the first state.
It is possible to separate SAML message creation from message finalization (sign) \+sending and to modify SAML messages between these two steps. This allows, for example, to implement workarounds in order to interoperate with IdPs that punctually violate the SAML 2.0 standard, and it allows to flexibly provide additional SAML SP features that are not or not yet available by SLS configuration properties or JEXL functions.
The actions and JEXL/Groovy variables in detail (applies to SAML Login, not to SAML Single Logout):
-
do.saml.sp.createmsg(optional): Creates the variable sp_authn_request, which wraps the (yet) unsigned AuthnRequest message. -
do.saml.sp.sendmsg(mandatory): Creates the AuthnRequest , unless already created using the action above, and tries to sent the message. -
do.saml.sp.handlemsg(mandatory): Creates the variable sp_assertion if the received assertion could be decrypted (if it was decrypted) and validated.
Between these actions, the SAML objects can be manipulated as needed via the variables. See the JEXL Guide for the prefixes that are same as the variable names above for available methods.
A method that is available for each variable is one that returns the "raw" Java OpenSAML 2 object. This object is bascially a 1:1 abstraction of the resulting XML elements, i.e. provides the lowest level access with still lots of convenience in many cases.
The AuthnRequest is sent with the first supported binding found in the IdP Metadata, i.e. either with redirect or with POST binding.
The LogoutResponse is sent with the same binding as the one with which the LogoutRequest was received, if the IdP supports it, otherwise the first supported binding found in the IdP Metadata is used, i.e. either redirect or POST.
In the generated SP Metadata, redirect binding is listed first if both bindings are defined via properties. This can be manually adjusted as desired when deploying the SSP Metadata to different IdPs.
IdP-initiated login is generally harder to secure, mainly since there is no
AuthnRequest from the SP that can be correlated to the received Response and
the Assertion it contains. From a practical point of view there is the
additional complication that under some circumstances (SP-initiated) logins at
the IdP can take long enough to have the login session at the SP expire before
the response is sent back from the IdP to the SP, hence a situation that looks
like an IdP-initiated login to the SP, but see details further below.
Generally it is recommended to disallow IdP-initiated login whenever possible
(keep sp.idp.<no>.sso.idpinit.allow at its default of false) and to make SP
login sessions live long enough, whenever both is practical.
In the case of SP-initiated login, the IdP should set both the InResponseTo
XML attribute of the Response and the InResponseTo in the SubjectConfirmation
in the Assertion to the ID XML attribute of the AuthnRequest.
The latter is especially helpful, as the Assertion is always signed. Signing
both AuthnRequest and Response is recommended for even better protection.
If an InResponseTo is present and there was an AuthnRequest, these checks are
always made - login fails if IDs do not match.
Conversely, by default if a Response comes in with an InResponseTo but there
was no AuthnRequest, the login also fails - since this may be a possible attempt
to replay an assertion obtained otherwise. In order to be able to work around
issues with expiring SP login sessions, however, it is possible to deactivate
these checks (set sp.idp.<no>.sso.idpinit.inresponseto.allow to true).
As an additional protection, the SP remembers all received Assertions during their lifetime, thus preventing replay attacks. (Note that in the case of several load-balanced SP instances this protection can be circumvented with a given probability of having new logins directed to a different SP.)
Note that overall SAML Messages are always protected by TLS connections, so that getting hold of them is not all that easy (e.g. man in the middle or access to client or server).
Say, you have a SAML SP with 5 IdPs, IdP1 to IdP5 and want or need to change the SP’s key pair / certificate, and hence also all five IdPs must become aware of the new key pair / certificate via their metadata.
In the past this required to make changes simultaneously on the SP
and on at least one of the IdPs. To do the change, say, for IdP1 you
would typically add a new key pair / certificate to the keystore at
the SP and configure to use it only with IdP1, thus you would set
sp.idp.<no-of-IdP1>.keystore.keypair.alias=<new-keystore-alias>,
restart the SP and obtain metadata for IdP1 with the new certificate
(or alternatively obtain the metadata offline using the command line
SLS Tool), install the new metadata at the IdP and restart also the IdP.
This has been greatly simplified so that SP and IdPs can be updated at different times, basically using the same approach as Microsoft. You can now proceed as follows:
- Add the new key pair / certificate to the SP keystore.
-
Configure
sp.keystore.future.keypair.alias=<new-keystore-alias>. - Either restart the SP and obtain SP metadata with both the current and future certificate included or use the SLS command line tool to generate IdP metadata.
- Update metadata at IdPs and restart them, in any order, at any time, the SP is not using the future key pair / certificate, yet, so there is no pressure.
-
Once all IdPs have the new metadata, configure the future keystore alias
as
sp.keystore.keypair.alias=<new-keystore-alias>and restart the SP. (Note that you are not forced to update all IdPs, you could still define a dedicated key pair alias for the respective IdPs at the SP, if needed.)
The opposite case, where an IdP needs or wants to change its key pair / certificate that is used by one or more SPs, is handled analogously, see the corresponding description in the chapter about the SAML Identity Provider.
The OIDC OP Adapter implements an OpenID Connect (OIDC) 1.0 OpenID Provider (OP).
OpenID Connect 1.0 is an authentication protocol based on the OAuth 2.0 framework for authorization protocols. A major use cases for OpenID Connect is mobile Apps.
The typical use case that the OP implements is the "Authorization Code Flow", in
which a mobile App (called "Client" or "Relying Party" or RP) lets the user
authenticate itself at the OP, obtains an id_token from the OP and then uses
this id_token to authenticate against web applications, often in REST calls or
similar WebService calls.
After authentication, the RP may request additional information using the OAuth
access_token also obtained during authentication as credential.
When the id_token expires, the RP can obtain a new id_token from the OP
via a "Refresh Request" by presenting the refresh_token, which had also
been obtained at authentication, as credential. (A new access_token is also
returned in that case and optionally the refresh_token can be refreshed, too.)
An overview of these typical use cases is given just below, followed by a detailed list of supported features with sample requests and responses, and then how to configure the OP in detail.
Since OpenID Connect is based on OAuth 2.0, it is also possible to use the SLS as an OAuth 2.0 authorization server. As a result, certain request validation steps are performed slightly different, and the model configuration needs to be adapted for this. The most notable difference is that the SLS will not create an id token in its token response when performing plain OAuth. Please refer to "Plain OAuth 2.0 Mode" for more details.
- The mobile App internally starts a mobile browser instance and visits the OP ("Authentication Request").
- The OP authenticates the user and returns an authorization code as a request parameter in the "Location" header of a 302 Redirect HTTP response.
-
This causes the mobile browser to hand control back to the mobile App, which
then uses the authorization code in order to obtain the actual
id_token, as well as anaccess_tokenand arefresh_token("Token Request") in a direct HTTP request to the OP. -
The
id_tokencan then be used to authenticate against various backends, theaccess_tokento retrieve user data, therefresh_tokento refresh all of these tokens.
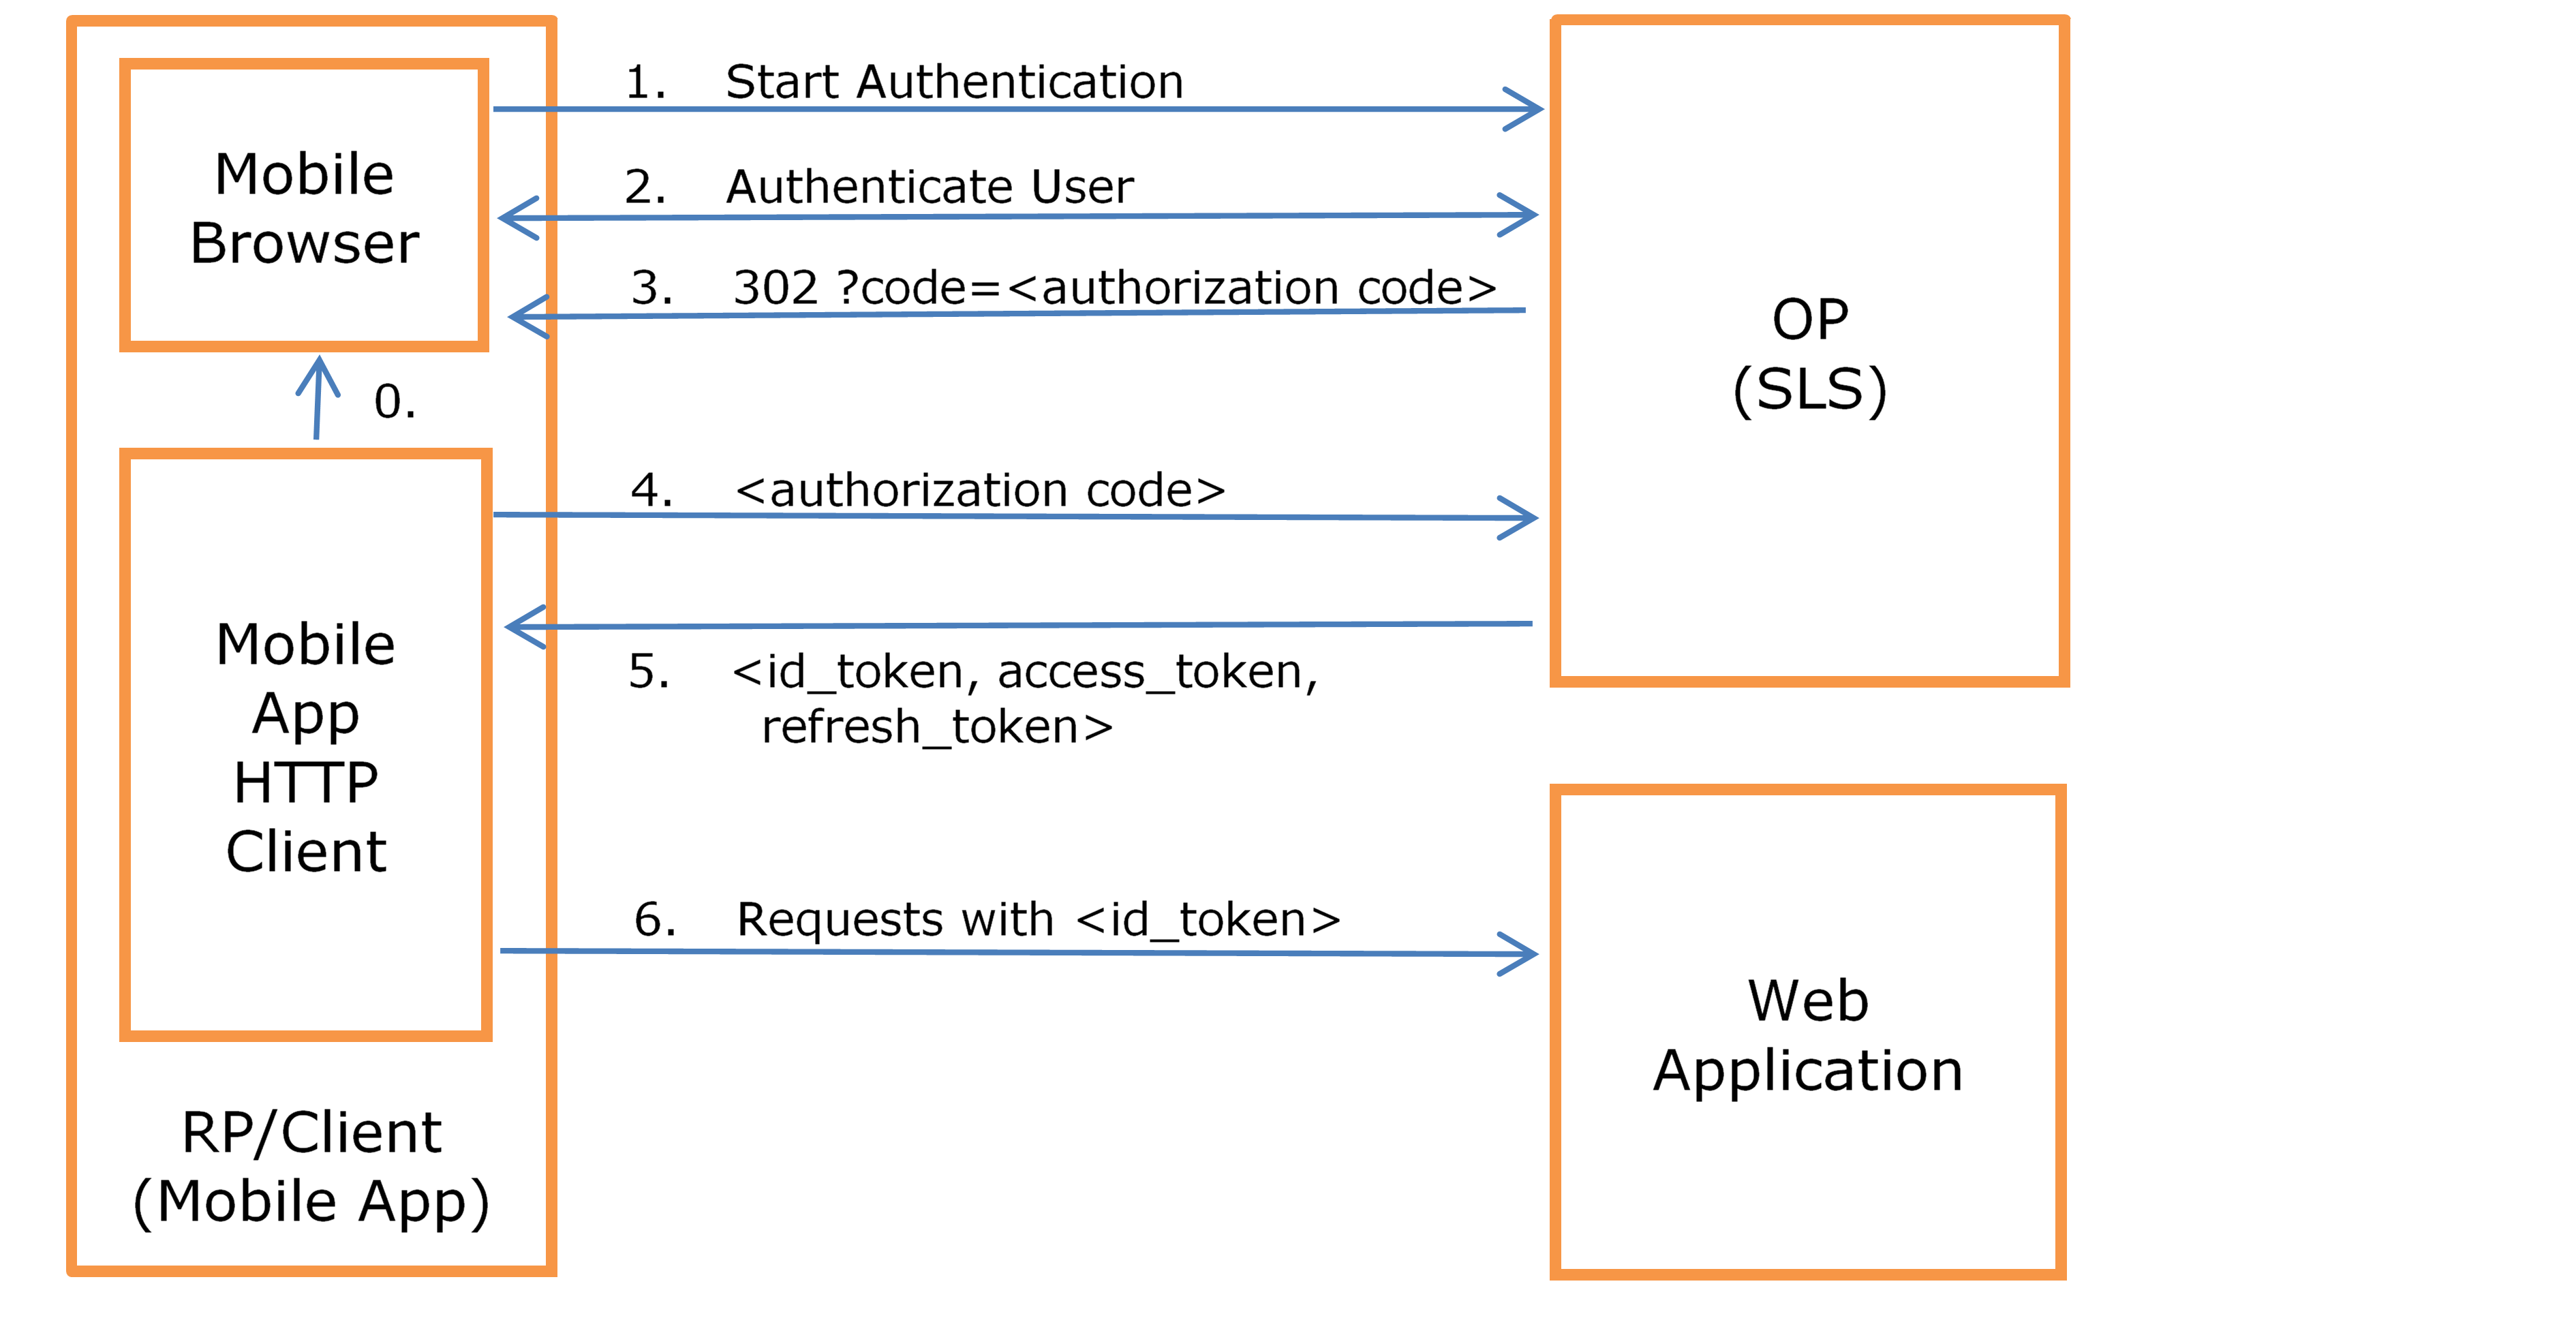
The mobile App (or any target web application called by the RP) uses the
access_token to obtain further information about the user from the OP,
like name, address, email, and so on.

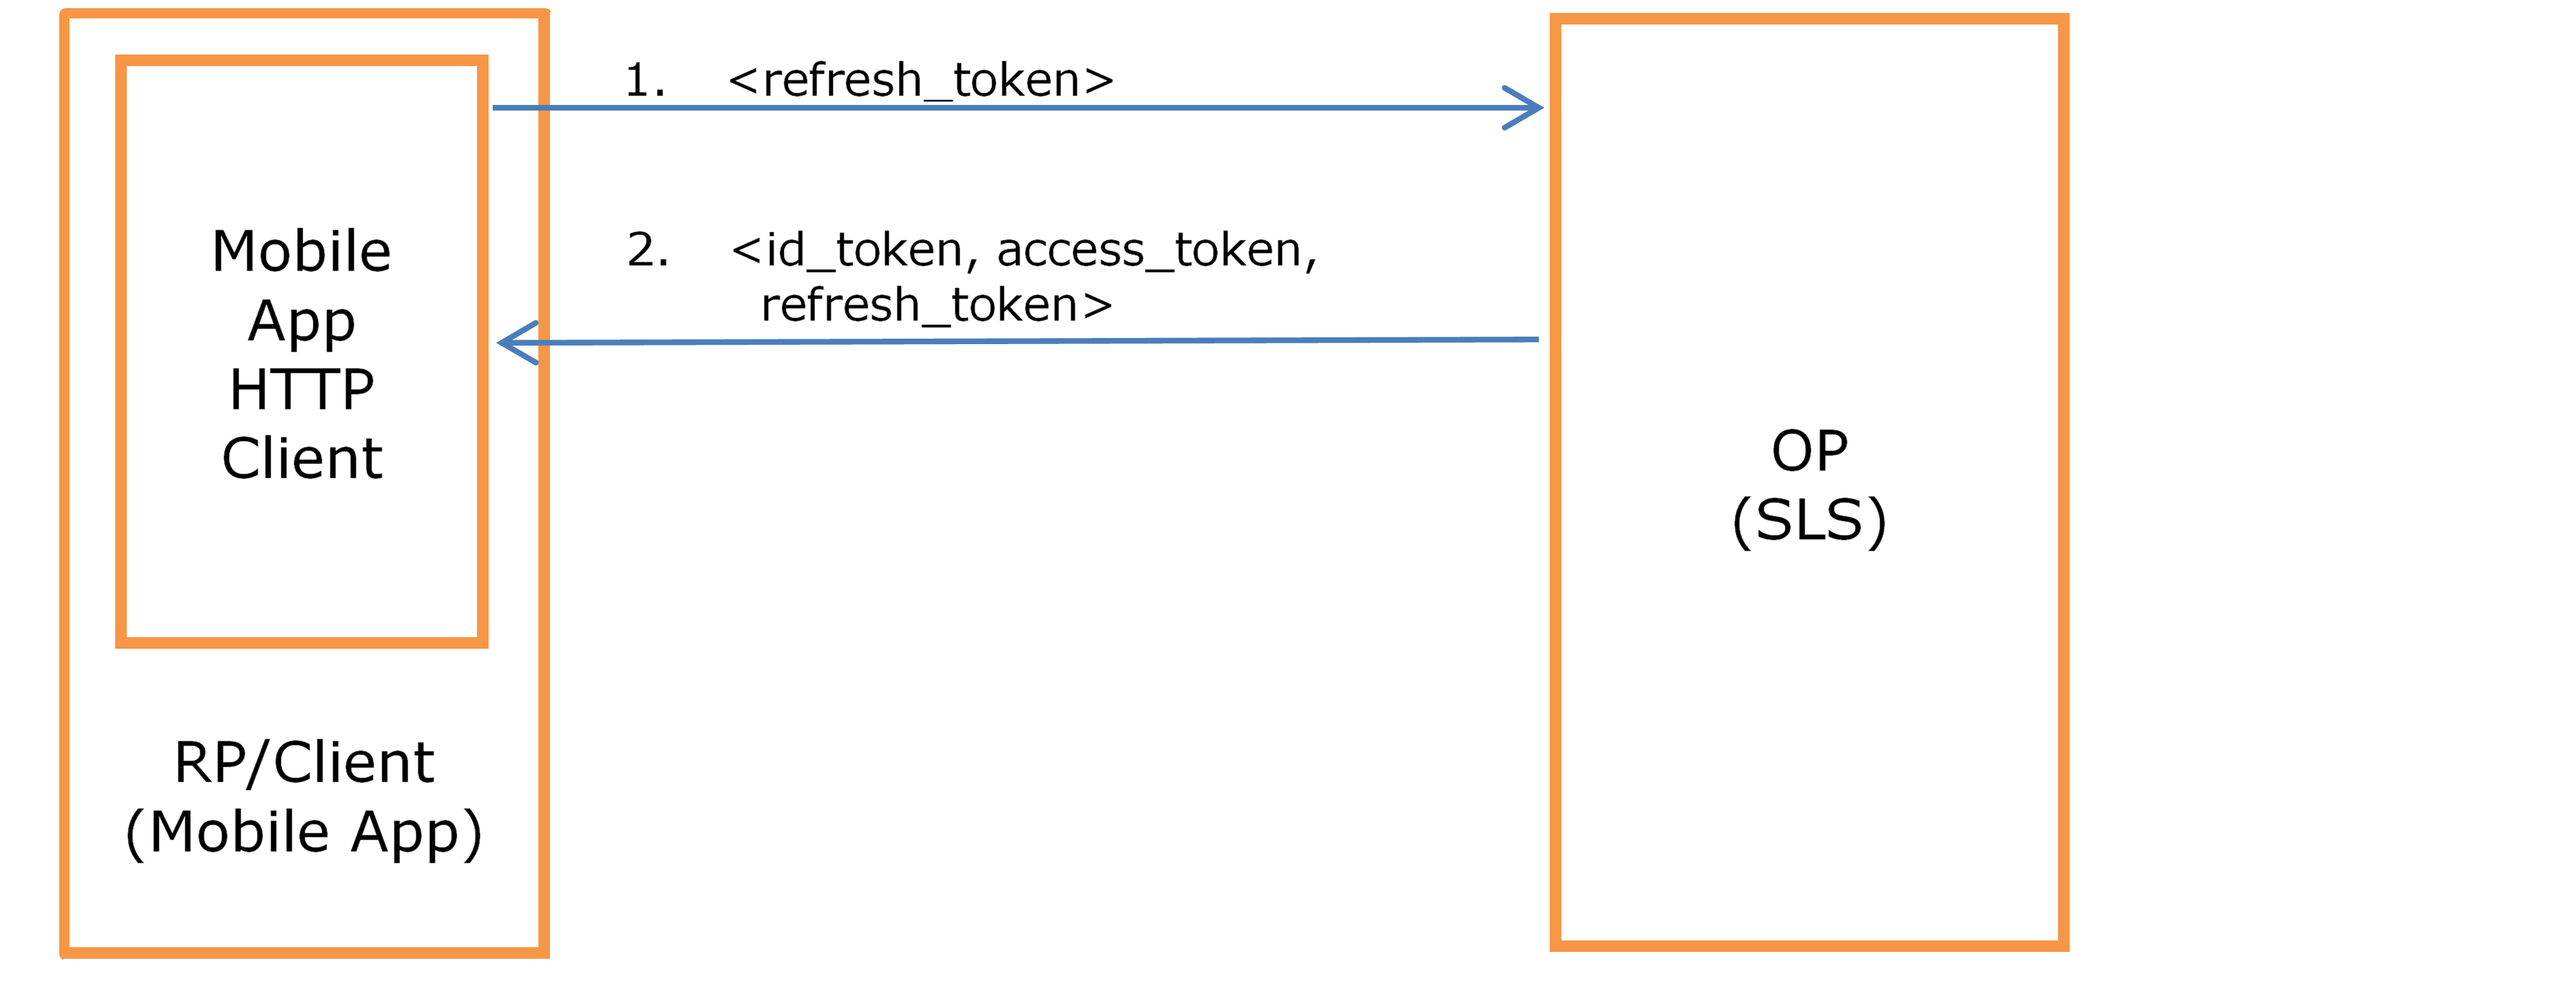
Broadly speaking, the SLS supports practically all mandatory requirements for OpenID Connect 1.0 Authorization Code Flow, UserInfo Request and Refresh Request, many optional requirements automatically, and additional optional requirements can often be handled flexibly in the SLS login model with JEXL/Groovy expressions or scripts, as needed/desired.
In addition, Proof Key for Code Exchange (PKCE, "Pixy") and Public Clients are also supported.
It is also possible to freely add, remove and modify claims in id_token,
refresh_token and userinfo (as well as to temporarily store some attributes
in the authorization code).
- The Authentication Request supports the parameters "response_type", "scope", "client_id", "redirect_uri", "state" and "nonce"; other parameters like "display" or "prompt" can be supported flexibly in the login model.
- The "response_type" must be "code" (this specifies Authorization Code Flow), the "scope" parameter must contain "openid", other additional values are ignored.
- The "max_age" parameter is not supported by default.
-
The Token Request supports parameters "grant_type", "code" and "redirect_uri"
and client authentication with Basic Auth or with HTTP POST parameters
(
client_id/client_secret). - The "grant_type" parameter must be "authorization_code" (this identifies the type of request).
-
The issued
id_tokenis signed with the "RS256" signature algorithm (RSASSA-PKCS1-v1_5 using SHA-256). Note that the RSA signing key must have a length of at least 2048 bit. -
The issued
id_tokencontains by default the claims "sub" (authenticated userid), "aud" (audience), "iss" (issuer), "iat" (issue date and time), "exp" (expiry date and time), "auth_time" (authentication date and time) and "nonce" (if got one in the Authentication Request), but it is possible to freely add, remove or modify any claims to theid_tokenin the SLS login model before the token is signed and sent back to the RP. - It is also possible to remember any number of attributes between the two OIDC requests to support use cases where user info might only be easily obtainable when the user authenticates.
-
The validity of
id_tokenandrefresh_tokenis configurable, as well as whether to renew therefresh_tokenvalidity period at refresh or not.
Sample Authentication Request (as in all examples below, additional line breaks have only been introduced for better readability):
https://acme.org/oidc-op/sls/auth? response_type=code& scope=openid& client_id=s6BhdRkqt3& state=af0ifjsldkj& nonce=n-0S6_WzA2Mj& redirect_uri=app%3A%2F%2Fsome-location
Sample Authentication Response (the state parameter is only present if there was one in the request):
HTTP/1.1 302 Found Location: app://some-location ?code=SplxlOBeZQQYb &state=af0ifjsldkj
Sample Token Request with Basic Auth:
POST /oidc-op/sls/token HTTP/1.1 Host: acme.org Content-Type: application/x-www-form-urlencoded Authorization: Basic ad...ds= grant_type=authorization_code &code=SplxlOBeZQQYb &redirect_uri=myapp%3A%2F%2Fsome-location
Sample Token Request with POST parameter client authentication:
POST /oidc-op/sls/token HTTP/1.1 Host: acme.org Content-Type: application/x-www-form-urlencoded client_id=myclient& client_secret=...& grant_type=authorization_code& code=SplxlOBeZQQYb& redirect_uri=myapp%3A%2F%2Fsome-location
Sample Token Response:
HTTP/1.1 200 OK
Content-Type: application/json
Cache-Control: no-store
Pragma: no-cache
{
"id_token": "SlAV32hkKG",
"access_token": "SlAV32hkKG",
"refresh_token": "8xLOxBtZp8",
"token_type": "Bearer",
"expires_in": 3600
}The id_token is a signed JWT (JSON Web Token) with by default claims like these:
{
"iss": "https://acme.org",
"sub": "24400320",
"aud": "[acme]",
"nonce": "n-0S6_WzA2Mj",
"exp": 1311281970,
"iat": 1311280970,
"auth_time": 1311280969
}The "nonce" claim is only set if there was one in the initial Authentication Request.
The refresh_token format is not specified in the OIDC standard, in case of the SLS
OP it is currently implemented also as a signed JWT.
{
"exp": 1311281970,
"revocation_id": "sdsafsfds",
"id_token_unsigned": "asd33ed...afsafds3"
}Again, refresh_token claims can be freely added, removed or modified.
-
Authorization must be with an "Authorization" HTTP request header of type "Bearer"
with the
access_tokenas authentication string. - By default, the returned userinfo contains only a single claim, "sub", but again claims can be freely added, modified and removed in the login model.
Sample UserInfo Request:
GET /userinfo HTTP/1.1 Host: server.example.com Authorization: Bearer SlAV32hkKG
The string after "Bearer" is the access_token.
Sample UserInfo Response:
HTTP/1.1 200 OK
Content-Type: application/json
Cache-Control: no-store
Pragma: no-cache
{
"sub": "24400320",
"email": "joe@acme.org"
}The OIDC 1.0 Core standard defines standard claims in "Section 5.1 Standard Claims".
-
The Refresh Request supports parameters "grant_type" and "refresh_token"
and client authentication with Basic Auth or with HTTP POST parameters
(
client_id/client_secret). - The "grant_type" parameter must be "refresh_token" (this identifies the type of request).
-
The returned response is formatted exactly as the response of a Token Request
and again claims in the
id_tokenand therefresh_tokencan be freely added, modified and removed.
The SLS OP does support a Discovery endpoint URI; the following URI is mapped in the SLS "web.xml" file, by default:
- /.well-known/openid-configuration
It can then be used in a model for the discovery endpoint, like this:
# OIDC well-known configuration
model.oidc-config.uri=/.well-known/openid-configuration
model.oidc-config.failedState=get.usererror
# optionally adapt config before displaying
#model.oidc-config.state.10.name=do.generic-adaptConfig
#model.oidc-config.state.10.action.1=#{config = oidc_op.getConfig()}
#model.oidc-config.state.10.action.2=#{config.claims_supported.addAll(['myOtherClaim','andThisClaim'])}
# mandatory, show the JSP
model.oidc-config.state.30.name=show.jsp-config
model.oidc-config.state.30.property=jsp.op.config
# handle errors
model.oidc-config.state.40.name=get.usererrorThis model shows how to create a map which contains the configuration metadata, and which is
then slightly changed in the model by adding a custom claim using a script expression. Then,
the JSON is finally displayed using the JSP OpConfig.jsp (JSP alias jsp.op.config).
Example JSON:
{
"authorization_endpoint": /* URL of the login model for Authentication Request */,
"token_endpoint": /* URL of the login model for Token/Refresh Request */,
"issuer": /* oidc.op.issuer property value */,
"jwks_uri": /* URI for the public key from the configured keystore */,
"scopes_supported":[
"openid"
],
"response_types_supported":[
"code"
],
"token_endpoint_auth_methods_supported":[
"client_secret_basic",
"client_secret_post"
],
"code_challenge_methods_supported":[
"S256"
],
"request_uri_parameter_supported":true,
"subject_types_supported":[
"public"
],
"userinfo_endpoint": /* URL of the login model for UserInfo Request */,
"end_session_endpoint": /* URL of the logout model */,
"id_token_signing_alg_values_supported":[
"RS256"
],
"claims_supported":[
"iss",
"auth_time",
"exp",
"iat",
"aud",
"auth_time"
]
}(Note that code_challenge_methods_supported does by default not contain method plain,
only the more secure S256, since by default plain is not allowed unless specifically
activated per configuration property for a specific client/RP. Use the script function
oidc_op.createConfigAsMap() as described below to add when needed.)
Script Functions
-
oidc_op.getConfig()- Returns a JSON string containing the configuration metadata. This method will internally calloidc_op.createConfigAsMap(), if it had not been called yet manually (see below), and then render the JSON based on the information in that map. -
oidc_op.createConfigAsMap()- optional / creates the configuration metadata as a JavaMap<String, Object>instance, which can then be changed using Groovy scripting (check Groovy tutorials for how to work with maps). The same instance of this object is also stored in the session, and used by a call to the functionoidc_op.getConfig(), so any changes done to the map will be reflected in the generated JSON string.
So, in order to customize the JSON shown in the JSP, follow these steps:
-
Call
oidc_op.createConfigAsMap()to receive aMap<String, Object>instance. - Edit the map using Groovy code.
-
The
OpConfig.jspalready callsoidc_op.getConfig()to create the JSON string.
The SLS OP does support a JWKS endpoint URI; the following URIs are mapped in the SLS "web.xml" file, by default:
- /jwks
- /oidc-jwks
- /.well-known/openid-configuration/jwks
One, or multiple of these can then be used in a model for the discovery endpoint, like this:
# OIDC JWKS
model.oidc-jwks.uri.1=/jwks
model.oidc-jwks.uri.2=/oidc-jwks
model.oidc-jwks.uri.3=/.well-known/openid-configuration/jwks
model.oidc-jwks.failedState=show.jsp
# optionally adapt config before displaying
#model.oidc-jwks.state.10.name=do.generic-adaptJwks
#model.oidc-jwks.state.10.action.1=#{jwks = oidc_op.createJwksAsMap()}
#model.oidc-jwks.state.10.action.2=#{jwks.keys[0].kid = 'bla' }
model.oidc-jwks.state.1000.name=show.jsp
model.oidc-jwks.state.1000.param.jsp=jsp.op.jwksThis model shows how to create a map which contains the key information, and which is
then slightly changed in the model by changing it using a script expression. Then,
the JSON is finally displayed using the JSP OpJwks.jsp (JSP alias jsp.op.jwks).
Example JSON:
{
"keys":[
{
"kty":"RSA",
"x5t#S256":"aSF8nngbepSY-EbbPjdc1mqc5_M-ODqm0KLstD_sLPg",
"e":"AQAB",
"kid":"uspauth",
"x5c":[
"MIIEIjCCAwqgAwIBAgIHANFqQQYpoDANBgkqhkiG9w0BAQsFADCBjDEdMBsGA1UEAwwUU2VjdXJlIExvZ2luIFNlcnZpY2UxHDAaBgNVBAsME1NlY3VyZSBFbnRyeSBTZXJ2ZXIxIjAgBgNVBAoMGVVuaXRlZCBTZWN1cml0eSBQcm92aWRlcnMxDzANBgNVBAcMBlp1cmljaDELMAkGA1UECAwCWkgxCzAJBgNVBAYTAkNIMB4XDTE5MDQyMjE3MzUyMloXDTMwMDQxOTE3MzUyMlowgYwxHTAbBgNVBAMMFFNlY3VyZSBMb2dpbiBTZXJ2aWNlMRwwGgYDVQQLDBNTZWN1cmUgRW50cnkgU2VydmVyMSIwIAYDVQQKDBlVbml0ZWQgU2VjdXJpdHkgUHJvdmlkZXJzMQ8wDQYDVQQHDAZadXJpY2gxCzAJBgNVBAgMAlpIMQswCQYDVQQGEwJDSDCCASIwDQYJKoZIhvcNAQEBBQADggEPADCCAQoCggEBAPuZvCX+IbdYSwH3teN2v+wgs5Yq282twWLfA9I6yB6+xvQZmmhEcAJBXayqaeCC5n5oRmylG/Yp2GK4s/ZGNQFFdMjbmrk2vRdw8ZN5gyLsbY1oEV2RvhBqNfd4dPqEzLynV8ubEwwwoGpebuSB1fhfavP02OaiErtRtLCQjuok5vKSrHFlDRzd7qWrFkvzqrekc8FgDjtlpE0pnizEonI1ICmX2Kk9/LEzyyHBJ0jLrTcsQEGrwIHIPszyUirgm+d/iqnom9Xw2pvZ3WxhLIw4W6J9v89Pr2qrG9U3AFcl+mMThB9gSYilXWF3kWAMDxbMGHhaq8Kk8ILeDvBk8SsCAwEAAaOBhjCBgzAfBgNVHREEGDAWghRTZWN1cmUgTG9naW4gU2VydmljZTALBgNVHQ8EBAMCAbYwDwYDVR0TAQH/BAUwAwEB/zAjBgNVHSUEHDAaBggrBgEFBQcDAQYIKwYBBQUHAwIGBFUdJQAwHQYDVR0OBBYEFLIP03gHk52Vn0B7L4SlGA6my/KnMA0GCSqGSIb3DQEBCwUAA4IBAQA8A2NJEa7voPk+F1tPQE82FiuG0VBgOl8vBZAslUSlwj6FxTXBN5Knw+96A4AEjhlPM4KeT1xcr46rbmHaaeXqKXe9VNU2zhRbT2kJzfjYu4kDSjJiJv1hdfKi+fqCPuUyPI5rsrDGDhhZ+UgZos4n7vXb3hzdjRoMMjxdVsf39czqZpJPe5z5c11h8G3J++Fg8SKx7dqTt7nz+WzUrDdrGXvRKdKpy6p05zF3XrBh9lDcUxiy7SqCNgO3MhCtbfHF5UU0aBRjyyg43iq/AL5ZfYbY17AOh7O7L8Ihyg7F+miBoxFBLR5mTsGns0qcQThgfU9ix1Cw4zhGzZMxv81A"
],
"n":"-5m8Jf4ht1hLAfe143a_7CCzlirbza3BYt8D0jrIHr7G9BmaaERwAkFdrKpp4ILmfmhGbKUb9inYYriz9kY1AUV0yNuauTa9F3Dxk3mDIuxtjWgRXZG-EGo193h0-oTMvKdXy5sTDDCgal5u5IHV-F9q8_TY5qISu1G0sJCO6iTm8pKscWUNHN3upasWS_Oqt6RzwWAOO2WkTSmeLMSicjUgKZfYqT38sTPLIcEnSMutNyxAQavAgcg-zPJSKuCb53-Kqeib1fDam9ndbGEsjDhbon2_z0-vaqsb1TcAVyX6YxOEH2BJiKVdYXeRYAwPFswYeFqrwqTwgt4O8GTxKw"
}
]
}Script Functions
-
oidc_op.getJwks()- Returns a JSON string containing the public key information. This method will internally calloidc_op.createJwksAsMap(), if it had not been called yet manually (see below), and then render the JSON based on the information in that map. -
oidc_op.createJwksAsMap()- optional / creates the JWKS information as a JavaMap<String, Object>instance, which can then be changed using Groovy scripting (check Groovy tutorials for how to work with maps). The same instance of this object is also stored in the session, and used by a call to the functionoidc_op.getJwks(), so any changes done to the map will be reflected in the generated JSON string.
So, in order to customize the JSON shown in the JSP, follow these steps:
-
Call
oidc_op.createJwksAsMap()to receive aMap<String, Object>instance - Edit the map using Groovy code
-
Call
oidc_op.getJwks()to create the JSON string
An OIDC Client/RP must be available that supports the required protocols etc.
The RP must provide client_id, client_secret and at least one redirect_uri.
It must be possible to configure the three SLS OP URLs for Authentication Request,
Token/Refresh Request and UserInfo Request, as well as the OP issuer URI,
at the RP.
Note that strong cryptography must be available in the JDK (at least AES256 and HMAC-SHA256 must be available).
The OP adapter is configured through a Java properties file, usually named "oidc-op-adapter.properties"
that must be installed in the "WEB-INF" directory of the SLS web application.
The standard SLS distribution is shipped with an example configuration file.
OIDC messages are automatically obtained from the HTTP request when needed
(no credential provider is needed):
do.oidc.op.handlemsg model action or oidc_op JEXL/Groovy functions
that get the OIDC message or check for its existence.
There are a number of OP-specific JEXL/Groovy functions that are used in models and JSPs.
See the SLS JEXL guide for a description of these functions (prefix oidc_op).
There is also a set of functions with prefix jwt that allows to parse and
inspect JSON Web Tokens (JWTs), as well as to validate their signatures, which is
useful in the SLS for validating ID tokens when the RP uses the ID token to
access the application (compared to addressing the SLS as OIDC OP). See also the
SLS JEXL guide for details.
In addition, the following JEXL variables are made available (see further below for sample login models that use these variables and see the SLS JEXL guide under the corresponding variable name for details about available methods on these variables):
Attributes in the authorization code during Authorization Code Flow, created
during validation of Authentication Request and Token Request, i.e. during
the oidc.op.handlemsg action.
Note that - also in order to support setups with multiple load-balanced SLS instances - any added attributes are transferred via the client browser as the "code" parameter in the 302 Redirect URL (enciphered and signed), hence the number of attributes that can be transferred has limits. As of 2017, the main limiting factor is still MS Internet Explorer which cannot handle more than about 2000 bytes, all other browsers can handle 8000 bytes or more. Without any additional attributes, the authorization code is about 120-150 bytes, i.e. there is lots of room for additional attributes in practice. The additionally required size per attribute is roughly 1.33 x (attribute key length in bytes + value length in bytes + 6).
- String getUserid() - String getClientId() - Date getAuthenticationDate() - Date getExpirationDate() - String getNonce() - void setAttribute(String name, Object value) - Object getAttribute(String name) - List<String> getAttributeAsStringList(String name) - Object removeAttribute(String name) - Set<String> getAttributeNames()
Claims of the id_token, created during creation of the responses for
Token Request, UserInfo Request and Refresh Request, i.e. during the
oidc.op.createmsg action.
- void setClaim(String name, Object value) - Object getClaim(String name) - List<String> getClaimAsStringList(String name) - Object removeClaim(String name) - Set<String> getClaimNames()
Claims of the refresh_token, created during creation of the responses for
Token Request and Refresh Request, i.e. during the oidc.op.createmsg action.
- void setClaim(String name, Object value) - Object getClaim(String name) - List<String> getClaimAsStringList(String name) - Object removeClaim(String name) - Set<String> getClaimNames()
Claims of the userinfo JSON body to be returned from a UserInfo Request, created
during creation of the response, i.e. during the oidc.op.createmsg action.
- void setClaim(String name, Object value) - Object getClaim(String name) - List<String> getClaimAsStringList(String name) - Object removeClaim(String name) - Set<String> getClaimNames()
In order to use the OIDC adapter, some properties have to be defined in the
oidc-op-adapter.properties file.
oidc.op.issuer
An URI that identifies the OP as the issuer of tokens sent to the RP.
oidc.op.issuer=https://xyz.acme.com/oidc-op/sls
oidc.op.keystore.file
Path and filename of the keystore that contains private key and certificate of the OP. Can be an absolute path or a path relative to the web application. Example:
oidc.op.keystore.file=WEB-INF/oidc-op/oidc-op.jks
oidc.op.keystore.type
The OP keystore type. Default is JKS (a Java keystore). Example:
oidc.op.keystore.type=PKCS12
oidc.op.keystore.pass
The OP keystore passphrase. Example:
oidc.op.keystore.pass=jsdi284ksau1m49284j234239c3dleuw
oidc.op.keystore.keypair.alias
The alias of the OP key pair (private key plus certificate) in the key store. Example:
oidc.op.keystore.keypair.alias=oidc-op
The key must be an RSA key and minimal key size is 2048 bit (mandated by JWT standards, more precisely by RFC 7518 "JSON Web Algorithms (JWA)").
oidc.op.authorization_code.validity.secs
Validity period of the authorization code. Default is 60 sec (1 min), maximally allowed valus is 3600 sec (1 hour). Example:
oidc.op.authorization_code.validity.secs=20
Security Note: Note that normally this validity should be kept short, as the mobile app usually follows the 302 to make the token request immediately. Replays can only be prevented in the SLS in setups with a single SLS or in the case of several load-balanced SLS instances if it can be guaranteed (e.g. via source IP), that both authentication requests via mobile browser and token request are sent to the same SLS instance, without a shared HTTP session.
oidc.op.id_token.validity.secs
Validity period of the id_token (and the access_token). Default is 300 sec (5 min).
Example:
oidc.op.id_token.validity.secs=120
oidc.op.id_token.userid
What to use as userid (subject, "sub" claim) in the id_token (and the access_token).
Example:
oidc.op.id_token.userid=${session.getVerifiedCred('username')}oidc.op.refresh_token.validity.hours
Validity period of the refresh_token. Default is 24 hours (one day).
Example:
oidc.op.refresh_token.validity.hours=144
oidc.op.refresh_token.validity.renew
Whether to renew the refresh_token validity period at refresh request
processing or not. Default is false.
Example:
oidc.op.refresh_token.validity.renew=true
oidc.op.rp.<no>.*
Settings that define things that are specific per trusted RP. See immediately below for the specific settings.
oidc.op.rp.<no>.client_id
The client_id of the RP.
Mandatory and must be unique among all configured RPs.
(This is enforced by the SLS OP.)
Fixed string, no expressions are allowed.
oidc.op.rp.<no>.client_secret
The client_secret of the RP.
Mandatory unless public client.
Fixed string, no expressions are allowed.
oidc.op.rp.<no>.redirect_uris
Comma-separated list of allowed redirect_uri parameters for authentication. Mandatory. Fixed string, no expressions are allowed.
oidc.op.rp.<no>.pixy.require, oidc.op.rp.<no>.pixy.allowPlain
These two settings control the handling of Proof Key for Code Exchange (PKCE, "Pixy").
By default both are false, which means that then for that RP Pixy is handled if requested
by the RP in the Authentication Request and only the code challenge method S256 is
supported.
If you set pixy.require to true, only requests with Pixy are handled for that RP,
while authentications without Pixy fail.
If you set pixy.allowPlain, the less secure code challenge method plain is also
allowed and performed for that RP.
Fixed strings, no expressions are allowed.
oidc.op.rp.<no>.publicClient
Whether the RP is a Public Client or not.
If false, the RP must send client_id and client_secret in the token request
(either in a basic auth Authorization header or in POST parameters)
and match the configured ones;
if true, the RP must send the client_id as a POST parameter and it must match
the configured one (a client_secret is then not required and ignored if sent).
Optional, defaults to false.
Fixed string, no expressions are allowed.
Below is a sample model in which the user authenticates as part 1 of the Authorization Code flow.
Note that a second adapter (e.g. LDAP) is assumed to be defined for authentication.
As also with all sample models below, it is important that the failed state of
do.oidc.op.handlemsg is do.oidc.op.sendmsg, because then the SLS attempts to send
back an OIDC error response to the RP with a standardized error code and an
error_description.
Note also the first model state which does nothing and which is only needed if the login is initiated with a HTTP request sent with POST binding, as then the SLS skips the first state.
Because the second request of the Authorization Code flow will come into the SLS
as a completely new HTTP session, the SLS stores some information about the login
like the userid in a cache, accessed by the authorization code. This cache item
is also made available as a JEXL/Groovy variable oidc_op_cache, in which an
arbitrary number of custom attributes can be stored for later inclusion into
the id_token as claims.
model.authenticate.uri=/auth
model.authenticate.failedState=get.cred
#
# generic "no operation" first state because skipped if first request is a POST
model.authenticate.state.1000.name=do.generic-nop-skipped-if-post
#
# handle oidc message (validate it)
model.authenticate.state.2000.name=do.oidc.op.handlemsg
model.authenticate.state.2000.failedState=do.oidc.op.sendmsg
#
# authenticate user (currently with ldap adapter)
model.authenticate.state.4000.name=get.cred
model.authenticate.state.5000.name=do.auth
#
# create oidc response (optional, would happen automatically at sendmsg)
model.authenticate.state.6000.name=do.oidc.op.createmsg
#
# add custom attributes to authorization code
model.authenticate.state.6500.name=do.generic-add-custom-attributes
model.authenticate.state.6500.action.1=${oidc_op_authorization_code.setAttribute('acme_claim', 'road-runner')}
#
# send oidc response
model.authenticate.state.7000.name=do.oidc.op.sendmsg
model.authenticate.state.7000.failedState=get.usererror
model.authenticate.state.8000.name=get.usererrorBoth the second part of the Authorization Code Flow, the Token Request, and the Refresh Request access the same location at the OP (this is mandated by the OpenID Connect standard). Because both requests also return essentially the same information, it thus often makes sense to handle these two requests in the same login model.
In case of the Token Request, after request validation, a JEXL/Groovy variable called
oidc_op_cache is made available to get attributes from the cache. In the case
both requests, after creating the response, a JEXL/Groovy variable called
oidc_op_id_token is created which allows to add, modify or remove any claims
in the default id_token, and a JEXL variable oidc_op_refresh_token which serves
the same purpose for refresh_token claims.
model.token.uri=/oidc-token
model.token.failedState=get.usererror
#
# Detect if incoming request is token request (and not refresh)
model.token.state.1500.name=do.generic-detect-if-token
model.token.state.1500.action.1=#{isTokenRequest = (oidc_op.getOidcRequestWrapper().getType() == 'token')}
#
# generic "no operation" first state because skipped if first request is a POST
model.token.state.1000.name=do.generic-nop-skipped-if-post
#
# handle oidc message (validate it)
model.token.state.2000.name=do.oidc.op.handlemsg
model.token.state.2000.failedState=do.oidc.op.sendmsg
#
# create oidc response (optional, would happen automatically at sendmsg)
model.token.state.3000.name=do.oidc.op.createmsg
model.token.state.3000.failedState=do.oidc.op.sendmsg
#
# add custom claims to id_token, but only if token request
# (are already in id_token if refresh request)
model.token.state.4000.name=do.generic-add-custom-claims
model.token.state.4000.action.1=${oidc_op_id_token.setClaim('acme_claim', oidc_op_authorization_code.getAttribute('acme_claim'))}
model.token.state.4000.action.1.if=${isTokenRequest}
#
# send oidc response
model.token.state.7000.name=do.oidc.op.sendmsg
model.token.state.7000.failedState=get.usererror
model.token.state.8000.name=get.usererrorThe typical model for handling UserInfo Requests is again very similar.
This time, a JEXL/Groovy variable called oidc_op_userinfo is created when the
response is created, which allows to add, modify or remove any claims of the UserInfo.
By default, the UserInfo only contains the mandatory "sub" claim (the subject
resp. userid of the user as in the id_token.
For convenience also a JEXL/Groovy variable oidc_op_id_token is created for
access to claims from the id_token.
model.userinfo.uri=/oidc-userinfo
model.userinfo.failedState=get.usererror
#
# generic "no operation" first state because skipped if first request is a POST
model.userinfo.state.1000.name=do.generic-nop-skipped-if-post
#
# handle oidc message (validate it)
model.userinfo.state.2000.name=do.oidc.op.handlemsg
model.userinfo.state.2000.failedState=do.oidc.op.sendmsg
#
# create oidc response (optional, would happen automatically at sendmsg)
model.userinfo.state.3000.name=do.oidc.op.createmsg
model.userinfo.state.3000.failedState=do.oidc.op.sendmsg
#
# add custom claims to userinfo
model.userinfo.state.4000.name=do.generic-add-custom-claims
model.userinfo.state.4000.action.1=${userid = session.getVerifiedCred('username')}
model.userinfo.state.4000.action.2=${oidc_op_userinfo.setClaim('preferred_username', userid)}
model.userinfo.state.4000.action.3=${oidc_op_userinfo.setClaim('email', userid + '@acme.not')}
#
# send oidc response
model.userinfo.state.7000.name=do.oidc.op.sendmsg
model.userinfo.state.7000.failedState=get.usererror
model.userinfo.state.8000.name=get.usererrorIt is possible to send a custom OIDC error message back to the RP in the login
model. Precondition is that this happens after a oidc.op.handlemsg action.
Example:
model.userinfo.state.7000.name=do.oidc.op.sendmsg-custom-error model.userinfo.state.7000.param.error=invalid_request model.userinfo.state.7000.param.error_description=No xyz parameter in request
The error parameter is mandatory and should normally be one of the standard
error codes for OIDC error responses. Note that these error codes differ for
the different request types and also how they are sent back to the client.
See the OIDC standard for details.
The error_description parameter is optional and is intended to provide
additional info, usually rather not for an end user using the RP App, but for
someone who develops or operates the RP.
Note that the OP could, for example act as a SAML 2.0 SP during the first part of the
Authorization Code Flow, i.e. redirect the client to a SAML IdP and after successful
user authentication remember the SAML Assertion (or some of its attributes) in the cache
for later use as claims in the id_token during the second part of the
Authorization Code Flow.
Typically the validity of an id_token is chosen to be relatively short, because
it is sent to applications, only protected by SSL/TLS, but the validity of a
refresh_token is often chosen to be quite long, since it is only sent to the OP,
but this long lifetime can still make it necessary to have a way to revoke a
refresh_token at the OP, for example if a mobile device containing the RP
App with refresh_token in its storage is stolen or lost.
The OpenID Connect standard(s) do not yet offer standardized
mechanisms and protocols for refresh_token revocation.
The SLS OP offers support for this use case. During handling of the Token
Request, the automatically generated revocation_id claim of the refresh_token
could be stored in some persistent storage, e.g. LDAP repository.
During handling of the Refresh Request, an additional check could be performed
for the presence of the revocation_id in the persistent storage and only
accept the refresh_token if its revocation_id is found there.
To revoke a token, you would simply remove the revocation_id from the
persistent storage, either directly or via a service URL at the SLS
(with suitable administrator authentication).
Note that there is no obligation to use the automatically generated
revocation_id, as it is not used in any hard-coded parts of the SLS OP.
The revocation_id can be replaced before the refresh_token is returned
or a completely different revocation mechanism might be implemented.
A sample Android App, which is known to have been compatible with the SLS OP in 2016 and can be configured to perform an Authorization Code Flow login followed by a UserInfo Request and also supports Refresh Requests can be found here: https://github.com/learning-layers/android-openid-connect.git
Endpoints and flow, as well as client_id, client_secret and redirect_uri
can be configured in the com.lnikkila.oidcsample.Config class. After
deploying the App to an Android device or emulator, click the yellow button
and the App will then try to perform a login with Authorization Code flow,
followed by a UserInfo request and then display the logged in user
(preferred_username claim in the user info). Clicking the button again,
will either get user info again or if the access_token has expired, try to
refresh the id_token/access_token.
Note that the App remembers the received tokens, so in order to start over, uninstall the App and reinstall it.
If you use self-signed certificates on a test server for the SLS OP, you will have to deactivate some SSL/TLS checks in the App, both for callouts via the mobile browser and direct callouts using an API from Google. Search the internet for how to do this or else ask USP for details.
Important:
Except for the id_token, whose format is defined by the OpenID Connect
standard, the format of the other tokens described here (token code,
access_token and refresh_token) is left open by OpenID Connect and
OAuth 2.0; thus far it may change between SLS releases in ways that would
not be compatible for any code outside of the OP that makes use of
the internal format of those tokens.
The information provided for those tokens should thus currently
not be used by code in related parties - if in doubt, contact USP.
The information here is only provided to make the implementation of the OP
in the SLS transparent, including its security related aspects.
As defined in the OpenID Connect standard.
The id_token is signed with the private RSA key of the OP;
currently encrypting it is not supported.
The functions in the JEXL/Groovy variable oidc_op_id_token allow to add,
modify and remove claims before the id_token is signed.
Note that accordingly these claims will be visible to any recipients
of the id_token, which is in line with the standard, but one should
be aware not to expose more information in the id_token than needed
for the specific OpenID connect use cases.
The token code (authorization code) is implemented as a JSON structure,
which is then encrypted and signed based on the private RSA key of the OP.
It contains the following fields:
-
uid: User ID, get withoidc_op_authorization_code.getUserId() -
cid: Client ID; get with withoidc_op_authorization_code.getClientId() -
aat: Authentication date: get withoidc_op_authorization_code.getAuthenticationDate() -
exp: Expiration date: get withoidc_op_authorization_code.getExpirationDate() -
nonce: Optional nonce: get withoidc_op_authorization_code.getNonce() -
attr: any number of additional named attributes (add/remove/list with correspondingoidc_op_authorization_codefunctions)
Encryption and signing is done as follows:
- Serialize JSON (max compression), convert to bytes (UTF-8).
- Sign a fixed pattern with the OP private key (SHA256withRSA).
- Calculate a hash of this signature (SHA-384), this yields a AES256 key with IV.
- Encipher the serialized JSON bytes (AES/CBC/PKCS5Padding).
- Sign another fixed pattern with the OP private key (SHA256withRSA).
- Create a HmacSHA256 from the second signature.
- Calculate the HmacSHA256 of the above JSON ciphertext.
- Concat ciphertext and HMAC.
- Base64 encode these bytes, this is the code.
The reason that there is encrypted data in the code at all is use cases
where several load-balanced SLS instances are used;
they need this information, and, so far, different SLS instances cannot
be synchronized internally.
Note that this limitation of the current SLS makes is also harder to prevent
replay attacks where a code is resent to another load-balanced SLS instance.
If sent to the same SLS again, the code is rejected,
if sent to another SLS instance, it is accepted.
It is recommended to keep the validity period of the code short,
especially in load-balanced setups.
The functions in the JEXL/Groovy variable oidc_op_authorization_code allow to add,
modify and remove claims before the code is enciphered and signed.
Currently, the access_token is identical to the id_token, except that
it is always enciphered as follows:
- Derive an AES256 key with IV, as described for the authorization code above.
-
Encipher the UTF-8 decoded
id_tokenbytes with this key (AES/CBC/PKCS5Padding). - Base64URL encode the resulting bytes.
The refresh_token is a JWT, which is signed with the private RSA key
of the OP (just like the id_token).
By default, it contains the following claims:
-
exp: The expiry time of therefresh_token. -
id_token_unsigned: An unsigned copy of theid_token, enciphered in the same way as thecode, see details above. Note that that the missing signature is no security issue, since the wholerefresh_tokenis always signed.
The functions in the JEXL/Groovy variable oidc_op_refresh_token allow to add,
modify and remove claims before the refresh_token is signed.
In some use-cases, basic OAuth 2.0 flows are required, not OpenID Connect. The main differences between the two, in terms of functionality, are:
Some request parameters are optional in OAuth, while mandatory in OIDC:
scope-
With OAuth 2.0, the "
scope" parameter is entirely optional -
With OpenID Connect, the "
scope" parameter must exist and contain the scope "openid". It MAY also connect other scopes, which the SLS ignores; in OAuth mode, the parameter is ignored by the SLS entirely.
-
With OAuth 2.0, the "
redirect_uri-
With OAuth 2.0, the "
redirect_uri" parameter is completely optional. However, IF it is in the request AND the state parameterverifyRedirectUrihas been set totrue, the SLS will verify that its value equals one of the configured redirect URIs in the corresponding relying party configuration (this applies for both the authorization and the token request). -
With OpenID Connect, the
"redirect_uri"parameter is mandatory for the Authentication request, and the SLS will also verify that its value equals one of the configured redirect URIs in the corresponding relying party configuration. For the token request, the same check is only performed IF the state parameterverifyRedirectUrihas been set totrue.
-
With OAuth 2.0, the "
- When processing OAuth token requests, the SLS will create only an access and a refresh token, but no id token.
In order to support OAuth 2.0 instead of OIDC, the first request-processing oidc-state in the model must set the state parameter "mode" to the value "oauth":
model.userinfo.state.2000.name=do.oidc.op.handlemsg model.userinfo.state.2000.param.mode=oauth model.userinfo.state.2000.failedState=do.oidc.op.sendmsg
In this case, the "oauth" mode will be used for all following requests and responses in the same SLS session.
The OIDC RP Adapter implements an OpenID Connect (OIDC) 1.0 Relying Party (RP).
OpenID Connect 1.0 is an authentication protocol based on the OAuth 2.0 framework for authorization protocols.
For an overview of the OpenID Connect flows, including how exchanged requests and responses typcially look like, see the corresponding sections in "OIDC OP Adapter".
Since the SLS as RP is typically used in different use cases than a mobile app and the like, the RP Adapter supports less features than the OP Adapter.
The main supported feature is the Authorization Code Flow, with Authentication Request via web browser redirect, followed by Token Request via an internal HTTP Callout directly to the OP, bypassing the client. If the flow passed without errors, by default a verified username credential is created for the subject of the received id_token.
- Supports multiple clients (RPs) for multiple OPs.
- Requests and responses can be modified via scripting before sending resp. before validating.
- Authentication of the client in the Token Request with Basic Auth.
- A proxy host and port with optionally proxy authentication can be defined for the Token Request and getting the JWKS via URI.
- OP JWKS can be provided indirectly via a file or directly as a string expression, or dynamically from a URI (to support OPs that change it frequently).
- Authorization codes are cached for a configurable time in order to prevent replay attacks on the same SLS instance.
- Access to id_token claims, as well as to access_token and refresh_token strings (for propagation).
-
Signed id_tokens (signed with
RS256). - Proof Key for Code Exchange (PKCE, "Pixy") and Public Clients.
Not supported are:
- Refresh and Userinfo Requests.
- Plain OAuth 2.0.
-
id_tokens that are encrypted, or signed with other algoritms than
RS256.
Each OIDC Client/RP to use must be registered at an OP with client_id, client_secret
and at least one redirect_uri.
Note that strong cryptography must be available in the JDK (at least AES256 and HMAC-SHA256 must be available).
The RP adapter is configured through a Java properties file, usually named "oidc-rp-adapter.properties"
that must be installed in the "WEB-INF" directory of the SLS web application.
The standard SLS distribution is shipped with an example configuration file.
OIDC messages are automatically obtained from the HTTP request when needed
(no credential provider is needed):
do.oidc.rp.handlemsg model action or oidc_rp JEXL/Groovy functions
that get the OIDC message or check for its existence.
There are a number of RP-specific JEXL/Groovy functions that are used in models and JSPs.
See the SLS JEXL guide for a description of these functions (prefix oidc_rp).
There is also a set of functions with prefix jwt that allows to parse and
inspect JSON Web Tokens (JWTs), as well as to validate their signatures.
See also the SLS JEXL guide for details.
In addition, the following JEXL variables are made available (see further below for sample login models that use these variables and see the SLS JEXL guide under the corresponding variable name for details about available methods on these variables):
Access to request parameters in the Authentication Request after creating
the request with the oidc.rp.createmsg model action. The request is
currently sent via 302 Redirect via the browser to the OP.
- String getParameter(String name) - void setParameter(String name, String value) - String removeParameter(String name) - Set<String> getParameterNames()
The Authentication Response can be obtained with the call
oidc_rp.getAuthResponseWrapper() and its method are documented
in the JEXL Guide under oidc_rp_auth_response. It is possible
to query/modify received parameters before validating the response.
- boolean hasResponse() - String getParameter(String name) - void setParameter(String name, String value) - String removeParameter(String name) - Set<String> getParameterNames()
Access to HTTP headers and POST parameters in the Token Request after creating
the request with the oidc.rp.createmsg model action.
- String getHeader(String name) - void setHeader(String name, String value) - String removeHeader(String name) - Set<String> getHeaderNames() - String getParameter(String name) - void setParameter(String name, String value) - String removeParameter(String name) - Set<String> getParameterNames()
The Token Response can be obtained with the call
oidc_rp.getTokenResponseWrapper() and its method are documented
in the JEXL Guide under oidc_rp_token_response. It is possible
to query/modify JSOP values and the HTTP response status before
validating the response.
- boolean hasResponse() - int getStatus() - void setStatus(int code) - Object getJsonValue(String key) - void setJsonValue(String key, Object value) - Object removeJsonValue(String key) - Set<String> getJsonKeys()
Access to the claims of the id_token; the variable is created
after successful validation of a Token Response.
- JWT getJwt() - Object getClaim() - List<String> getClaimAsStringList() - Set<String> getClaimNames()
In addition, two more variables are created if the corresponding
items were part the Token Response, each containing the respective
token as a string, exactly as received: oidc_rp_access_token and
oidc_rp_refresh_token.
In order to use the OIDC adapter, some properties have to be defined in the
oidc-rp-adapter.properties file.
The following properties are not specific to an OP or RP.
oidc.rp.code.cache.keepsecs
How long to keep the authorization code in the cache in order to prevent replay attacks with the same authorization code. Note that the cache is per SLS instance, i.e. it cannot fully protect in setups with several load-balanced SLS instances for the same RP. Default is 3600 seconds.
oidc.rp.code.cache.keepsecs=120
oidc.rp.http.proxy.host, oidc.rp.http.proxy.port
Optional settings for host and port of a proxy to use for HTTP callouts from the RP Adapter, specifically so far for the Token Request and for getting the JWKS via URI. If a proxy host is configured, configuring also the port is mandatory.
oidc.rp.http.proxy.host=proxy.acme.org oidc.rp.http.proxy.port=8443
oidc.rp.http.proxy.auth.username
Optional setting for the username for proxy authentication.
oidc.rp.http.proxy.auth.password
Setting for the password for proxy authentication, mandatory if the username is defined.
oidc.rp.http.proxy.auth.type
The type of authentication to the proxy.
Allowed values are basic, ntlm and spnego, default is basic.
oidc.rp.http.proxy.auth.domain
Optional domain or realm for proxy authentication.
Sample config settings for proxy with basic auth:
oidc.rp.http.proxy.host=proxy.acme.org oidc.rp.http.proxy.port=8443 oidc.rp.http.proxy.auth.username=sls oidc.rp.http.proxy.auth.password=secret oidc.rp.http.proxy.auth.type=basic oidc.rp.http.proxy.auth.domain=acme
The following properties define OPs.
oidc.rp.op.<no>.issuer
Mandatory unique ID of the OP issuer (an URI). Fixed string, no expressions are allowed.
oidc.rp.op.10.issuer=https://op.acme.org/
oidc.rp.op.<no>.authUri
Mandatory URI for the authentication request. Expressions are allowed (e.g. derive from issuer).
oidc.rp.op.10.authUri=https://op.acme.org/auth
oidc.rp.op.<no>.tokenUri
Mandatory URI for the token request. Expressions are allowed (e.g. derive from issuer).
oidc.rp.op.10.tokenUri=https://op.acme.org/token
oidc.rp.op.<no>.jwksSourceType, oidc.rp.op.<no>.jwksSource
Mandatory source type and source for JWKS. Supported source types are:
-
file: Source is the path to a JWKS file in the file system, absolute or relative to the webapp. -
string: Source is the JWKS string. -
uri: Source is the URI where to get the JWKS with an HTTP GET callout.
Expressions are allowed for the source, but not for the source type.
In case of source type uri, the result of the callout is cached and only requeried
with a callout again if a received id_token contains a key ID that is not part of
the JWKS or the last callout was more than an hour ago, whichever comes first.
Example for source type file:
oidc.rp.op.10.jwksSourceType=file oidc.rp.op.10.jwksSource=WEB-INF/oidc-rp/acme-op-jwks.json
Example for source type string:
oidc.rp.op.<no>.jwksSourceType=string
oidc.rp.op.<no>.jwksSource=#{myUtil.getJwks('acme-op')}Example for source type uri:
oidc.rp.op.<no>.jwksSourceType=uri oidc.rp.op.<no>.jwksSource=https://op.acme.org/jwks
The following properties define clients (RPs) and which OP they are registered at, hence also pairing a client (RP) with an OP as defined with settings above.
oidc.rp.client.<no>.alias
Mandatory alias that is unique per client (globally, not per OP).
Must be of the form <client-specific>@<op-specific>;
often might use the client_id for the first part
and maybe the domain of the OP for the second part.
Fixed string, no expressions are allowed.
Example:
oidc.rp.client.200.alias=client1@acme-op
oidc.rp.client.<no>.description
Optional string to display to users to identify the client/OP pairing, usually shown in a dedicated JSP where the user can select the desired OP. If not present, defaults to the alias. Fixed string, no expressions are allowed.
oidc.rp.client.200.description=First Client for ACME
oidc.rp.client.<no>.isForCurrentVhost
Optional expression that yields true if the RP is for the current vhost. Typically used to include/exclude client/OP pairings to offer to the user for login. Default is true. Expressions are allowed.
oidc.rp.client.200.isForCurrentVhost=#{var('header.host')=='acme.org'}oidc.rp.client.<no>.op
Mandatory unique issuer identifier (URI) as in the OP configuration above. Fixed string, no expressionsa are allowed.
oidc.rp.client.200.op=https://op.acme.org/
oidc.rp.client.<no>.client_id, oidc.rp.client.<no>.client_secret, oidc.rp.client.<no>.redirect_uri, oidc.rp.client.<no>.pixy.use, oidc.rp.client.<no>.publicClient
Mandatory settings that define the client.
The client_id and client_secret must be fixed strings, no expressions allowed,
and must be registered at the corresponding OP.
The redirect_uri can be an expression and it must evaluate to one of the
URIs registered at the corresponding OP.
The pixy.use setting is optional (defaults to false) and should be compatible with
the configuration/behavior of the OP.
If true, performs Proof Key for Code Exchange (PKCE, "Pixy"), with code challenge
method S256 and a code challenge of 256 secure random bits (base64-encoded 43 characters).
(Note that the less secure code challenge method plain is not supported because the PKCE
standard forbids clients that can support S256 to also support plain.)
The publicClient setting is optional (defaults to false) and should be compatible
with the configuration/behavior of the OP.
If false, client_id and client_secret are sent in a basic auth Authorization
header in the token request;
if true, only the client_secret is sent and instead as a POST parameter.
Fixed string, no expressions allowed.
oidc.rp.client.200.client_id=client1 oidc.rp.client.200.client_secret=ghd0387 oidc.rp.client.200.redirect_uri=https://client1.xyz.org/redirect
oidc.rp.client.<no>.scopes
Optional comma separated list of scopes to send in addition to openid.
Expressions are allowed.
oidc.rp.client.200.scopes=email,acme
Below is a sample model in which a user can authenticate with the Authorization Code flow.
If the initial request has no parameter clientopalias,
a JSP is shown for selection of the corresponding client/OP pairing,
and then posted with that parameter.
After that, it is two times a sequence of do.oidc.rp.createmsg,
do.oidc.rp.sendmsg and do.oidc.rp.handlemsg, first for the
Authentication Request, then for the Token Request.
In between in the sample model some parts of the requests/responses
are logged, but they could also be modified there, if needed.
model.login.uri=/auth
model.login.failedState=get.usererror
#
# generic "no operation" first state because skipped if first request is a POST
model.login.state.1000.name=do.generic-nop
# skip client/OP selection JSP if alias already indicated
model.login.state.1500.name=do.generic-clientop-indicated
model.login.state.1500.nextState.1=do.oidc.rp.createmsg-auth
model.login.state.1500.nextState.1.if=#{var('parameter.clientopalias') != null}
# show client/OP selection JSP
model.login.state.1600.name=show.jsp-select-clientop
model.login.state.1600.param.jsp=jsp.rp.clientopselection
# create auth request
model.login.state.2000.name=do.oidc.rp.createmsg-auth
model.login.state.2000.param.mode=oidc
model.login.state.2000.param.alias=#{var('parameter.clientopalias')}
model.login.state.2000.param.request=authentication
# audit log some stuff from auth request
model.login.state.2500.name=do.generic-auth-request
model.login.state.2500.action.1=#{function.logAudit('auth request parameter names: ' + oidc_rp_auth_request.parameterNames)}
# send auth request
model.login.state.3000.name=do.oidc.rp.sendmsg-auth
# audit log some stuff from auth response
model.login.state.3500.name=do.generic-auth-response
model.login.state.3500.action.1=#{function.logAudit('auth response parameter names: ' + oidc_rp.getAuthResponseWrapper().parameterNames)}
# validate auth response
model.login.state.4000.name=do.oidc.rp.handlemsg-auth
# create token request
model.login.state.5000.name=do.oidc.rp.createmsg-token
model.login.state.5000.param.request=token
# audit log some stuff from token request
model.login.state.5500.name=do.generic-token-request
model.login.state.5500.action.1=#{function.logAudit('token request header names: ' + oidc_rp_token_request.headerNames)}
model.login.state.5500.action.2=#{function.logAudit('token request parameter names: ' + oidc_rp_token_request.parameterNames)}
# send token request
model.login.state.6000.name=do.oidc.rp.sendmsg-token
# audit log some stuff from auth response
model.login.state.6500.name=do.generic-token-response
model.login.state.6500.action.1=#{function.logAudit('token response status: ' + oidc_rp.getTokenResponseWrapper().status)}
model.login.state.6500.action.2=#{function.logAudit('token response parameter names: ' + oidc_rp.getTokenResponseWrapper().jsonKeys)}
# validate token response
model.login.state.7000.name=do.oidc.rp.handlemsg-token
model.login.state.8000.name=do.success
model.login.state.9000.name=get.usererrorThe WebAuthn adapter implements support for using authentication tokens according to the FIDO2 project, using the "WebAuthn" API (short for "Web Authentication").
- Registration Flow
Authentication Flow
- Multi-factor authentication (FIDO token as additional factor)
- Single-factor authentication (aka password-less login)
Various credential persistence options
- LDAP
- SES Identity (IDM / Syncope database)
- In-Memory (for testing / initial integration, lost at SLS restart)
The following limitations currently exist for the SLS WebAuthn adapter:
- No attestation support: Attestations are currently not required, and are not validated.
- No metadata support: There is currently no built-in mechanism to look up the metadata for the authenticator token based on its AAGUID.
- No token binding support (RFC 8471).
The WebAuthn API is supported by all recent major web browsers; it allows to perform a challenge-/response flow between a web application and a client, with a hardware token, either to be used as a second factor (in addition to username and password), or for password-less login.
There are many different implementations of such tokens; they can be connected over USB or NFC, or built right into the client platform, such as fingerprint readers in smartphones. The probably most common use-cases are:
- Using a USB-connected token (examples are many Yubico tokens etc.) as a second factor for authentication at a desktop/laptop computer browser.
- Using a smartphones' own biometric authentication token (like a fingerprint reader) for password-less authentication at a mobile browser.
- Using the TPM (Trusted Platform Module) in a Windows PC/Laptop in combination with a PIN or biometrics (camera, fingerprint, etc.).
There are also different levels of security supported by the tokens. For example, some USB tokens may come with a built-in fingerprint reader, so that only the rightful owner can activate the token during the authentication procedure. Therefore, such tokens authenticate the enduser themselves, before allowing them to use the token. Others just have a simple button that needs to be pressed, which means anyone who gets a hold of the token can use it. It depends on the context and the security needs of the customer and the application how to best deal with these different situations.
The basic idea is that per "website" a private/public key pair is generated on some sort of "secure authentication device" and the public key is registered on the server. By proving possession of the private key the client can be strongly authenticated after registration.
-
Origin / RP ID: The "website" is identified by the so-called "Relying Party
Identifier", short RP ID, which must be the same as the domain ("origin") of the
server or a superdomain of it. For example, if the server is at
coyote.acme.org, valid RP IDs arecoyote.acme.org(default) andacme.org, but neitherroadrunner.acme.orgnor justorg. - Authenticator: The "secure authentication device" (normative name Authenticator or WebAuthn Authenticator) can be on the same device as the web browser (e.g. Trusted Platform Module on a PC/laptop, fingerprint sensor on a mobile device) or plugged into the device (e.g. USB dongle) or connected wirelessly (e.g. PC/laptop to cell phone via Bluetooth, etc.).
Flows: There are only two flows:
- Registration Flow: A private/public key pair is generated, the key pair is stored on the authentication device, the public key on the server.
- Authentication Flow: The client proves its identity with its private key in response to a challenge from the server.
- Web Authentication API: On the client side all clients (typically web browsers) must support the corresponding Javascript API, the Web Authentication API (aka "WebAuthn" API).
- Attestation: Statements about the authenticator and the data it provides (like the public key of a user at registration), signed with a private key related to the authenticator. Attestation can be demanded by the server at registration and can then be sent to the server.
The WebAuthn standard can be found here: https://www.w3.org/TR/webauthn/
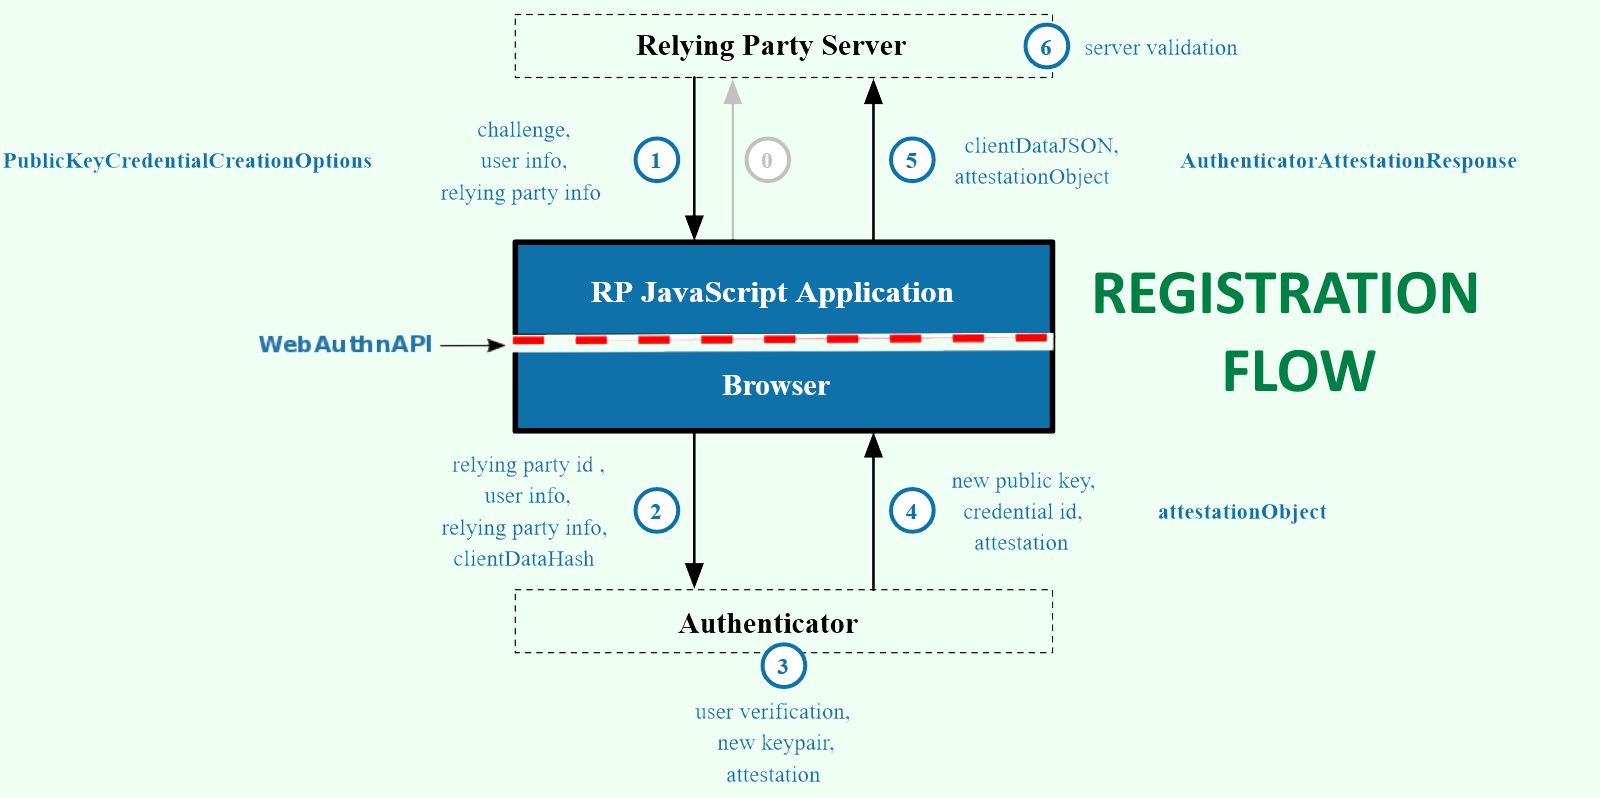
The RP Server (SLS) prepares data for a so-called publicKey Javascript structure
which is then passed to the browser/client Javascript function navigator.credentials.create(publicKey)
as the sole argument.
Here is an example publicKey with related SLS config properties as comments, which are explained in detail in the configuration section further below:
{
"attestation": "none",
"challenge": base64UrlDecode("M8...ig"), /* generated by SLS */
"authenticatorSelection": {
"authenticatorAttachment": "cross-platform", /* webauthn.reg.authenticatorSelection.authenticatorAttachment */
"userVerification": "preferred", /* webauthn.reg.authenticatorSelection.userVerification */
"requireResidentKey": false, /* webauthn.reg.authenticatorSelection.requireResidentKey */
"residentKey": "preferred" /* webauthn.reg.authenticatorSelection.residentKey */
},
"user": {
"displayName": "myuser-display-name", /* webauthn.user.displayName */
"name": "myuser", /* SLS username credential */
"id": base64UrlDecode("PkN...R8Q") /* opaque user handle, generated by SLS */
},
"rp": {
"name": "ACME RP", /* webauthn.rp.friendlyName */
"id": "webauthn.acme.org" /* webauthn.rp.id */
},
"timeout": 60000, /* webauthn.reg.timeout */
"excludeCredentials": [ /* <=> webauthn.reg.excludeCredentials.populate */
],
"pubKeyCredParams": [ /* webauthn.reg.pubKeyCredParams.<n>.alg */
{
"type": "public-key",
"alg": -7
},
{
"type": "public-key",
"alg": -257
}
]
}The client has a secure way of communicating with authenticators, typically via CTAP, which is part of the FIDO specifications. If the user gives their consent to register and also otherwise everything is as desired, the authenticator generates a private/public key pair and the call returns without errors. Then Javascript by the SLS assembles a JSON data structure which is posted to the SLS (base64url-encoded), typically as parameter called "webauthnMessage", but the name and source is configurable as an SLS credential.
Here is a sample of the posted JSON:
{
"id": "cgy...SpA",
"type": "public-key",
"response": {
"attestationObject": "o2N...U4E",
"clientDataJSON": "eyJ...In0",
}
}The "id" field is the credential ID, a unique identifier for the public key. There are essentially two cases:
- The authenticator is capable of storing individual private keys and did do so at registration, then the credential ID is usually a random string that the authenticator also stored.
- The authenticator is not capable of storing individual private keys or did not do so at registration, then the credential ID contains the private key encrypted with a single secret of the authenticator.
This difference will be important later regarding possible ways to authenticate.
Below the "response" field there are two fields. The field "clientDataJSON" is rather high-level information. It is a base64url-encoded JSON structure, example:
{
"challenge": "M8...ig",
"clientExtensions": {
},
"hashAlgorithm": "SHA-256",
"origin": "https://webauthn.acme.org",
"type": "webauthn.create"
}The "challenge" field must match the one in the publicKey Javascript and the "type" must be "webauthn.create". The origin must be compatible with the RP ID.
The other field below "response", namely "attestationObject", has a more complex, more low-level structure, a mix of CBOR (sort of a binary JSON) and fixed data structures. Some parts of it are always present, others even depend on the type of authenticator.
Sample "attestationObject" base64url- and then CBOR-decoded to a pseudo JSON representation:
{
"fmt": "packed",
"attStmt": {
"alg": -7,
"sig": "3046...B246",
"x5c": "3082...4051"
},
"authData": "6706...5381"
}The field "sig" is a signature by the authenticator that could be used for what is called "attestation" (which is currently not supported by the SLS), and "x5c" contains a certificate as trust anchor for the signature (in some cases even a self signed certificate of the generated key pair).
Drilling down further into "authData", again shown as pseudo JSON:
"authData": {
"credentialData": {
"aaguid": "-iuZ3J45QlePkkow0jxBGA==",
"credentialId": "X9FrwMfmzj...",
"publicKey": {
...
},
"flags": {
"AT": true,
"ED": false,
"UP": true,
"UV": false
},
"rpIdHash": "xG...7c=",
"signatureCounter": 7
}The "aaguid" field is the so-called AAGUID, a globally unique identifier for the type of authenticator. The "rpIdHash" is a hash over the RP ID (c.f. "hashAlgorithm" further above), the "credentialId" is what it says, but this time in principle part of signed data. The flags give additional information about conditions at registration (and they are also available via script functions in the SLS):
- UP: User was present (usually mandatory to be the case, e.g. user pressed a button on the token)
- UV: User identity was verified by the authenticator itself (PIN, fingerprint, etc.)
- AT: Attested credential data is included
- ED: Extension data is included
The SLS makes mandatory validations and, if OK, stores the credential. More precisely the following data is stored:
- rpId: The RP ID
- userHandle: The opaque user handle (user.id field in the publicKey Javascript)
- slsUsername: The SLS username (username credential)
- credentialId: The credential ID generated by the authenticator
- credentialFriendlyName: A friendly name for the credential optionally chosen by the user at registration and posted along, e.g. "My Yubico USB Token" (note that this friendly name is not known to the authenticator nor the browser, it only serves to help the user to eventually list and delete credentials stored on the RP (SLS))
- authenticator: Low-level info required to authenticate the user (this includes also the counter value which is later needed at authentication)
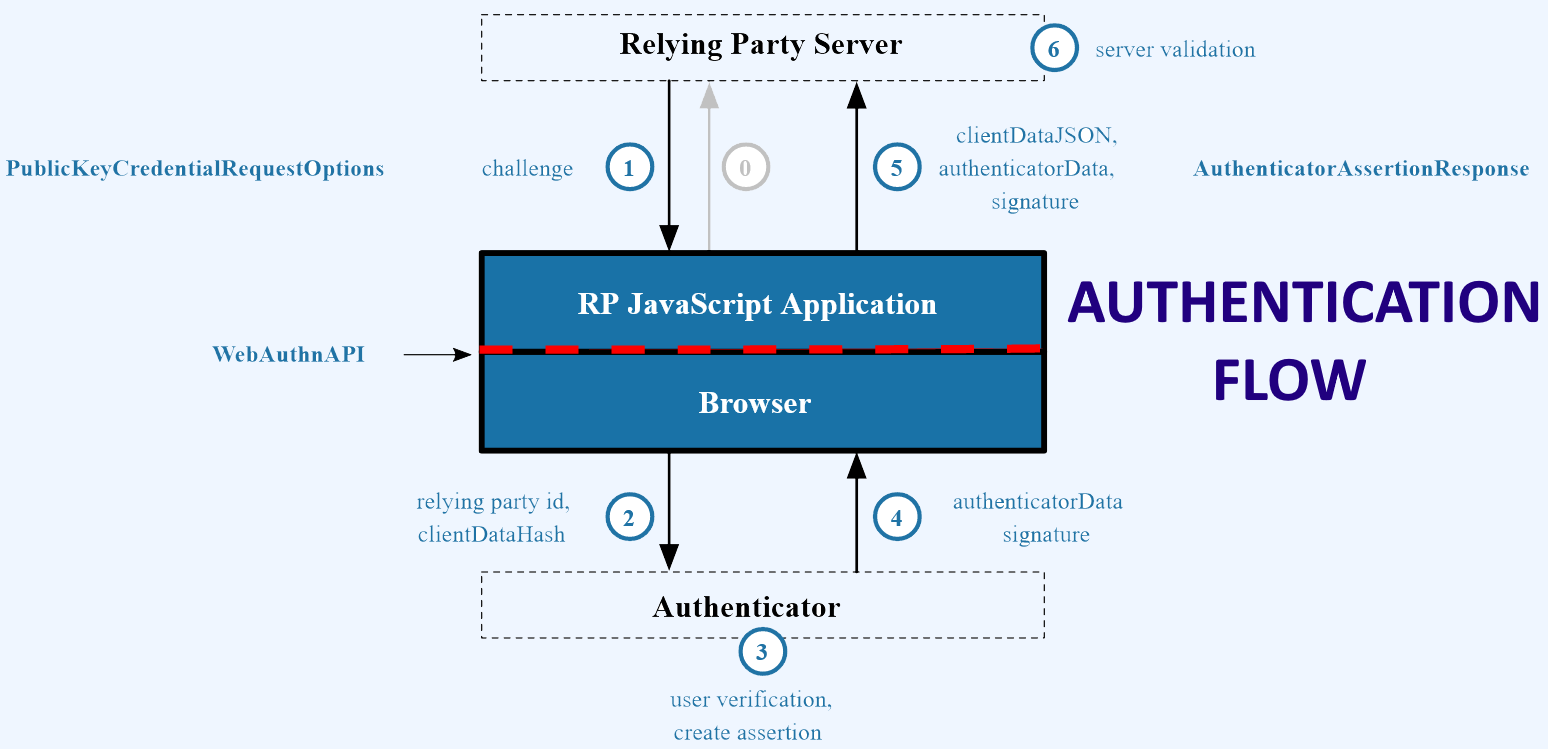
Authentication is very similar to registration. The SLS again prepares the publicKey Javascript structure, here again an example with related SLS config properties as comments, which are again explained in detail in the configuration section further below:
{
"userVerification": "preferred", /* webauthn.auth.userVerification */
"challenge": base64UrlDecode("05g...WNQ"), /* generated by SLS */
"rpId": "webauthn.acme.org", /* webauthn.rp.id */
"timeout": 60000, /* webauthn.auth.timeout */
"allowCredentials": [ /* <=> webauthn.auth.allowCredentials.populate */
]
}There is again a challenge and the RP ID is indicated. An important security feature is that the client only allows RP IDs that are compatible with the origin of the website that provided the publicKey Javascript structure, this helps to eliminate certain man-in-the-middle attacks.
The publicKey Javascript is passed to navigator.credentials.get(publicKey),
which then offers suitable authenticators.
There are basically two cases.
- If the "allowCredentials" field is empty, any available authenticator can be used and the RP (SLS) later maps the posted credential ID to the user. This is the tpyical case of "password-less login". Note that this is only possible with authenticator tokens that are capable of storing the private key / credential ID of the credential.
- If the "allowCredentials" field contains a list of credential IDs, only a matching authenticator is allowed. In order to create the list, the RP (SLS) must know the user before creating the publicKey Javascript, typically via username/password login. In principle also the user could just be asked to just provide the username, but that is a secrity risk, it would allow an attacker to find out which users have credentials and their IDs.
In other words, password-less login is effectively only possible with tokens that are capable of storing the private key. To complicate things further (at least as of summer 2021), administration of credentials on authenticator tokens is often only possible via command line with admininistrator privileges, which makes password-less login even more difficult to handle for customers, at least with many tokens that only have space for a small number of credentials. But, of course, things are expected to evolve there.
If everything is OK with the authenticator and the user gives their consent, the call returns without errors and SLS Javascript again assembles a JSON struture that it posts the same way as at registration. Example:
{
"id": "cg...pA",
"type": "public-key",
"response": {
"authenticatorData": "Zw...CQ",
"clientDataJSON": "eyJ...In0",
"signature": "MEQ...nVw",
"userHandle": "XX...10"
}
}The most important field is "signature". With that the authenticator proves possession of the private key. The "id" is again the credential ID, the "userHandle" is, of course, the opaque user handle. The challenge must again match the one in the publicKey Javascript.
The "clientDataJSON" is just like at registration, except that the "type" must be "webautn.get":
{
"challenge": "05g...WNQ",
"clientExtensions": {},
"hashAlgorithm": "SHA-256",
"origin": "https://webauthn.acme.org",
"type": "webauthn.get"
}Sample "authenticatorData" as pseudo JSON:
{
"rpIdHash": "ZwaNeIU1_JVLqKvBGPD5Px4pMeZeB4TjK1SRkVjLskU",
"flags": {
"UP": true,
"UV": false,
"AT": false,
"ED": false
},
"counter": 9
}Same flags, but this time indicating what happened at authentication. The counter is verified to have increased since registration or the last previous authentication. (Note that the standard only mandates that the counter is increased by a positive amount, not necessarily by 1. One reason for that is that some authenticators only have a single counter for all keys, and at least with Yubico USB tokens the increase is often more than 1 even if only registering and then using a single key, maybe because some keys are also used to communicate between token and host device, or maybe for other internal reasons, in any case such behavior is allowed by the standard.)
In most use cases necessary parameters can be set via configuration properties, as shown in the comments around the publicKey Javascript structure above, but with the SLS it is also possible to make custom changes both to the publicKey Javascript before sending it to the client and to the receveived JSON before processing it regularly in the SLS as WebAuthn RP. Details further below.
The WebAuthn adapter is configured through a Java properties file, usually
named "webauthn-adapter.properties" that must be installed in the "WEB-INF"
directory of the SLS web application
(or in additionally configured configuration directories).
The standard SLS distribution is shipped with an example configuration file.
A WebAuthn credential provider must be configured:
cred.provider.webauthn=webauthn cred.provider.webauthn.cred.1.type=webauthn cred.provider.webauthn.cred.1.source=parameter cred.provider.webauthn.cred.1.name=webauthnMessage
The source can be parameter or header, while parameter has precedence
over header if both are present in the received HTTP request.
In order to use the WebAuthn adapter, some properties have to be defined in the
webauthn-adapter.properties file.
Using the LDAP backend requires to load the LDAP adapter before the WebAuthn adapter,
so this should be forced with the configuration property adapter.types, for example:
adapter.types=ldap,http,webauthn,ws
webauthn.rp.id
A hostname that defines the Relying Party ID of the SLS instance.
Allowed values are e.g. webauthn.acme.com or acme.com, but not com.
webauthn.rp.id=webauthn.acme.com
Settings that apply to the registration flow, i.e. to assembling the publicKey Javascript structure for registration.
webauthn.rp.friendlyName
A human-readable name for the SLS relying party instance, used only to be displayed to users, never stored.
webauthn.rp.friendlyName=ACME WebAuthn SLS
webauthn.user.displayName
Display name of the user, typically a script expression.
webauthn.user.displayName=#{session.getCred('username')}-display-namewebauthn.reg.pubKeyCredParams.<n>.alg
Accepted types/algorithms for public keys. The type is always "public-key" (the only available option to-date); the algorithm can be chosen by COSE algorithm number.
# ES256 = -7 webauthn.reg.pubKeyCredParams.1.alg=-7 # RS256 = -257 webauthn.reg.pubKeyCredParams.2.alg=-257
webauthn.reg.timeout
The timeout for registration in ms, default 60000 (one minute). This is the time between when the user clicks the button in the webpage to trigger the communication with the authenticator token, and the time the manual interaction with the token (such as pressing a button) is completed. Note, however, that the client is free to ignore this setting, and apparently this is often the case.
webauthn.reg.timeout=60000
webauthn.reg.excludeCredentials.populate
Whether to populate the "excludeCredentials" field with all existing credentials
for the user; the default is true.
webauthn.reg.excludeCredentials.populate=true
This can maybe in some cases be useful to prevent an authenticator to register multiple times for the same user at the same RP, unnecessarily filling the store of the RP and/or the autenticator if it stores the private keys.
webauthn.reg.authenticatorSelection.authenticatorAttachment
The authenticatorAttachment of the authenticatorSelection for registration,
the default if not present or empty is to omit the setting from the generated
publicKey JSON, which is equivalent to "any attachment is allowed".
Standard values: cross-platform / platform.
- https://www.w3.org/TR/webauthn/#dom-authenticatorselectioncriteria-authenticatorattachment
- https://www.w3.org/TR/webauthn/#enum-attachment
-
cross-platform- external authenticator tokens, connected through USB, NFC or Bluetooth. The point is that a cross-platform device can be used with multiple computers. -
platform- built-in authenticators, such as fingerprint readers, Windows PIN, TPM, cameras for facial recognition. A platform authenticator therefore is inherently bound to the device (laptop, smartphone).
Note that there are some tokens that may qualify for both, for instance a USB fingerprint reader, which is supported by the host OS like a local built-in (e.g. TPM) authentication device. Such devices may work with both settings.
webauthn.reg.authenticatorSelection.authenticatorAttachment=cross-platform
Dynamic configuration example:
webauthn.reg.authenticatorSelection.authenticatorAttachment=#{var('parameter.platformType')}In this example, a JSP could be created that allows a user to first choose if a
cross-platform, or a platform device should be used, sending the choice in a
request parameter with name platformType.
webauthn.reg.authenticatorSelection.requireResidentKey
webauthn.reg.authenticatorSelection.residentKey
These two properties specify if the private key for the user credential should be stored on the authenticator device itself, or if it may be stored externally on the RP. In the latter case, the client would have to send the username first during the login procedure, so that the RP could perform a lookup and access the stored private key to be used during the login procedure.
The reason why there are two similar properties has to do with the evolution of the FIDO standard and the need for backwards compatibility with older U2F tokens.
Which option is preferred depends heavily on the use-case scenario, and the authenticator devices. Older devices may be limited in storage space (or have none at all). Also, in corporate environments, it may be desirable to manage the private keys of the users centrally, instead of having them stored on each individual token. Conversely, in scenarios with external users / customers, their private key should probably be kept on their device.
-
...requireResidentKey: TherequireResidentKeyof theauthenticatorSelectionfor registration, the default isfalse. SHOULD set it totrueif, and only if,residentKeyis set torequired. -
...residentKey: TheresidentKeyof the authenticatorSelection for registration, the default ispreferred. Standard values:required/preferred/discouraged - https://www.w3.org/TR/webauthn/#dom-authenticatorselectioncriteria-residentkey
- https://www.w3.org/TR/webauthn/#dom-authenticatorselectioncriteria-requireresidentkey
- https://www.w3.org/TR/webauthn/#enum-residentKeyRequirement
The values of these tokens should be set in one of the following combinations:
Allow storing private key on the device, if possible:
-
webauthn.reg.authenticatorSelection.residentKey=preferred -
webauthn.reg.authenticatorSelection.requireResidentKey=false
-
Note that this does not guarantee specific behavior. With Yubico USB tokens in 2021 this had the effect of not creating a resident key, with TMP with PIN it had, which both makes sense, as in the TPM space for resident keys is much less restricted than it was then on the Yubico tokens.
Enforce storing the private key on the device:
-
webauthn.reg.authenticatorSelection.residentKey=required -
webauthn.reg.authenticatorSelection.requireResidentKey=true
-
This had, as expected, both with Yubico and TMP the effect of creating a resident key.
Storing the private key on the RP if possible:
-
webauthn.reg.authenticatorSelection.residentKey=discouraged -
webauthn.reg.authenticatorSelection.requireResidentKey=false
-
webauthn.reg.authenticatorSelection.userVerification
Defines if the authenticator token itself should verify the users identity, be
it with a PIN, a fingerprint reader or something similar. The default
is preferred. Allowed values are: required / preferred / discouraged.
webauthn.reg.authenticatorSelection.userVerification=preferred
Settings that apply to the authentication flow, i.e. to assembling the publicKey Javascript structure for authentication.
webauthn.auth.timeout
The timeout for authentication in ms, default 60000 (one minute). Note, however, that the client is free to ignore this setting, and apparently this is often the case.
webauthn.auth.timeout=60000
webauthn.auth.allowCredentials.populate
Whether to populate the allowCredentials field with all existing credentials
for the user - only possible with multi-factor authentication, i.e. if the SLS
username is already known when creating the publicKey Javascript for the client
(otherwise silently not created); default is true.
webauthn.auth.allowCredentials.populate=true
webauthn.auth.userVerification
Defines if the authenticator token itself should verify the users identity, be
it with a PIN, a fingerprint reader or something similar. The default
is preferred. Allowed values are: required / preferred / discouraged.
webauthn.auth.userVerification=preferred
webauthn.store.type
The type of store to use, allowed values include memory and ldap.
The default is memory which is ideal for testing and initial integration:
WebAuthn registration data is only persisted for as long as the SLS container
resp. its Java VM is running (but it is possible to export/import to/from
JSON string representiation using script functions for more extended testing).
webauthn.store.type=ldap
See chapter "Credential Storage" for more information about the storage types, and for details about LDAP storage configuration.
Usually the adapter will need at least two different models, one for the credential registration process, and one for the authentication.
Below is a sample model in which the user registers: First presents username and password the usual way and then does the WebAuthn registration.
######################## # WebAuthn Registration ######################## model.webauthn-reg.uri=/webauthn-reg model.webauthn-reg.failedstate=get.usererror model.webauthn-reg.state.50.name=do.generic-skipped-if-post-request # ----------------------- # ----------------------- # Authenticate user with username/password # ----------------------- model.webauthn-reg.state.1000.name=get.cred model.webauthn-reg.state.1200.name=do.auth model.webauthn-reg.state.1200.failedState=get.cred # ----------------------- # ----------------------- # WebAuthn registration # ----------------------- model.webauthn-reg.state.2000.name=do.webauthn.createmsg model.webauthn-reg.state.2000.param.flow=registration model.webauthn-reg.state.2100.name=get.webauthn.reg.sendmsg model.webauthn-reg.state.2200.name=do.webauthn.handlemsg # ----------------------- # Finalize # ----------------------- model.webauthn-reg.state.5000.name=do.success.jsp model.webauthn-reg.state.5000.param.jsp=/WEB-INF/jsp/WebAuthnRegOk.jsp model.webauthn-reg.state.5000.param.credentials=username,password,webauthn # ----------------------- # ----------------------- # Error handling # ----------------------- model.webauthn-reg.state.10000.name=get.usererror # -----------------------
This sample model shows how to perform a multi-factor authentication, using the FIDO2 token as a second factor with username / password.
Multi-factor authentication means that the user still has to enter username and password, and then additionally provide a credential from a registered authenticator token. This is often used for desktop-/web-application scenarios, to further strengthen the security.
For this scenario, the following combination of configuration settings is recommended:
webauthn.reg.authenticatorSelection.residentKey=preferred webauthn.reg.authenticatorSelection.requireResidentKey=false webauthn.auth.userVerification=preferred
########################################### # WebAuthn Authentication Multi-factor MFA (username known when authenticating with WebAuthn) ########################################### model.webauthn-auth-mfa.uri=/auth model.webauthn-auth-mfa.failedstate=get.usererror model.webauthn-auth-mfa.state.50.name=do.generic-skipped-if-post-request # ----------------------- # ----------------------- # Authenticate user with username/password # ----------------------- model.webauthn-auth-mfa.state.1000.name=get.cred model.webauthn-auth-mfa.state.1200.name=do.auth model.webauthn-auth-mfa.state.1200.failedState=get.cred # ----------------------- # ----------------------- # WebAuthn authentication # ----------------------- model.webauthn-auth-mfa.state.2000.name=do.webauthn.createmsg model.webauthn-auth-mfa.state.2000.param.flow=authentication model.webauthn-auth-mfa.state.2100.name=get.webauthn.auth.sendmsg model.webauthn-auth-mfa.state.2200.name=do.webauthn.handlemsg # ----------------------- # ----------------------- # Finalize # ----------------------- model.webauthn-auth-mfa.state.5000.name=do.success model.webauthn-auth-mfa.state.5000.param.credentials=username,password,webauthn # ----------------------- # ----------------------- # Error handling # ----------------------- model.webauthn-auth-mfa.state.10000.name=get.usererror # -----------------------
This kind of authentication can be especially useful for web applications that are used mostly through modern smartphone browsers. Smartphones nowadays usually come with some form of biometric authentication mechanism (fingerprint reader, face recognition etc.), and entering complicated passwords on a touchscreen can be quite difficult for some users. For such scenarios, enabling single-factor authentication can make sense, meaning the user will not have to enter a password.
As mentioned in the introduction, asking only for a username without password or other kind of authentication is a security risk as then credential IDs for any user could be queried. Plus even entering just a username might be too cumbersome on some mobile devices.
This means that in most cases only authenticators that have stored the private key at registration can be used for single-factor / "password-less" authentication. In this case the username is determined on the SLS when it receives the credential ID after authentication at the client.
For single-factor authentication setups, the following combination of configuration settings is recommended:
webauthn.reg.authenticatorSelection.residentKey=required webauthn.reg.authenticatorSelection.requireResidentKey=true webauthn.auth.userVerification=required
This sample model shows how to perform a single-factor authentication, using only the FIDO2 token to authenticate the user. A common use-case for this scenario are smartphone browsers, using a built-in biometric authentication device like a fingerprint reader.
########################################### # WebAuthn Authentication Single-factor SFA (username not known when authenticating with WebAuthn) ########################################### model.webauthn-auth-sfa.uri=/webauthn-auth-sfa model.webauthn-auth-sfa.failedstate=get.usererror model.webauthn-auth-sfa.state.50.name=do.generic-skipped-if-post-request # ----------------------- # ----------------------- # WebAuthn authentication # ----------------------- model.webauthn-auth-sfa.state.2000.name=do.webauthn.createmsg model.webauthn-auth-sfa.state.2000.param.flow=authentication model.webauthn-auth-sfa.state.2100.name=get.webauthn.auth.sendmsg model.webauthn-auth-sfa.state.2200.name=do.webauthn.handlemsg # ----------------------- # ----------------------- # Finalize # ----------------------- model.webauthn-auth-sfa.state.5000.name=do.success # note: username credential is created at do.webauthn.handlemsg, there is no password model.webauthn-auth-sfa.state.5000.param.credentials=username,webauthn # ----------------------- # ----------------------- # Error handling # ----------------------- model.webauthn-auth-sfa.state.10000.name=get.usererror # -----------------------
When a credential is registered on the SLS to be used for later logins, it needs to be stored somewhere. As of now, the following storage options are supported:
- LDAP
- IDM (For storing the credentials in a SES Identity API (Syncope) database)
- Memory (for testing and initial integration, not persistent)
For more details about the available storage types, check the corresponding chapters below.
The "memory" storage will employ a volatile, static in-memory (RAM) map of all registered credentials, which will be lost if the service is restarted. The main purpose of this storage type is to allow for quick testing of the related WebAuthn functionality such as models (registration, login), JSPs etc., without having to configure or set up an external storage, which often means having to involve other organizational departments, additional delays and efforts such as changing / adapting the schema of the local LDAP service etc.
In order to store registered credentials only in memory, set the following configuration property:
webauthn.store.type=memory
The "idm" storage uses a SES Identity instance to store the Webauthn credentials in a Syncope database. The functionality is supported with any SES 5.13.x appliance and newer releases.
In order to store registered credentials in an IDM instance, set the following configuration property:
webauthn.store.type=idm
Furthermore, the following configuration properties must be set for the IDM storage functionality:
The IDM configuration properties are usually done in the "idm-adapter.properties" file. See the IDM adapter configuration chapter for details:
The "ldap" storage uses the JNDI API (Java Naming and Directory) to store the WebAuthn credentials in an LDAP directory server. The functionality should work with any LDAP-standard compliant server.
In order to store registered credentials in an LDAP directory, set the following configuration property:
webauthn.store.type=ldap
Furthermore, the following configuration properties must be set for the LDAP storage functionality:
Multiple LDAP backends are NOT supported, UNLESS there is a mechanism which ensures that the entries for registered credentials in the various LDAP instances are all up-to-date and synchronized at all times.
The problem with multiple LDAP backends is that when a user registers a credential, it might be stored in one backend, and then when the same user performs an authentication procedure later, the SLS might connect to a different backend (depending on the configuration), which would lead to a failed authentication attempt since that LDAP backend would not contain the required credential.
Therefore, it is advised to configure only one single LDAP backend, unless there are special measures in place which keep all LDAP directories in sync.
The following non-WebAuthn-related 3 properties must be set in order for the SLS LDAP adapter to be initialized properly at startup time. Note that these settings will not be used for the WebAuthn-related operations, or only as a fallback, if the corresponding WebAuthn LDAP properties described further below are omitted.
ldap.url=...URL of LDAP server... ldap.principal.default=...DN of bind principal... ldap.password.default=...password of bind principal...
The values in these 3 properties may bet set to something like "INVALID" or even left empty (but property key defined), as long as the WebAuthn-related properties described further below are configured with the correct values; see
-
ldap.webauthn.url -
ldap.principal.webauthn -
ldap.password.webauthn
webauthn.ldap.dn.credentials
Defines the LDAP disginguished name (DN) of the LDAP branch which will store all the credential entries. Example:
webauthn.ldap.dn.credentials=OU=WebAuthnCredential,DC=acme,DC=com
The child objects (one for each registered WebAuthn credential) created below this DN will have (among others) the following attributes:
-
objectClass:top,person,organizationalPerson,user -
cn: A hex string with a SHA256 hash of the WebAuthn credential ID
ldap.webauthn.url
Specifies the URL of the LDAP service used to store the WebAuthn credential data. This is just a regular "ldap://" or "ldaps://" URL.
ldap.webauthn.url=ldaps://store.acme.com:636
NOTE: If this property is not set, the SLS adapter will fall back to the
default LDAP url configured by the property ldap.url.
Furthermore, the following two properties must be set to configure the LDAP bind principal used for all LDAP operations:
ldap.principal.webauthn=username ldap.password.webauthn=password
NOTE 1: The bind principal must have permissions to read, write and create entries in the directory.
NOTE 2: If the principal is not configured, the SLS adapter will fall back to the
default LDAP bind principal configured by the properties ldap.principal.default
and ldap.password.default.
ldap.webauthn.backendsMode
Specifies which backend handling mode to use for the configured LDAP server. See chapters "LDAP Adapter" and "Load-Balancing / Failover" for details about backend modes.
NOTE: If multiple LDAP backends are used, it is of paramount importance that the data between them is synchronized at all times! Otherwise, it may happen that a credential of a user is stored in one backend during registration, and then another backend is used during later authentication attempts; this could result in failed logins due to the LDAP server not containing the required authenticator information!
ldap.webauthn.backendsMode=failover
If only one single LDAP server is used, this setting can be omitted.
webauthn.ldap.attribute.name.<alias>
The WebAuthn adapter needs to persist a number of fields in the LDAP directory. To that end, it requires a mapping of each WebAuthn data entity to an LDAP attribute. The mapping is defined using a set of properties with the following format:
webauthn.ldap.attribute.name.<alias>=<LDAP attribute name>
The "<alias>" part refers to a specific kind of WebAuthn-related information entity that needs to be persisted. The following entity types exist:
-
slsUsername- The SLS username credential value -
credentialId- The WebAuthn credential ID generated on the client -
userHandle- The The WebAuthn user handle created by the SLS -
rpId- The relying party (SLS) ID -
authenticator- The Base64 string containing the serialized authenticator state -
credentialFriendlyName- Descriptive label for credential, given by user
All of these information entities are string values, and therefore should be mapped
to LDAP attributes of type DirectoryString. Most of them are relatively
short, but some are, or may be very long, which means that they must be mapped
to LDAP attributes supporting larger values (up to, or above 2 KB). The following
list details the size requirements of each data entity:
-
slsUsername- A short username, usually < 16 characters -
credentialId- Base64 string, in some cases very long, up to or larger than 2 KB -
userHandle- Base64 string, up to 86 characters -
rpId- A short hostname-like value, usually < 32 characters, technical limit 253 characters (hostname limit) -
authenticator- A long Base64 string, up to or larger than 2 KB -
credentialFriendlyName- A short string, usually < 32 characters
The following example shows a complete list of required mapping definitions:
webauthn.ldap.attribute.name.slsUsername=middleName webauthn.ldap.attribute.name.credentialId=businessCategory webauthn.ldap.attribute.name.userHandle=displayName webauthn.ldap.attribute.name.rpId=adminDisplayName webauthn.ldap.attribute.name.authenticator=homePostalAddress webauthn.ldap.attribute.name.credentialFriendlyName=comment
NOTE: The example above (ab)uses LDAP attributes that typically exist in an MS Active Directory, and which fullfil the requirements of each data entity as described below. It is NOT recommended to use these settings in production environments. Instead, it is advised to adapt the LDAP schema according to the requirements outlined above, and create new attributes for the webauthn data.
Various script functions allow to further configure/customize behavior of the SLS als WebAuthn RP. Here only the basics are described, see the script function documentation for details.
webauthn.*
-
Map<String,Object> getPublicKeyJson()Call this method after the model stepdo.webauthn.createmsgto get a JSON representation of the publicKey Javascript structure, as parsed by Groovy’s JsonSlurper. -
String getPublicKeyJavascript()This method is typically only called in the provided JSPs to get the publicKey Javascript structure. -
Map<String,Object> getReceivedMessageJson()Call this method before the model stepdo.webauthn.handlemsgto make changes to the received JSON, again parsed by Groovy’s JsonSlurper. -
String getReceivedMessageFlow()Derives the flow, "registration" or "authentication" from the received message. -
Map<String,Object> getReceivedMessageClientDataJsonExtracts and parses the "clientDataJSON" field of the received message.
webauthn_message.*
These methods can be called after the model step do.webauthn.handlemsg was
successful (at registration or authentication).
-
boolean isUserPresent()Whether the user was present at registration resp. authentication (UP flag). -
boolean isUserVerified()Whether the user was verified at registration resp. authentication (UV flag). -
boolean isAttestedCredentialDataIncluded()AP flag. -
boolean isExtensionDataIncluded()ED flag. -
Object getDataObject()Gets the RegistrationData object at registration resp. the AuthenticationData object at authentication from the WebAuthn4J library that the SLS currently uses.
function.*
-
String renderJson(Map<String,Object> map)Renders the given JSON map to a single-line JSON string for logging etc. -
String renderJson(Map<String,Object> map, boolean heuristicallyBase64UrlEncodeByteArrays)Renders the given JSON map to a single-line JSON string for logging etc., while optionally heuristically detecting byte arrays and rendering them as base64url-encoded strings for easier handling.
-
webauthn.clearMemoryStore()Clears all credentials in the memory store. -
String webauthn.exportMemoryStore()Exports the memory store in a JSON format. -
webauthn.importMemoryStore(String storeDataJson)Imports the memory store from previously exported JSON format.
-
List<WebAuthnScriptCredentialData> webauthn.getStoredCredentials()Gets a list of all credentials for the current user and the currently configured RP ID. The credential data contains two fields,credentialIdandcredentialFriendlyName. -
webauthn.deleteStoredCredential(String credentialId)Deletes the credential with the given credential ID from the store, but for security reasons only if the credential is for the current user and the currently configured RP ID.
The IDM adapter allows to authenticate user credentials with basic authentication requests to a SES Identity server. On a SES appliance, this is usually the local SES Identity instance.
In future releases, this adapter will probably be extended to allow all kinds of custom REST calls on the IDM Syncope API, but for now, the functionality is restricted to authentication.
The IDM response object received from the SES Identity server during the authentication callout
is available as an object variable idm.response of the type UserTO, representing the following JSON structure:
{
"key":"badafbfc-d6a9-4c09-9afb-fcd6a97c0916",
"type":"USER",
"realm":"/someRealm",
"username":"myuser",
"creator":"admin",
"creationDate":"2022-01-25T17:43:24.335+00:00",
"lastModifier":"admin",
"lastChangeDate":"2022-01-25T17:43:24.335+00:00",
"status":"created",
"password":null,
"token":null,
"tokenExpireTime":null,
"lastLoginDate":"2022-02-01T07:40:55.483+00:00",
"changePwdDate":"2022-01-25T17:43:23.402+00:00",
"failedLogins":0,
"securityQuestion":null,
"securityAnswer":null,
"suspended":false,
"mustChangePassword":false,
"dynRealms":[
],
"auxClasses":[
],
"plainAttrs":[
{
"schema":"passwordNeverExpires",
"values":[
"true"
]
}
],
"derAttrs":[
],
"virAttrs":[
],
"resources":[
],
"roles":[
],
"dynRoles":[
],
"privileges":[
],
"relationships":[
],
"memberships":[
],
"dynMemberships":[
],
"linkedAccounts":[
]
}This object then has getter and setter methods for all the fields in the JSON structure. So for the example above, the following example would be possible:
#{var('idm.response').getCreator()}Furthermore, the numeric code of the last HTTP call to the IDM backend is available in the usual (see HTTP Adapter) variable:
response.code
To use the IDM adapter for an authentication step, just configure it as usual, e.g.
adapter.authentication=idm
With that, the model state do.auth will use the IDM adapter to send a GET request
to the SES Identity API (Syncope) server, to the following URI:
/idm-api/rest/users/self
The request will use the users username and password credentials, which MUST be
available in the current login session at this point, for the basic authentication header.
If the call is successful, the credentials will be marked as verified.
The IDM adapter is configured through a Java properties file, usually named idm-adapter.properties.
The following paragraphs explain all available configuration properties and values.
idm.url
Defines the base URL (protocol, host and port) of the SES Identity API (Syncope) Server. The typical value for an IDM instance running on the same appliance as the SLS would be as follows:
idm.url=http://localhost:3447
By default, the SES Identity API uses the following two ports:
- 3447 for plain HTTP
- 3443 for TLS / HTTPS
Note
If an external IDM instance is used, connections will most likely need to be made on the HTTPS/SSL enabled port, usually 3443. In such cases, it is necessary to import the HTTPS server certificate of the IDM target server in the SLS truststore (same as with any other HTTPS backend server).
Important
If any form of failover or load-balancing between multiple IDM API instances is used, they must be in sync with each other in regards to the user data. So the underlying databases should be automatically kept in sync, otherwise the authentication attempts might be unreliable!
To define more than one IDM backend that should be used as a fall-back in case the connection to the current directory fails, specify additional IDM URLs, each one separated by comma:
idm.url=https://one.identity.com:3443,https://two.identity.com:3443
This will enable simple failover by default. By adding the ".mode" property, failover with a primary, or load-balancing can be enabled.
The criterion for backend availability is: Connect with the technical username/password was successful.
Example for enabling failover with a primary backend:
idm.url=https://one.identity.com:3443,https://two.identity.com:3443 idm.backendsMode=failoverWithPrimary
Or alternatively, enabling load-balancing instead of failover:
idm.url=https://one.identity.com:3443,https://two.identity.com:3443 idm.backendsMode=loadBalancing
The default backend mode is failover, simple round-robin failover.
Please see chapter "Load-Balancing / Failover" for details about failover and load-balancing.
idm.connectionCheckTenant
An existing tenant MUST be configured using this property. The reason is that if either load-balancing or fallback with primary is used, monitoring of the backends is required. It is also possible that monitoring is enabled separately, or due to settings in another adapter.
In such a case, a valid tenant must be used for the monitoring requests. Since the regular tenant property can be an expression (to chose the tenant dynamically from within the model), there needs to be an additional, fixed, statically configured tenant to be used for the monitoring requests. Example:
idm.connectionCheckTenant=acme
idm.tenant
The SES Identity tenant for which to perform the operations. The value configured here will be used in the request header "X-Syncope-Domain" sent to the IDM API backend.
idm.tenant=FoogleCom
As with most other SLS configuration properties, it is possible to use a dynamic expression, if the SLS should serve multiple tenants. Example:
idm.tenant=#{var('someVariableSetInTheModel')}idm.username idm.password
Most requests to the IDM API server require credentials of a technical user, to be used in an "Authorization" header sent to the Syncope service. These values MUST be configured with these two properties. Example:
idm.username=admin idm.password=jE73dDW93FOS08W7493nhdw0
The following properties allow to use a proxy server through which to send all the REST requests to the IDM API backend.
idm.http.proxy.host, idm.http.proxy.port
Optional settings for host and port of a proxy to use for REST calls to the IDM API backend. If a proxy host is configured, configuring also the port is mandatory.
idm.http.proxy.host=proxy.acme.org idm.http.proxy.port=8443
idm.http.proxy.auth.username
Optional setting for the username for proxy authentication.
idm.http.proxy.auth.password
Setting for the password for proxy authentication, mandatory if the username is defined.
idm.http.proxy.auth.type
The type of authentication to the proxy.
Allowed values are basic, ntlm and spnego, default is basic.
idm.http.proxy.auth.domain
Optional domain or realm for proxy authentication.
Sample config settings for proxy with basic auth:
idm.http.proxy.host=proxy.acme.org idm.http.proxy.port=8443 idm.http.proxy.auth.username=sls idm.http.proxy.auth.password=secret idm.http.proxy.auth.type=basic idm.http.proxy.auth.domain=acme
While the SLS does not feature something like a "Mobile ID" adapter, support for this login procedure can be implemented using the right combination of model, HTTP adapter configuration, templates and scripting. The following components (see folder "examples/mobileid" in the delivery archive) are required to set up a Mobile ID login:
- Mobile ID login model
5 JSON request and response template files
-
mobileid-MSS_SignatureReq.json- creates REST signing request -
mobileid-MSS_SignatureResp.json- processes REST signing response -
mobileid-MSS_StatusReq.json- creates REST status request -
mobileid-MSS_StatusResp.json- processes REST status response -
mobileid-MSS_RespFault.json- processes REST fault responses
-
-
mobileid.properties- Some Mobile ID related settings -
http-adapter.properties- HTTP adapter configuration
Setting it all up:
- Add the Swisscom CA certificates to the SLS truststore
- Add the SLS client certificate for the HTTPS connection to the SLS keystore
-
Copy the 5 JSON template files into the
WEB-INF/templatesfolder of the SLS -
Copy the Mobile ID login model file into the
WEB-INFfolder of the SLS. - Adapt the login model for the authentication step (username / password check) with lookup of mobile number
-
Adapt the Mobile ID settings in the
mobileid.propertiesfile. -
Adapt the private key alias in the
http-adapter.propertiesfile. -
If needed, add required proxy settings for the custom HTTP calls in the
http-adapter.properties
The "Mobile ID" challenge is just an addition to a previously performed password verification step. The password verification is usually done with a standard mechanism like LDAP. It is also important that during, or right after that step, the user’s mobile number is retrieved from somewhere. In case of an LDAP authentication, all LDAP user attributes are automatically turned into scripting variables, so the common attribute "mobile" would create the variable
attribute.ldap.mobile
which can then be set in the property mobileid.mobilenumber (see
"Mobile ID Settings").
The SLS client certificate which has been registered at Swisscom for the HTTPS TLS connection to the Mobile ID backend needs to be imported into the SLS keystore. The alias given to this key then has to be configured in the HTTP adapter configuration (see "Mobile ID HTTP Adapter settings").
There are usually at least 2 CA certificates that need to be added to the SLS truststore. One will be needed to verify the Swisscom REST service HTTPS server, in the HTTPS connection between the SLS and the REST backend. The second CA certificate will be needed to verify the signature in the Swisscom response.
For details about the CA certificates, and where to download the latest versions of them, please consult the Swisscom Mobile ID Reference Guide.
Beyond adding those certificates to the truststore, no further configuration is required. The certificates will be used automatically when needed (no alias settings required).
mobileid.ap-id
Mandatory / Defines the ID of the Mobile ID Access Point (AP / your SLS instance). This is a credential that must be provided by Swisscom when registering the SLS instance. Example:
mobileid.ap-id=mid://ap.acme.com
mobileid.ap-pwd
Optional / Defines the password of the Mobile ID Access Point (AP / your SLS instance). This is a credential that must be provided by Swisscom when registering the SLS instance. In case of X509 mutual authentication between the SLS and the Swisscom backend, this may be empty. Example:
mobileid.ap-pwd=somePassword
mobileid.mobilenumber
Mandatory / Specifies the source for the value of the end user’s mobile phone number. This is usually a JEXL / Groovy expression referencing a variable containing that number, such as an attribute set by the LDAP adapter in a previous look-up. Example:
mobileid.mobilenumber=#{var('attribute.ldap.mobile')}mobileid.msg-prefix
Mandatory / The prefix for the message that must be signed by the user. This prefix is SLS instance specific and represents a credential provided by Swisscom when registering the SLS instance. Example:
mobileid.msg-prefix=ACME SLS
mobileid.msg-data
Mandatory / The message data (the part after the prefix), typically configured
by referencing text.mobileid.data (see "Data to be signed" further below) from
language resources and by generating the 4-digit secure random digits like this:
mobileid.msg-data=#{': ' + function.htmlDecode(function.getLocalizedMessage('text.mobileid.data')) + ' (#' + mobileid.getSecureRandomText() + ')' }mobileid.truststore.path
mobileid.truststore.pwd
mobileid.truststore.type
Optional / The path of the Java keystore to be used as truststore for the mobile ID signature verification step (absolute path or path relative to the webapp directory). NOTE: This only allows to adjust the truststore path for the signature verification; for the HTTPS mutual authentication connection, the normal truststore will be used.
If these properties are not set, the same truststore used for TLS connections will also be used for the signature verification.
Example:
mobileid.truststore.path=/var/acme/keys/truststore mobileid.truststore.pwd=changeit mobileid.truststore.type=JKS
The default for the property mobileid.truststore.type is "JKS".
The message that is sent to the user and signed by entering the PIN is taken from the SLS message resource files, from the key
text.mobileid.data
Adapt the value of this key to change the text of the message. Note that only German, French, Italian and English are supported by Mobile ID.
The HTTP adapter configuration requires two custom HTTP actions, like this:
# Default JSON fault response template
template.file.mobileid-faultresponse=mobileid-MSS_RespFault.json
# --------------- MobileID signing call -----------------
template.file.http-request-mobileid-sign=mobileid-MSS_SignatureReq.json
template.file.http-response-mobileid-sign=mobileid-MSS_SignatureResp.json
http.mobileid-sign.method=post
http.mobileid-sign.header.Content-Type=application/json;charset=UTF-8
http.mobileid-sign.url=https://mobileid.swisscom.com/rest/service
http.mobileid-sign.body=${function.getTemplateContent('http-request-mobileid-sign')}
http.mobileid-sign.code.error=500,503
http.mobileid-sign.key.alias=<ACME mobileid client>
http.mobileid-sign.action.1=#{mobileid.checkSignatureResponse()}
http.mobileid-sign.action.2=#{function.logAudit("Waiting for MID signature...")}
# --------------- MobileID status call -----------------
template.file.http-request-mobileid-status=mobileid-MSS_StatusReq.json
template.file.http-response-mobileid-status=mobileid-MSS_StatusResp.json
http.mobileid-status.method=post
http.mobileid-status.header.Content-Type=application/json;charset=UTF-8
http.mobileid-status.url=https://mobileid.swisscom.com/rest/service
http.mobileid-status.body=${function.getTemplateContent('http-request-mobileid-status')}
http.mobileid-status.code.error=500,503
http.mobileid-status.key.alias=<ACME mobileid client>Some important notes:
- With the provided request templates, the Swisscom backend will support both SIM and app mode (see further below).
- The ".key.alias" property must contain the alias of the SLS private key, i.e. the client certificate that was registered at Swisscom for the HTTPS TLS connection with mutual authentication.
mobileid.ap-id=mid://ap.united-security-providers.ch
mobileid.ap-pwd=
mobileid.mobilenumber=#{var('attribute.file.mobileNumber')}
mobileid.msg-prefix=ACME SLS
mobileid.msg-data=#{': ' + function.htmlDecode(function.getLocalizedMessage('text.mobileid.data')) + ' (#' + mobileid.getSecureRandomText() + ')' }
# Optional: Truststore for validation of signer certificate
#mobileid.truststore.path=...file path...
#mobileid.truststore.pwd=...password...There are two ways to log in with Mobile ID:
- Using a challenge-/response mechanism performed by the SIM card itself. This requires a Mobile ID enabled SIM card.
- Using an iOS / Android app.
From the SLS point of view, this is fully transparent.
Note that the provided request templates use the Swisscom backend which automatically selects either the SIM- or the App-based login, based on the user’s preferences.
Also worth noting is the "App" mode is for Swisscom customers only. All other mobile phone providers only support the SIM mode.
For details on how to adapt the request templates to either enforce SIM- or app- based login, adjust the JSON parameter "SignatureProfile" - see Swisscome Mobile ID Reference Guide for details.
There are 3 JSPs involved with the Mobile ID login flow:
-
MobileIDWait.jsp- Is displayed after sending the signing request. It contains JavaScript code to pull the status of the signing transaction in regular intervals using AJAX requests. -
MobileIDState.jsp- Is used to provide the response to the AJAX request. .MobileIDError.jsp- Provides some MobileID specific customizations in case of an error.
If CI adaptations need to be made (logo, stylesheets etc.), only the two files
MobileIDWait.jsp and MobileIDError.jsp need to be changed. The JSP file
MobileIDState.jsp is never visible to the end user, it’s only processed
by the JavaScript handler in the browser.
See "List of model states" for details about the model states mapped to each one of these JSPs.
The Mobile ID login flow generates a few variables that are used by the request templates and/or to process and validate the responses. Normally, it should not be necessary to do anything with them, but just for the sake of information, this is the list of all the variables:
| The language of the user sent in the signing request to the Mobile ID backend. Supported values are "DE" (German), "FR" (French), "IT" (Italian) and "EN" (English). |
| The SLS Mobile ID Authentication Provider ID. |
| In the responses from the Mobile ID backend, the Authentication Provider ID is also sent back. This is used to validate the response. |
| The SLS Mobile ID Authentication Provider Password (may be empty). |
| A random 20-digit string used as a transactional identifier. The value is used
in the request sent to the Mobile ID backend, and the response will require to
feature the same value (see variable |
| In the responses from the Mobile ID backend, the transaction identifier is also sent back. This is used to validate the response. |
| The mobile number of the phone to which the Mobile ID challenge will be sent. |
| In the responses from the Mobile ID backend, the mobile number is also sent back. This is used to validate the response. |
| The message being sent to the user’s mobile phone, to be signed by them. |
| Contains the signature of the signed data as sent back in the status response after a successful login. This signature is then validated using the Swisscom CA certificate in the truststore. |
| In case of a failed login, this text string contains the error reason to be displayed to the user in the JSP. |
| Contains the Mobile ID status message received in the last response from the Mobile ID backend. |
| Contains the Mobile ID status code received in the last response from the Mobile ID backend. |
SLS Frontends provide access to SLS authentication capabilities via other protocols (e.g. SOAP or RADIUS). The basic principle is that any such frontend is basically a translator between non-HTTP protocols and the HTTP-based SLS:
A frontend receives requests in its specific protocol and then makes a local HTTP call to the SLS to perform the actual authentication. The HTTP response of the SLS is then processed by the frontend and translated back to the original protocol.
frontends
Comma separated list of frontend IDs. If this property is set, the corresponding frontends are started, including custom thread-pools etc. Example:
frontends=soap
Note: Currently, only "soap" is a supported value. Others will be implemented in future SLS releases.
Furthermore, each frontend usually has a separate configuration file for its specific configuration. The name of the file follows the convention "<type>-frontend.properties", like "soap-frontend.properties".
The SOAP Frontend provides SLS authentication capabilities via a Web Service interface.
The following features will give you a brief overview of the SOAP Frontend functionality:
- SOAP 1.1 with document style (wrapped) WSDL
- Single-step authentication (typical use case username/password login)
- Currently, the SOAP Frontend cannot be used on an SLS on which the RSA7 adapter is used, due to conflicting 3rd party Jar library requirements.
The SOAP Frontend is configured through a property file, usually named "soap-frontend.properties".
frontend.soap.publish.uri
This configuration property defines the URL at which the Web Service will be published. If the frontend itself is located behind an SES reverse proxy, this should be the URL as it can be reached from the SRM.
Note that this is usually a "http://" URL; as of now, the SOAP frontend does not support the "https://" protocol
directly. The reason being that it's the HTTPS listener of the reverse proxy which handles the SSL connection with the
client. The actual SOAP client connects to the HTTPS listener, which forwards the connection to the SRM, and the SRM
forwards it to the SLS Tomcat with the SOAP frontend (just as with any common SES setup).
Therefore, a typical example would look like this:
frontend.soap.publish.uri=http://acme.com:3333/sls/soap-frontend
Then a corresponding location should be defined in the SRM:
<Location /sls/soap-frontend> AC_AccessArea Public HGW_Host slshost.acme.com:3333 </Location>
frontend.soap.sls.url
This configuration property defines the URL at the SLS for the login via HTTP. This is usually the hostname of the local host and the port of the HTTP listener in the SLS container. Example:
frontend.soap.sls.url=http://localhost:8080/sls/auth
frontend.soap.threads
This optional property allows to set the size of the listener thread pool. If not set, it defaults to 200. Example:
frontend.soap.threads=500
frontend.soap.forward.header.<id>
This configuration property has two meanings (partially for historical reasons): * The first meaning is a regex for HTTP response headers received from the SLS to return to the client/HSP as HTTP response headers. * The second meaning is the name (not a regex) of HTTP request headers received from the client/HSP to also send back to the client/HSP as HTTP response headers.
For example, if the HTTP header "hsp_client_addr", which the SLS received from the reverse proxy,
should be forwarded back to the SOAP client, this setting would be required:
frontend.soap.forward.header.0=hsp_client_addr
Also returns headers of the exact same name that were received by the HSP
frontend.soap. attribute.<name>
Optional: Allows to define custom attributes in the SOAP response. Each attribute consists of a key and a value. For
example, this would send back an attribute with the key "info", and with a prefix "User:", followed by the login ID,
as its value:
frontend.soap.attribute.info=User: ${session.getCred('username')}frontend.soap.status.message
_Optional:_Allows to define a text string to be sent back in the XML element "slsStatusMessage" in the SOAP response.
Example:
frontend.soap.status.message=State: ${session.getModelState()}The default log4j configuration is set up so that the SOAP frontend will write its own logfile (see "soap-frontend.log - SOAP / Webservice frontend log" for details).
Once the SLS has started, the WSDL for the Web Service is visible at "<frontend.soap.publish.uri>+?wsdl+".
Note: The SLS web application must have been started before the SOAP frontend can be used. So, as a general rule, it is advised to first invoke the login page once manually before accessing any SOAP frontend function URL.
There is one method, "authenticate". It is passed credentials as a map of key/value pairs. The exact credentials depend on the SLS adapter used. A common use case is passing a userid and a password.
The key of each pair should be the semantic type of an SLS credential, which is one of this list:
-
username -
password -
newpassword -
newpassword2 -
challenge -
secret -
certificate
And the value of each pair is the value of the respective credential.
The method returns a SLS status code and a list of next credentials. The list of next credentials is always empty and intended for future support of more complex authentication procedures involving several autentication steps. The SLS status code can have the following numerical values:
- 200: User has been successfully authenticated.
- 401: The SLS (not its back-end service!) has denied the request, for example due to invalid or missing credentials.
- 500: Internal error in SLS.
- 503: The back-end system of the SLS has failed.
The Web Service call may also fail on the HTTP transport level, i.e. return something else than HTTP Status 2xx. Exceptions are normally not propagated back to the caller of the Web Service and result instead in SLS status code 500 (and a log entry on the SLS).
Below the WSDL; note that the publishing endpoint depends on SLS settings and HSP.
<?xml version='1.0' encoding='UTF-8'?><wsdl:definitions name="ISlsSoapWebServiceService" targetNamespace="http://soap.frontend.sls.usp.com/" xmlns:ns1="http://schemas.xmlsoap.org/soap/http" xmlns:soap="http://schemas.xmlsoap.org/wsdl/soap/" xmlns:tns="http://soap.frontend.sls.usp.com/" xmlns:wsdl="http://schemas.xmlsoap.org/wsdl/" xmlns:xsd="http://www.w3.org/2001/XMLSchema">
<wsdl:types>
<xs:schema elementFormDefault="qualified" targetNamespace="http://soap.frontend.sls.usp.com/" version="1.0" xmlns:tns="http://soap.frontend.sls.usp.com/" xmlns:xs="http://www.w3.org/2001/XMLSchema">
<xs:element name="authenticate" type="tns:authenticate"/>
<xs:element name="authenticateResponse" type="tns:authenticateResponse"/>
<xs:complexType name="authenticate">
<xs:sequence>
<xs:element minOccurs="0" name="authenticateRequest" type="tns:slsSoapAuthenticateRequest"/>
</xs:sequence>
</xs:complexType>
<xs:complexType name="slsSoapAuthenticateRequest">
<xs:sequence>
<xs:element name="credentials">
<xs:complexType>
<xs:sequence>
<xs:element maxOccurs="unbounded" minOccurs="0" name="entry" nillable="true">
<xs:complexType>
<xs:sequence>
<xs:element minOccurs="0" name="key" type="xs:string"/>
<xs:element minOccurs="0" name="value" type="xs:string"/>
</xs:sequence>
</xs:complexType>
</xs:element>
</xs:sequence>
</xs:complexType>
</xs:element>
</xs:sequence>
</xs:complexType>
<xs:complexType name="authenticateResponse">
<xs:sequence>
<xs:element minOccurs="0" name="return" type="tns:slsSoapAuthenticateResponse"/>
</xs:sequence>
</xs:complexType>
<xs:complexType name="slsSoapAuthenticateResponse">
<xs:sequence>
<xs:element name="attributes">
<xs:complexType>
<xs:sequence>
<xs:element maxOccurs="unbounded" minOccurs="0" name="entry" nillable="true">
<xs:complexType>
<xs:sequence>
<xs:element minOccurs="0" name="key" type="xs:string"/>
<xs:element minOccurs="0" name="value" type="xs:string"/>
</xs:sequence>
</xs:complexType>
</xs:element>
</xs:sequence>
</xs:complexType>
</xs:element>
<xs:element maxOccurs="unbounded" minOccurs="0" name="nextCredentialSemanticTypes" nillable="true" type="xs:string"/>
<xs:element name="slsStatusCode" type="xs:int"/>
<xs:element minOccurs="0" name="slsStatusMessage" type="xs:string"/>
</xs:sequence>
</xs:complexType>
</xs:schema>
</wsdl:types>
<wsdl:message name="authenticate">
<wsdl:part element="tns:authenticate" name="parameters">
</wsdl:part>
</wsdl:message>
<wsdl:message name="authenticateResponse">
<wsdl:part element="tns:authenticateResponse" name="parameters">
</wsdl:part>
</wsdl:message>
<wsdl:portType name="ISlsSoapWebService">
<wsdl:operation name="authenticate">
<wsdl:input message="tns:authenticate" name="authenticate">
</wsdl:input>
<wsdl:output message="tns:authenticateResponse" name="authenticateResponse">
</wsdl:output>
</wsdl:operation>
</wsdl:portType>
<wsdl:binding name="ISlsSoapWebServiceServiceSoapBinding" type="tns:ISlsSoapWebService">
<soap:binding style="document" transport="http://schemas.xmlsoap.org/soap/http"/>
<wsdl:operation name="authenticate">
<soap:operation soapAction="" style="document"/>
<wsdl:input name="authenticate">
<soap:body use="literal"/>
</wsdl:input>
<wsdl:output name="authenticateResponse">
<soap:body use="literal"/>
</wsdl:output>
</wsdl:operation>
</wsdl:binding>
<wsdl:service name="ISlsSoapWebServiceService">
<wsdl:port binding="tns:ISlsSoapWebServiceServiceSoapBinding" name="ISlsSoapWebServicePort">
<soap:address location="https://my.acme.com:8080//sls/soap-frontend"/>
</wsdl:port>
</wsdl:service>
</wsdl:definitions>This chapter describes several use-case scenarios for the SLS. The implementation of these scenarios requires various configuration settings that are described in more detail in separate chapters referenced by these paragraphs here.
The most important things to keep in mind are:
- The model defines what the SLS will do, based on the URL / parameters / session state of the initial request. For an authentication, a login model is needed, for a password change operation, a password change model is needed etc.
-
The "
adapter.xyz"-properties in the "sls.properties" file define what type of adapter (LDAP, RADIUS, NTLM…) is used for what kind of operation (authentication, mapping, password change…). The actual configuration for that adapter is then found in the corresponding adapter configuration file, such as "ldap-adapter.properties".
Valid adapter types that can be used for the "<type>"-part of the following example configuration properties are:
-
file- XML-file based login; supports authentication, authorization and mapping. This adapter is always included in the SLS and is used mostly for test purposes. -
ldap- LDAP directory access; supports authentication and mapping. -
radius- RADIUS server access; supports authentication only. -
ntlm- transparent NTLM-based login in Windows environments; supports authentication only. -
securid- RSA ACE-server based SecurID authentication; supports authentication and password (PIN) change. -
spnego- transparent Kerberos-based login, usually in Windows environments; supports authentication only. -
pki- X.509-certificate based login; supports authentication and mapping.
Note that processes like user ID mapping, password change etc. can often be implemented by combining different types of adapters. A typical example would be using the NTLM adapter for the authentication against a Microsoft Active Directory Server, and the LDAP adapter for implementing the password change or user ID mapping functionality.
The basic job of the Login Service is certainly the login functionality. This allows users to be granted a ccess to a restricted area. There are two predefined access areas: "Member" and "Customer":
-
Member: Named after typical self-registration areas of public websites, where users are authenticated only through username and password (weak authentication). -
Customer: Means a closed / internal area, where users need to perform a strong authentication, such as using a hardware token, a digital certificate or a strike list.
More fine-granular access restrictions can be implemented using the authorization feature of the HSP and SLS (see "Authorization Function Options").
The access area that the SLS grants access for after a successful login must be specified with the property hsp.access.area. The value of this property should match the value of the location in the HSP configuration. It is also possible to set an access area value in the current SLS session through the invocation of a JEXL function from within the login model.
Users may login by accessing the URI /auth. This is the default login location to be used.
This property in the file "sls.properties" defines which type of adapter to use for the authentication:
adapter.authentication=<type>
Model extract:
model.login.state.2.name=do.auth
The "do.auth"-state is mapped to a Java action which invokes the adapter defined by the property "adapter.authenticate" to perform the actual authentication call-out.
If a user has already performed an authentication on an SLS instance and accesses that SLS for any reason, the SLS will receive the name of the authenticated user through a special, encrypted cookie that is stored only in the SES session store (the cookie never reaches the client).
The SLS creates a credential of the semantic type "username" (see "Credential Providers" for details about credential handling) in its session, based on this cookie. Since the cookie was created by the SLS itself and is encrypted, it is trusted, so the "username" credential is marked internally as already having been verified.
This can then be used through these two JEXL functions:
-
session.isVerifiedCred(username)- Returns "true" if the "username" credential exists and has been verified; meaning, the user is already authenticated. -
session.getVerifiedCred(username)- Returns the actual username value, but only if it already has been verified.
Note: The existence of this verified credential really only indicates that the current user already had been authenticated in some way - it does not give any indication of the level of authentication that had been used (weak or strong).
See "Handling Missing Authorizations" to find out how to check if a user requires a missing authorization, which could be the case for a user who had performed weak authentication first and then is redirected to the SLS later.
"Authorization" by itself is a term with a very broad scope, and there are many ways how authorization can be implemented using the SLS and the HSP. The recommended way is to use the "Require_AZ" directive in the HSP location to define what authorization is needed to access the location, for example:
<Location /apps/adminweb> AC_AccessArea Member AC_AuthorizedPath /apps AC_LoginPage /apps/sls/auth AC_RequireAz admin </Location>
Now, once the SLS completes an authentication, it must not only grant access to a certain access area, but it must also send the required authorization information to the HSP. Otherwise, the user will be denied access, even though the authentication may have been successful.
The SLS now allows to send authorization information to the HSP based on either specific authorization functionality of the adapter, or by using any kind of user data to create that authorization information for the HSP dynamically.
When the HSP redirects a client to the SLS due to some missing authorization, it also sends information about those authorizations to the SLS through some custom HTTP headers. It is then possible to either trigger a specific model for the SLS session based on the missing authorization, or to handle it within a model through JEXL expressions.
For information on how to define a trigger for a certain model based on a missing, required authorization, see "Missing Authorization".
Within JEXL expressions in the model (conditions or actions) and / or JSPs, the following functions can be used to deal with information about missing, required authorizations:
-
session.getMissingAuthorizationValues()- Returns a list of all authorizations the user lacks, but requires to access the requested URL. -
session.requiresAuthorization()- Checks if the user has to authenticate because of any missing authorization -
session.requiresAuthorization(String auth)- Checks if the user has to authenticate because of a specific missing authorization
Please read the JEXL guide for detailled information on how to use these functions.
Some adapters, like the file adapter, implement support for the HSP authorization feature. This means that they allow to perform a special authorization function (in case of the file adapter through a custom look-up in the XML file) and then create the corresponding information for the HSP automatically.
As of now, however, most adapters don't provide a specific authorization function, since most used protocols are designed to be used for authentication only.
In order to use this approach, the model must contain an authorization step, and the type of the autorization adapter must be defined similar to the authentication adapter. This property in the file "sls.properties" defines which type of adapter to use for the authorization:
adapter.authorization=<type>
Model extract:
model.login.state.2.name=do.auth model.login.state.3.name=do.authorization
It is also possible to set authorizations through JEXL functions in model state actions (see "Custom Actions" for details on using JEXL actions in models). This example sets the authorization "admin" just before the final "do.success" state is reached, but only for users whose LDAP-Attribute "isAdmin" contains the value "true":
model.login.state.9.name=do.generic
model.login.state.9.action.1=${response.setAuthorization(\'admin\')}
model.login.state.9.action.1.if=${attribute.ldap.isAdmin eq \'true\'}
model.login.state.10.name=do.successIf the adapter does not implement a specific authorization functionality, the required authorization information for the HSP can be generated by setting some SES session attribute properties; these properties are evaluated and processed by the SLS after a successful login.
An example of a group of four properties that together define one SES session attribute that will notify the HSP that the user has the authorization "admin" would be:
session-attribute.name.1=admin session-attribute.path.1=/web/admins session-attribute.type.1=ac-app-az session-attribute.value.1=allow
In a real-world configuration, the value of the "path" property (which corresponds to the "authorized path" as defined in the HSP location) should preferably not be hard-coded. Instead, a JEXL variable should be used which automatically inserts the authorized path as received from the HSP.
session-attribute.name.1=admin
session-attribute.path.1=${special.authorized.path}
session-attribute.type.1=ac-app-az
session-attribute.value.1=allowThe "type"-property must always be set to "ac-app-az" and the "value"-property to "allow".
The following example also replaces the hard-coded authorization string with a value received in the LDAP user attribute "userAuth" during the authentication LDAP lookup:
session-attribute.name.1=${attribute.ldap.userAuth)
session-attribute.path.1=${special.authorized.path}
session-attribute.type.1=ac-app-az
session-attribute.value.1=allowUsing more than one model in the SLS configuration, it is possible to implement support for weak and strong authentication in one login service instance. The following example fullfils these requirements, showing both the required SES (SRM) and SLS configuration parts:
-
Have two main URI locations: "
/" for all applications in general, which defaults to weak authentication, and "/strong/" for all applications that require strong authentication. -
The requirement for strong authentication for the "
/strong" URI is enforced by the SES through an authorization named "strong" - Implement weak authentication through LDAP authentication (checks username and password through the bind).
- If the user accesses any of the applications that do not require strong authentication, the model for weak authentication will be used as a default.
- If the user accesses an application that requires strong authentication, the model for strong authentication will be triggered due to the missing required authorization.
- Implement strong authentication through an SMS authentication, where the HTTP adapter is used to trigger the SMS creation through some external SMS provider interface.
- In the strong authentication model, the first step is the LDAP password check, then the SMS challenge is created based on the username. In the next step, the user has to enter the SMS response code.
- In the strong authentication model, the first part (LDAP password check) shall be omitted if the user had already performed weak authentication before.
In the SRM configuration, the default root location would be set to use weak authentication, while all applications below the "/strong" URI path would require the "strong" authorization.
<Location /> ... AC_AccessArea Member AC_StartPage /sls AC_LoginPage /sls AC_AuthorizedPath / ... </Location> <Location /strong> # Applications must have "strong" authorization. # This maps to the "missingAuthorization" trigger # in the SLS "strong" authentication model example. AC_RequireAz strong </Location>
Note that this example intentionally does not show any details of the LDAP or HTTP adapter configuration, since they are not relevant for the purposes of this example.
Being mapped to the default action URI "/auth", this model is used by the SLS as a default.
# Default login model for weak authentication model.weak.uri=/auth model.weak.failedState=get.cred # State 10: Show login page model.weak.state.10.name=get.cred # State 20: Perform LDAP authentication model.weak.state.20.name=do.auth # State 90: success model.weak.state.90.name=do.success
This login model uses two steps. In the first one, it shows the page for entering username and password, which are then checked using LDAP authentication. Then, the challenge is created and sent to the user by SMS, using the HTTP adapter.
However, the first step (username and password page and check) shall be omitted, if the user had already performend weak authentication before.
This login model is triggered by the absence of the required "strong" authorization (as defined by the "AC_RequireAz" directive in the SRM configuration - see above).
# Login model for strong authentication
model.strong.missingAuthorization=strong
model.strong.failedState=get.cred
# State 5: Jump to challenge creation if user is authenticated
model.strong.state.5.name=do.generic
model.strong.state.5.nextState.1=create.challenge
model.strong.state.5.nextState.1.if=${session.hasVerifiedCred(\'username\')}
# State 10: Show login page
model.strong.state.10.name=get.cred
# State 20: Perform LDAP authentication
model.strong.state.20.name=do.auth
# Create challenge
model.strong.state.30.name=create.challenge
# Send SMS using the HTTP adapter
model.strong.state.40.name=do.http
# Show page with input field for response code
model.strong.state.50.name=get.cred.challenge
# Check SMS code
model.strong.state.60.name=do.authresponse
# State 80: set "strong" authorization
model.strong.state.80.action.1=${response.setAuthorization(\'strong\', \'/\')}
# State 90: success
model.strong.state.90.name=do.successAnother use case is to provide a logout functionality which makes sure that the users\' HSP session is immediately invalidated and cannot be used anymore.
Applications can then use this action from a "logout"-link in the application, without needing any knowledge about how to signal a session invalidation to the HSP reverse proxy; the SLS takes care of that.
The logout function is available through the "/logout" URI. It will set the required HTTP headers to instruct the HSP to terminate the session, and will redirect the user to a defined page (such as a portal start page). The target of that redirect can also be overridden by supplying the target parameter with the specified URI location.
Please note that if a logout is performed directly and only through the SLS, the user is effectively logged out immediately only from the reverse proxy, denying any further access to the applications. However, the application sessions will remain alive until they expire due to the users\' inactivity, which often takes up to 30 minutes. During this time, the open sessions still consume resources on the application servers. For this reason, the better and recommended approach for an application is to provide a logout function which terminates the application session first and redirects the user to the SLS logout location afterwards.
This chapter describes how to integrate the sorbay_risk service specifically in the SLS. The service calculates a risk score based on various pieces of information gathered directly from the client (browser) like IP (plus country etc. via geolocation), User-Agent header, and a round-trip time (rtt) measured via WebSocket.
It is assumed here that readers are familiar with the documentation of the service including its general integration with login services as described at doc.sorbay.com.
Setup of CORS settings and API-Key in the sorbay_risk GUI.
-
Important detail: When you configure individual origins in the sorbay_risk GUI, make sure not to include a trailing slash, e.g. configure
https://mylogin.org(nothttps://mylogin.org/) orhttps://mylogin.org:8443(nothttps://mylogin.org:8443/).
-
Important detail: When you configure individual origins in the sorbay_risk GUI, make sure not to include a trailing slash, e.g. configure
In the login JSP include a hidden form field for the token (to be posted along with userid and login credentials):
<!-- sorbay risk service integration --> <input type="hidden" id="token" name="token" value="">
And include the client-side JavaScript, ideally near the end of the body, at least after the hidden field for the token:
<!-- sorbay risk service integration -->
<sls:getScript expression="#{Risk.clientJavaScript()}" />(A more sophisticated integration would prevent posting the login form before the token calculation completed with a little bit of extra JavaScript. Getting and running the script could exceptionally take a few seconds, while normally it takes less than a second.)
Here is a minimal login model, without the logic related to the risk score and eventual 2nd factor or sending notifications of the login (see comment in model below):
model.login.uri=/auth
model.login.failedState=get.cred
model.login.state.500.name=do.generic-skipped-if-post
# login ("first factor")
model.login.state.1000.name=get.cred
model.login.state.2000.name=do.auth
model.login.state.2000.action.1=#{token = var('parameter.token')}
model.login.state.2000.action.2=#{function.logAudit("token: " + token)}
# send token and userid (from do.auth post)
# to risk service in order to get the risk score
model.login.state.3000.name=do.http
model.login.state.3000.param.alias=risk
model.login.state.3000.action.1=#{risk = Risk.riskFromResponse(var('response.content'))}
model.login.state.3000.action.2=#{function.logAudit("risk: " + risk)}
# **********************************************************************
# Add your logic based on the risk score here, e.g.
# - skip 2nd factor in case of low risk score (typically lower than 0.3)
# - send notification/challenge email to the user on high risk score
# **********************************************************************
# if login was successful, notify the risk server
model.login.state.4000.name=do.http
model.login.state.4000.param.alias=loginok
model.login.state.9000.name=do.successNote that generally the login flow should treat any errors/exceptions when trying to obtain the risk score like a maximal risk score (10.0), for obious security reasons.
In many error cases on the client-side, the JavaScript sets the token field to an error message instead of to an enciphered token. This error message can usually be posted to the sorbay_risk service, resulting in an error response to the SLS and logging the error on the sorbay_risk service, which may help for later analysis.
These properties define the base URL for calling the sorbay_risk service, the API-Key for authentication and an HMAC secret used to hide the real userid (set actual service URL and secret values according to your setup):
# The base URL of the Risk Service (mandatory) risk.baseUrl=https://df0675b7-02aa-421b-9ea8-b747e58a71f3.cloud.dev.sorbay.com # The API-Key for authentication of callouts to the risk service (mandatory) risk.apikey=your-api-key-typically-protect-with-sls-dataprotector # The secret for the HMAC that is used to get an opaque userid to send to the risk service (mandatory) risk.useridHmacSecret=your-hmac-secret-typically-protect-with-sls-dataprotector
These properties define the HTTP Adapter callouts to the risk service:
# set timeout as desired
http.connection.timeout=30
# calculate risk score
http.risk.url=#{Risk.riskUrl()}
http.risk.method=post
http.risk.code.error=400,401,403,500,501,503
http.risk.response.ok=#{Risk.riskResponseOkRegex()}
http.risk.action.1=#{function.logAudit("risk response.code: " + var('response.code'))}
http.risk.action.2=#{function.logAudit("risk response.content: " + var('response.content'))}
http.risk.body.userid=#{Risk.getOpaqueUserid(session.getCred('username'))}
http.risk.body.token=#{token}
http.risk.header.x-api-key=#{Risk.apiKey()}
# notify risk service of successful login = stores user data
http.loginok.url=#{Risk.loginokUrl()}
http.loginok.method=post
http.loginok.code.error=400,401,403,500,501,503
http.loginok.action.1=#{function.logAudit("loginok response.code: " + var('response.code'))}
http.loginok.action.2=#{function.logAudit("loginok response.content: " + var('response.content'))}
http.loginok.body.userid=#{Risk.getOpaqueUserid(session.getCred('username'))}
http.loginok.body.token=#{token}
http.loginok.header.x-api-key=#{Risk.apiKey()}The following Groovy script encapsulates a lot of "boilerplate" to make the actual individual configuration as slim and independent of local settings as possible.
// Helper class for integrating the Sorbay Risk Service with the USP SLS.
class Risk {
/**
* Gets the baseUrl for risk service calls as to use in Javascript on the client side.
* Source is the "risk.baseUrl" property.
*/
static String baseUrl() {
function.getConfigProperty('risk.baseUrl')
}
/** URL for risk callout. */
static String riskUrl() {
baseUrl() + "/rest/risk"
}
/** URL for loginok callout. */
static String loginokUrl() {
baseUrl() + "/rest/loginok"
}
/** Get opaque userid for risk service, here using HMAC SHA256. */
static String getOpaqueUserid(String userid) {
return crypto.hmacSHA256(function.getConfigProperty('risk.useridHmacSecret'), userid)
}
/** Regex for ok response of risk callout. */
static String riskResponseOkRegex() {
/^.*"risk":"[\d\.]+".*$/
}
/** The API-Key for authentication of callouts. */
static String apiKey() {
function.getConfigProperty('risk.apikey')
}
/**
* Gets the risk score from the JSON response of the /risk rest call.
*/
static double riskFromResponse(String riskResponse) {
Double.parseDouble(function.parseJson(riskResponse).risk)
}
/**
* Gets the client JavaScript (with baseUrl set).
*/
static String clientJavaScript() {
"""\
<script>
function sorbaySetTokenInForm(token) {
console.log('SLS: setting token in form to: ' + token);
document.getElementById('token').value = token;
}
function sorbayGetSetToken() {
const baseUrl = "${baseUrl()}";
import(baseUrl + '/resources/sorbay-risk.min.js')
.catch(e => { throw new Error('client-error: import ' + baseUrl + '/resources/sorbay-risk.min.js failed: ' + e); })
.then(js => js.sorbayGetToken(baseUrl, sorbaySetTokenInForm))
.catch(e => e.message.startsWith('client-error: ') ? e.message : 'client-error: sorbayGetToken() failed: ' + e);
}
sorbayGetSetToken();
</script>"""
}
}A "Yubikey" is an affordable USB OTP Token for strong authentication. For details about the product, consult the manufacturer homepage:
The unique feature of this token is, that it works as a USB keyboard. When the user presses the single button on the token while it is inserted in the USB port, it will send a number of key presses, typing in the one-time passcode for the user. The code itself is calculated based on a secret known by the manufacturer of the token.
Yubico Cloud Service
Yubico provides a freely available, public verification service for all tokens manufactured by them. NOTE: This service only verifies that the one-time passcode generated by a certain token is correct for that specific token and time; it does NOT, however, verify in any way that the token belongs to a specific user.
In other words, it is the SLS's duty to map the token to a user. This mapping should usually be made persistent with a data source like an LDAP directory, where the ID of the user's Yubikey token could be stored in an attribute of the user object.
Token ID
When the code is generated by the token, it always also contains the ID (similar to a serial number) of the token itself. This ID is contained in the first 12 characters of the OTP string sent by the token. So, within the SLS, it makes sense to extract that ID from the one-time passcode first and use it to look up the user data in a data source like an LDAP directory.
For details, please consult the "Yubikey Manual" available for download as PDF on the Yubico homepage.
To verify a Yubikey one-time passcode, the SLS HTTP adapter can be used, with the publicly available Yubico verification service.
The HTTP adapter should be configured to be used as an authentication adapter, but most likely a secondary one. Usually, a username and password need to be verified as well, for which one of the traditional adapters like LDAP or RADIUS will be used.
Then, after verifying username and password, the ID of the token must be extracted from the OTP code, and the SLS must somehow make sure that this token is the one that actually belongs to the user. One way to do this would be to use the token ID as a filter value in an LDAP search, where a user is searched whose attribute "XYZ" must contain that token ID. If the search returns no result, it means no user has that particular token, and the authentication should fail right there.
If a user was found, an LDAP bind could be performed with the DN of that user to verify the username and password, and then after that the HTTP authentication against the Yubico cloud service would verify the OTP.
The configuration for the HTTP adapter (in the SLS configuration file "http-adapter.properties") would look like this:
# NOTE: Insert your own valid API Key ID for the "id" parameter !!
http.auth.url=https://api.yubico.com/wsapi/2.0/verify?id=5695\& +
otp=${session.getCred('secret')}& +
nonce=${function.random().substring(1).concat(function.random().substring(1))}& +
sl=50\&timeout=20\×tamp=1
# Handle the OTP as credential of type \'secret\'
http.auth.credentials=secret
# non-200 HTTP responses are tech errors
http.auth.code.error=500,503
# Everything other than this in the response body signals an error
# (see validation protocol specification for details)
http.auth.response.ok=status=OK
# Must always be a GET request
http.auth.method=GETNote
The various parameters in the Yubikey service URL may be fine-tuned to suit the needs of a specific use-case. Please consult the Yubico verification protocol specification for details.
Yubico API Key ID
For the "id" parameter in the URL, insert your own valid API key ID (request a Yubikey API ID:
An example configuration in "sls.properties" will then look something like this:
# Use LDAP adapter to verify "username" and "password" credentials.
# NOTE: This does NOT verify the "secret" credential; that must
# be done 'by hand' in the model (see below).
adapter.authentication=ldap
# Verify the Yubikey OTP with the HTTP adapter
adapter.authentication2=http
#### login model configuration ####
model.login.uri=/auth
model.login.failedState=get.cred.token
# Get username, password and OTP code
model.login.state.10.name=get.cred.token
# Extract Token ID from OTP code by extracting
# the first 12 characters (see Yubico manual for details)
model.login.state.20.name=do.generic
model.login.state.20.action.1=${function.setVariable('tokenid', +
session.getCred('secret').substring(0, 12))}
# Perform LDAP authentication, preferably with some
# filter that uses the JEXL variable "tokenid" to
# find the user DN.
model.login.state.30.name=do.auth
# Perform authentication with the HTTP adapter
model.login.state.25.name=do.auth2
model.login.state.25.nextState=do.success
model.login.state.25.failedState=do.generic-failure
# If the token verification failed, reset the username
# and password credentials too before starting again
model.login.state.40.name=do.generic-failure
model.login.state.40.action.1=${session.clearCredentials()}
model.login.state.40.nextState=get.cred.token
# Login completed!
model.login.state.90.name=do.successNote that this is an incomplete example, since the specifics of the first authentication step (verifying username and password, and implementing a mapping of the token ID to a username) depend on the use-case.
The WAF (HSP) supports several different times of timeouts that have an impact
on the session of the user. 3 of them can be set dynamically by the SLS either
through static configuration properties (see
"SES Session Attributes", usage
type "ac-cred-tmo") or JEXL functions (see "SLS JEXL Guide" /
function.setWafSessionTimeout()).
Each of these timeouts will enforce a re-authentication of the user’s session once it is triggered. Usually, the user session will still be active after the re-authentication, except in cases where it was inactive for too long, and has already been removed from the HSP session store.
NOTE: Setting HSP timeouts dynamically in the SLS requires at least HSP version 4.18.0.0 or newer!
This chapter lists the SRM configuration directives used to configure the timeout settings in the WAF (for details about these directives, please look them up in the "HTTP Secure Proxy Administration Guide").
AC_HspCredentialValidityPeriod
JEXL type parameter: validity
Triggered by: The user being inactive for as long as configured by this statement (so, basically an idle / inactivity timeout).
Typical value: This timeout will usually be set to a rather short value of a few minutes (5 - 15).
AC_HspCredentialUpdateTrigger
JEXL type parameter: updateTrigger
Triggered by: This timeout is directly connected to the validity
timeout and exists only for performance reasons. Basically, whenever a new
request is processed, the HSP would need to update the timestamp in the session
which marks the time from which the time will be measured to decide if the
inactivity timeout has been reached. But updating a session value impedes
performance because it requires to hold a lock on the session store for the
short time of this operation; in high-load environments, this could have a
serious performance impact. For this reason, the update trigger specifies
basically a shifting window within the inactivity timeout period; whenever
the current time is beyond the timestamp of the validity timestamp
plus the range specified by updateTrigger, the HSP will actually update
the timestamp (hence the name).
Typical value: Must always be smaller than the value defined by updateTrigger,
usually about a third of it.
AC_HspCredentialFinalTimeout
JEXL type parameter: final
Triggered by: Once the given timeout value has been reached (starting with the initial login), no matter if there was activity in the session or not.
Typical value: This timeout usually set to something like 1, 4 or maybe even 8 hours. Setting it too short would, depending on the authentication requirements, potentially make work really annoying for the users.
This migration guide will list the deprecated properties and their new values.
The new tenant values have been introduced in SLS 4.6.0
config properties
- multimandator.enabled -→ multitenancy.enabled
- mandator. -→ tenant.
- multimandator.resolving. -→ multitenancy.resolving
jexl variable
- current.mandator -→ current.tenant
browser blacklist properties
- .mand -→ .tenant
jexl functions
- session.getMandatorSpecific -→ session.getTenantSpecific
- session.getMandator -→ session.getTenant
log4j custom variables
- mand -→ tenant
error messages
- MANDATOR_SWITCHING -→ TENANT_SWITCHING
- MANDATOR_FOUND -→ TENANT_FOUND
- MANDATOR_NOT_FOUND -→ TENANT_NOT_FOUND
url parameters
- mand -→ tenant
parameter checking properties
- parameter.http.<id>.mand -→ parameter.http.<id>.tenant
This FAQ ("Frequently Asked Questions") addresses some of the most frequent questions and problems around the . It is grouped in two areas, usage questions and troubleshooting.
Q: I want my application to receive the user's login ID after a successful login, in a custom HTTP request header. How can I configure that?
A: The simple way is to use the "app.header" configuration property, as explained in "Propagating Custom HTTP Headers". Use the name of the header which the application expects (for example: "userid") in the name-part of the property, and the variable (see "JEXL Expressions" for details about variables) which holds the value of the request parameter with the login ID in the value part of the property:
app.header.userid = ${parameter.id}Q: Strange "NoSuchMethodError" or similar messages appear in the log after deploying a new SLS release. Why?
A: It is most likely that due to a Tomcat bug, not all the old SLS code (jar files) in Tomcats temporary directory have been replaced by the new SLS jar files. See the next question for an answer to this problem.
Q: New code / JSPs have been deployed, but somehow it seems that old classes are still active, or methods that have been removed are still referenced. Why?
A: Tomcat sometimes appears to have problems with its caching directory, mixing up newly deployed JSPs or code with older versions. In such situations, delete the caching directory entirely (the "work" subdirectory of the Tomcat installation) and restart Tomcat. The directory will just be created automatically again (make sure that the user which is used to run the Tomcat process has the proper permissions to do so).
Q: After removing the "work" directory and restarting Tomcat, my web application fails to start up entirely. What's wrong?
A: If the user under which the Tomcat process is running does not have the permission to create a subdirectory inside the Tomcat installation directory, Tomcat cannot re-create the "work" subdirectory. If this is the case, create a new "work" subdirectory (with write-permission for the Tomcat-user) yourself.
Q: I only get a "HTTP 404" when I try to access the login URL, but I don't see any error log messages, and all configuration files are ok. What's going on?
A: Experience showed that strange behavior like this is most often caused by problems with file or directory permissions. Make sure that the entire Tomcat installation directory tree has the right user and group IDs and has the correct permissions for that user.
Q: A cookie that was created by the SLS as a version 0 cookie, and without quotes around the value, ends up being a version 1 cookie with quotes. Why?
A: This is a Tomcat behaviour that is documented here:
http://tomcat.apache.org/tomcat-6.0-doc/config/systemprops.html
To avoid this, set this system property in the Tomcat startup script:
-Dorg.apache.catalina.STRICT_SERVLET_COMPLIANCE=true
Q: I'm having problems with my URI / URL. Which configuration files do I need to check?
A: These files contain a URI / URL related to the in some way. For details about the configuration values, read the documentation that belongs to the component (for :
HSP HTTP and HTTPS listeners:
- http.conf
SRManager:
- http.conf
Tomcat:
- conf/server.xml
- webapp/sls/WEB-INF/web.xml
- webapp/sls/WEB-INF/struts-config.xml
Q: Tomcat or my web application does not find some JAR or resource files to which I have made soft-links (Unix).
A: It is a known fact that Tomcat has problems finding files that are available through softlinks. It is generally recommended, therefore, to make all files available to Tomcat as real files and not through links.
Q: The debug or trace log seems to be missing some records. It appears as if, for some mysterious reason, parts of the SLS code suddenly just don't create any debug or trace log anymore.
A: This can happen if multitenancy (see "Multitenancy Support") has been enabled, but the logging configuration has not been adapted accordingly. If the current SLS session has a tenant set, but no log configuration exists for that tenant (see "Tenant-specific logging"), no debug or trace log records may be created.
Q: I have configured authorizations for a location in the HSP and now the login model suddenly restarts in the middle.
A: This bug is fixed since SLS 4.20.0. For older SLS versions, see the detailed explanations below:
This can happen if a login model is retriggered when the HSP sends headers about required authorizations during the login process after the first request of a login.
Take the following sample configuration which defines an authorization "foo" for the /app location and a login location for it:
<Location /app> SetHandler http_1_1_gw_handler HGW_Host sample:9999 HGW_RequestHeaders %SRM_as_std AC_LoginPage /sls/login AC_AuthorizedPath /app AC_AccessArea Member AC_RequireAz foo </Location> <Location /sls/login> HGW_Host sample:9999 HGW_RequestHeaders %SRM_ls_std AC_LoginPage /sls/login AC_StartPage /sls/login AC_AuthorizedPath /app AC_RequireAzNone </Location>
Now, say, the user starts by sending a request to the the /app location and is redirected by the HSP to the login location with a requested page, as follows:
GET /login/sls?RequestedPage=%2fapp HTTP/1.1
In this case, the HSP takes required authorizations from the location of the requested page, i.e. the /app location in this case ("%2f" is "/" URL encoded), which is the "foo" authorization and sends required authorization headers to the SLS:
HSP_AC_SESSION_ATTRIBUTES_REQAZ-0: name="foo", path="/app", value="allow", vtype="direct", encoding="string", usage="ac-app-az"
Now, suppose as a next step in the login model the SLS sends a login form to the client and the user then posts it:
POST /login/sls HTTP/1.1
In this case, since there is no RequestedPage parameter as the first GET parameter in the request, the HSP determines the location to use for determining required authorizations as follows: The location defined in the AC_AuthorizedPath for the login location, which is the /app location again in this example.
Now the HSP sends again the same required authorization headers in this example, which can cause the SLS model to restart.
This can be resolved by changing the AC_AuthorizedPath for the login location, which, however, must be a sublocation of the AC_AuthorizedPath location of the /app location. In this case, we use /, which is also the default if no AC_AuthorizedPath is defined.
<Location /sls/login> HGW_Host sample:9999 HGW_RequestHeaders %SRM_ls_std AC_LoginPage /sls/login AC_StartPage /sls/login AC_AuthorizedPath / AC_RequireAzNone </Location>
In other words, the HSP always sends required authorization headers for some location (if that location has any required authorizations), only how that location is determinded is different depending on whether there is a RequestedPage parameter as the first GET parameter or not.
Note also, that with SLS <4.20.0 it is not possible to define authorizations for the / location and avoid the described problem (because if the / location requires authorizations, there are no sublocations except / itself), i.e. some login models cannot not be used if the root location has authorizations set.
Since SLS 4.20.0, the req az headers sent by the HSP are only considered if there is a RequestedPage parameter or if it is the first request for SLS login session.
Table 71.1. Additions
| Ref. | Document | Version/Date |
|---|---|---|
HSP Administration Guide:
| Version 4.2.19.1, 2009 | |
Secure Login Service log messages
| same as this document | |
Secure Login Service JEXL Functions
| same as this document | |
Secure Login Service JSP Tag Library | same as this document
|
Table 71.2. Glossary
| Term | Definition |
|---|---|
HSP | Http Secure Proxy This is the reverse proxy part of the SES. |
SES | USP Secure Entry Server, the entire software suite, entailing the reverse proxy and the login service. |
SRM | Secure Request Manager, a part of the reverse proxy. |
The RegExp library used to evaluate the expression is Sun's regex implementation in the JDK (package "java.util.regex"). Details can be found here:
http://java.sun.com/j2se/1.5.0/docs/api/java/util/regex/package-summary.html
\\ The backslash character
\0n The character with octal value 0n (0 ⇐ n ⇐ 7)
\0nn The character with octal value 0nn (0 ⇐ n ⇐ 7)
\0mnn The character with octal value 0mnn (0 ⇐ m ⇐ 3, 0 ⇐ n ⇐ 7)
\xhh The character with hexadecimal value 0xhh
\uhhhh The character with hexadecimal value 0xhhhh
\t The tab character (\u0009)
\n The newline (line feed) character (\u000A)
\r The carriage-return character (\u000D)
\f The form-feed character (\u000C)
\a The alert (bell) character (\u0007)
\e The escape character (\u001B)
\cx The control character corresponding to x
[abc] a, b, or c (simple class)
[^abc] Any character except a, b, or c (negation)
[a-zA-Z] a through z or A through Z, inclusive (range)
\[a-z-\[bc\]\] a through z, except for b and c: [ad-z] (subtraction)
\[a-z-\[m-p\]\] a through z, except for m through p: [a-lq-z]
\[a-z-\[^def\]\] d, e, or f