User Manual
Copyright © 2025 United Security Providers AG
This document is protected by copyright under the applicable laws and international treaties. No part of this document may be reproduced in any form and distributed to third parties by any means without prior written authorization of United Security Providers AG.
DOCUMENTATION IS PROVIDED "AS IS" AND ALL EXPRESSED OR IMPLIED REPRESENTATIONS AND WARRANTIES, INCLUDING BUT NOT LIMITED TO ANY IMPLIED WARRANTY OF MERCHANTABILITY, FITNESS FOR A PARTICULAR PURPOSE OR NON-INFRINGEMENT, ARE DISCLAIMED TO THE EXTENT PERMISSIBLE UNDER THE APPLICABLE LAWS.
Table of Contents
To install the system, you first need to configure your appliance or your VM to boot from the USP NAS .iso file. After booting from the .iso, select the option "Install appliance operating system" in the bootloader menu. Installation will proceed without needing any user interaction. Partitions and filesystems will be created and the USP NAS System will be installed. The System will then restart automatically and boot the USP NAS operating system.
Once the installation is completed, a login prompt will be displayed on the console. You can log in to the basic system configuration menu using the console user with the following credentials:
- Username: console
- Password: console
The network interface of the appliance and the default gateway can be set via the console menu. After completing the initial network setup, you can access the web-based USP NAS GUI using a webbrowser of your choice (Google Chrome, Mozilla Firefox or Microsoft Edge is recommended) via the configured IP address to continue with the configuration of the USP NAS application.
USP NAS offers the possibility to install software updates via the Web GUI (System → Update). You can upload the update image directly via the Web GUI file chooser. Alternately, the image can be uploaded via SFTP using the transfer user, whose password you can configure in the Web GUI (System → SSH Access). In this case, the image must be placed in the update directory. After selecting the update image and clicking the Update button in the Web GUI, the system will be updated and restarted without requiring further intervention. Please note that the update process can take several minutes.
What are the system requirements to install NAS?
We recommend the configurations for a virtual server:
| 1-5000 Endpoints | 5000-100000 Endpoints | |
|---|---|---|
RAM | 8 GB | 16 GB |
Processors cores | 2-4 | 8 |
Harddisk size | 50 GB | 140 GB |
How do I set up high-availability (HA)?
To set up high-availability, you need at least two USP NAS servers (further called nodes) and have the Authenticator module licensed. One of the nodes will run in MASTER-mode, and the other nodes(s) will run in AUTHENTICATOR-mode. This can be configured in the Web GUI in Configuration → HA Authenticator. The configuration is composed of two steps:
Configure AUTHENTICATOR/MASTER
In one node, the modus must be set as MASTER. Then, all Authenticator instances can be added in the AUTHENTICATOR instance list with their respective IP address and hostname. On the other nodes, the modus must be set as AUTHENTICATOR, and the hostname and IP of the master node must be provided.
Exchange HA certificate
In order for the AUTHENTICATOR nodes to communicate with the MASTER, the HA certificate must be exchanged between the systems. To do so, you can download the certificates of each node in Configuration → HA certificate. In the same menu, the certificate of another node can be imported. Using these tools, you will need to import all the AUTHENTICATOR certificates on the MASTER node, and the MASTER certificate must be imported on each AUTHENTICATOR node.
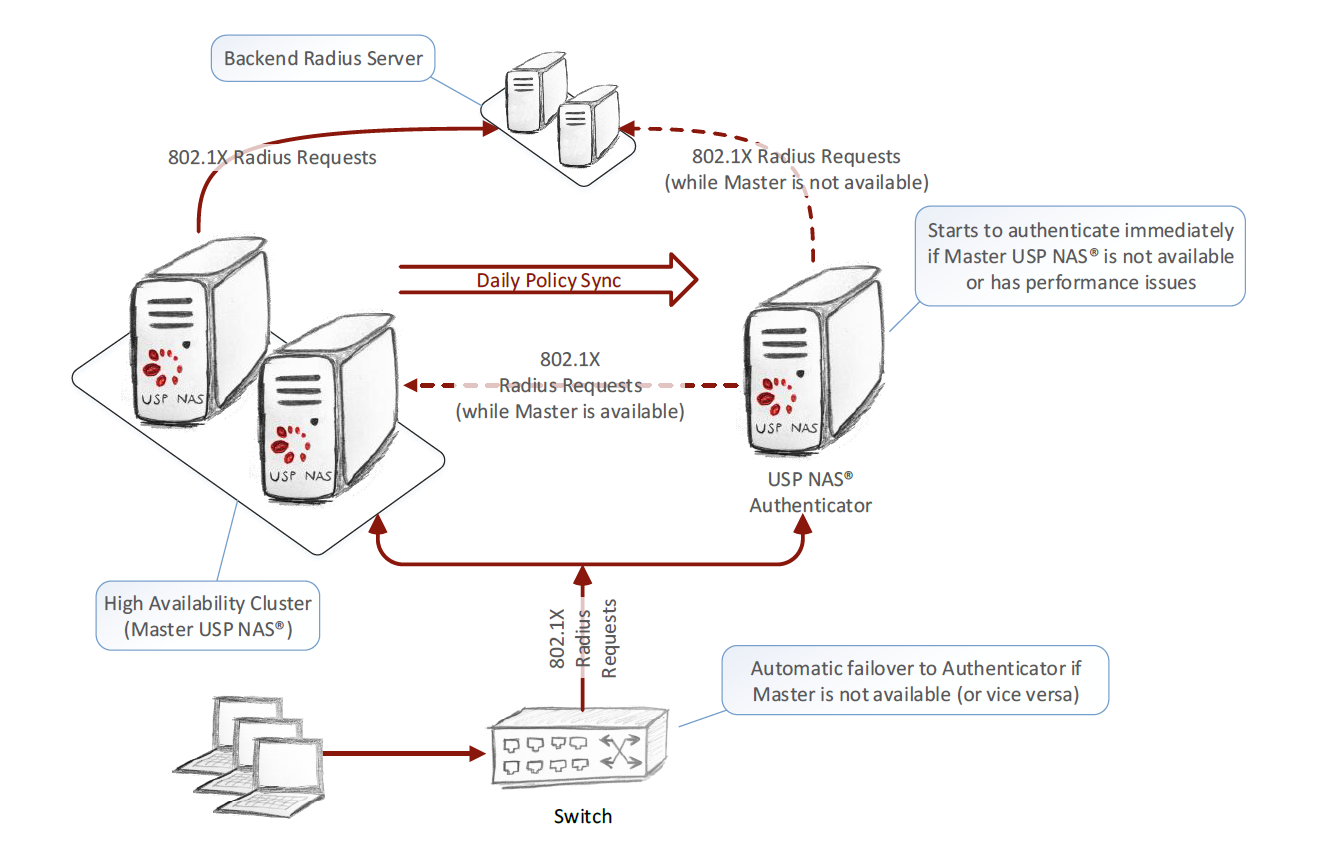
What does the HA architecture look like? How does the HA mode work?
An AUTHENTICATOR node is operating almost completely independently of the MASTER system. By default, an AUTHENTICATOR node fetches a copy of the policy and inventory from the MASTER system once a day. The AUTHENTICATOR checks the availability of the MASTER system at short regular intervals and forwards incoming SNMP traps and RADIUS requests to the master as long as it is available. If the master system fails (AUTHENTICATOR node gets no responses from MASTER) or is overloaded, the AUTHENTICATOR immediately takes over the authentication functionality. As soon as the master is online again, authentication requests are forwarded to the MASTER system again.
How does the synchronization between MASTER and AUTHENTICATOR systems work?
The high-availability functionality of USP NAS includes a periodic synchronization where an AUTHENTICATOR node copies the database from the MASTER node. This includes, among others:
- Core configuration
- Policy configuration
- Inventory (endpoints, netdevices etc.)
Excluded from the synchronization are:
- Connection events
- Event logs
- Alarming configuration
- Monitoring history
- Scheduled reports
- Scheduled scripts
The synchronization schedule can be configured using a cron pattern.
The USP NAS Web GUI offers also the option to carry out a synchronization manually. It is recommended to do this after setting up a new authenticator node.
In addition to synchronizing the policy, an AUTHENTICATOR systems provides a function to synchronize particular system configuration information from the MASTER to an AUTHENTICATOR node. The following configuration settings are synchronized using the "Config Synchronization":
Monitoring/alerting settings
- Email server
- Syslog server
- SNMP trap destinations
Expert settings (set via CLI)
- Additional operating system users
- Customized database access and performance configuration
Not included in the config synchronization are, among others, the following settings which have to be set manually on every instance:
- System contact / location
- Email receiver
- NTP server
- Network settings
- Automatic backups
- Monitoring thresholds
- Scheduled backup
- Where can I configure and manage users for Web GUI or system access?
- How can users be managed locally?
- How do I configure LDAP authentication for USP NAS?
- What is the multi-domain login feature for Web GUI users?
- How can USP NAS user roles be mapped in Active Directory (for Web GUI users only)?
- What is the Domain SID config in the LDAP configuration (for system users only)?
- How do I define LDAP Login configurations for Web GUI users?
- How do I define the LDAP Login configuration for system users?
- What roles are there available in the Web GUI? How do the permissions work?
- What is the transfer user?
Where can I configure and manage users for Web GUI or system access?
There are two ways to manage Web GUI and system users:
- Locally on the appliance using the user-management provided in the Web GUI
- Using an Active Directory (AD) to authenticate users via LDAP
How can users be managed locally?
In the All Users menu users can be added, edited and deleted. When you add or edit a user, you can define its password, decide if the user is active and define its roles. If you use tenants, you can also assign a user to a tenant.
How do I configure LDAP authentication for USP NAS?
The LDAP Login can be configured in the Web GUI in "Configuration → LDAP Configuration". From there, two types of LDAP logins can be configured:
- LDAP Login for Web GUI users (multi-domains login available)
- LDAP Login for system users (only single domain login available)
What is the multi-domain login feature for Web GUI users?
Usually there is only one domain required to provide authentication for Web GUI users.
With the multi-domain extension it is possible to store several domains as authentication backends.
This feature is therefore only relevant for environments with multiple domains.
The default configuration is the configuration which will be applied first if the username is provided without domain name.
To login using another domain configuration, the user must provide the server name in the following format: servername/username.
For system user login, only one configuration may be defined. That means that system users may be managed only by one dedicated LDAP server. These users will all have root privileges on the USP NAS system. User home directories on USP NAS are not persistent across reboots, therefore, they should only be used to temporarily store files.
How can USP NAS user roles be mapped in Active Directory (for Web GUI users only)?
In the Web GUI, different user roles are available. To assign these roles to AD-based users, the roles which will be used have to be defined in Active Directory as group-objects. These group objects need to have an attribute which does match exactly the given role name. It might be the "cn" of the group or any other attribute like "description". No matter which attribute is chosen, the name of the attribute must be specified in the LDAP config under "LDAP name of the role attribute".
What is the Domain SID config in the LDAP configuration (for system users only)?
In the system LDAP configuration there is only one role, therefore no groups need to be defined for the roles. In contrast to the web GUI configuration, the domain SID must be specified here. The domain SID corresponds to the SID of any object (e.g. user object) of an AD without the part after the last hyphen i.e.:
-
SID of a user:
S-1-5-21-3172367666-555659623-114111100-1335 -
Domain SID:
S-1-5-21-3172367666-555659623-114111100
The domain SID is required for successfully configuring system LDAP authentication. If you are logged in as a domain user in a Windows system you might get the user SID with the following command in the Windows Command Prompt:
wmic useraccount where name='{username}' get sidHow do I define LDAP Login configurations for Web GUI users?
Active | Defines if this LDAP configuration is active or not | True / False |
Default | If true, this configuration will be the first to be tried if no servername is provided with the username | True / False |
Name of the server | Name of the server, can be provided during the login to specify which configuration must be used | DOMAIN1 |
URL of LDAP server | URL of the LDAP Server | <ldap://server:port, ldaps://server:port> |
LDAP DN of the service user for the initial bind | DN of the administrative user for the initial bind to LDAP, for searching the authenticating user. Read permissions to the required LDAP directory are required. | CN=LDAP Service Read, OU=Service, OU=Accounts, DC=test, DC=local |
LDAP password of the service user | Password of the administrative user for the initial bind to the LDAP | C0mplxPwd420! |
LDAP DN where to search for the user | Base DN under which users are searched for the initial bind. | OU=Accounts,DC=test,DC=local |
LDAP filter to search for users | LDAP filter with the user searched for the initial bind. | &((cn={0}) (objectClass=organizationalPerson)) |
LDAP DN to search for roles | Base DN under which roles (authorizations) are searched for | OU=Security Groups, DC=test, DC=local |
LDAP filter to search for role(s) | Filter to search the group objects for the roles. | (&(objectClass=group) (member={0}) (|(description=support) (description=admin) (description=monitoring))) |
LDAP name of the role attribute | Name of the attribute of the groups which define the role. It might be the "cn" of the group or any other attribute like i.e. "description". But the value has to match exactly the role-name (see available roles beyond) | cn |
How do I define the LDAP Login configuration for system users?
Active | Defines if this LDAP configuration is active or not | True / False |
Name of the server | Name of the server, can be provided during the login to specify which configuration must to use (only relevant in multi-domain environments): domain1/username | domain1 |
URL of LDAP server | URL of the LDAP Server | <ldap://server:port, ldaps://server:port> |
LDAP DN of the service user for the initial bind | DN of the administrative user for the initial bind to LDAP, for searching the authenticating user. Read permissions to the required LDAP directory are required. | CN=LDAP Service Read, OU=Service, OU=Accounts, DC=test, DC=local |
LDAP password of the service user | Password of the administrative user for the initial bind to the LDAP | C0mplxPwd420! |
LDAP DN where to search for the user | Base DN under which users are searched for the initial bind. | OU=Accounts,DC=test,DC=local |
LDAP filter to define which users are allowed | LDAP filter for the users which have the permission to login as system users. This filter has to match exactly those users which are allowed to log in. | (&(objectClass=organizationalPerson) (sAMAccountName=*) (|(memberOf=CN= NAC_Admin, OU=Accounts, DC=test, DC=local))) |
LDAP Domain SID | SID for the configured LDAP Domain. | S-1-5-21-2614513918-2685075268-614796884 |
What roles are there available in the Web GUI? How do the permissions work?
USP NAS has several WebGUI user roles with different system permissions:
| Name | Name to be set for the LDAP role attribute | Description |
|---|---|---|
Helpdesk |
| Users with the role Helpdesk can check the USP NAS operating status and can block or unblock ports. Further they can give temporary access to unauthorized endpoints. |
Support |
| The Support role has the Helpdesk’s permissions and additionally the possibilities to change existing rules. |
Admin |
| All users assigned to the Admin role have full control to all USP NAS functions including the configuration of the entire set of rules. By performing changes on the policy as an administrator the changes will not be applied instantly to the running configuration. The changes are only applied in a policy workspace. Not until this workspace is activated explicitly they will be copied in one transaction to the running config. Therefore, multiple admin users cannot be logged in at the same time. |
Monitoring |
| The Monitoring role is typically used to integrate USP NAS in an existing monitoring environment. |
Reporting |
| The Reporting role especially exists for data evaluation. Users with this role have the permissions to visualize saved NAS-data in a clearly arranged and consolidated fashion in using the predefined web-reports. |
User administration |
| The User administration role exists for the administration of USP NAS users. Only users with that role can add new users and modify or delete existing users. |
Read-Only |
| With the Read-Only role a user can log in into USP NAS with reading permissions only. |
Policy read-only |
| With the policy read-only role a user can log in into USP NAS having read access to the policy-views. In contrast to admin users, several users with the policy read-only role can be logged in at the same time |
The transfer user is a user that has limited SSH access to the system. The user can connect via SCP or SFTP and access some useful directories and files like backups, logs, updates or imports. The default password for the transfer user is transfer, but it can be changed in the WebGUI in System → SSH Access
USP NAS offers different backup options: Backups can be created manually in the Web GUI in Operation → Backup or on a regular schedule, and generated backup files can be stored on USP NAS, downloaded to a local PC via the Download link or copied to a remote file server using SFTP/SCP.
USP NAS offers various backup types:
Full | Complete backup of all NAS settings and configurations (system, database, logs and policies). |
Full - No log data | Same as Full without the logs |
System settings | Only system settings (e.g. system name, network settings, etc.) are backed up. |
NAS settings | Backup of core configuration, alarming configuration, monitoring configuration |
NAS data | Backup of the USP NAS database (end clients, registered end devices, users, monitoring history, etc.) |
NAS log | Backup the USP NAS log files. |
NAS policy | Backup of the USP NAS ruleset (port groups, rules, network devices, network ports, etc.) |
The following shows in more detail which configuration data is contained in which backup type:
| Name | Description | Full | Full (no logs) | System settings | NAS settings | NAS data | NAS log | NAS policy |
|---|---|---|---|---|---|---|---|---|
Config | Core Configuration, monitoring/alarming settings | x | x | x | ||||
Policy | Netdevices, inventory, access profiles, access rules | x | x | x | ||||
DNS-Server | Config for DNS transfer | x | x | |||||
RADIUS Server | Server for certificate authentication | x | x | x | ||||
CA Certificates | For authentication on local FreeRADIUS | x | x | x | x | |||
Server Certificates | For authentication on local FreeRADIUS | x | x | x | x | |||
License | USP NAS license | x | x | x | x | |||
System LDAP Configuration | For ssh authentication with LDAP user | x | ||||||
Scheduled Scripts | Automatic scripts | x | x | x | ||||
Scheduled Reports | Automatic scheduled reports | x | x | x | ||||
Connection events | Connection events | x | x | |||||
Event logs | Structured events logged by USP NAS core and Web GUI | x | x | |||||
Server Certificates | For SSL/TLS (HTTPS) | x | x | x | ||||
DB config | Configuration users, access, configuration | x | x | x | ||||
SFTP Users | Inventory import | x | x | x | ||||
SFTP transfer user | Configurable in GUI for SFTP access | x | x | x | ||||
Mail servers | Used for alerts | x | x | x | ||||
Syslog servers | Used for events | x | x | x | ||||
SNMP Trap destinations | Used for alerts | x | x | x | ||||
SNMP Daemon Community | Used to monitor the system | x | x | x | ||||
Location and Contact | Just informative | x | x | x | ||||
Network Interfaces | Configuration of IP, gateway, DNS etc | x | ||||||
Hostname | Hostname of the appliance | |||||||
Scheduled Backups | Configuration automatic backup jobs | x | x | x | ||||
File Servers | Configuration of IP, gateway, DNS etc | x | x | x | ||||
HA Config (Authenticator) | Config for master/authenticator | x | x | x | ||||
NTP Servers | Used for system time synchronization | x | x | x |
Restoring a backup consists of the following steps:
- (Optional) Transfer the backup file to the appliance via SFTP using the "transfer" user, and store it in the "backup" directory.
- In the Web GUI, under Operation → Restore, either select a backup available on the USP NAS system via the select box, or use the "Browse" button and select the corresponding backup file on your local drive.
- Select the backup/restore type of the saved backup file.
- Click the "Start" button to start the restore process.
Please take note that only backups created with the same USP NAS version can be restored. If a backup of a different USP NAS version is restored, this can lead to an inconsistent state. If the checkbox "Force restore" is not checked in the GUI, the system prevents restoring a backup which was created with a different release number.
After restoring a backup, the system will reboot automatically.
Also note that the following settings are ignored when restoring a full backup:
- System hostname
- Network interface settings (IP address/netmask)
- Default gateway
This means that restoring a full backup will normally not change your current network settings.
How do I schedule an automatic regular backup?
The automatic backup can be scheduled in the WebGUI in Operation→Scheduled backup. The same backup options are available for the automatic backup as for the manual backup.
A daily, weekly or monthly interval is available for the execution interval. The automatic backups can be stored either locally on the appliance or remotely via SCP/SFTP on a remote server.
The backups stored locally on the appliance appear in the list of manual backups and can be downloaded analogously to the manual backups.
Important: The name of the automatic backup cannot contain spaces or special characters.
What interfaces does USP NAS provide to peripheral systems?
| System | Type of interface | Functionality of the peripheral system |
|---|---|---|
Network components (RADIUS authentication) | RADIUS authentication server | USP NAS provides functionality for network components to verify authentication requests from endpoints wanting to connect to the network. |
Switches | SNMP MIBs | USP NAS offers functionality to collect and provide information from switch ports and end devices connected to the wired network. |
DNS-Servers | AXFR Zonentransfer | The DNS zone transfer collects IP address/hostname mappings of endpoints. The IP addresses are not relevant for authentication purposes, but are used to enhance information displayed in the USP NAS Web GUI and in reports. |
Layer-3 Devices (Router) | Querying ARP tables (SNMP queries) | The ARP tables of layer-3 devices are used to get IP address/MAC address mappings of endpoints connected to the network. |
Endpoint inventory systems | Using push (csv) or pull (REST, sql) mechanism | One or multiple inventory system may be connected to the USP NAS to provide endpoint inventory information. |
Network management systems | Using push (CSV files) or pull (REST API, SQL queries) mechanisms | One or multiple network management systems may provide inventory data of network devices which should be controlled by NAS |
Monitoring (active) | Query SNMP service running on USP NAS | A Monitoring system may query the SNMP-MIB of USP NAS to get current system and operational data. |
TRAP destination (monitoring passive) | SNMP-trap | A Monitoring system may receive events and alarms via SNMP-Trap from USP NAS about system and operational status. |
Email server (passive monitoring) | A Monitoring system may receive events and alarms by mail from USP NAS about system and operational status. | |
SYSLOG server (monitoring passive) | syslog | A Monitoring system may receive events and alarms by syslog from USP NAS about system and operational status. |
File server | SCP/SFTP | One or more file servers can be used to remotely store scheduled backups and scheduled reports. |
How can I import data into USP NAS?
The first way of importing data into USP NAS is to use the Import interface. Inventory systems and NMS deliver data to USP NAS in the form of flat CSV files. The files are transferred to the USP NAS server via SFTP (SSH File Transfer Protocol). The supplemental document "Specification Inventory Import and NMS Import" describes the technical procedure of the import process as well as the data format of the CSV files to be imported. CSV files can also be uploaded manually via the Web GUI in Operation → Upload import data.
The second way of importing data is to use Scheduled Scripts. These scripts can be created using a template in the Web GUI in Configuration → Scheduled Scripts. You can then customize the script to import data from any source (for example using Nmap, LDAP, SQL server or HTTP API).
Which network equipment vendors are supported by USP NAS?
USP NAS should support many common switches through the use of generic/standardized SNMP query functionality, but the following switch/router/access point vendors and model series have been observed to work well in customer setups:
- Actelis Networks
- Alcatel-Lucent (OmniSwitch)
- Cisco (Catalyst, Business)
- Dell (PowerSwitch)
- Extreme Networks
- Fortinet (FortiGate/FortiSwitch)
- H3C
- HP (ProCurve, Aruba, Nortel, 3Com)
- Hirschmann
- Huawei
- Microsens
- onway (Mobile Router)
- Ubiquiti (UniFi)
How can a token be generated for REST-API authentication?
Authentication for the REST API is implemented with a user-based authentication token.
In order for an authentication token to be created for a user, the "REST API" role must be assigned to the user.
A user having the "REST API" role can generate a corresponding token in the user profile page in the Web GUI. This token can then be used for authentication, either via cookie or HTTP header.
How does a REST-API request look like?
The URL for querying the REST-API looks as follows:
https://{IP}/api/v1/An example of a request using curl with the token set as cookie looks as follows:
curl -b jwttoken=eyJhbG.....sXtRrBRY https://NAS_IP/api/v1/status
Using the token in the authorization header looks as follows:
curl -H "Authorization: Bearer eyJhbG.....sXtRrBRY" https://NAS_IP/api/v1/status
What data is provided by the REST-API?
Request | Description |
| Provides some basic status information about the USP NAS application and operating system. |
| Endpoints are entities that are defined in the inventory or were detected on the network through an SNMP scan or a RADIUS request. When querying for endpoints, different filters can be applied to the individual attributes. These are described in detail in the REST API documentation. |
| Netdevices are entities of SWITCHES/ROUTERS/WLAN-CONTROLLER which have been defined in the netdevice inventory or were detected on the network through a RADIUS request which hast been received from an allowed network scope (RADIUS subnet). When querying for netdevices, different filters can be applied to the individual attributes. These are described in detail in the REST API documentation. |
| Interfaces are entities of network-ports of switches which have been scanned by SNMP. When querying for interfaces, different filters can be applied to the individual attributes. These are described in detail in the REST API documentation. |
Where can I get detailed documentation about the REST-API?
A detailed REST API documentation is available in the Web GUI. It can be displayed using the following link (available also via the help menu):
https://[IP]/ng/swagger-ui/index.html
Note that the user needs to be logged into the USP NAS Web GUI first to view this documentation.
How can I configure DNS zone transfer?
You can define which DNS zones on which DNS servers are to be taken into account for the DNS zone transfer. This can be configured in Configuration → DNS zone configuration.
On this page, you can configure multiple DNS zones by providing the DNS zone name and the DNS server IP address.
Please note that one DNS zone can be assigned to multiple DNS server IPs.
How do I set up system monitoring?
The monitoring can be configured under Configuration → Monitoring configuration. On this page, monitoring thresholds can be configured for each sensor. When a measured value is out of range, an alert will be displayed in the status overview page.
It is further possible to define a remote alarming system for each log message. This can be done in Configuration → Alarming configuration. When nothing is configured for a message, the message will only be displayed on the Monitoring status pages of the WebGUI.
What Scheduled Scripts templates are available?
Here is a list of the different script templates:
| Name | Description |
|---|---|
WSUS Fetch | Template of a jython script which queries a WSUS Inventory server |
NMAP Import | Template of a jython script which parses an XML output file from nmap and complements additional data/information to the end devices |
Mac flooding cleaner | Template of a jython script which finds out which switch ports have more than 100 nodes connected, and cleans them up from the node table. |
Query to CSV to Mail | Template of a jython script which receives a SQL query as a parameter, writes the result to a CSV file and sends that file to the email address given in parameter. |
CSV Import | Template of a jython script which queries an inventory CSV file on the local file-system. |
HTTP/HTTPS Fetch | Template of a jython script which queries an inventory system over HTTP or HTTPS |
MS SQL Fetch | Template of a jython script which queries an inventory MS SQL server on a remote system. You have to place the mssql jdbc jar on the Java classpath. |
MySql Fetch | Template of a jython script which queries an inventory mySQL server on a remote system. You have to place the mysql jdbc jar on the Java classpath. |
Oracle Fetch | Template of a jython script which queries an inventory ORACLE server on a remote system. You have to place the oracle jdbc jar on the Java classpath. |
Generic bash script | This is an example bash script, it prints a "Hello World" and the current date in an output file. |
Generic python script | This is an example python script, it prints a "Hello World" and the current date in an output file. |
Generic jython script | This is an example jython script, it prints a "Hello World" and the current date in an output file. |
If access control is not yet implemented in a network, we recommend the following best practices (detailed further down) for conducing the rollout of USP NAS:
- Network transparency: The first step is usually to achieve transparency in the network.
- Network authentication/inventory: The second step is to introduce authentication. The inventory is gradually built up and then a restrictive policy is introduced.
- Network policy/automation: In a third step, specific policies, dynamic VLAN assignment and device-specific RADIUS attributes can then be assigned.
- What benefits does USP NAS’s network transparency generate?
- How is network transparency implemented with USP NAS?
- How to list switches for network transparency (query using SNMP)?
- How to define uplinks (netports) of switches?
- How to configure network transparency with automatic switch detection?
- Is it necessary to define netports for RADIUS auth devices?
- How can the results of network transparency be checked/used?
What benefits does USP NAS’s network transparency generate?
Network transparency is the first step in implementing network access control. This provides a view of what is and was connected to the network, when and where.
Network transparency provides the basis for important use cases in the areas of
- traceability
- incident analysis
- provides important data that can be used in operations of network and endpoints
This means that important requirements from security audits can be met.
How is network transparency implemented with USP NAS?
The implementation of network transparency with USP NAS is usually very easy and can be implemented with little effort. There are two possible approaches to implementing network transparency.
- If the network components (switches) allow querying their bridge MIBs via SNMP, no further configuration on the network components is necessary. However, switches must be defined with IP address and SNMP community string in the USP NAS.
- If querying the bridge MIBs is not possible, RADIUS-MAC authentication must be activated on the switches. In this case however, switches do not have to be defined in the USP NAS manually, but are automatically recognized as soon as they send authentication requests.
How to list switches for network transparency (query using SNMP)?
Switches (netdevices) may be either managed via Web GUI or by uploading a CSV list with IP, DNS name and SNMP read credentials. In addition to defining the switches, at least one uplink (netport) must be defined for each device. The uplink ports can also either be recorded via the web GUI or imported via a CSV list.
How to define uplinks (netports) of switches?
Netports have to be defined on the switches explicitly. This is because MAC addresses registered in the forwarding table of an uplink-port are not connected on this port and should therefore not be considered as connected on the port. Netports may be defined for every switch by selecting the link “Netports”. Netports can be set or removed with a check mark. The number of detected MAC addresses on this port (MAC count), the VLAN trunk ports and the vendor announcements ports (VA) are displayed for assistance. Ports with check marks on the last two attributes mentioned should be defined as netports in USP NAS. Having multiple devices connected to one port is also a strong indicator of a Netport. As soon as a netdevices is added and the netport is defined, a portscan is automatically started. The portscan will update the netdevice details as well as the connected endpoints. By default, a switch scan runs periodically at regular intervals. It can also be triggered manually in the Web GUI.
How to configure network transparency with automatic switch detection?
The second option of implementing network transparency is using the approach of activating RADIUS authentication on the netdevices. By default, USP NAS is configured to answer any RADIUS authentication requests from the network. If a request is received from a network device that is not yet listed in the system, it is automatically created as a device of type "RADIUS authentication device". With this approach, the network devices do not have to be explicitly entered initially or during operation. The network area (subnet) from which switches are allowed to send RADIUS requests to the USP NAS can be restricted if necessary.
Is it necessary to define netports for RADIUS auth devices?
No uplinks need to be recorded for RADIUS auth devices that are automatically listed after receiving an authentication request.
How can the results of network transparency be checked/used?
The result of the network transparency mode is a list of all connected endpoints during operation of USP NAS. In case of automatic listing of netdevices, a list with information of all netdevices will be generated. In case of querying netdevices using SNMP, detail information like netdevice description and port information will be available after the initial scan.
All collected information is available in the Web GUI and may be filtered/exported from there. In addition, the data can also be retrieved using the REST API.
The following table list the specific information and preconditions to collect it:
| Information | Precondition | Detail description |
|---|---|---|
Basic endpoint information | The endpoint is connected to the controlled network | The USP NAS provides a list of all endpoints connected to a netdevice which is controlled by the USP NAS system. The basic information includes MAC address and vendor of the endpoint as well as information about the switch port/WLAN controller the endpoint has been connected |
Endpoint IP address and hostname | The layer-3 netdevice can be queried by SNMP, and the DNS zone transfer has been performed successfully | The USP NAS provides IP address and hostname of the endpoints. |
Switch details | The switch may be queried from USP NAS by SNMP | The USP NAS provides detailed port information about the switch ports. This includes in particular: ifindex, ifname, ifalias, PVID, number of connected MAC addresses, vendor-announcement information |
- What are the requirements for network authentication?
- What kind of identity may be used for authentication?
- What kind of protocols may be used for authentication?
- What are the requirements for SNMP authentication?
- Why is there a delay of more than 10 seconds from plugging in a cable until receiving an SNMP connection event?
- How can I connect a RADIUS server?
- How to use local RADIUS server?
What are the requirements for network authentication?
The rollout of network authentication in an existing network has to be well planed and carefully applied. The requirement for a successful rollout is an accurate onboarding process of all endpoints which should have access in a controlled network. The result of the onboarding process is a complete inventory of all endpoint entities. USP NAS provides efficient features to support a seamless and efficient onboarding process.
What kind of identity may be used for authentication?
There are mainly two different kinds of authentication available, which are the MAC address with which an endpoint communicates on the network, or a certificate which the endpoint/user provides when connecting to the network.
The current best practice is to use certificates for endpoints which are managed in an Active Directory. Technically, it is also possible to use certificates for other endpoints. The problem is usually how to manage the certificate lifecycle for those endpoints. Therefore, the MAC address is used normally as identity for endpoints which are not managed in an Active Directory.
What kind of protocols may be used for authentication?
If certificates are use for identity it is required to use RADIUS as the authentication protocol. If only MAC-addresses are used for endpoint identity it may be possible to use only SNMP for authentication.
What are the requirements for SNMP authentication?
The requirements for SNMP authentication are that Bridge-MIBs are available on the netdevices and that write access is available on those netdevices. Additionally, SNMP may be used for authentication, if certificates are not used as identity of endpoints. That means that SNMP authentication may be used in an "MAC Identity" - only environment.
Why is there a delay of more than 10 seconds from plugging in a cable until receiving an SNMP connection event?
When using SNMP authentication, switches send up/down notification traps to USP NAC when cables are (un)plugged. This will trigger a scan of the related switch port, to see which MAC address(es) the switch has learned to be present on that interface.
At the time when a link-up trap is sent, the MAC address is not yet present in the bridge table, as it is only entered there when the client has sent the first packet. Since it is “relatively” time-consuming to make query the switch for MAC addresses, it is usually only done a few seconds later so that the probability of a successful query on the first attempt is as high as possible.
The timeout can be fine-tuned in the USP NAS application configuration in the category "SNMP". The related setting is called "GetMac Retry Timeouts". In smaller environments this could be turned down without any problems, in very large ones it is not recommended.
Can USP NAS be used as a RADIUS server?
The USP NAS can be configured as a RADIUS server or as RADIUS proxy. For RADIUS MAC authentication USP NAS always has the role of RADIUS server. For RADIUS EAP authentication you may configure whether USP NAS is a proxy and sends the EAP requests to a server or handles them locally.
The RADIUS Servers can be configured in Configuration → RADIUS server config. There you can add as many servers as needed, by providing the IP address, the port and the shared secret.
How to use local RADIUS server for EAP authentication
To use the local RADIUS server for certificate authentication, you need to activate the integrated "RADIUS server" module. After the module is activated, you can upload the CA certificate and the Server certificate in System → SSL certificate management. USP NAS will now answer RADIUS requests directly, without forwarding them to an external RADIUS server.
What kind of endpoint onboarding process USP NAS provides?
There are basically two options for efficiently onboarding endpoints: The system has an automatic onboarding mechanism for devices that authenticate themselves in the network using a certificate, and the system has also bulk onboarding mechanisms for devices that authenticate on the network using their MAC address. These devices can be filtered based on specific properties and then imported as a whole list. During this process, attributes that determine their type/class membership can also be assigned to the devices
How does the onboarding process work for endpoints using a certificate for authentication?
For devices that log on to the network with a certificate, onboarding is extremely easy - onboarding occurs automatically as soon as they log on to the USP NAS with their certificate for the first time. The devices are registered in the local inventory with the CN of the certificate and the MAC address currently used. If an endpoint logs in once over the WLAN and once over the LAN with the same certificate, a separate entry is created for each connection type.
How does the onboarding process work for endpoints that are using MAC address for authentication?
For devices that are supposed to authenticate themselves on the network via the MAC address, there are special onboarding functions that make this process as efficient as possible. The prerequisite for onboarding via MAC address is that the devices have already been scanned once by the USP NAS system via the SNMP scan, or the switch has already sent a RADIUS authentication request for the MAC address.
The devices can then be filtered by specific properties (manufacturer, connection point, connection time, etc.) and imported as a list. During the import process, attributes can be assigned to the devices which determine the type/class of the devices. These assigned attributes can later be used to define the policies that a terminal device is assigned when it is connected to the network.
- What kind of policy does USP NAS provide?
- Is it possible to apply different policies for different locations?
- Is it possible to apply different policies for different endpoint types?
- Are there best practices for policy rollout?
- How does the policy management work?
- How can I configure the system so that no device is blocked?
- Are changes to the rule set or the operating mode activated instantly?
- Is it possible to disable the control of the network?
What kind of policy does USP NAS provide?
USP NAS supports different options how an access decision can be enforced on a port ("Access Control Enforcement").
The applicable option is specified in the global configuration, but can also be overridden locally for individual switches if required.
The following table lists the possible options and their purposes:
| Option | Purpose |
|---|---|
Port shutdown/reject | Unauthorized and unknown endpoints are blocked with a port shutdown (SNMP authentication) or blocked with a RADIUS reject (RADIUS Authentication). Authorized endpoints remain in the VLAN which is preconfigured on the switch port. Blocked ports are only unblocked after the blocking time has elapsed (SNMP Authentication). Addition: The VoIP availability is always guaranteed. VoIP Phones are not blocked. If an unauthorized endpoint is connected to a VoIP phone, then the port is moved into the block VLAN and not blocked with a port shutdown. |
Block VLAN | Unauthorized and unknown endpoints are moved into the block VLAN. Authorized endpoints remain in the VLAN which is configured on the switch. Unblocked ports are reset to the VLAN which was preconfigured on the port before the blocking. The block VLAN can either be a “Public Internet access” or a VLAN without any access. This option has the advantage over the shutdown option that a blocked port is unblocked again as soon as the unknown endpoint is disconnected from the network. Addition: In this option it is possible to use the feature “VoIP Security”. By activating the feature "VoIP Security" unknown VoIP phones are blocked too. |
VLAN assignment | All endpoints are moved into the VLAN which is specified in the corresponding access profile. The VLAN’s will be set immediately after this access control mode has been set, this will occur without other warnings. The productive VLAN will be assigned on every port where endpoints are connected to. The assignment will happen in every policy mode (either ALLOWED, PERMISSIVE or RESTRICTIVE). |
Generic RADIUS Attributes | Generic RADIUS attributes allow specific configurations to be applied for certain end devices when accessing the network. USP NAS supports all attributes defined according to the IEEE standard. The specific available RADIUS attributes depend on the capabilities of the network components (switches, WLAN controllers). Examples of the use of generic RADIUS attributes include setting a specific session timeout or setting a port speed for specific end devices. |
Is it possible to apply different policies for different locations?
It is possible to define different policies for different locations. The basis for this is formed by policy groups, each of which can be assigned a specific access rule. A policy group consists of any grouping of switch ports and WLAN controllers, which can be labeled with a label. This allows locations in particular to be grouped together and provided with a specific policy.
Is it possible to apply different policies for different endpoint types?
The assignment of a policy to a specific endpoint type is done in an access rule. The access rule contains a mapping of endpoint type to access profile. The access profile then contains the definition of which VLAN or which RADIUS attributes should be applied to the end device.
Are there best practices for policy rollout?
A step-by-step approach is usually recommended for policy rollout.
- A pilot area is defined with an isolated policy group consisting of individual network devices (switch/WLAN controller)
- An access rule is created for the pilot policy group which defines the mapping of device types to access profiles.
- The policy is verified in the pilot area.
- After verification, the access rule will then be assigned to additional/larger policy groups.
How does the policy management work?
When endpoint is connected in the network, the Access Control Engine determines the policy valid for this connection point. A policy consists of the operating mode, the access policy (access rule and access profile) and, if necessary, the client security policy (health rule and health profile).
Access Policy
In the access policy, access rules can be used to define which access profile is to be applied to a terminal device connected to a specific connection point in the network.
Access Rule / Access Profile
The access rule defines which access profile is to be used for an endpoint at a specific connection point. An access-profile defines which VLAN will be assigned and whether specific RADIUS attributes have to be sent to the switch for the connecting endpoint. A VLAN is defined in the access profiles for each access type/authentication type respectively (mac-authentication, eap-authentication, no access, remediation access).
How can I configure the system so that no device is blocked?
The operating mode has an effect on the access type. The operating mode specifies whether a failed authentication is enforced (restrictive), not enforced but displayed to the Helpdesk for verification (permissive) or whether the negative access decisions are not enforced at all (allowed).
The operating modes of USP NAS are described in detail in the following table:
| Operating Mode | Description |
|---|---|
ALLOWED | All MAC addresses get access, even if they are not authorized. This mode can be used to passively monitor the network (monitoring mode). |
PERMISSIVE (Not relevant for RADIUS Authentication) | An operator can decide whether the port should be blocked or not respectively to what VLAN it should be moved on connection of an unauthorized endpoint. Access type depends on the decision of the operator. |
RESTRICTIVE | The port is blocked automatically by USP NAS or moved in the quarantine VLAN on connection of an unauthorized endpoint. Access type depends on the authorization of the endpoint and whether the guest flag is set. Additionally, the health state of the endpoint will be checked in case of endpoint compliance. |
Are changes to the rule set or the operating mode activated instantly?
Changes made by the Admin user on the rule set or on the operating mode are implemented in a workspace.
The workspace is a copy of the rule set.
Thus changes on the policy will not affect the current operation.
As soon as the policy has been changed in the WEB-console, a red button Impact analysis will be displayed.
By clicking this button, the changes in the policy workspace may be applied to the productive policy configuration.
Is it possible to disable the control of the network?
The ability to disable the control of the network depends on the type of authentication which is activated. It depends on whether the endpoint authentication is done using SNMP or RADIUS.
Disable network access control using SNMP authentication mode:
When using SNMP authentication, the access control may be disabled just by changing the operation mode from "SYSTEM" to "OFF". There will neither be a communication to the netdevices nor the execution of blocks as long as this mode is set! All endpoints are unblocked if this mode is activated.
Disable network access control using RADIUS authentication mode:
When using RADIUS authentication for access control, the access control has to be disabled on the SWITCHES. To just change the operation mode of USP NAS would have strong impact on the connectivity of the endpoints on the network. In this case the switch still requires an authentication response but the USP NAS would no longer answer to authentication requests in the OFF Mode. Therefore, the only way to disable network authentication is to deactivate RADIUS authentication on the switches.
What ist the purpose of endpoint profiling?
The module offers the possibility of detecting and classifying all end devices in the network. Based on this classification, end devices can be added to the inventory fully automatically or semi-automatically, i.e. after confirmation by an operator.
The access decision for a device can be made via the access policies depending on the classification of the device. This means that the USP Network Authentication System can, for example, automatically recognize a printer, classify it as a printer and place it in the printer VLAN - without manual intervention and without the printer having to be recorded in an inventory.
In addition, attackers who want to gain unauthorized access to the network using MAC Spoofing can be recognized with the help of the profiling and blocked by the USP Network Authentication System.
What is the potential benefit of endpoint profiling?
- Network transparency / reporting: Endpoint profiling increases network transparency by collecting data on the connected end devices, classifying the end devices and creating reports and statistics based on this information.
- Efficient inventory creation: By classifying unknown, non-inventoried enddevices, endpoint profiling can make a major contribution to efficient inventory creation, especially when introducing USP NAS.
- Intrusion Detection und Prevention: Based on an exception list (white list), for example, none-PC devices such as printers, surveillance cameras or IP phones can be moved to corresponding VLANs automatically, i.e. without these devices having to be present in the inventory.
- Automatic inventory: By continuously profiling the connected devices, attacks such as MAC spoofing can be detected and access for these devices can be blocked.
Profiling consists of two parts: collecting profile information and defining profiles. During profiling, a device is then assigned a profile that matches the information it has collected.
The profiling module offers the collection of DHCP fingerprinting information in addition to the information already available in the standard area, such as manufacturer, DNS name, IP address
When profiling is configured, it is possible to enable profile enforcement so that clients that mismatch the profile are blocked.
How to activate the profiling?
To enable the profiling, you first have to enable the Profiling Module and then enable the DHCP listener in the Core configuration → Profiling configuration.
How to extend/configure profiles?
An endpoint profile consists of one or more rules which have matcher types, patterns and weights. Single rules may be added or removed from an endpoint profile.
How to configure DHCP fingerprinting?
In order to receive DHCP fingerprinting of end devices, the USP NAS system’s IP address must be entered as an IP helper on routers so that the USP NAS system receives a copy of the DHCP requests. The USP NAS system will not answer DHCP requests and will only use this to calculate the device’s fingerprint.
USP NAS comes with an integrated Reporting functionality, which covers the evaluation of the collected data using predefined web reports. Depending on the user role, different reports are available. The reports are available in PDF-, CSV- and HTML-format by default.
Reports can be generated using the menu Reporting → Create new report. Depending on the current report, different parameters have to be set to create the report like for example the periode of evaluation.
Additional to the manual generation of the report using the Web GUI, a report can be defined as scheduled report which will be generated periodically. Reports generated by the scheduler will be stored and are available in the Web GUI for displaying and downloading, or they may be sent to any email address or stored on a remote file server.
- What is the purpose of internal certificate management?
- How is the server certificate set up?
- How can the server certificate be renewed?
- What are the requirements for certificate authentication of endpoints?
- How are CA certificates installed for peripheral systems?
- How are CA certificates installed for RADIUS authentication?
What is the purpose of internal certificate management?
The internal certificate management is used to manage the server certificate and CA certificates. The CA certificates are used to authenticate surrounding systems and to check endpoint certificates.
The internal certificate management cannot be used to create endpoint certificates.
How is the server certificate set up?
A server certificate, which is required for the web server (https) and the RADIUS server, is installed on the system by default. In a production environment this should be replaced with a certificate signed by a trusted company CA.
In a first step, you can access the “Regenerate certificate” item under the “Certificate details” of the server certificate. The desired properties for the CSR can be defined there. The CSR can then be copied under “Renew certificate” in order to issue the certificate by the company CA and then store it on the USP NAS.
How can the server certificate be renewed?
Under "Certificate details" of the server certificate, the CSR can be copied under "Renew certificate" in order to issue a new certificate by the company CA and then store it on the USP NAS.
What are the requirements for certificate authentication of endpoints?
To use certificate authentication of endpoints, the following certificate management requirements must be met:
- The server certificate must be issued by a CA which is also present in the trust store of the endpoints.
- All CAs of endpoints that are to authenticate must be stored in the certificate management of USP NAS as CAs using "CA certificate for RADIUS Authentication" type.
How are CA certificates installed for peripheral systems?
A CA certificate for peripheral systems is installed by installing a new CA certificate in the certificate management of USP NAS and then setting the flag "CA certificate for peripheral systems" in the certificate details.
How are CA certificates installed for RADIUS authentication?
A CA certificate for surrounding systems is installed by installing a new CA certificate in the certificate management of USP NAS and then setting the flag "CA certificate for RADIUS" in the certificate details.
How can the overall status of the system be checked?
By clicking the menu entry Status → Status the USP NAS Core Status overview is displayed. The most important USP NAS status information is displayed at a glance on the core status overview. If something is wrong with the hardware, the OS or the USP NAS application, the corresponding status will be shown in red color in the notifications table. The section “Events and NAS tasks” shows for example how many traps were received and the timestamp of the last inventory import. To get more information about the status of USP NAS, the OS or hardware, you can use the other submenus under Stats/Reporting. There you will see the details about the alerts, and the status is displayed in the form of graphs.
Users with the monitoring role have access to the Healthcheck menu. This page will display the Trap handling and the USP NAS daemon status.
Where are the errors displayed?
If there are errors, they will be displayed in the status overview page. The status of Hardware, Operating System or the USP NAS application will turn to red, and you can click on the item to receive more information about the error. From there, you will see a notification table with the error text. You can show the detailed error texts by clicking on the error number.
To be informed by mail, or notify an alarm system in case of an error, you can go to Configuration → Alarming configuration and configure the alarming system for each error.
How can the system be reinstalled after a failure?
If you have a recent backup of the system, you can make a fresh installation of the system as described in "How to install the system?", and after installation restore the backup.
If there is no recent backup available, but you have a second node used for HA you can restore the system with the following steps:
- Install the USP NAS System
- Configure the newly installed system as an authenticator and set the already installed node as a master
- Start an authenticator synchronisation
- Start an authenticator config synchronisation
What to do if a user has no access to the network?
First of all, go into the connection events and find the client using its mac address. Over the Event, there is a tooltip that might give you more information about why the device is blocked or rejected. Possible reasons could be that the endpoint is not registered or not authorized. If you use EAP authentication the endpoint certificate might be invalid or expired. If this does not help you figure out the problem, the connection events table shows you which policy have been applied to the endpoint, check if the expected policy have been applied.
When does an endpoint count as connected?
An endpoint counts as connected to the network if one of the following scenarios applies to it:
- The status is Active
- The status is Connecting
The status is Inactive and
- the corresponding netdevice has been updated no more than 2 hours before the endpoint has.
The status is Disconnected and
- the corresponding access decision is either Blocked, Isolated or Declined
- the endpoints EAP authentication is authorized or unknown
- the endpoint has been updated more recently than the access decision was made
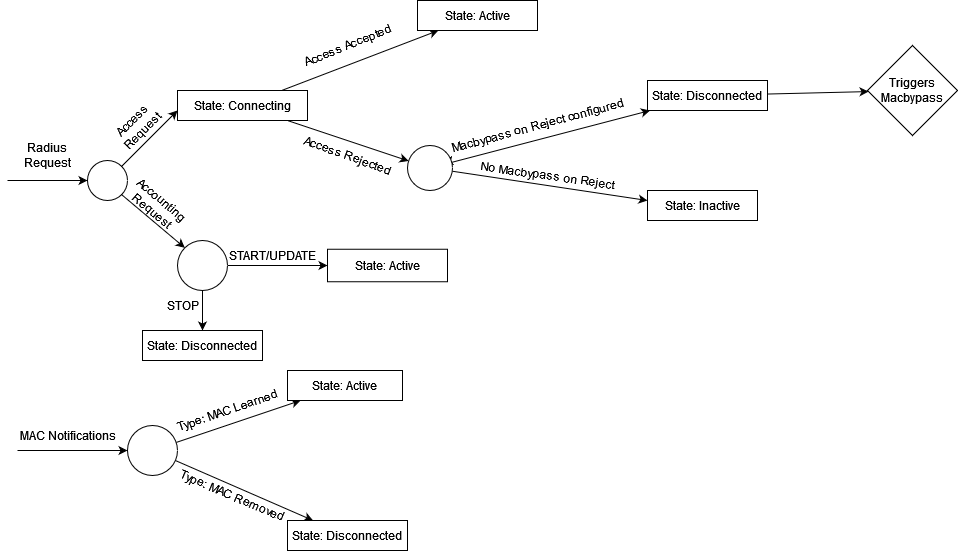
The status will be changed in one of the following events:
To Active if
- the endpoint is found by scanning a Switch
- a MAC notification with operation type MAC Learned is received
- a RADIUS Accounting Request is processed (except when it’s a STOP request)
- a successful RADIUS Authentication could be made
To Disconnected if
- a MAC notification with operation type MAC Removed is received
- a RADIUS Accounting STOP Request has been processed
- if a RADIUS Access Packet is rejected and Mac Bypass on reject is configured
To Connecting if
- a RADIUS Access Packet is received but not yet processed
to Inactive if
- if a RADIUS Access Packet is rejected and Mac Bypass on reject is not configured
What does the authentication time/EAP authentication time of a connection event measure?
The authentication time measures the delay of USP NAS receiving a request for authentication until the subject is correctly placed within USP NAS. For EAP authentication the time used for the request to the external RADIUS Server is excluded. This is measured by the EAP authentication time, specifically the time between the sending of the request packet by USP NAS to the RADIUS Server and the start of the internal authentication by USP NASUSP NAS.
What open-source components are used in USP NAS?
USP NAS is built with the help of various open-source components, which include, among others:
- Angular
- AsciiDoc
- Apache Commons
- Apache Log4j
- Apache Tomcat
- Containerd
- Collectd
- Docker
- FreeRADIUS
- Gentoo Linux
- GnuPG
- Hibernate
- JasperReports
- JUnit
- The Linux Kernel
- Liquibase
- netfilter / iptables
- Netty
- OpenJDK
- OpenLDAP
- OpenSSH
- OpenSSL
- PHP
- PostgreSQL
- RRDtool
- RxJS
- Simple Java Mail
- SNMP4J
- Spring Framework
- syslog-ng